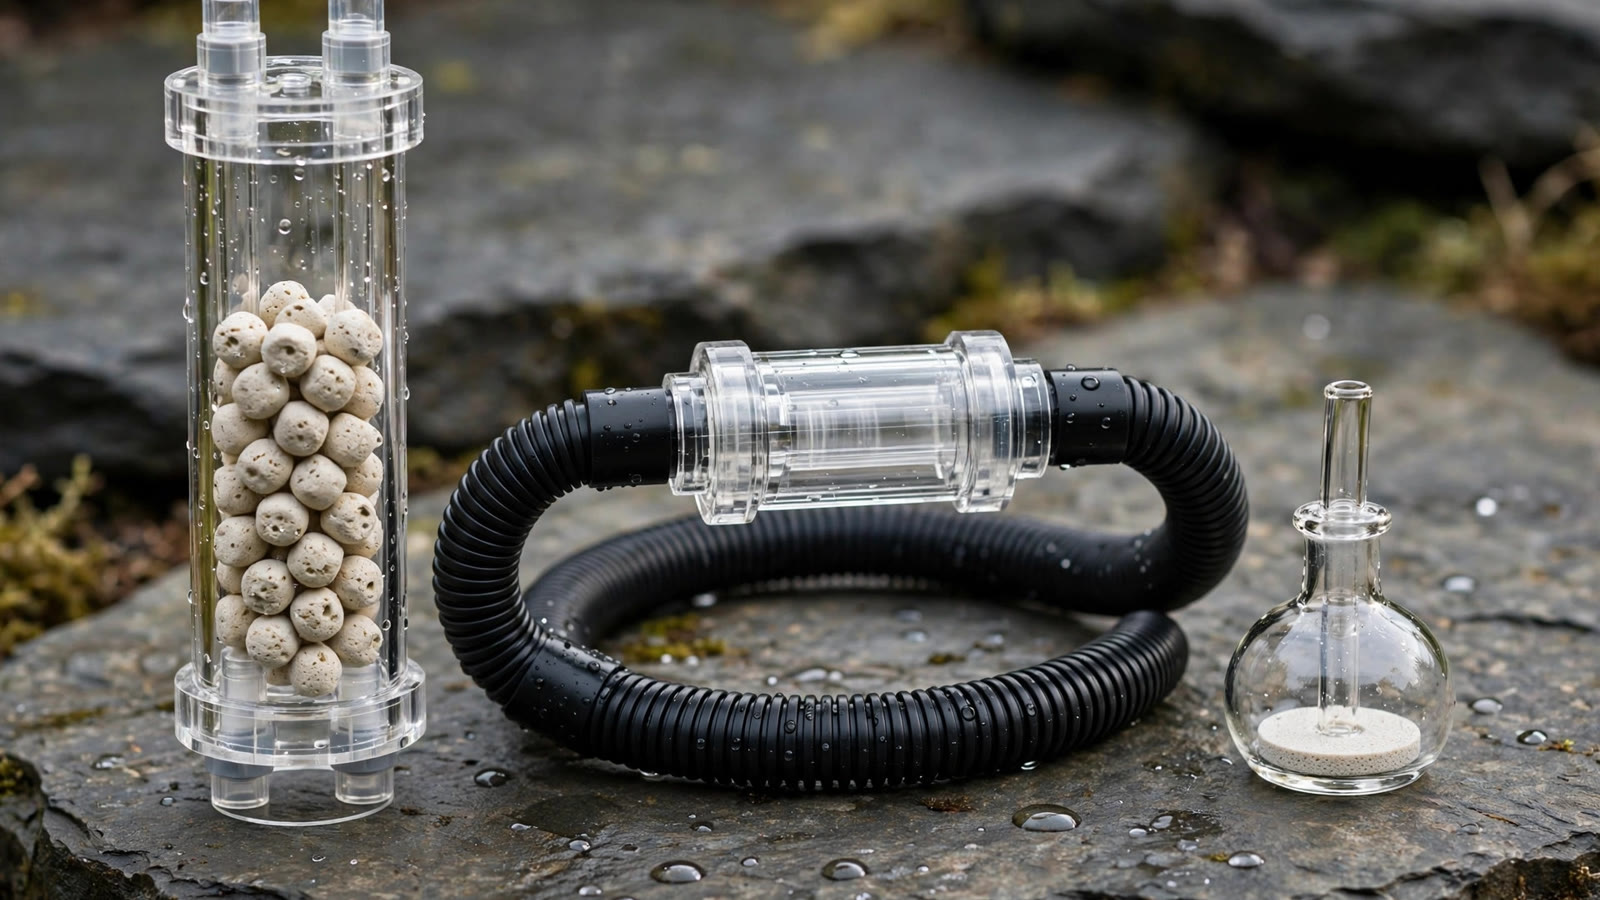
If you have ever searched for the CO2 reactor vs diffuser debate, you know how heated it gets. Every forum thread eventually turns into a loyalty contest: the mist lovers swear by their atomizers, the filter-nerd crowd backs inline diffusers, and the reactor devotees talk about "100% dissolution" like it is a moral virtue. They are all describing the same job — getting carbon dioxide out of a bubble and into your tank water — but they do it with very different machinery. This guide cuts through the tribalism and compares the three methods that matter: in-tank atomizers, inline diffusers, and external CO2 reactors. You will learn how each one actually dissolves CO2, what bubble behavior tells you about efficiency, what each costs to run, which tank sizes each suits, and how to set them up without gassing your fish.
What "dissolving CO2" really means
Before the comparison makes sense, it helps to picture what happens at the surface of a single CO2 bubble. Dissolution is a race between two forces: the bubble's urge to rise to the surface and escape, and the water's ability to pull CO2 across the bubble's surface while it travels. Anything that gives the water more time, more surface area, or more turbulence wins that race. A big bubble rising fast from a coarse airstone is nearly useless — most of the CO2 it carries leaves the tank unused. A swarm of microscopic bubbles suspended in moving water is dramatically more effective, because the combined surface area is enormous and the tiny bubbles rise so slowly that contact time stretches out.
There are two useful ways people describe the end state of CO2 in the tank. Dissolved CO2 is gas that has fully entered the water column and is invisible; plants can absorb it from anywhere, and it is what a drop checker roughly indicates. CO2 mist is fine undissolved microbubbles that drift through the water and physically touch leaves, where they can deliver a concentrated burst of CO2 directly to the plant tissue. Mist is not a gimmick — many hobbyists report faster pearling on plants hit by mist — but it is also not free efficiency. Every bubble that escapes at the surface is CO2 you paid for and never used. That single fact explains the whole argument you are about to read.
The in-tank atomizer
An atomizer is a small glass or metal disc that sits inside the tank, usually near the filter outflow. CO2 is forced through a ceramic membrane at pressure, shattering the gas stream into a visible fog of microbubbles. If you have seen a planted tank with a gentle white haze drifting from a little disc in the corner, you have seen an atomizer at work. A good atomizer produces bubbles far finer than a standard CO2 diffuser, and that fine mist is its whole identity.
Strengths
- Simple to install and move: it is one piece of hardware with a suction cup and a CO2 line. No plumbing changes, no filter surgery.
- Excellent distribution in small to medium tanks: placed in the filter's current, the mist blankets the whole tank and bathes leaves directly, which often produces visible pearling quickly.
- Cheap: most atomizers cost a fraction of a reactor setup, and replacements are easy to find.
Weaknesses
- Wasteful by design: a significant share of the mist reaches the surface and escapes, so you will run a higher bubble rate to reach the same dissolved level as a reactor.
- In-tank hardware: the disc, tubing, and often a small bubble counter clutter the aquascape, and tubing can be a visual eyesore in a styled tank.
- Maintenance: ceramic membranes clog with algae and biofilm. Without regular soaking, bubble size creeps up and efficiency drops.
Atomizers shine on nano tanks and medium setups up to about 30–40 gallons, where the equipment stays out of the way and the waste is small.
The inline diffuser
An inline diffuser is a small chamber plumbed into your canister filter's return hose, outside the tank. Water flowing back toward the aquarium passes a ceramic membrane where CO2 is injected, so microbubbles are mixed into the flow and blasted into the tank by the outflow nozzle. Functionally it is an atomizer that lives in the plumbing instead of in the glass box.
Strengths
- Nothing visible in the tank: the biggest single win for aquascapers — no disc, no tubing, just the outflow you already have.
- Great distribution: mist is delivered exactly where the filter current goes, which is usually right across the plant mass.
- Easy retrofit: if you already run a canister filter, adding an inline unit means cutting one hose section and inserting two clamps.
Weaknesses
- Still produces mist, still wastes some CO2: bubbles are finer than a cheap in-tank diffuser, but undissolved bubbles still escape at the surface.
- Requires a canister filter: no canister, no inline anything. It is a non-starter for hang-on-back or sponge-filter setups.
- Flow sensitivity: on undersized filters the chamber can trap gas pockets and gurgle, or noticeably reduce flow. Matching the diffuser to your filter's hose diameter matters.
Inline diffusers are the default recommendation for medium canister-filtered tanks in the 20–60 gallon range. They give you the mist advantage of an atomizer with a spotless display tank, at the cost of some gas waste you will barely notice.
The external CO2 reactor
A reactor is a chamber — usually mounted inside the cabinet — where CO2 and filter water are mixed long enough that the gas fully dissolves before the water returns to the tank. The classic designs (sometimes called Griggs-style or Cerges-style reactors) are tall tubes where water enters at the top, spins or tumbles downward, and exits with no visible bubbles at all. Done right, the outflow is bubble-free: 100% of the gas you inject dissolves, and the tank water carries it silently everywhere.
Strengths
- Highest gas efficiency: essentially zero waste. On large tanks, the CO2 savings alone can pay for the reactor within a year or two.
- No mist, no equipment in the tank: nothing reaches the surface, nothing clouds the water, nothing sits on the glass.
- Gentle on livestock: because dissolution is complete and steady, CO2 levels rise smoothly rather than in mist-driven spikes, which pairs well with conservative fish-safety practices.
Weaknesses
- Needs real flow: reactors only work if your filter or a dedicated pump pushes enough water through them. On a small filter the chamber just fills with undissolved gas and burps.
- Bulk and cost: the chamber, extra plumbing, and sometimes a second pump cost more up front and eat cabinet space.
- No mist benefit: if your goal is maximum direct leaf contact with microbubbles, a reactor deliberately eliminates that. For most setups dissolved CO2 is plenty, but mist loyalists notice the difference.
Reactors are the answer for large tanks (60+ gallons), multiple-tank systems, or anyone who wants the most CO2 per dollar of refill. They are overkill on a nano tank.
Head-to-head comparison
Here is the short version, with the caveat that setup quality matters more than category — a badly installed reactor will lose to a well-placed atomizer every time.
| Factor | In-tank atomizer | Inline diffuser | External reactor |
|---|---|---|---|
| CO2 efficiency | Moderate — much of the mist escapes | Moderate — fine mist, still some surface loss | Excellent — near-complete dissolution, no visible bubbles |
| Bubble size | Microbubble fog in the tank | Microbubbles delivered via outflow | None visible — fully dissolved |
| Typical cost | Low ($10–30 for the unit) | Medium ($25–60) | High ($50–120+, plus plumbing/pump) |
| Best tank size | Nano to ~40 gallons | 20–60 gallons with a canister filter | 60+ gallons, or multi-tank systems |
| In-tank equipment | Disc + tubing visible | Nothing extra | Nothing extra |
| Flow requirement | Low — position near current | Moderate — needs canister filter | High — needs strong filter or dedicated pump |
| Maintenance | Ceramic disc clogs; soak regularly | Occasional disc cleaning, check hose clamps | Minimal — check for trapped gas, clean rarely |
| Setup difficulty | Easy | Moderate (plumbing cut) | Moderate–advanced |
Which one actually suits your tank?
Nano tanks (under 20 gallons)
Use an in-tank atomizer or a small paintball-style CO2 setup with a quality disc. A reactor is wasted here, and inline diffusers need canisters that nano tanks rarely have. Keep the bubble rate low, watch the drop checker, and keep the mist gentle — small water volumes swing fast, so changes should be gradual.
Medium tanks (20–60 gallons) with a canister filter
This is inline-diffuser territory, and it is where most planted-tank owners should land. You keep the tank clean, distribution rides the filter current, and gas cost stays reasonable. If you already run one CO2 system across multiple tanks, inline units are easy to duplicate per tank.
Large tanks (60+ gallons) and heavy plant loads
Buy or build a reactor. At this scale the difference between "most of the mist escapes" and "nothing escapes" shows up in your refill schedule, and the lack of visible bubbles keeps a big display tank pristine. Pair it with a filter or pump strong enough to keep the chamber tumbling — a weak flow turns a reactor into an expensive gas trap.
The undecided middle ground
If you are upgrading from a basic diffuser and cannot decide, ask one question: do you run a canister filter? Yes → inline diffuser. No, and the tank is big → reactor with a dedicated pump. No, and the tank is small → atomizer. That flowchart resolves about nine out of ten cases.
Setting up and tuning whichever you choose
The method changes; the tuning discipline does not. Follow this sequence and you will avoid the classic beginner disaster of cranking CO2 until the fish gasp.
- Start low and observe. Begin around 1 bubble per second on a 20–40 gallon tank (less on nanos) and hold it for a full day. Check the drop checker after 2–3 hours of CO2-on time and, more importantly, watch your livestock. Slight lethargy or gasping at the surface means back off immediately — this is the conservative, livestock-first rule for all CO2 injection for planted tanks.
- Time it to the lights. Start CO2 1–2 hours before lights-on so dissolved levels are built up when photosynthesis begins, and shut it off about an hour before lights-out. A solenoid on a timer makes this automatic and prevents wasteful overnight injection.
- Give changes time. Adjust by small steps and wait at least a full day between changes. Drop checkers lag by a couple of hours, so chasing the color in real time leads to overshooting.
- Keep surface movement moderate. A gentle ripple oxygenates the water without stripping CO2; a churning surface defeats even a reactor. Read our guide on balancing surface agitation with CO2 if your levels never stabilize.
- Verify with two signals. Use the drop checker and livestock behavior. The checker tells you chemistry; the fish tell you biology. Trust the fish first.
Common mistakes to avoid
- Sizing the method to the tank wrong: atomizers on 100-gallon tanks (endless refills, visible haze) and reactors on 10-gallon nanos (bulky, starved of flow) are both common regrets.
- Ignoring flow: a reactor on a weak filter or an inline diffuser on an undersized canister underperforms badly. Match hardware to your actual turnover.
- Neglecting the ceramic disc: atomizers and inline diffusers both lose efficiency as membranes clog. A quick soak every few weeks keeps bubble size fine.
- Chasing mist as proof of CO2: visible bubbles are not dissolved CO2. A reactor tank with zero bubbles can hold more CO2 than a hazy tank — check the drop checker, not the fog.
If you are still deciding between gas systems at the budget level, our guide to cheap CO2 systems covers what you can safely cut and what you should not.
Frequently Asked Questions
Is a CO2 reactor really more efficient than a diffuser?
Yes, measurably so. A well-built reactor dissolves essentially all the gas it receives, so your bubble rate and cylinder refill schedule drop noticeably compared to mist-based methods. That said, efficiency only matters if your filter flow can drive the reactor — on a tank with weak turnover, an atomizer you maintain properly will outperform a reactor that cannot tumble. Match the tool to your flow first, then chase efficiency.
Can I use an inline diffuser without a canister filter?
Not practically. Inline diffusers are designed to sit in the return hose of a canister filter, and they rely on that pressurized flow to shear CO2 into microbubbles. If you run a hang-on-back or sponge filter, your realistic options are an in-tank atomizer or, for larger tanks, an external reactor on a small dedicated pump. Do not try to force an inline unit onto gravity-fed plumbing — it will trap gas and gurgle.
Do I lose the benefits of CO2 mist with a reactor?
You lose the mist, but mist is a bonus, not the mechanism. Plants primarily take up dissolved CO2 from the water column, and a reactor delivers fully dissolved CO2 uniformly through the filter current. Many high-growth Dutch and nature-style tanks run reactors exclusively. If you want both, some hobbyists run a reactor plus a small atomizer at low rate, but most tanks do not need it.
How often should I clean my atomizer or inline diffuser membrane?
Plan on a soak every 3–6 weeks, more often in algae-prone tanks. A diluted bleach soak followed by thorough rinsing and dechlorination restores ceramic membranes to fine-bubble performance. The warning sign is unmistakable: bubbles get visibly larger and your drop checker takes longer to shift color at the same bubble rate. Reactors need far less attention — just confirm no gas pocket is building up in the chamber.
Which method is safest for sensitive livestock like shrimp?
All three are safe when tuned conservatively, because the danger is the CO2 level, not the hardware. Reactors have a slight edge in practice: fully dissolved, steady CO2 avoids the micro-spikes that mist clouds can create near the injection point, and there is no equipment in the tank for curious shrimp to climb into. Whatever you choose, start low, wait a full day between adjustments, and back off at the first sign of distress.
The bottom line
There is no universal winner in the CO2 reactor vs diffuser argument — only the right tool for your tank. Atomizers win on nano tanks where simplicity matters, inline diffusers win on medium canister-filtered setups where a clean aquascape is the priority, and external reactors win on large or multi-tank systems where gas efficiency pays real money. All three dissolve CO2; they just disagree about how much of it should reach the surface unused. Pick the method that fits your tank size, your filter, and your tolerance for in-tank hardware — then tune it the boring way: start low, watch the drop checker, and let the fish have the final vote. For authoritative background on how CO2 affects plant growth, see Tropica's CO2 guide.
Tissue-culture plants are the exception — they’re grown in sterile gel and adapt with minimal melting, which is part of what you’re paying for. Plants bought submersed from another hobbyist’s tank also transition with little melt, since they’re already in the right form.
Which Plants Melt Most (and Least)
Heavy melters (expect significant leaf loss)
- Cryptocorynes — infamous for “crypt melt,” sometimes dropping every leaf after any disturbance. They almost always recover from the roots within weeks.
- Stem plants grown emersed — rotala, ludwigia, and hygrophila often shed lower emersed leaves while the growing tips transition.
- Amazon swords — emersed-grown swords typically lose their broad oval aerial leaves and replace them with longer submersed ribbon leaves.
Light melters
- Anubias, java fern, bucephalandra — slow-growing rhizome plants transition gradually; occasional old-leaf melt but rarely dramatic.
- Vallisneria — usually transitions well, though it dislikes the move itself and may sulk for a week.
- Floating plants — minimal melt since their leaves were already at the air-water interface.
The Acclimation Protocol
Step 1: Quarantine or dip first
Before acclimating to your tank’s conditions, make sure you’re not acclimating pests along with the plant. Run new arrivals through our quarantine and dip protocol — it adds days upfront but prevents months of regret.
Step 2: Float to temperature-match (30 minutes)
Float the bag or container in your tank for 20–30 minutes to equalize temperature. Plants are less temperature-sensitive than fish, but a 10°F shock on top of transplant stress is an avoidable insult.
Step 3: Trim before planting
Remove any leaves that are already damaged, yellowing, or heavily algae-covered — they won’t recover and they’ll rot in your tank, feeding algae. For stem plants, trim off the bottom inch and any emersed leaves that look unlikely to adapt; the plant wastes energy maintaining leaves it’s going to shed anyway. Keep the healthy growing tips — that’s where recovery starts.
Step 4: Plant correctly the first time
Follow our planting guide — right depth, crown exposed on rosettes, rhizomes unburied on epiphytes. Every uprooting and replanting restarts the acclimation clock, so get placement right on the first attempt. Decide where each plant goes before it goes in the water.
Step 5: Run a gentle first week
For the first 7 days after planting:
- Moderate light — run your normal photoperiod but consider dropping intensity 20–30% if your light is dimmable. Blast-level light on a melting plant grows algae on the dying leaves, not recovery.
- Stable CO2 — if you inject CO2, keep it consistent. Fluctuating CO2 during acclimation is a melt accelerator. If you’re low-tech, this doesn’t apply — see growing without CO2.
- Half-strength fertilizer — new plants with damaged leaves can’t use full dosing, and the excess feeds algae. Ramp to full strength over 2–3 weeks per our fertilizer schedule.
- No disturbance — don’t move, trim, or “check on” new plants for at least two weeks. Every touch resets root establishment. This is especially critical for crypts.
Step 6: Remove melt, keep the base
As emersed leaves melt, remove the mushy material promptly — decaying leaves release ammonia and grow fungus that can spread to healthy tissue. But never discard the plant while the crown, rhizome, or roots are firm and alive. A crypt that’s lost every leaf but has firm roots is a plant that’s about to recover, not a dead plant. Give it 3–4 weeks before judging.
Telling Normal Melt From Real Problems
Normal transition melt:
- Affects oldest/emersed leaves first, newest growth last
- New submersed leaves emerge even as old ones dissolve
- Roots and crown stay firm and white/green
- Timeline: 1–4 weeks, then obvious new growth
Concerning melt (see our full melting diagnosis guide):
- New growth also melts or emerges deformed
- Rhizome or crown turns mushy and brown — this is rot, not transition
- Entire plant dissolves within days with no new growth after 4+ weeks
- Melting spreads to established plants that weren’t recently moved
Buying Tips to Minimize Melt
- Buy submersed-grown when available — hobbyist-grown cuttings transition with almost no melt.
- Choose tissue culture for sensitive species — crypts and delicate stems establish far more reliably from sterile cups.
- Avoid plants already melting in the store tank — some melt is normal, but a plant that’s mostly mush at purchase has less energy for recovery.
- Transport carefully — keep plants damp and out of direct sun/heat. A plant that dries out or cooks in a hot car melts far worse than one transported properly.
The First-Month Timeline: What to Expect Week by Week
Knowing what’s normal when removes most acclimation anxiety. Here’s the typical timeline for a healthy plant adapting to a new tank:
Week 1: The quiet week
Almost nothing visible happens. The plant is growing roots you can’t see and assessing its new environment. Some species (vallisneria, stem plants) may start shedding their lowest leaves. This is normal. Resist the urge to “help” — no moving, no extra fertilizer, no light changes. The most common beginner mistake is intervening during a week when the correct action is nothing.
Week 2: Melt peaks
This is when emersed leaves give up in earnest. Crypts may drop everything; swords shed their broad aerial leaves; stem plants lose lower foliage. It looks catastrophic and it’s usually fine. Keep removing mushy material, keep conditions stable, and watch the crown and growing tips — if those are firm and green, recovery is already underway.
Week 3: The turn
New submersed-adapted leaves emerge — smaller, thinner, often a slightly different shade of green than the emersed foliage. Stem plant tips start growing visibly; crypts push tiny curled leaves from the crown; swords unfurl narrow ribbon leaves. This is the moment most beginners exhale for the first time.
Week 4+: Established
New growth outpaces melt, and the plant is functionally yours. You can resume full-strength fertilizer, normal trimming, and stop treating it as fragile. Some slow growers (anubias, bucephalandra) take 6–8 weeks to show obvious progress — that’s their normal speed, not a problem.
Acclimating Different Plant Formats
Tissue-culture cups
Sterile, pest-free, and already adapted to high-humidity (not emersed) growth — tissue cultures melt the least of any format. Rinse the agar gel off gently (leftover gel rots and feeds fungus), split the portion into small plantlets, and plant per our planting guide. They establish slowly for the first two weeks, then accelerate. No dip needed, minimal acclimation stress — this is the premium experience you’re paying for.
Potted plants
Remove the pot and strip away the rockwool completely — leftover rockwool traps debris and rots. Tease the root mass apart gently; if it’s a dense mat, splitting it into 2–3 smaller portions actually establishes faster than planting one big clump (more growing points, better water flow around roots). Potted plants are usually emersed-grown, so expect the standard 2–4 week melt cycle.
Bare-root / bunched stems
Typically sold as weighted bunches. Remove any bands, foam, or weights, strip the lower leaves, and plant stems individually or in small groups. Bunched stems from the store are often already transitioning — check for new submersed growth at the tips, which tells you the plant is mid-adaptation and will settle quickly.
Hobbyist cuttings
Already submersed-grown and the fastest to establish — often showing new growth within days. The main acclimation factor is water-parameter difference between the two tanks. Float to temperature-match, plant promptly, and they’ll usually take off with minimal melt. This is why experienced hobbyists prefer trading cuttings over buying potted plants.
Frequently Asked Questions
Should I use a “plant starter” or transplant fertilizer?
Products marketed for transplant shock are mostly B-vitamins and mild hormones. They don’t hurt, but there’s no strong evidence they help aquarium plants specifically. Stable conditions and patience outperform any bottle. Save the money for more plants.
My new plant melted completely — bare crown, no leaves. Is it dead?
Probably not, if the crown or rhizome is firm. Crypts and swords routinely lose 100% of their leaves and regrow from the base within a month. The test is firmness: firm and pale/green means alive; mushy and brown/black means rot. Give firm-but-leafless plants a full 4 weeks before declaring them dead.
Can I speed up acclimation with extra light or CO2?
No — and trying usually backfires. A melting plant can’t use extra light; the excess just grows algae on its dying leaves. Keep light moderate and CO2 stable (not boosted) during acclimation. Growth speed comes from the plant’s own adaptation timeline, which you can’t rush, only avoid delaying.
Should new plants go straight into my main display tank?
After quarantine/dipping, yes — there’s no benefit to a separate “growing-in” tank for most plants. They acclimate to your water fastest in the tank they’ll live in. The exception is very delicate species going into a tank with boisterous fish; give those a few weeks in a calm corner or breeder box first.
The Patience Rule
The single most important acclimation skill is restraint: plant it right, set gentle conditions, remove decay, and then leave it alone for a month. The hobbyists with the best plant growth aren’t doing something clever in week one — they’re simply not interfering in weeks two through four while the plants do what they’ve evolved to do. Melt looks like failure and feels like failure, but in most cases it’s the visible part of a plant successfully becoming yours.