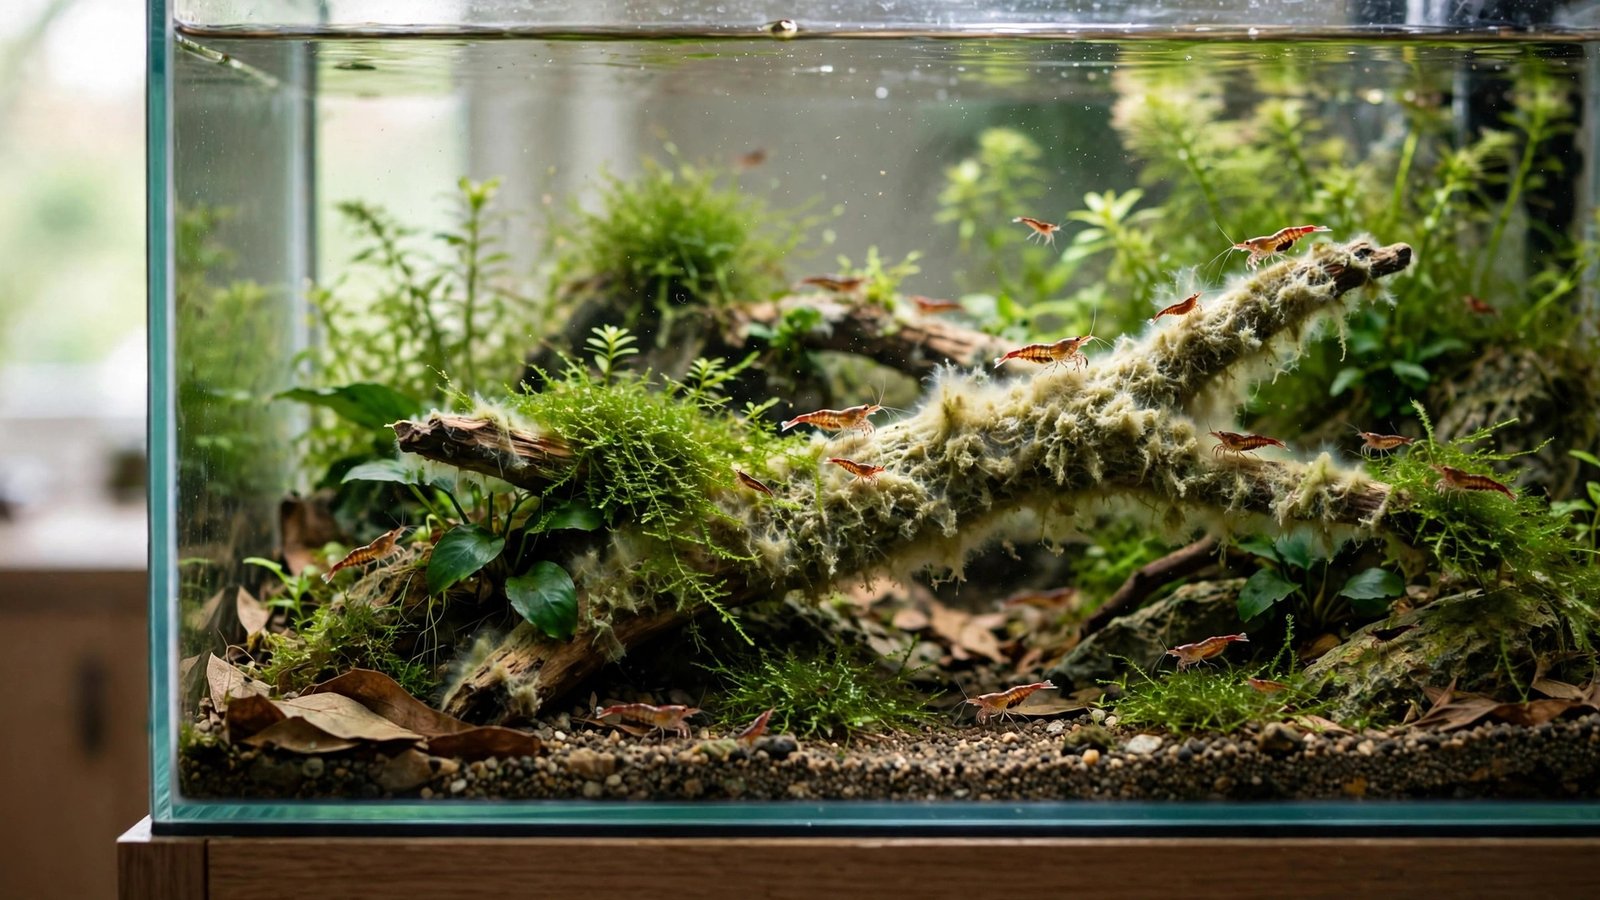
If you want to breed cherry shrimp — or keep any dwarf shrimp species thriving — learning how to grow biofilm for shrimp is the single most useful skill you can develop. Biofilm is the thin, slippery coating of bacteria, microalgae, fungi, and microscopic organisms that forms on every submerged surface in a healthy tank. To adult shrimp it is a snack; to newborn shrimplets, it is survival. Baby shrimp hatch too small to compete for regular food, so they graze biofilm almost exclusively for their first days of life. A tank with rich biofilm and a tank without it are, functionally, two different worlds for shrimp.
This guide walks you through what biofilm actually is, how to cultivate it on purpose, how long a new tank needs to season before shrimp arrive, and the common mistakes that wipe it out. No guesswork — just the practical steps working shrimp keepers use.
What Is Biofilm, and Why Do Shrimp Need It?
Biofilm is a living mat of microorganisms that coats any surface submerged in water: glass, substrate, rocks, driftwood, and especially plant leaves. It begins as a film of bacteria, then layers in microalgae, fungi, protozoa, and tiny infusoria as it matures. You can usually see it as a faint milky haze on fresh wood or a slippery, nearly invisible slick on glass.
Shrimp are grazing animals. In the wild, Neocaridina and Caridina species spend their days picking at this layer with their tiny feeding appendages. Pellets and powdered food supplement the diet, but biofilm is the continuous, always-available base of it. That matters most for shrimplets: a newborn cherry shrimp is about 1 mm long and cannot fight adults for a pellet. It needs a surface it can sit on and graze in peace — and that surface must already have food on it when the babies arrive.
A heavily grazed, well-established tank produces higher shrimplet survival rates, faster growth, and more frequent berried females. If your shrimp breed but the babies never seem to survive, a biofilm deficit is one of the most likely causes.
How Biofilm Forms in a Planted Shrimp Tank
Biofilm forms on its own whenever water, surfaces, and a food source for bacteria coexist. Ammonia and organic waste feed the bacteria; light feeds the algae component. A planted tank is naturally ideal because plants provide enormous surface area and oxygen, which accelerates bacterial colonization.
The process follows a predictable sequence:
- Days 1–7: A milky bacterial haze forms on the newest, richest organic surfaces (especially fresh driftwood). This is the first visible sign of colonization.
- Weeks 2–3: The haze settles and spreads. Glass feels faintly slippery. Microalgae begin tinting surfaces green or brown at the microscopic level.
- Weeks 4–8: The biofilm matures into a multi-layered mat. It becomes genuinely nutritious — this is the point where shrimplets can survive on it.
- Months 3+: The tank's surfaces carry a stable, self-sustaining film that shrimp graze down and regrows continuously.
The milky phase on new wood looks alarming to beginners, but it is harmless. Leave it — your shrimp and snails will graze it off once the tank is stocked. It is a sign the process is working, not a problem to fix.
How to Grow Biofilm for Shrimp on Purpose
You don't have to wait passively for biofilm to develop. Every surface in the tank is potential grazing land, and you can manage the tank to maximize it. The goal is more colonizable surface area, more organic food for microbes, and enough time before shrimp arrive.
Maximize Grazing Surface Area
Biofilm grows on surfaces, so the tank with more surface area wins. A bare glass box with gravel grows very little; a planted tank with wood and porous rock grows enormously more.
- Live plants are the best surface of all. Fine-leaved stems and mosses — Java moss, pearl weed, rotala — create vast grazing meadows. Dense planting is the single fastest way to boost biofilm.
- Driftwood leaches organics and grows heavy early biofilm. Mopani and spider wood are shrimp-keeper favorites.
- Porous rocks like lava rock or seiryu stone give bacteria endless tiny crevices.
- Sponge filters pull double duty: gentle filtration that won't suck up shrimplets, and a sponge is one of the most biofilm-rich surfaces in the tank.
If you're setting up a dedicated shrimp tank, read our planted shrimp tank setup guide for a stocking-and-hardscape plan built around this principle.
Use Botanicals and Leaves
Dried botanicals — Indian almond (catappa) leaves, guava leaves, alder cones, seed pods — are a biofilm superfood. As they slowly decompose, they feed bacterial colonies directly, and shrimp graze the softening leaf surfaces for days.
- Add 1–2 catappa leaves per 10 gallons, replaced as they fully decompose.
- Alder cones (2–3 per 10 gallons) do the same job in a smaller footprint.
- Let spent leaves fully break down in the tank rather than removing them — the skeletonized remains are grazing hotspots.
Botanicals also release mild tannins, which have gentle antimicrobial properties that benefit shrimp without harming biofilm. This is one of the reasons wild-collected leaves beat plastic substitutes.
Season a New Tank Before Adding Shrimp
This is the step beginners skip, and it is the one that costs them shrimplets. A tank that has finished its nitrogen cycle may read 0 ammonia — but it is still "new" in biological terms. The cycling process for a planted tank establishes nitrifying bacteria; the seasoning phase after that builds the broader biofilm community that actually feeds shrimp.
After cycling completes, run the tank for another 3–4 weeks with plants, botanicals, and a light feeding routine (a pinch of food every few days, or a small snail crew) to build grazing biofilm before the first shrimp go in. Many experienced keepers age a tank 6–8 weeks total before adding Caridina species, which are less forgiving than cherry shrimp.
Feed the Biofilm, Not Just the Shrimp
Once shrimp are in, you can keep biofilm production ahead of grazing with small additions:
- Shrimp-specific powdered foods (bacter AE–style products) are designed to disperse through the water and feed biofilm organisms directly. Use them sparingly — a fraction of the label dose — because overfeeding pollutes the water faster than it feeds the film.
- Blanched vegetables (zucchini, spinach, mulberry leaves) left for 12–24 hours grow a fresh film that shrimp attack enthusiastically.
- Regular feeding of your shrimp leaves uneaten particles that seed new colonization — a lightly, consistently fed tank outgrows a starved one in biofilm.
Timeline: How Long Before Adding Shrimp?
The honest answer depends on your setup and your shrimp species. Use this table as a baseline:
| Setup | Minimum wait | Ideal wait |
|---|---|---|
| Heavily planted tank, wood + botanicals, seeded filter media from an established tank | 3 weeks post-cycle | 5–6 weeks |
| Heavily planted tank, all new materials | 4 weeks post-cycle | 6–8 weeks |
| Sparsely planted or new nano tank for cherry shrimp | 4 weeks post-cycle | 6+ weeks |
| Tank for Caridina (crystal red/black shrimp) | 6 weeks post-cycle | 8–10 weeks |
The test is not the calendar — it's the glass. If the tank glass feels slippery to a clean fingertip, wood shows a healthy film, and botanicals are visibly softening, the grazing is ready. For a dedicated breeding project, plan the tank around plants for a shrimp breeding tank from day one so the biofilm infrastructure is in place before the first berried female arrives.
Biofilm Boosters: What Works and What's Hype
The hobby has developed several ways to accelerate or supplement biofilm. Here is how they actually stack up.
- Powdered biofilm foods (e.g., bacter AE–type products): Work. They feed the microbial layer directly. Risk is overdosing — start at half the label dose, once or twice weekly, and watch water clarity.
- Seeded media from an established tank: Works best of all. Moving a handful of substrate, a piece of filter sponge, or a rock from a healthy older tank imports mature biofilm instantly.
- "Biofilm plates" and mineral grazing stones: Useful as supplemental grazing stations, especially in bare breeding tanks. They are not a substitute for a seasoned tank.
- Bottled "biofilm in a bottle" products: Mostly hype. Biofilm is a living, surface-attached community; it does not survive meaningfully in a bottle. Spend the money on botanicals instead.
- Beneficial bacteria starters: Help with the nitrogen cycle but do not create grazing biofilm by themselves. Our guide to beneficial bacteria in planted tanks explains the difference between cycle bacteria and the broader biofilm community.
Mistakes That Kill Biofilm
Growing biofilm is only half the job — the other half is not destroying it. These are the most common ways keepers wipe out the food their shrimp depend on.
Over-cleaning the Tank
Scrubbing every surface spotless, siphoning the substrate aggressively, and rinsing filter media in tap water (chlorine kills bacteria on contact) all reset biofilm to zero. Clean the front glass for viewing, but leave the back and sides for the shrimp. Rinse filter sponges only in old tank water, and never all the media at once.
Over-medicating
Antibacterial and many antiparasitic medications kill biofilm alongside pathogens. If you must treat a shrimp tank, expect a biofilm crash and feed powdered foods more generously during recovery. Prevention — stable parameters, quarantine of new stock — is always cheaper than treatment.
Starving the Tank
A tank with zero feeding grows zero biofilm. Shrimp-only tanks with tiny populations and near-zero feeding can actually be biofilm-poor, which is why even small colonies need a consistent light feeding routine and botanicals on rotation.
Algae "Solutions" That Nuke Everything
Algaecides and hydrogen peroxide spot-treatments kill biofilm organisms indiscriminately. Shrimp tanks should manage algae with balance — light duration, plant mass, and a proper cleanup crew for planted tanks — not chemical warfare. And when choosing helpers, make sure your algae eaters are shrimp-safe: some "algae eaters" will happily eat shrimplets too.
Signs Your Biofilm Is Working
You don't need a microscope to confirm success. Watch for these:
- Shrimp graze constantly instead of clustering at feeding time. Happy shrimp are spread across the tank, picking at surfaces.
- Berried females carry eggs to term and babies appear regularly.
- Shrimplets survive — you see tiny juveniles growing week over week, not just hatchlings that vanish.
- Surfaces feel slippery and botanicals decompose steadily.
- Water stays stable with minimal intervention — mature biofilm is part of the tank's waste-processing engine.
If your colony is established but breeding has stalled, add more plants, drop in fresh botanicals, and check whether an overzealous cleaning routine has been stripping the grazing surfaces bare.
Biofilm in the Shrimp Tank Ecosystem
Biofilm is not a standalone trick — it is one part of a balanced planted system. Dense planting feeds the film with oxygen and surface area. A gentle sponge filter hosts it without endangering babies. Botanicals feed it directly. Light feeding sustains it. Get these right and the tank starts to run itself: waste becomes biofilm, biofilm becomes shrimp, shrimp waste feeds the plants, and the cycle tightens.
For keepers ready to go deeper, pairing a biofilm-rich tank with the right night aeration strategy for planted tanks keeps oxygen — and therefore bacterial activity — high around the clock. And if stem plants are part of your scape, watch for stem rot in aquarium plants, which can dump sudden organic loads that destabilize the very biofilm you've built.
Frequently Asked Questions
How long does it take to grow biofilm for shrimp?
Visible bacterial film appears within 1–2 weeks on new surfaces like driftwood, but grazing-quality biofilm — the mature, multi-layered mat that sustains shrimplets — takes 4–8 weeks after the nitrogen cycle completes. Seed a new tank with media, substrate, or botanicals from an established tank to shorten this significantly, and always confirm surfaces feel slippery before adding shrimp.
Can I add shrimp to a tank with no biofilm?
Adult cherry shrimp can survive in a freshly cycled tank if you feed them directly, but they won't thrive and any babies they produce will almost certainly starve. Shrimplets depend on grazing biofilm from day one. Season the tank for at least 3–4 weeks post-cycle with plants and botanicals before adding shrimp if you want breeding success.
Is the white fuzzy stuff on my driftwood dangerous?
No — that white or translucent fuzz is a harmless bacterial bloom, the first stage of biofilm colonization on fresh wood. It looks alarming but is completely safe for shrimp and fish. Leave it alone; shrimp, snails, and otocinclus will graze it off within a few weeks as the film matures.
What is the best food to grow biofilm in a shrimp tank?
Dried botanicals like Indian almond leaves and alder cones are the best long-term biofilm food because they decompose slowly and feed bacteria for weeks. Powdered biofilm products used sparingly accelerate growth. Avoid dumping excess powdered food — overfeeding pollutes water far faster than it builds film, so start at half the label dose.
Does biofilm replace regular shrimp food?
No. Biofilm is the dietary foundation, especially for shrimplets, but adult shrimp still benefit from a varied diet of quality shrimp pellets, blanched vegetables, and occasional protein. Think of biofilm as the constant base layer and prepared foods as supplements that fill nutritional gaps and support breeding condition.
Will snails compete with shrimp for biofilm?
Snails graze the same surfaces, but in a well-seasoned planted tank there is more than enough biofilm for both — and their waste actually feeds further bacterial growth. Small snail species like ramshorns and Malaysian trumpet snails make excellent companions. Just avoid overstocking any single grazer and keep botanicals in rotation.
The Habit That Feeds Your Shrimp
Growing biofilm for shrimp is less a technique than a habit of mind: build the tank for surfaces, feed the invisible layer, give it time, and then resist the urge to scrub it all away. Do that, and your shrimp will do what healthy shrimp do — graze, breed, and multiply — on food you never have to buy.