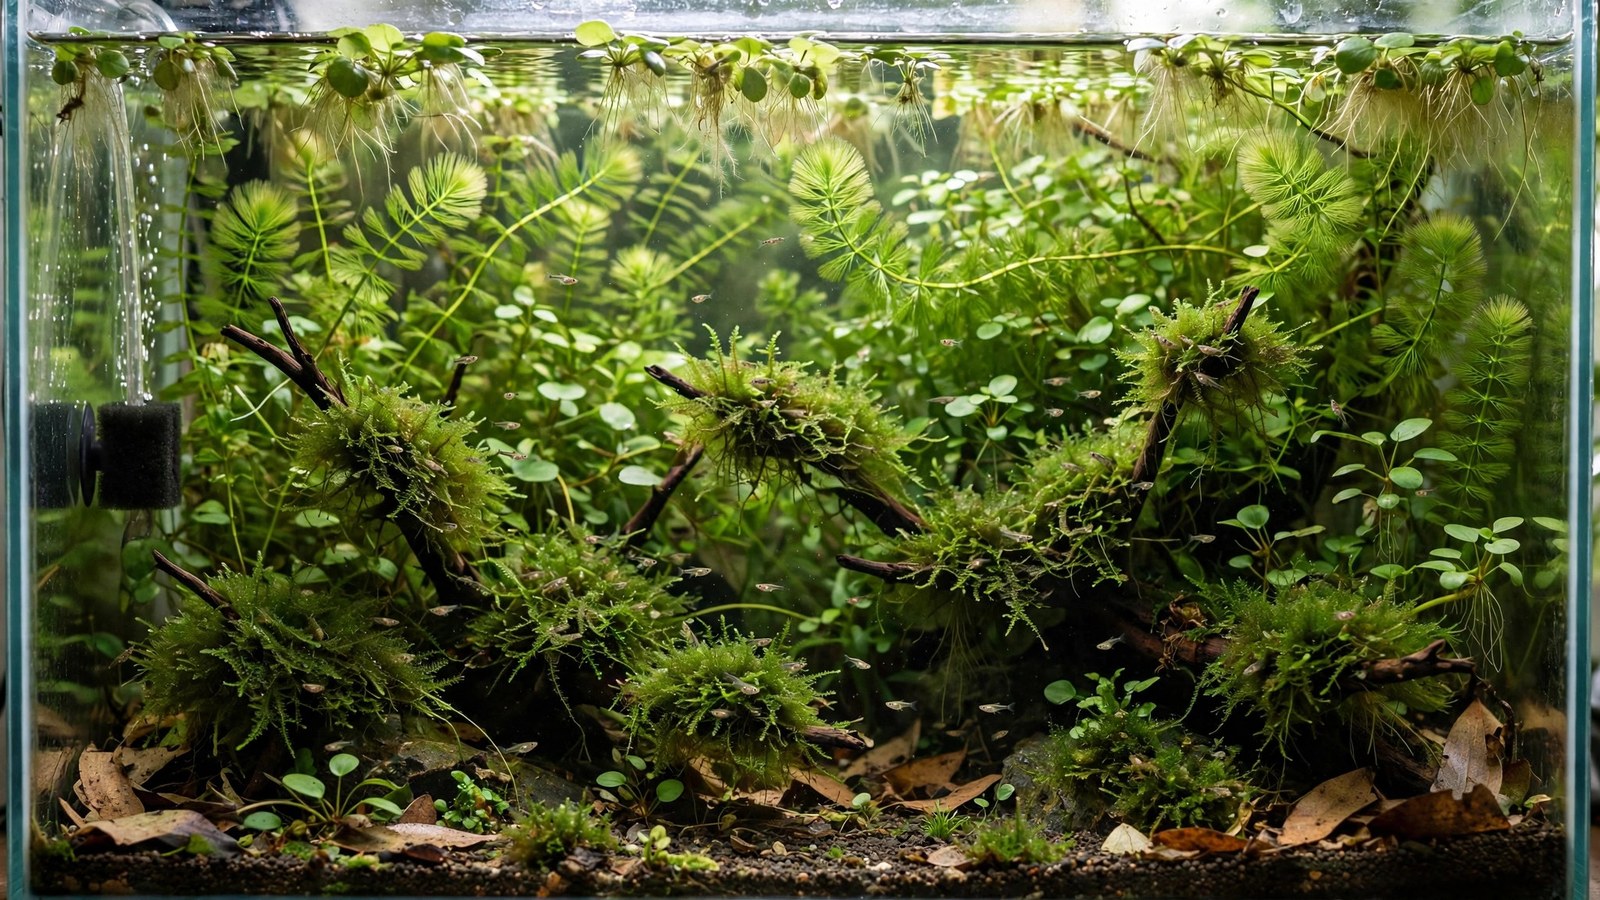
Most fry die in bare breeding tanks — eaten by parents, stressed by open water, or starved for the microscopic food that bare glass can't provide. A planted breeding tank flips every one of those disadvantages: dense vegetation hides fry from predators (including their parents), grows the infusoria and biofilm newborns feed on, and stabilizes the water chemistry that fragile fry demand. If you're serious about raising fish, plants aren't decoration — they're infrastructure.
Why Breeders Plant: The Three Jobs
Plants in breeding tanks do three critical jobs that equipment can't:
- Refuge: fine-leaved density that fry vanish into — the difference between 5% and 80% survival in livebearer colonies.
- First food: biofilm, infusoria, and microfauna colonize plant surfaces within days; newborn fry graze continuously before they're big enough for prepared foods.
- Water stability: plants absorb the ammonia spikes that kill fry at concentrations adult fish tolerate, and smooth the chemistry swings of frequent feeding.
Breeding Tank Basics
A dedicated breeding tank is separate from the display — 10–20 gallons for most species, bare enough to manage but planted enough to function:
- Size: 10 gallons for small species (guppies, shrimp, nano fish); 20-long for cichlids, angelfish pairs, or larger spawns. Our 10-gallon setup and 20-gallon setup cover the hardware.
- Filtration: sponge filter — the only safe choice. Gentle, fry-proof, and grows grazing biofilm. Run it for weeks before breeding so the sponge matures.
- Heater: adjustable, sized to the tank; stable temperature triggers spawning in many species.
- Substrate: thin sand or bare bottom for egg-scatterers you want to siphon (bare makes fry and eggs visible); planted substrate for colony breeding. Match to the method below.
- Lid: fry tanks evaporate fast; lids also prevent jumping during spawning chases.
Breeding Methods and Their Planting
Livebearers (guppies, platies, mollies, swordtails)
The easiest breeding in the hobby — and plants do most of the work. Dense fine-leaved cover (guppy grass, hornwort, java moss) throughout the tank lets a self-sustaining colony run indefinitely: adults drop fry monthly, plants hide them, survivors join the colony. Our planted guppy tank setup is the complete colony-breeding guide. For maximum fry yield, move pregnant females to a planted birthing tank and return them after the drop.
Egg-scatterers (tetras, rasboras, danios, barbs)
Scatter adhesive eggs among fine plants at dawn, then eat them enthusiastically. The planted method: a spawning tank with java moss mats or spawning mops covering the bottom, conditioned breeders added in the evening, spawning at dawn, parents removed immediately after. Eggs hatch in the moss; fry feed on the infusoria blooming through it. Key plants: java moss (the universal spawning medium), guppy grass, hornwort. Dim the tank — most scatterer eggs are light-sensitive.
Bubble-nesters (bettas, gouramis)
Males build foam nests at the surface and guard eggs. Plants serve as nest anchors and female refuge: floating plants (frogbit, water lettuce) give the male nest-building material and shelter; dense submerged planting gives the female escape routes from the aggressive male. Our planted betta tank setup covers the species' needs; our floating plant guide lists nest-friendly species. Remove the female after spawning; remove the male after fry are free-swimming.
Cichlids (angelfish, discus, apistogramma, rams)
Substrate or cave spawners with parental care. Plants provide spawning surfaces and territory structure: broad Amazon sword leaves for angelfish eggs (our angelfish setup details it), flat stones and caves for apistogramma, dense plant boundaries that let pairs define territories. Java fern and anubias on wood give cover without disturbing the bottom the parents are guarding.
Shrimp (neocaridina, caridina)
The colony model: dense moss, fine plants, and leaf litter in a species tank, and the colony manages itself. Our planted shrimp tank setup is the definitive guide — moss density is the entire breeding strategy.
The Breeding Plant List
- Java moss / Christmas moss — the universal breeding plant: spawning medium, fry refuge, infusoria farm. Every breeding tank needs moss.
- Guppy grass — fine, fast, dense; the livebearer colony's backbone.
- Hornwort — floating or planted; fry shelter plus nitrate absorption for heavily-fed fry tanks.
- Water sprite — floating root tangles that newborn fry inhabit; also a spawning mop substitute.
- Subwassertang / susswassertang — liverwort balls of fry cover; slow but permanent.
- Floating plants — frogbit, salvinia, duckweed (in breeding tanks, duckweed's downsides don't matter): surface cover that calms breeders and shelters fry.
- Amazon swords — spawning slates for angelfish; broad-leaf structure.
- Anubias / java fern on wood — permanent structure that never needs replanting between spawns.
Conditioning Breeders
Breeding starts weeks before spawning — with conditioning: feeding breeders heavily on high-quality live and frozen foods (bloodworms, brine shrimp, daphnia) to bring them into spawning condition. Well-conditioned females are visibly plump; males color up intensely. In a planted tank, conditioning is easier — the environment already reduces stress, and natural microfauna supplements prepared foods.
Trigger spawning with the species' cues: large water changes with slightly cooler water (simulates rain) for tetras and corys; raised temperature for discus; dawn light increase for scatterers; simply putting a conditioned pair together for cichlids. Plants make the tank ready; the trigger starts the event.
Raising Fry in Planted Tanks
First foods (the critical week)
Newborn fry need food smaller than you can see: infusoria, green water, and biofilm — all abundant on plant surfaces in a mature planted tank. Supplement with:
- Powdered fry food / egg yolk paste — in tiny amounts, 3–4 times daily
- Newly hatched baby brine shrimp — the gold standard once fry are large enough (day 3–7 depending on species)
- Vinegar eels, microworms — for the smallest fry (betta, tetra)
- Crushed flake powder — as fry grow
Feed small amounts constantly rather than large meals — fry stomachs are tiny and fouling kills faster than hunger. In a mature planted tank, the biofilm baseline means fry never truly starve between feedings.
Water quality for fry
Fry need pristine water and frequent feeding — a combination that demands small, frequent water changes: 10–15% daily or every other day, siphoned carefully (use airline tubing, not a gravel vac — fry get siphoned). Match temperature precisely; fry die from change shock that adults shrug off. Plants buffer the chemistry between changes.
Grow-Out: When Fry Outgrow the Breeding Tank
Move fry to a larger planted grow-out tank once they're too big for parents' mouths but still small — typically 4–8 weeks. The grow-out is a simple planted tank: sponge filter, dense fast growers (hornwort, guppy grass), heavy feeding, big water changes. Our 20-gallon setup makes an ideal grow-out.
Grade as they grow: separate the largest (they'll cannibalize the smallest in many species), cull deformities early (hard but necessary for line breeding), and don't overcrowd — stunting from crowding is permanent.
Maintenance of Breeding Tanks
- Daily: feed fry 3–4 times; remove uneaten food; check temperature.
- Every other day: 10–15% water change with matched water.
- Weekly: trim fast growers (but never strip cover while fry are small); rinse sponge filter gently in tank water.
- Between spawns: rest the breeders — return them to the display tank, let the breeding tank's plants recover, reset.
Frequently Asked Questions
How do I stop parents from eating the fry?
Dense plants are the primary defense — fry that can vanish into moss and guppy grass survive at far higher rates. For maximum yield, remove parents immediately after spawning (egg-scatterers) or after fry are free-swimming (bubble-nesters). For livebearers, a planted colony tank reaches equilibrium: enough fry survive to sustain the colony, enough get eaten to prevent overpopulation.
Why did my fry all die in the first week?
The big three: starvation (no infusoria-sized food — the planted tank's biofilm usually prevents this), water quality (ammonia from heavy feeding in an immature tank), or temperature shock during water changes. Review feeding size/frequency, test ammonia daily during the fry stage, and match change water precisely. First-week losses are the breeder's tuition; each spawn teaches.
Can I breed fish in my display planted tank?
Many species breed spontaneously in well-planted displays — livebearers, shrimp, and some cichlids raise fry in community tanks with plant cover. Survival rates are lower than dedicated breeding tanks (predation), but it's zero extra work. Our guppy setup and jungle build both produce surprise fry regularly.
How many fry should I expect to raise?
Species-dependent and method-dependent: livebearer colonies produce dozens monthly with minimal intervention; egg-scatterer spawns yield 50–200+ with dedicated rearing; angelfish pairs produce hundreds per spawn. Plan the endpoint before you start — grow-out space, rehoming, store trade-ins. Successful breeding creates a fish surplus; that's the point, but have the plan.
Do I need separate tanks for breeding?
For serious results, yes — a dedicated breeding tank lets you control parents, protect eggs, feed fry intensively, and manage water quality without display-tank compromises. For casual colony breeding (guppies, shrimp), the planted display tank suffices. Match the infrastructure to your ambition.
When can fry join the main tank?
When they're too large to be eaten — typically 3/4 to 1 inch depending on the tankmates, usually 2–3 months of grow-out. Introduce them in groups (not singly — a lone juvenile gets bullied), after the main tank's lights have been off for an hour, and feed the main tank first so residents are distracted.
The Breeding Tank Payoff
Raising fish from eggs to adults in a planted tank is the hobby's deepest satisfaction — watching fry emerge from the moss you planted, graze the biofilm you grew, and mature into fish you created. The plants make it possible: refuge, first food, and stability, all from vegetation. Set up the breeding tank, condition your breeders, and let the oldest cycle in nature run in your living room.
For wild breeding-behavior context, see SeriouslyFish’s guppy species profile.
Tissue-culture plants are the exception — they’re grown in sterile gel and adapt with minimal melting, which is part of what you’re paying for. Plants bought submersed from another hobbyist’s tank also transition with little melt, since they’re already in the right form.
Which Plants Melt Most (and Least)
Heavy melters (expect significant leaf loss)
- Cryptocorynes — infamous for “crypt melt,” sometimes dropping every leaf after any disturbance. They almost always recover from the roots within weeks.
- Stem plants grown emersed — rotala, ludwigia, and hygrophila often shed lower emersed leaves while the growing tips transition.
- Amazon swords — emersed-grown swords typically lose their broad oval aerial leaves and replace them with longer submersed ribbon leaves.
Light melters
- Anubias, java fern, bucephalandra — slow-growing rhizome plants transition gradually; occasional old-leaf melt but rarely dramatic.
- Vallisneria — usually transitions well, though it dislikes the move itself and may sulk for a week.
- Floating plants — minimal melt since their leaves were already at the air-water interface.
The Acclimation Protocol
Step 1: Quarantine or dip first
Before acclimating to your tank’s conditions, make sure you’re not acclimating pests along with the plant. Run new arrivals through our quarantine and dip protocol — it adds days upfront but prevents months of regret.
Step 2: Float to temperature-match (30 minutes)
Float the bag or container in your tank for 20–30 minutes to equalize temperature. Plants are less temperature-sensitive than fish, but a 10°F shock on top of transplant stress is an avoidable insult.
Step 3: Trim before planting
Remove any leaves that are already damaged, yellowing, or heavily algae-covered — they won’t recover and they’ll rot in your tank, feeding algae. For stem plants, trim off the bottom inch and any emersed leaves that look unlikely to adapt; the plant wastes energy maintaining leaves it’s going to shed anyway. Keep the healthy growing tips — that’s where recovery starts.
Step 4: Plant correctly the first time
Follow our planting guide — right depth, crown exposed on rosettes, rhizomes unburied on epiphytes. Every uprooting and replanting restarts the acclimation clock, so get placement right on the first attempt. Decide where each plant goes before it goes in the water.
Step 5: Run a gentle first week
For the first 7 days after planting:
- Moderate light — run your normal photoperiod but consider dropping intensity 20–30% if your light is dimmable. Blast-level light on a melting plant grows algae on the dying leaves, not recovery.
- Stable CO2 — if you inject CO2, keep it consistent. Fluctuating CO2 during acclimation is a melt accelerator. If you’re low-tech, this doesn’t apply — see growing without CO2.
- Half-strength fertilizer — new plants with damaged leaves can’t use full dosing, and the excess feeds algae. Ramp to full strength over 2–3 weeks per our fertilizer schedule.
- No disturbance — don’t move, trim, or “check on” new plants for at least two weeks. Every touch resets root establishment. This is especially critical for crypts.
Step 6: Remove melt, keep the base
As emersed leaves melt, remove the mushy material promptly — decaying leaves release ammonia and grow fungus that can spread to healthy tissue. But never discard the plant while the crown, rhizome, or roots are firm and alive. A crypt that’s lost every leaf but has firm roots is a plant that’s about to recover, not a dead plant. Give it 3–4 weeks before judging.
Telling Normal Melt From Real Problems
Normal transition melt:
- Affects oldest/emersed leaves first, newest growth last
- New submersed leaves emerge even as old ones dissolve
- Roots and crown stay firm and white/green
- Timeline: 1–4 weeks, then obvious new growth
Concerning melt (see our full melting diagnosis guide):
- New growth also melts or emerges deformed
- Rhizome or crown turns mushy and brown — this is rot, not transition
- Entire plant dissolves within days with no new growth after 4+ weeks
- Melting spreads to established plants that weren’t recently moved
Buying Tips to Minimize Melt
- Buy submersed-grown when available — hobbyist-grown cuttings transition with almost no melt.
- Choose tissue culture for sensitive species — crypts and delicate stems establish far more reliably from sterile cups.
- Avoid plants already melting in the store tank — some melt is normal, but a plant that’s mostly mush at purchase has less energy for recovery.
- Transport carefully — keep plants damp and out of direct sun/heat. A plant that dries out or cooks in a hot car melts far worse than one transported properly.
The First-Month Timeline: What to Expect Week by Week
Knowing what’s normal when removes most acclimation anxiety. Here’s the typical timeline for a healthy plant adapting to a new tank:
Week 1: The quiet week
Almost nothing visible happens. The plant is growing roots you can’t see and assessing its new environment. Some species (vallisneria, stem plants) may start shedding their lowest leaves. This is normal. Resist the urge to “help” — no moving, no extra fertilizer, no light changes. The most common beginner mistake is intervening during a week when the correct action is nothing.
Week 2: Melt peaks
This is when emersed leaves give up in earnest. Crypts may drop everything; swords shed their broad aerial leaves; stem plants lose lower foliage. It looks catastrophic and it’s usually fine. Keep removing mushy material, keep conditions stable, and watch the crown and growing tips — if those are firm and green, recovery is already underway.
Week 3: The turn
New submersed-adapted leaves emerge — smaller, thinner, often a slightly different shade of green than the emersed foliage. Stem plant tips start growing visibly; crypts push tiny curled leaves from the crown; swords unfurl narrow ribbon leaves. This is the moment most beginners exhale for the first time.
Week 4+: Established
New growth outpaces melt, and the plant is functionally yours. You can resume full-strength fertilizer, normal trimming, and stop treating it as fragile. Some slow growers (anubias, bucephalandra) take 6–8 weeks to show obvious progress — that’s their normal speed, not a problem.
Acclimating Different Plant Formats
Tissue-culture cups
Sterile, pest-free, and already adapted to high-humidity (not emersed) growth — tissue cultures melt the least of any format. Rinse the agar gel off gently (leftover gel rots and feeds fungus), split the portion into small plantlets, and plant per our planting guide. They establish slowly for the first two weeks, then accelerate. No dip needed, minimal acclimation stress — this is the premium experience you’re paying for.
Potted plants
Remove the pot and strip away the rockwool completely — leftover rockwool traps debris and rots. Tease the root mass apart gently; if it’s a dense mat, splitting it into 2–3 smaller portions actually establishes faster than planting one big clump (more growing points, better water flow around roots). Potted plants are usually emersed-grown, so expect the standard 2–4 week melt cycle.
Bare-root / bunched stems
Typically sold as weighted bunches. Remove any bands, foam, or weights, strip the lower leaves, and plant stems individually or in small groups. Bunched stems from the store are often already transitioning — check for new submersed growth at the tips, which tells you the plant is mid-adaptation and will settle quickly.
Hobbyist cuttings
Already submersed-grown and the fastest to establish — often showing new growth within days. The main acclimation factor is water-parameter difference between the two tanks. Float to temperature-match, plant promptly, and they’ll usually take off with minimal melt. This is why experienced hobbyists prefer trading cuttings over buying potted plants.
Frequently Asked Questions
Should I use a “plant starter” or transplant fertilizer?
Products marketed for transplant shock are mostly B-vitamins and mild hormones. They don’t hurt, but there’s no strong evidence they help aquarium plants specifically. Stable conditions and patience outperform any bottle. Save the money for more plants.
My new plant melted completely — bare crown, no leaves. Is it dead?
Probably not, if the crown or rhizome is firm. Crypts and swords routinely lose 100% of their leaves and regrow from the base within a month. The test is firmness: firm and pale/green means alive; mushy and brown/black means rot. Give firm-but-leafless plants a full 4 weeks before declaring them dead.
Can I speed up acclimation with extra light or CO2?
No — and trying usually backfires. A melting plant can’t use extra light; the excess just grows algae on its dying leaves. Keep light moderate and CO2 stable (not boosted) during acclimation. Growth speed comes from the plant’s own adaptation timeline, which you can’t rush, only avoid delaying.
Should new plants go straight into my main display tank?
After quarantine/dipping, yes — there’s no benefit to a separate “growing-in” tank for most plants. They acclimate to your water fastest in the tank they’ll live in. The exception is very delicate species going into a tank with boisterous fish; give those a few weeks in a calm corner or breeder box first.
The Patience Rule
The single most important acclimation skill is restraint: plant it right, set gentle conditions, remove decay, and then leave it alone for a month. The hobbyists with the best plant growth aren’t doing something clever in week one — they’re simply not interfering in weeks two through four while the plants do what they’ve evolved to do. Melt looks like failure and feels like failure, but in most cases it’s the visible part of a plant successfully becoming yours.