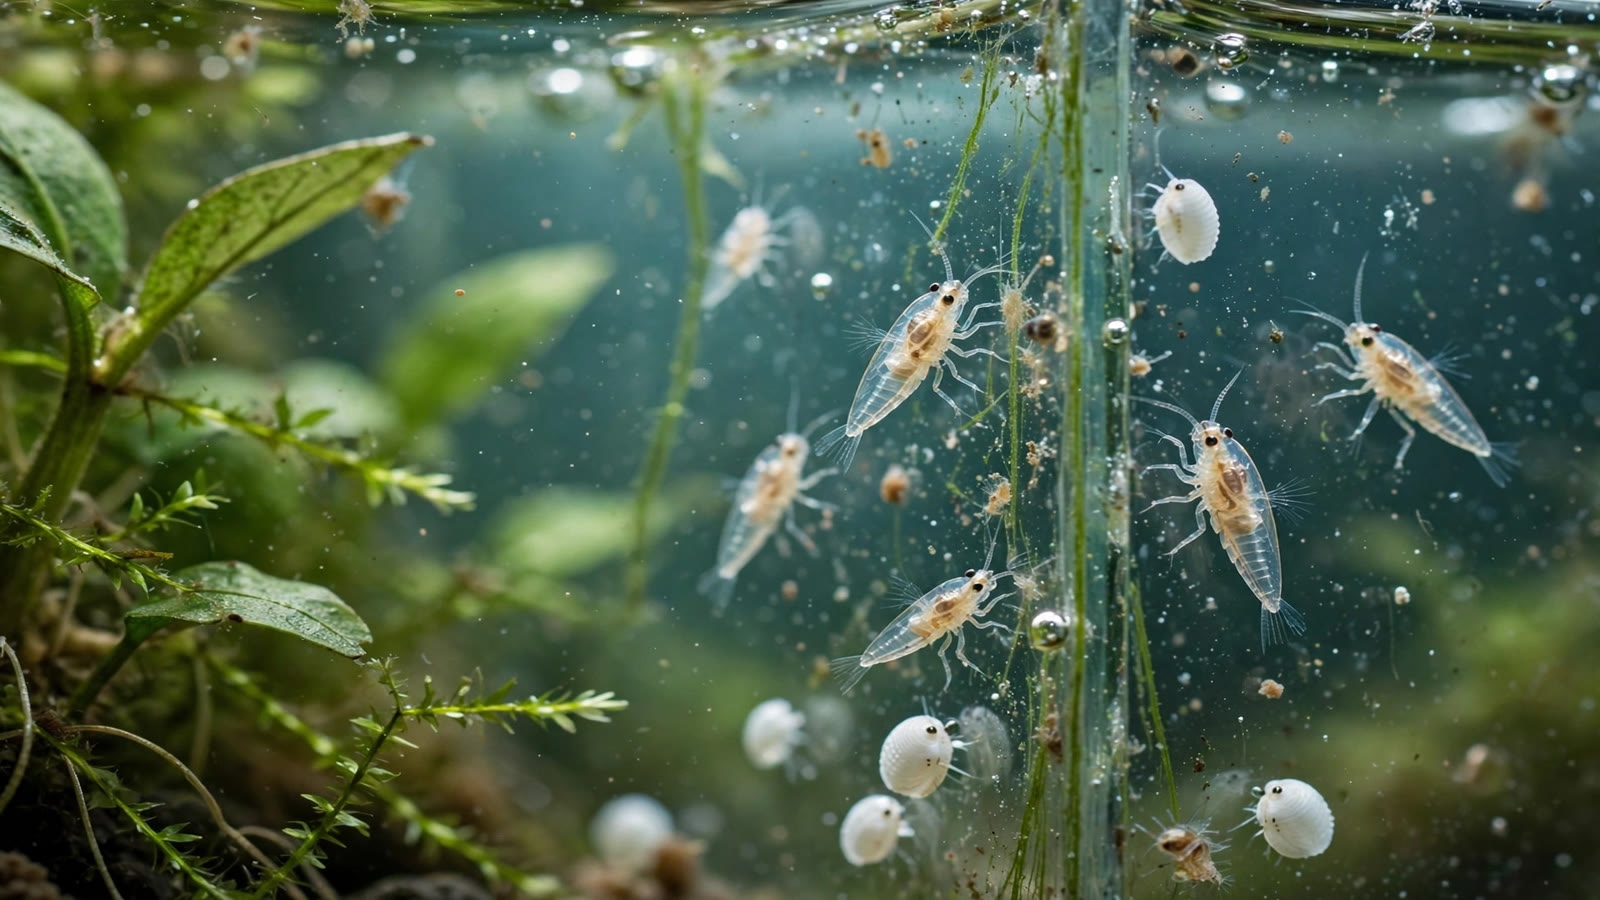
You look closely at the glass one evening and your stomach drops: tiny white bugs in fish tank — dozens of them, crawling or swimming in jerky little bursts. Your first instinct is that something has gone horribly wrong. Breathe. This is one of the most common experiences in the hobby — nearly every planted tank keeper discovers microfauna at some point — and in the vast majority of cases these little creatures are harmless, natural, and even a sign that your tank's ecosystem is working. This guide will help you identify exactly what you are looking at, sort the harmless from the worth-managing, and bring exploding populations under control without chemicals.
Tiny White Bugs in Fish Tank: Almost All of Them Are Harmless
A planted aquarium is a living ecosystem, not a sterile box. The same water that supports your plants and fish also supports a community of near-microscopic animals — copepods, ostracods (seed shrimp), detritus worms, and similar microfauna. They arrive as hitchhikers on new plants, in fish-store bag water, on live foods, or even as dormant eggs, and they quietly colonize every tank with food and hiding places.
The critical skill is identification, not eradication. Most of these animals are free-living scavengers eating decaying plant matter, uneaten food, and biofilm — cleanup work your filter cannot reach. A small number, most notably planaria, are worth actively managing. Learning to tell them apart takes five minutes and prevents the classic beginner mistake: nuking a healthy tank with medication over a harmless bloom.
The Quick Identification Table
Four organisms account for nearly every "tiny white bug" report in planted tanks. Compare what you see against this table before reading further.
| Critter | Size & Appearance | Movement | Harm Level |
|---|---|---|---|
| Copepods (cyclops) | 1–2 mm; teardrop body, single dark eye spot, forked tail and antennae visible under close inspection | Swim in short, jerky darts — pause, then dart again | Harmless to beneficial; excellent live food for fry |
| Ostracods (seed shrimp) | 0.5–2 mm; rounded, clam-like two-part shell; look like tiny white sesame seeds | Crawl along glass and substrate, paddling with legs from a slightly opened shell | Harmless scavengers; mainly an eyesore in large numbers |
| Detritus worms | 2–10 mm; thin, thread-like white or pinkish strings | Wriggle and swim with S-shaped waves, often in open water | Harmless; a visible bloom signals overfeeding or dirty substrate |
| Planaria (flatworms) | 3–15 mm; flat ribbon-like body, distinct arrow-shaped head, two dark eye spots | Glide smoothly along glass without wriggling | Nuisance — manage the population; a concern for shrimp breeders and fish eggs |
Copepods: The Most Common Aquarium "Bug" of All
If the creatures in your tank swim in quick, stop-start darts — like fleas hopping through the water — you are almost certainly looking at copepods. They are the most common "bug" in home aquariums, and experienced keepers treat them as good news rather than bad.
What copepods actually are
Copepods are among the most abundant animals on Earth, and the freshwater species (often called cyclops after their single eye spot) thrive on micro-food: biofilm, infusoria, decaying plant matter, and the finest particles of uneaten fish food. They typically appear in new or lightly stocked tanks because nothing is eating them yet — essentially a self-sustaining live-food culture growing on your tank's leftovers.
Are copepods good or bad?
Copepods are good. They are a free, continuous supply of nutritious live food, especially valuable for fry, nano fish like chili rasboras, and shrimp — many breeders deliberately culture them. A dense population also signals a healthy food web at the base of your tank. The only real complaint is cosmetic: hundreds of white specks drifting through the water can look untidy. A small predator fish, or simply cutting back on feeding, thins them out within a week or two. Never medicate for copepods.
Seed Shrimp (Ostracods): Tiny Clams With Legs
Seed shrimp, properly called ostracods, look exactly like their nickname: minuscule white or pale-tan seeds, roughly half to two millimeters long, usually crawling on the glass, rocks, and substrate. Their defining feature is a hinged, clam-like shell enclosing the whole body — they open it slightly to extend legs and antennae, then snap it shut when disturbed.
Ostracods are enthusiastic scavengers, grazing on algae films, dead plant tissue, fish waste, and leftover food in crevices larger cleanup crew cannot reach. They are completely harmless to fish, shrimp, snails, and plants. The one scenario where they become genuinely annoying is an explosion in an overfed or neglected tank, where thousands coating the glass ruin the view. Their hard shells make them unpalatable to many small fish, so biological control is limited — the real fix is reducing the food supply that supports them: less food in, fewer seed shrimp out.
Detritus Worms: The White Squiggles on the Glass
Detritus worms (mostly tiny oligochaete worms, relatives of earthworms) look like thin white or pinkish threads, a few millimeters to a centimeter long. They live invisibly in the substrate most of the time; you notice them when large numbers writhe in the water column or cling to the glass, usually after a water change stirs things up. Unlike planaria, they wriggle — constant S-shaped thrashing, never a smooth glide.
Detritus worms are harmless scavengers and genuinely useful: they aerate the substrate, break down mulm, and serve as free live food that guppies, danios, and corydoras hunt with enthusiasm. But a sudden visible bloom is useful information — it means far more decaying organic matter sits in the substrate than should. The standard response is not a dewormer: it is a gravel vacuum, a hard look at your feeding routine, and a filter check. Our dedicated detritus worms in planted tanks guide covers substrate routines and how to tell at a glance that you are not dealing with planaria.
Planaria: The Flatworm You Need to Rule Out
Planaria are the one common aquarium flatworm worth identifying carefully. They are flat, ribbon-like worms, typically 3 to 15 millimeters long, moving by gliding smoothly across the glass — no wriggling, no darting. Their signature is the arrow- or spade-shaped head with two dark eye spots. Flat, gliding, triangular head: planaria. Thread-like and wriggling: detritus worm.
A note on scope: this is standard hobby knowledge for identifying common aquarium hitchhikers, not a veterinary diagnosis. Planaria do not parasitize healthy adult fish — they are scavengers eating uneaten food, dead organisms, and biofilm. They become a genuine management issue in two situations: tanks breeding egg-laying fish (planaria eat eggs) and shrimp colonies, where heavy populations harass shrimplets. A handful in a community tank is unsightly but not an emergency; a carpet of them on the glass after lights-out means the tank is overfed and needs a cleanup.
If you confirm planaria and decide to act, start mechanical: feed much less, vacuum the substrate thoroughly, and remove uneaten food within minutes. Simple baited traps (a small container with food inside and a tiny entrance, placed overnight) pull numbers down fast, and several small fish — most famously gouramis and paradise fish — eat them. Our full planaria removal guide covers trapping, predators, and targeted treatments as a last resort.
Why They Showed Up: The Five Usual Causes
Micro-critter blooms are always a response to food and shelter. Work through this checklist in order:
- Overfeeding. The biggest driver by a wide margin. Uneaten food breaks down into the fine organic debris that copepods, ostracods, and worms thrive on.
- A new or lightly stocked tank. Fresh setups go through a phase where microfauna booms before the ecosystem matures. Blooms in the first two to three months are practically a rite of passage.
- Dirty or deep substrate. Mulm and trapped debris are the main pantry for detritus worms and ostracods — deep beds that never get vacuumed are worm cities.
- New plants, hardscape, or bag water. Plants, driftwood, rocks, and fish-store bag water carry hitchhikers and eggs — new plants are the classic vector for duckweed infestations — which is why a strict quarantine routine is one of the highest-value habits in the hobby.
- Dead plant mass. Melting leaves and decaying trimmings feed the biofilm at the base of the food web.
How to Reduce Their Numbers Without Chemicals
The playbook is the same for copepods, seed shrimp, and detritus worms: shrink their food supply and add gentle predation. Chemical treatments risk your shrimp, snails, beneficial bacteria, and plants — and ignore the overfeeding that caused the bloom.
Fix the feeding first
Feed only what fish consume in two to three minutes, once or twice a day, and watch it get eaten rather than tossing it in and walking away. Give bottom feeders sinking tablets in portions that vanish within the hour. Skipping one feeding day per week does fish no harm and starves the microfauna buffet. Within two weeks of disciplined feeding, most blooms visibly shrink.
Vacuum the substrate on a real schedule
A gravel vacuum during each water change physically removes mulm, uneaten food, and worms from the substrate. Focus on open areas and around hardscape where debris collects; in planted tanks, hover the siphon above delicate root zones rather than plunging it in. A substrate that never accumulates a surplus never supports a surplus of worms. Pair this with regular water testing and you will catch rising organics before they become a bloom.
Enlist natural predators
Small, inquisitive fish are ruthless microfauna hunters. Bettas, dwarf and honey gouramis, and paradise fish pick copepods and worms off the glass with enthusiasm — gouramis and paradise fish famously eat planaria too. Endlers, guppies, and small danios work well for water-column copepods. One responsible-keeping caution: never buy a fish solely as pest control for a tank it does not suit; match the predator to your tank size, temperature, and existing stocking.
Quarantine everything new
You cannot fully sterilize an ecosystem, but you can slow the conveyor belt of hitchhikers. Quarantine and treat new plants, rinse hardscape, and never dump fish-store bag water into your tank. Stable tanks with dialed-in feeding rarely bloom again — new introductions are how most re-infestations start. The same discipline that keeps pest snails and hydra out keeps microfauna populations from resetting.
When to Leave Them Completely Alone
Sometimes the correct action is no action at all. Leave the microfauna alone when:
- The population is modest and stable — a scattering of copepods on the glass means a functioning food web, not a dirty tank.
- You are breeding fish or raising fry — copepods and detritus worms are free first foods that improve fry survival.
- The tank is under three months old — the bloom is a normal phase of ecosystem maturation and will fade.
- The only problem is how it looks — copepods do not deserve the response that genuine pests do.
A useful rule of thumb: act on the cause, not the critter. Clear water, growing plants, active fish, stable parameters — if all of those hold, a visible microfauna population is working for you, not against you. When it explodes, it is telling you something about feeding or maintenance, and that message is the real value of these tiny white bugs.
Frequently Asked Questions
Are copepods good or bad for an aquarium?
Copepods are good. They are harmless crustaceans that graze on biofilm and decaying matter, and they double as nutritious live food for fry and nano fish. A visible copepod population usually means your tank has a healthy, functioning food web. The only downside is cosmetic — in large numbers they can make the water look speckled. This freshwater crustacean identification primer covers copepods and ostracods in detail. Reduce feeding or add a small predator fish and numbers fall naturally.
Will seed shrimp hurt my fish, shrimp, or plants?
No. Seed shrimp (ostracods) are peaceful scavengers that eat algae films, leftover food, and dead plant tissue. They do not bite fish, do not eat healthy plants, and do not bother shrimp. The worst they do is look untidy when thousands coat the glass of an overfed tank. Because their hard shells make them unappealing to many small fish, control comes from cutting their food supply: feed less, vacuum the substrate, and remove decaying plant matter promptly.
Will these tiny white bugs hurt my fish?
The common microfauna — copepods, seed shrimp, and detritus worms — do not harm healthy adult fish; many fish happily eat them. Planaria deserve more caution: they are not parasites of adult fish, but they will eat fish eggs and can harass shrimplets, so breeders manage them actively. If worms are attached to your fish's body or gills rather than crawling on the glass, that is a different problem (a true parasite) and warrants advice from a fish health specialist.
Are these bugs the same as ich (white spot disease)?
No, and confusing the two is a common beginner worry. Ich appears as tiny white spots stuck on the fish's body and fins, like grains of salt. The microfauna in this guide crawl or swim on the glass, substrate, and in the water — they never attach to fish. If the white specks are on your fish rather than on tank surfaces, look into ich treatment instead of microfauna control; they are entirely different problems with entirely different solutions.
How do I get rid of seed shrimp in my aquarium for good?
Total eradication is rarely achievable or necessary — ostracod eggs are extremely hardy and hitchhike on almost everything. The realistic goal is keeping numbers invisible: feed sparingly, gravel-vacuum on schedule, and remove dead plant matter before it decays. Small predators like guppies or a betta help with copepods and worms, though seed shrimp's hard shells deter many fish. A well-maintained tank keeps ostracods at background levels indefinitely; see this freshwater worm FAQ from WetWebMedia for more hobby-tested perspective.
The Bottom Line: Learn to Read Your Tank's Smallest Residents
Discovering tiny white bugs in your fish tank feels like an emergency, but it is really an invitation to look closer at the living system you have built. Nine times out of ten, those specks are copepods, seed shrimp, or detritus worms: harmless scavengers doing free cleanup work, sometimes serving as live food. Learn the one exception — gliding, arrow-headed planaria — keep feeding and substrate maintenance disciplined, and your smallest residents will stay a feature of a balanced tank, not a problem.
Tissue-culture plants are the exception — they’re grown in sterile gel and adapt with minimal melting, which is part of what you’re paying for. Plants bought submersed from another hobbyist’s tank also transition with little melt, since they’re already in the right form.
Which Plants Melt Most (and Least)
Heavy melters (expect significant leaf loss)
- Cryptocorynes — infamous for “crypt melt,” sometimes dropping every leaf after any disturbance. They almost always recover from the roots within weeks.
- Stem plants grown emersed — rotala, ludwigia, and hygrophila often shed lower emersed leaves while the growing tips transition.
- Amazon swords — emersed-grown swords typically lose their broad oval aerial leaves and replace them with longer submersed ribbon leaves.
Light melters
- Anubias, java fern, bucephalandra — slow-growing rhizome plants transition gradually; occasional old-leaf melt but rarely dramatic.
- Vallisneria — usually transitions well, though it dislikes the move itself and may sulk for a week.
- Floating plants — minimal melt since their leaves were already at the air-water interface.
The Acclimation Protocol
Step 1: Quarantine or dip first
Before acclimating to your tank’s conditions, make sure you’re not acclimating pests along with the plant. Run new arrivals through our quarantine and dip protocol — it adds days upfront but prevents months of regret.
Step 2: Float to temperature-match (30 minutes)
Float the bag or container in your tank for 20–30 minutes to equalize temperature. Plants are less temperature-sensitive than fish, but a 10°F shock on top of transplant stress is an avoidable insult.
Step 3: Trim before planting
Remove any leaves that are already damaged, yellowing, or heavily algae-covered — they won’t recover and they’ll rot in your tank, feeding algae. For stem plants, trim off the bottom inch and any emersed leaves that look unlikely to adapt; the plant wastes energy maintaining leaves it’s going to shed anyway. Keep the healthy growing tips — that’s where recovery starts.
Step 4: Plant correctly the first time
Follow our planting guide — right depth, crown exposed on rosettes, rhizomes unburied on epiphytes. Every uprooting and replanting restarts the acclimation clock, so get placement right on the first attempt. Decide where each plant goes before it goes in the water.
Step 5: Run a gentle first week
For the first 7 days after planting:
- Moderate light — run your normal photoperiod but consider dropping intensity 20–30% if your light is dimmable. Blast-level light on a melting plant grows algae on the dying leaves, not recovery.
- Stable CO2 — if you inject CO2, keep it consistent. Fluctuating CO2 during acclimation is a melt accelerator. If you’re low-tech, this doesn’t apply — see growing without CO2.
- Half-strength fertilizer — new plants with damaged leaves can’t use full dosing, and the excess feeds algae. Ramp to full strength over 2–3 weeks per our fertilizer schedule.
- No disturbance — don’t move, trim, or “check on” new plants for at least two weeks. Every touch resets root establishment. This is especially critical for crypts.
Step 6: Remove melt, keep the base
As emersed leaves melt, remove the mushy material promptly — decaying leaves release ammonia and grow fungus that can spread to healthy tissue. But never discard the plant while the crown, rhizome, or roots are firm and alive. A crypt that’s lost every leaf but has firm roots is a plant that’s about to recover, not a dead plant. Give it 3–4 weeks before judging.
Telling Normal Melt From Real Problems
Normal transition melt:
- Affects oldest/emersed leaves first, newest growth last
- New submersed leaves emerge even as old ones dissolve
- Roots and crown stay firm and white/green
- Timeline: 1–4 weeks, then obvious new growth
Concerning melt (see our full melting diagnosis guide):
- New growth also melts or emerges deformed
- Rhizome or crown turns mushy and brown — this is rot, not transition
- Entire plant dissolves within days with no new growth after 4+ weeks
- Melting spreads to established plants that weren’t recently moved
Buying Tips to Minimize Melt
- Buy submersed-grown when available — hobbyist-grown cuttings transition with almost no melt.
- Choose tissue culture for sensitive species — crypts and delicate stems establish far more reliably from sterile cups.
- Avoid plants already melting in the store tank — some melt is normal, but a plant that’s mostly mush at purchase has less energy for recovery.
- Transport carefully — keep plants damp and out of direct sun/heat. A plant that dries out or cooks in a hot car melts far worse than one transported properly.
The First-Month Timeline: What to Expect Week by Week
Knowing what’s normal when removes most acclimation anxiety. Here’s the typical timeline for a healthy plant adapting to a new tank:
Week 1: The quiet week
Almost nothing visible happens. The plant is growing roots you can’t see and assessing its new environment. Some species (vallisneria, stem plants) may start shedding their lowest leaves. This is normal. Resist the urge to “help” — no moving, no extra fertilizer, no light changes. The most common beginner mistake is intervening during a week when the correct action is nothing.
Week 2: Melt peaks
This is when emersed leaves give up in earnest. Crypts may drop everything; swords shed their broad aerial leaves; stem plants lose lower foliage. It looks catastrophic and it’s usually fine. Keep removing mushy material, keep conditions stable, and watch the crown and growing tips — if those are firm and green, recovery is already underway.
Week 3: The turn
New submersed-adapted leaves emerge — smaller, thinner, often a slightly different shade of green than the emersed foliage. Stem plant tips start growing visibly; crypts push tiny curled leaves from the crown; swords unfurl narrow ribbon leaves. This is the moment most beginners exhale for the first time.
Week 4+: Established
New growth outpaces melt, and the plant is functionally yours. You can resume full-strength fertilizer, normal trimming, and stop treating it as fragile. Some slow growers (anubias, bucephalandra) take 6–8 weeks to show obvious progress — that’s their normal speed, not a problem.
Acclimating Different Plant Formats
Tissue-culture cups
Sterile, pest-free, and already adapted to high-humidity (not emersed) growth — tissue cultures melt the least of any format. Rinse the agar gel off gently (leftover gel rots and feeds fungus), split the portion into small plantlets, and plant per our planting guide. They establish slowly for the first two weeks, then accelerate. No dip needed, minimal acclimation stress — this is the premium experience you’re paying for.
Potted plants
Remove the pot and strip away the rockwool completely — leftover rockwool traps debris and rots. Tease the root mass apart gently; if it’s a dense mat, splitting it into 2–3 smaller portions actually establishes faster than planting one big clump (more growing points, better water flow around roots). Potted plants are usually emersed-grown, so expect the standard 2–4 week melt cycle.
Bare-root / bunched stems
Typically sold as weighted bunches. Remove any bands, foam, or weights, strip the lower leaves, and plant stems individually or in small groups. Bunched stems from the store are often already transitioning — check for new submersed growth at the tips, which tells you the plant is mid-adaptation and will settle quickly.
Hobbyist cuttings
Already submersed-grown and the fastest to establish — often showing new growth within days. The main acclimation factor is water-parameter difference between the two tanks. Float to temperature-match, plant promptly, and they’ll usually take off with minimal melt. This is why experienced hobbyists prefer trading cuttings over buying potted plants.
Frequently Asked Questions
Should I use a “plant starter” or transplant fertilizer?
Products marketed for transplant shock are mostly B-vitamins and mild hormones. They don’t hurt, but there’s no strong evidence they help aquarium plants specifically. Stable conditions and patience outperform any bottle. Save the money for more plants.
My new plant melted completely — bare crown, no leaves. Is it dead?
Probably not, if the crown or rhizome is firm. Crypts and swords routinely lose 100% of their leaves and regrow from the base within a month. The test is firmness: firm and pale/green means alive; mushy and brown/black means rot. Give firm-but-leafless plants a full 4 weeks before declaring them dead.
Can I speed up acclimation with extra light or CO2?
No — and trying usually backfires. A melting plant can’t use extra light; the excess just grows algae on its dying leaves. Keep light moderate and CO2 stable (not boosted) during acclimation. Growth speed comes from the plant’s own adaptation timeline, which you can’t rush, only avoid delaying.
Should new plants go straight into my main display tank?
After quarantine/dipping, yes — there’s no benefit to a separate “growing-in” tank for most plants. They acclimate to your water fastest in the tank they’ll live in. The exception is very delicate species going into a tank with boisterous fish; give those a few weeks in a calm corner or breeder box first.
The Patience Rule
The single most important acclimation skill is restraint: plant it right, set gentle conditions, remove decay, and then leave it alone for a month. The hobbyists with the best plant growth aren’t doing something clever in week one — they’re simply not interfering in weeks two through four while the plants do what they’ve evolved to do. Melt looks like failure and feels like failure, but in most cases it’s the visible part of a plant successfully becoming yours.