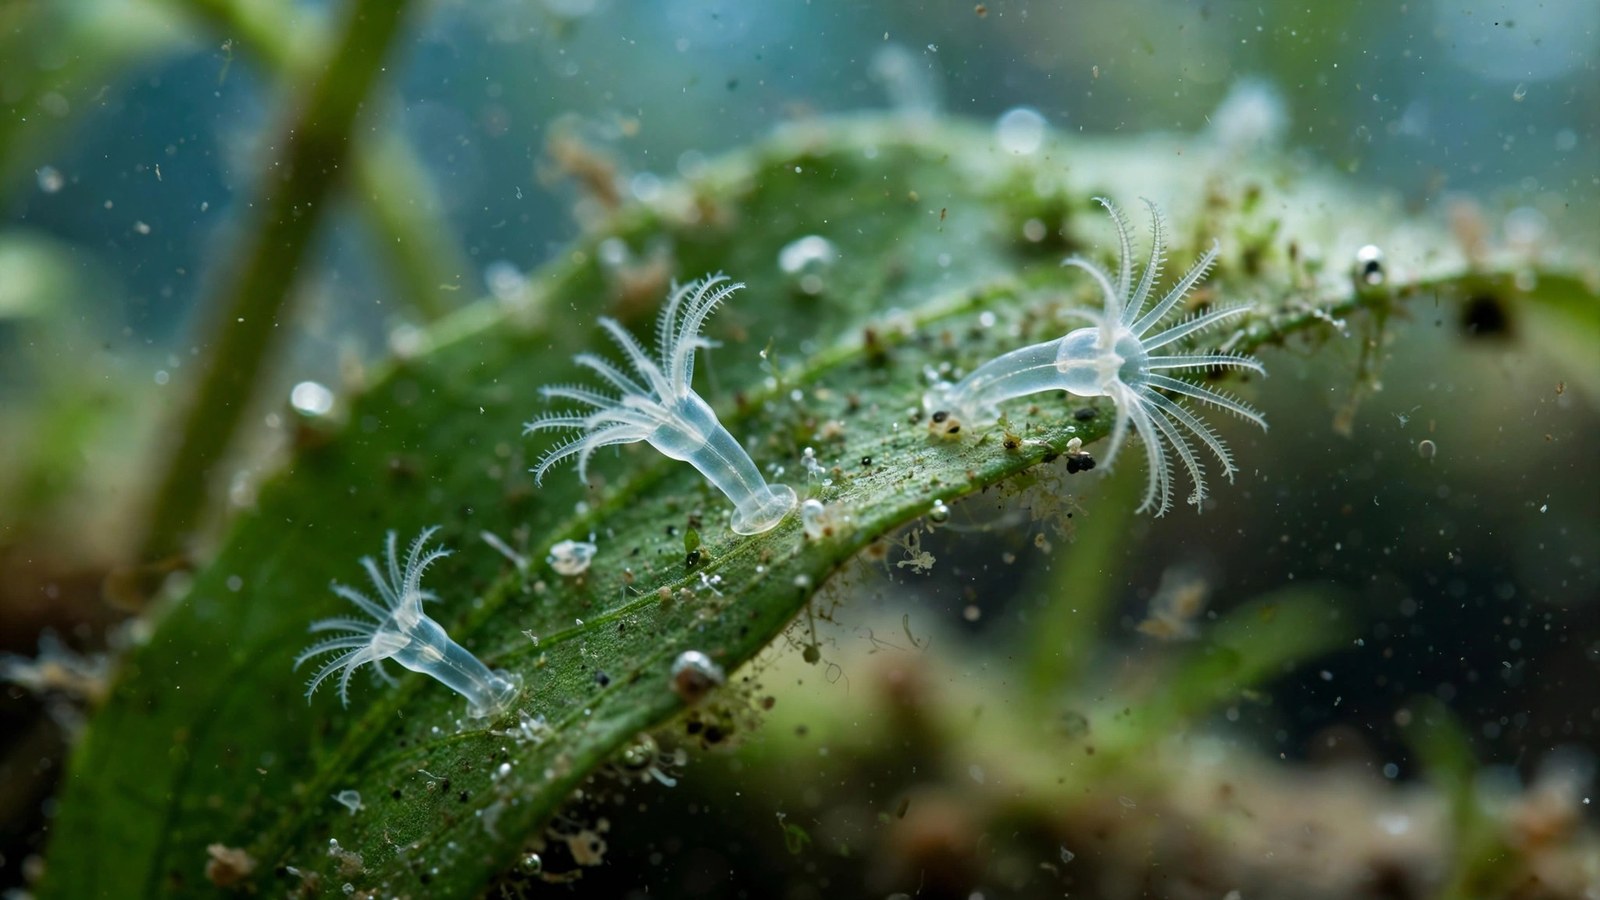
You lean in close to the glass to admire your new plant leaves, and then you see them: dozens of tiny pale stalks waving like miniature sea anemones on the glass, the driftwood, even a leaf tip. That unsettling little forest is hydra in aquarium water — a tiny predatory animal, not an algae — and finding it is one of the most common surprises in planted tanks. The good news: it is manageable, the removal methods are well understood, and most tanks recover fully with a little patience and methodical action.
What Hydra Actually Are
Hydra are tiny freshwater cnidarians — the same animal group as jellyfish and corals. Each one is little more than a translucent stalk a few millimeters long, topped with a crown of thin tentacles carrying stinging cells. That makes them true predators, not just another aquarium nuisance.
They anchor to glass, plant leaves, driftwood, filter intakes, even snail shells, and sit motionless with tentacles fanned out, waiting for something edible to drift past. They reproduce asexually by budding, so a few unnoticed individuals on a new plant can quietly become a visible colony within weeks. Color varies with diet — brownish or greenish after feeding on small crustaceans, nearly transparent when hungry. The green tint comes from symbiotic algae living inside their tissues, which sometimes causes confusion with actual algae.
How to Identify Hydra (and Not Confuse Them)
Correct identification matters because hydra respond to animal-targeted treatments, not algae treatments. Dimming your lights or dosing algaecide will do nothing to them.
The tentacle test
Hydra are the only common aquarium hitchhiker with a stalk-and-tentacle body plan. Watch closely and you will see the tentacles flex and sway, sometimes contracting suddenly when disturbed. Nothing else growing in aquariums moves that way.
Hydra vs algae
Algae never have tentacles or a mouth. If you are unsure whether you face an algae problem, compare against thread algae and how to treat it, cladophora algae treatment, or green water algae bloom fixes. Algae responds to light and nutrient control; hydra ignore all of that.
Hydra vs planaria
Planaria are flatworms that glide across glass with a smooth, slug-like motion and a distinctive arrow-shaped head. Hydra stay fixed in place and wave tentacles. The two sometimes arrive together on new plants, but their treatments and risk profiles differ.
Hydra vs snail eggs
Snail eggs are static, jelly-encased dots or sacs with no moving parts. If the things on your glass have waving filaments, they are hydra. (If you do have an actual snail problem, see our guide on snails eating aquarium plants.) For a second opinion with photos, this hydra identification guide shows close-ups that make the stalk-and-tentacle shape unmistakable.
How Hydra Get Into Your Tank
Hydra almost never appear from nowhere — they ride in on something you added:
- Live plants. The number-one route. Microscopic hydra or dormant stages cling to leaves, survive a quick rinse, and wake up in your tank. Dipping and quarantining new plants is the single highest-value habit a plant keeper can build — see our guide to quarantining aquarium plants.
- Live foods. Daphnia, baby brine shrimp, and similar cultures can carry hydra or their eggs straight to your fish.
- Decor and hardscape. Secondhand driftwood, rocks, or substrate that was only rinsed, never dried or treated, can harbor survivors.
- Shared equipment. Nets, siphons, and scrapers moved between tanks without drying or disinfecting transfer hydra colonies effortlessly.
A tank that only receives dipped, quarantined plants and never shares wet equipment with another tank is very unlikely to develop a hydra problem.
The Real Risk Level: An Honest Assessment
Adult fish are essentially unaffected. A healthy adult fish is far too large and fast for hydra tentacles to matter. Most community tanks can host a small hydra population indefinitely with no visible consequences.
Fry, shrimplets, and very small shrimp are genuinely at risk. This is the real danger zone. Hydra tentacles can sting, immobilize, and kill newly hatched fry and baby shrimp, and a dense colony can meaningfully reduce survival in a breeding tank. Dedicated shrimp colonies and egg-layer breeding setups deserve prompt, serious action.
Plants are not harmed. Hydra do not eat plants or compete for nutrients in any meaningful way. If your plants are struggling, look at why aquarium plants are not growing or why aquarium plants melt — hydra are almost certainly a coincidence, not the cause.
Bottom line: in a display tank with adult fish, hydra are mostly an aesthetic issue and a warning sign of overfeeding. In a breeding or shrimp tank, they are a real threat to the smallest livestock.
Removal Methods Compared
There is no single best method — the right choice depends on your livestock, especially shrimp and snails:
| Method | Shrimp-safe | Snail-safe | Speed |
|---|---|---|---|
| Manual suction removal | Yes | Yes | Slow — needs daily repetition |
| Fenbendazole treatment | Generally yes | Generally yes | Fast — days |
| No Planaria / betel-nut extract | Yes | No — relocate snails first | Fast — days |
| Starving them out | Yes | Yes | Slow — weeks |
| Micro-predator fish | No (eats shrimplets too) | Yes | Moderate — weeks |
Method 1: Manual Removal
The simplest and safest approach, and the right first move in any shrimp tank — hydra detach easily with gentle suction.
- Start a siphon with airline tubing into a bucket, or attach tubing to a large syringe for precision work.
- Hover the tube just above each hydra cluster and draw it up.
- Work methodically across glass, leaves, and hardscape during a water change.
- Repeat daily for one to two weeks, catching each new generation before it reproduces.
Manual removal alone can clear a light infestation, and it pairs well with every other method here. Its weakness is persistence: miss a few individuals and the colony rebuilds, so daily repetition matters more than thoroughness in any single session.
Method 2: Fenbendazole
Fenbendazole — sold as a dog dewormer — is widely used against hydra at roughly 1–2 mg per liter of tank water, and is generally considered safe for plants and most fish at that level. Treat it with the respect any medication deserves: follow the product's directions, start with the recommended dose for your exact tank volume, do not stack it with other treatments, and remove sensitive or valuable livestock first if you have any doubt. Observe the tank closely during and after treatment — hydra typically detach and die within a few days — then follow up with water changes per the product guidance. It is the most effective chemical option where you want to keep ornamental snails, since it is generally snail-safe at hydra-killing doses. It will not fix overfeeding, though — a tank that stays overfed will host hydra again.
Method 3: No Planaria / Betel-Nut Extract Products
Commercial "No Planaria" style products based on betel-nut extract are effective against hydra and widely used by shrimp keepers with shrimp in the tank. The critical catch: they kill snails. Before dosing, relocate every snail you want to keep to a holding container, and do not return them until you have completed the recommended water changes after treatment. As with any medication: follow the product's directions, start with the recommended dose, and observe your livestock — forum dosage experiments are where mistakes happen.
Method 4: Starve Them Out
Hydra populations track food availability almost directly, feeding on the tiny organisms that thrive on uneaten food, powdered fry foods, and tank mulm. Cut the food supply and the colony crashes on its own:
- Reduce feeding sharply for two to three weeks — only what fish consume in under a minute.
- Pause powdered and live foods entirely during the starvation period.
- Improve cleanliness: vacuum detritus, rinse mechanical filter media in old tank water, prune decaying leaves promptly.
- Keep up regular water changes to export the dissolved organics feeding the micro-fauna hydra eat.
Expect weeks, not days — but it is free, perfectly safe for all livestock, and fixes the root cause. Many keepers combine it with daily manual suction: remove the visible hydra while starving the invisible ones.
Method 5: Micro-Predator Fish
Small fish such as tiny rasboras and Endler's guppies will happily graze on hydra. In a community display tank, a small school can clear a mild infestation while looking perfectly at home. The limitation is obvious: anything that eats hydra will also eat shrimplets and tiny fry. This method is not an option in dedicated shrimp-breeding tanks or fry-rearing setups.
Shrimp-Tank-Specific Guidance
- Start with manual removal plus starvation. Both are 100% shrimp-safe and often sufficient for light to moderate infestations.
- If you need chemistry, fenbendazole is the usual first choice for shrimp keepers — used conservatively, dosed for your exact tank volume, with close observation.
- Betel-nut products are shrimp-safe but snail-lethal — fine if the tank has no snails you care about; otherwise relocate them first.
- Never add micro-predator fish to a breeding colony — the cure would eat the livestock you are protecting.
- Quarantine everything going forward. Shrimp tanks are hydra magnets because of powdered foods and biofilm-rich environments; new plants must be dipped and observed before going in.
Prevention Checklist
- Dip all new plants before they enter any tank.
- Quarantine new livestock and plants for one to two weeks of observation.
- Feed disciplined amounts — no uneaten food on the substrate; go easy on powdered and live foods.
- Keep one set of tools per tank, or dry and disinfect shared tools between tanks.
- Inspect new arrivals closely — hydra are visible to the naked eye once you know the shape.
- Maintain the tank: regular water changes, detritus removal, and prompt pruning of melting leaves deny hydra the micro-fauna they feed on.
Prevention is genuinely easier than any cure. A keeper who dips plants, quarantines additions, and feeds carefully may never see hydra at all.
Frequently Asked Questions
Are hydra harmful to adult fish?
No, not in any practical sense. Adult fish are far too large for hydra tentacles to injure, and most community tanks host small hydra populations with zero impact on fish health. The risk sits entirely with fry, shrimplets, and tiny juvenile shrimp, which hydra can sting and kill. With only adult fish present, treat hydra as an aesthetic issue and a signal to cut back feeding, not an emergency.
Will hydra kill my cherry shrimp colony?
They can kill newborn shrimplets, reducing recruitment over time, but rarely wipe out an established colony of adults outright. Danger scales with density: a few stalks on the glass are minor, while a heavy infestation in a breeding tank can seriously suppress baby survival. Manual removal plus reduced feeding is the safest first response, escalating to fenbendazole if the colony keeps growing.
How long does fenbendazole take to kill hydra?
Most keepers report hydra detaching and dying within two to five days of dosing at the commonly used 1–2 mg/L level, though heavy infestations sometimes need a second dose. Follow the product's directions for your tank volume, observe livestock during treatment, and complete the recommended water changes afterward. Pair treatment with better feeding discipline, since fenbendazole kills the hydra present but not the overfeeding that invited them.
Can I just wait for hydra to go away on their own?
Sometimes — small populations in mature, lightly fed tanks can fade as their food supply declines. But waiting is a gamble in breeding and shrimp tanks, where every week of hydra presence costs fry or shrimplets. A better passive strategy is deliberate starvation: cut feeding, pause powdered and live foods, improve cleanliness, and let the population crash from hunger over several weeks, combined with manual suction for faster results.
Do hydra harm aquarium plants?
No. Hydra are carnivores that eat tiny live animals, not plants, and they damage neither leaves, roots, nor stems. If plants are melting or stalling while hydra are present, the two problems almost certainly have separate causes — check lighting, nutrients, and CO2 instead. Hydra on a leaf simply means the leaf is a convenient anchor point, not that the plant is in trouble.
How do I keep hydra out after removing them?
Dip every new plant before it enters the tank, quarantine new livestock and decor for a week or two of observation, and feed disciplined amounts so uneaten food never accumulates. Use dedicated tools per tank or disinfect shared equipment between tanks, and inspect newcomers closely. These habits block nearly all reintroductions, since hydra cannot spontaneously generate in a tank they never enter.
Final Thoughts
Discovering hydra in a planted tank is startling, but it is one of the more solvable problems in the hobby. Identify them correctly, match the removal method to your livestock — gentle manual and starvation methods for shrimp tanks, targeted treatments where appropriate — then close the door they came through with dipped plants, quarantine, and disciplined feeding. Do that, and hydra become a story you tell, not a problem you manage.
Tissue-culture plants are the exception — they’re grown in sterile gel and adapt with minimal melting, which is part of what you’re paying for. Plants bought submersed from another hobbyist’s tank also transition with little melt, since they’re already in the right form.
Which Plants Melt Most (and Least)
Heavy melters (expect significant leaf loss)
- Cryptocorynes — infamous for “crypt melt,” sometimes dropping every leaf after any disturbance. They almost always recover from the roots within weeks.
- Stem plants grown emersed — rotala, ludwigia, and hygrophila often shed lower emersed leaves while the growing tips transition.
- Amazon swords — emersed-grown swords typically lose their broad oval aerial leaves and replace them with longer submersed ribbon leaves.
Light melters
- Anubias, java fern, bucephalandra — slow-growing rhizome plants transition gradually; occasional old-leaf melt but rarely dramatic.
- Vallisneria — usually transitions well, though it dislikes the move itself and may sulk for a week.
- Floating plants — minimal melt since their leaves were already at the air-water interface.
The Acclimation Protocol
Step 1: Quarantine or dip first
Before acclimating to your tank’s conditions, make sure you’re not acclimating pests along with the plant. Run new arrivals through our quarantine and dip protocol — it adds days upfront but prevents months of regret.
Step 2: Float to temperature-match (30 minutes)
Float the bag or container in your tank for 20–30 minutes to equalize temperature. Plants are less temperature-sensitive than fish, but a 10°F shock on top of transplant stress is an avoidable insult.
Step 3: Trim before planting
Remove any leaves that are already damaged, yellowing, or heavily algae-covered — they won’t recover and they’ll rot in your tank, feeding algae. For stem plants, trim off the bottom inch and any emersed leaves that look unlikely to adapt; the plant wastes energy maintaining leaves it’s going to shed anyway. Keep the healthy growing tips — that’s where recovery starts.
Step 4: Plant correctly the first time
Follow our planting guide — right depth, crown exposed on rosettes, rhizomes unburied on epiphytes. Every uprooting and replanting restarts the acclimation clock, so get placement right on the first attempt. Decide where each plant goes before it goes in the water.
Step 5: Run a gentle first week
For the first 7 days after planting:
- Moderate light — run your normal photoperiod but consider dropping intensity 20–30% if your light is dimmable. Blast-level light on a melting plant grows algae on the dying leaves, not recovery.
- Stable CO2 — if you inject CO2, keep it consistent. Fluctuating CO2 during acclimation is a melt accelerator. If you’re low-tech, this doesn’t apply — see growing without CO2.
- Half-strength fertilizer — new plants with damaged leaves can’t use full dosing, and the excess feeds algae. Ramp to full strength over 2–3 weeks per our fertilizer schedule.
- No disturbance — don’t move, trim, or “check on” new plants for at least two weeks. Every touch resets root establishment. This is especially critical for crypts.
Step 6: Remove melt, keep the base
As emersed leaves melt, remove the mushy material promptly — decaying leaves release ammonia and grow fungus that can spread to healthy tissue. But never discard the plant while the crown, rhizome, or roots are firm and alive. A crypt that’s lost every leaf but has firm roots is a plant that’s about to recover, not a dead plant. Give it 3–4 weeks before judging.
Telling Normal Melt From Real Problems
Normal transition melt:
- Affects oldest/emersed leaves first, newest growth last
- New submersed leaves emerge even as old ones dissolve
- Roots and crown stay firm and white/green
- Timeline: 1–4 weeks, then obvious new growth
Concerning melt (see our full melting diagnosis guide):
- New growth also melts or emerges deformed
- Rhizome or crown turns mushy and brown — this is rot, not transition
- Entire plant dissolves within days with no new growth after 4+ weeks
- Melting spreads to established plants that weren’t recently moved
Buying Tips to Minimize Melt
- Buy submersed-grown when available — hobbyist-grown cuttings transition with almost no melt.
- Choose tissue culture for sensitive species — crypts and delicate stems establish far more reliably from sterile cups.
- Avoid plants already melting in the store tank — some melt is normal, but a plant that’s mostly mush at purchase has less energy for recovery.
- Transport carefully — keep plants damp and out of direct sun/heat. A plant that dries out or cooks in a hot car melts far worse than one transported properly.
The First-Month Timeline: What to Expect Week by Week
Knowing what’s normal when removes most acclimation anxiety. Here’s the typical timeline for a healthy plant adapting to a new tank:
Week 1: The quiet week
Almost nothing visible happens. The plant is growing roots you can’t see and assessing its new environment. Some species (vallisneria, stem plants) may start shedding their lowest leaves. This is normal. Resist the urge to “help” — no moving, no extra fertilizer, no light changes. The most common beginner mistake is intervening during a week when the correct action is nothing.
Week 2: Melt peaks
This is when emersed leaves give up in earnest. Crypts may drop everything; swords shed their broad aerial leaves; stem plants lose lower foliage. It looks catastrophic and it’s usually fine. Keep removing mushy material, keep conditions stable, and watch the crown and growing tips — if those are firm and green, recovery is already underway.
Week 3: The turn
New submersed-adapted leaves emerge — smaller, thinner, often a slightly different shade of green than the emersed foliage. Stem plant tips start growing visibly; crypts push tiny curled leaves from the crown; swords unfurl narrow ribbon leaves. This is the moment most beginners exhale for the first time.
Week 4+: Established
New growth outpaces melt, and the plant is functionally yours. You can resume full-strength fertilizer, normal trimming, and stop treating it as fragile. Some slow growers (anubias, bucephalandra) take 6–8 weeks to show obvious progress — that’s their normal speed, not a problem.
Acclimating Different Plant Formats
Tissue-culture cups
Sterile, pest-free, and already adapted to high-humidity (not emersed) growth — tissue cultures melt the least of any format. Rinse the agar gel off gently (leftover gel rots and feeds fungus), split the portion into small plantlets, and plant per our planting guide. They establish slowly for the first two weeks, then accelerate. No dip needed, minimal acclimation stress — this is the premium experience you’re paying for.
Potted plants
Remove the pot and strip away the rockwool completely — leftover rockwool traps debris and rots. Tease the root mass apart gently; if it’s a dense mat, splitting it into 2–3 smaller portions actually establishes faster than planting one big clump (more growing points, better water flow around roots). Potted plants are usually emersed-grown, so expect the standard 2–4 week melt cycle.
Bare-root / bunched stems
Typically sold as weighted bunches. Remove any bands, foam, or weights, strip the lower leaves, and plant stems individually or in small groups. Bunched stems from the store are often already transitioning — check for new submersed growth at the tips, which tells you the plant is mid-adaptation and will settle quickly.
Hobbyist cuttings
Already submersed-grown and the fastest to establish — often showing new growth within days. The main acclimation factor is water-parameter difference between the two tanks. Float to temperature-match, plant promptly, and they’ll usually take off with minimal melt. This is why experienced hobbyists prefer trading cuttings over buying potted plants.
Frequently Asked Questions
Should I use a “plant starter” or transplant fertilizer?
Products marketed for transplant shock are mostly B-vitamins and mild hormones. They don’t hurt, but there’s no strong evidence they help aquarium plants specifically. Stable conditions and patience outperform any bottle. Save the money for more plants.
My new plant melted completely — bare crown, no leaves. Is it dead?
Probably not, if the crown or rhizome is firm. Crypts and swords routinely lose 100% of their leaves and regrow from the base within a month. The test is firmness: firm and pale/green means alive; mushy and brown/black means rot. Give firm-but-leafless plants a full 4 weeks before declaring them dead.
Can I speed up acclimation with extra light or CO2?
No — and trying usually backfires. A melting plant can’t use extra light; the excess just grows algae on its dying leaves. Keep light moderate and CO2 stable (not boosted) during acclimation. Growth speed comes from the plant’s own adaptation timeline, which you can’t rush, only avoid delaying.
Should new plants go straight into my main display tank?
After quarantine/dipping, yes — there’s no benefit to a separate “growing-in” tank for most plants. They acclimate to your water fastest in the tank they’ll live in. The exception is very delicate species going into a tank with boisterous fish; give those a few weeks in a calm corner or breeder box first.
The Patience Rule
The single most important acclimation skill is restraint: plant it right, set gentle conditions, remove decay, and then leave it alone for a month. The hobbyists with the best plant growth aren’t doing something clever in week one — they’re simply not interfering in weeks two through four while the plants do what they’ve evolved to do. Melt looks like failure and feels like failure, but in most cases it’s the visible part of a plant successfully becoming yours.