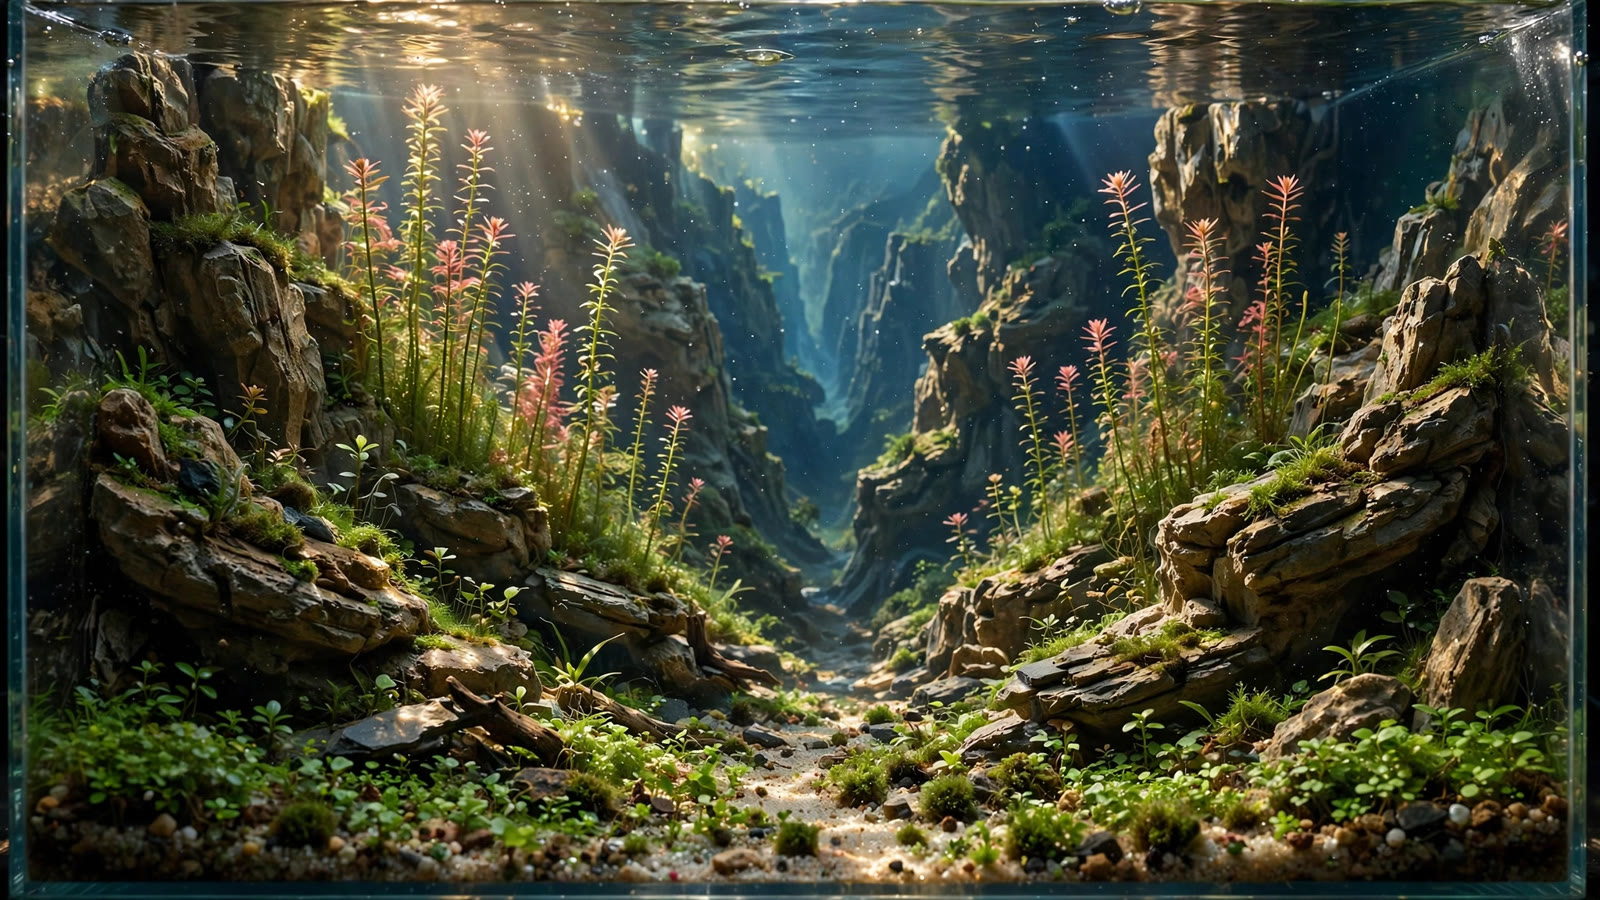
A diorama aquascape turns a glass box into a miniature world you can walk through with your eyes: a rainforest gorge, a mountain valley, a sunken path through ancient stones. It borrows its tricks from theater set design and theme-park facades — forced perspective, layered scenery, and a carefully faked horizon — to make a 90-liter tank look like it holds a kilometer of landscape. This guide walks you through exactly how the illusion works, which materials hold up underwater, how to layer hardscape from back to front, which plants sell the scale trick, and how to keep the scene pristine once it is running.
What Is a Diorama Aquascape?
Diorama aquascaping is a style built around one idea: the tank is a tiny landscape seen from a distance, not a cross-section of a riverbed. Where most aquascapes fill the tank with mid-sized stones and plants that look impressive at arm's length, a diorama scape asks you to stand back and imagine a valley you could shrink down and climb into.
Its signature is a three-dimensional background — carved foam, sculpted resin, or stacked stone terraces — that creates hills, cliffs, and treelines behind the planting, with hardscape and plants shrinking steadily toward the back the way your brain reads distance in the real world. The style dominates contest finalist galleries, but a modest diorama is also one of the most conversation-starting home layouts you can build. Unlike a biotope layout that recreates a real habitat, a diorama is unapologetically theatrical — the goal is wonder, not ecological accuracy.
The Forced-Perspective Illusion: How Depth Is Faked
Forced perspective works because your brain has fixed rules for judging distance, and a diorama exploits every one of them. The four rules that matter most:
- Things get smaller with distance. Stones, branches, and plant clumps must shrink steadily from front to back — a foreground boulder the size of a grapefruit pairs with background pebbles the size of peas.
- Lines converge toward a vanishing point. Valleys, paths, and ridges angle inward as they recede, meeting near the center or thirds of the background. Parallel ridges that never converge flatten the scene.
- Detail fades with distance. Sharp textures belong up front — rough bark, coarse stone. The background should read as soft shapes and silhouettes, so plant the back with fine, blurry textures like mosses.
- Contrast drops with distance. Distant scenery in nature sits behind haze. A slightly lighter, softer background zone sells miles of air — even underwater.
Tank Choice and Core Materials
Depth illusions need actual depth. Shallow, narrow tanks fight you at every step because there is no room for the layers the trick depends on. A good diorama tank is at least 40–45 cm front-to-back; 50 cm or more is ideal. The classic proportions are something like 90×45×45 cm.
Frameless, rimless tanks with low-iron glass are worth the premium here because the illusion depends on seeing the scene without visual interruptions — thick green-tinted seams and silicone beads break the "window into a world" effect at the edges.
Substrate
Use an aquasoil throughout; dioramas are usually heavily planted, and a sloped bed 3 cm deep at the front glass and 8–12 cm at the back wall gives both the rising horizon and the root zone the background plants need. Sand paths can be laid over the soil for riverbeds and trails, but edge them with stone so they do not slump into the soil after a few months.
Lighting
A single wide, high-output LED panel with adjustable intensity is the workhorse. Depth illusions read best with even, slightly cool white light — dramatic warm spotlights look gorgeous on a forest scape but wash out the background-haze effect. A dimmer or app control lets you run a bright midday peak for the carpet and softer mornings and evenings to hold algae back.
Building the 3D Background
The 3D background is what separates a diorama from a conventional layout, and it is where most beginners either stall or go wrong. There are three practical routes:
Carved foam backgrounds
Expanded polystyrene or extruded foam sheets, carved with a hot wire or serrated knife into cliff faces and hillsides, then sealed with aquarium-safe cement, tinted grout, or epoxy. This gives maximum creative control — waterfalls, cave mouths, terraced ridges no natural stone will ever offer — but a convincing carved background takes a full weekend of shaping, texturing, and sealing, and every sealant must be fully cured and leached before livestock goes in.
Natural terraces
No manufactured background at all. Instead, stack thin slate, flat lava rock, or schist into receding terraces from front to back, like rice paddies climbing a hill. This is the most aquarium-natural option: it cannot leach anything, and it survives forever. Each tier must be stable and the soil behind it retained. For wood-forward variations, see our single-driftwood layout guide, which uses one strong branch as the hero and layers stone around it.
Whatever background you choose, paint or film the outside of the back glass a neutral gradient — darker at the bottom, lighter at the top — or a soft misty blue-gray. Black backdrops add drama but can flatten depth; the diorama wants atmosphere, not a void.
Layered Hardscape: Step-by-Step Depth Build
With the background in place, the hardscape is laid from back to front in three zones. Work with the tank empty or nearly so — moving a boulder after planting is how carpets get destroyed.
- Mark your vanishing point. Stand where you will view the tank and tape a small X on the outside back glass where the valley or path should converge — usually slightly off-center. Every ridge line and stone row you place aims at that point.
- Set the background anchors. Place your largest background stones or tallest background wood against the 3D background, below its top edge so the background stays visible. These should already be smaller than your planned foreground stones.
- Build the midground ridges. Lay two or three converging ridges of medium stone from the side walls toward the vanishing point, like valley walls, each smaller in scale than the last. Leave a central low gap for the "valley floor" or path.
- Place the foreground heroes. Set your largest, most detailed stones or wood in the front third — crisp texture, bold shapes. One dominant piece beats three competing ones.
- Check the shrink. Squint at the layout. Foreground pieces should look roughly twice the size of midground ones and three to four times the background ones. If a background pebble rivals a foreground stone, the illusion collapses — shrink it.
- Step back, then walk around. View from your normal seating distance and from the sides. Dioramas are frontal compositions, but ugly gaps visible from an angle will nag at you forever — fill them with small filler stone rather than shifting your anchors.
This sequencing is the opposite of how many beginners build — front first, background last — and that reversal is half the secret. For more on the classic traps, see the beginner mistakes guide, which covers the hardscape errors that flatten layouts before a single plant goes in.
Plant Selection: Scale Contrast Is Everything
Plants do the heavy lifting of the scale illusion, and the rule is absolute: leaf size must shrink with distance. A foreground of fine Eleocharis or Monte Carlo, a midground of slightly larger leaves, and a background of tall, fine-textured stems or moss-covered branches reads as a meadow giving way to a distant treeline.
Foreground (the meadow)
Low, dense carpets sell the "near ground" of the miniature world: Hemianthus callitrichoides (HC Cuba), Micranthemum tweediei (Monte Carlo), Eleocharis acicularis mini, and Glossostigma elatinoides. A bright sand path through the carpet reads as a road or riverbed — keep it narrow toward the back to strengthen the perspective.
Midground (the hillsides)
Bushy, medium-textured plants fill the valley walls: Staurogyne repens, Rotala species kept compact, Bucephalandra tied to the midground ridges for shaded cliff faces, and small Anubias nana petite on stone. Bucephalandra and Anubias are slow and stable, so they hold their scale for months without constant trimming.
Background (the distant forest)
Here you want fine, airy, vertical texture — the silhouettes of far-away trees: Taxiphyllum mosses grown thick over the background, fine Rotala wallichii or Myriophyllum stems, and tall Vallisneria rising along the back glass. Kept thick and slightly ragged, moss reads as forest canopy at a distance. Consult Tropica's plant database for growth rates and placement guidance before committing, since swapping a fast grower out of a finished diorama disturbs the layers around it.
Lighting and Water for Depth and Atmosphere
Once planted, depth is a lighting problem. Run the light brightest and slightly bluer at midday; the cool, even top light mimics an overcast sky and lets the background-haze trick read. Keep one shadow direction — from above — so competing side shadows do not betray the back wall's real position.
Water clarity matters more in dioramas than in any other style. Keep the water polished — fine mechanical filtration, regular water changes, and glass wiped weekly — so the background reads as "far," not fogged. A faint blackwater tint can suit moody canyon dioramas, but keep it very light or the background disappears entirely.
CO2 injection pays for itself in a diorama because carpets and background stems both need strong, even growth to hold their zones. A steady CO2 supply plus good flow to the back corners prevents the classic diorama failure: a lush front and a melting, algae-eaten back wall. ADA's Nature Aquarium materials on balancing light, CO2, and nutrients are the best reference for dialing this triangle in.
Maintenance: Keeping the Illusion Alive
A diorama is a sculpture that grows, and growth is the enemy of forced perspective. Stem plants in the background that double in height in a month will break the scale ratio; carpets that creep up the midground ridges blur the zone boundaries. Plan on a trimming rhythm from day one: background stems topped weekly or biweekly, carpet edges redefined monthly, and moss thinned before it forms solid green blobs that swallow the rockwork.
Detritus settles into the background's crevices where flow is weakest, so during each water change, gently waft a turkey baster or small powerhead over the background zones to lift debris out of the cracks. And every few months, reassess the soil slope — our guide to sloping substrate for depth covers building gradients that hold — and counter subtle slope migration with a top-up of soil behind the midground ridges once or twice a year. When the soil is compacted and spent, refresh the worst zones in sections rather than tearing the whole scape down.
Common Mistakes That Flatten the Scene
- Uniform stone sizes. The single most common killer. If every stone is fist-sized, the brain reads them as equidistant and the depth illusion never starts. Force the gradient: grapefruit, orange, egg, pea.
- A background that is too loud. Hyper-detailed foam with every crack painted in high contrast reads as "close" no matter where you put it. Mute the background's contrast so it recedes.
- Ignoring the viewing axis. Building while hunched over the open top gives a bird's-eye arrangement that looks chaotic through the front glass. Build from the front, checking constantly at eye level.
- Too many focal points. Dioramas want one valley, one path, one waterfall. Three competing heroes split attention and the eye never travels into the depth.
- Neglecting flow to the back. Dead zones behind the midground ridges collect debris and algae, and a green, fuzzy background reads as near and neglected rather than far and pristine.
Frequently Asked Questions
How much does a diorama aquascape cost to build?
A modest diorama in a 60–90 liter tank typically runs $200–$500: the tank and light are the big items, plus substrate, hardscape, plants, and either foam and sealant for a carved background or a ready-made panel. The background labor is the real cost — carving and sealing foam takes a full weekend. Reusing stone and wood from old layouts and buying tissue-culture plants in bulk keeps the budget down — see our budget aquascaping guide for where to spend and where to save.
What size tank is best for forced perspective?
Front-to-back depth matters more than length or volume. Aim for at least 40–45 cm of depth, with 50 cm or more being ideal, so you can stack genuine foreground, midground, and background zones. A 90×45×45 cm tank is the sweet spot for a first diorama — long shallow tanks and tall narrow cubes both starve the illusion of room for receding layers.
Are foam 3D backgrounds safe for fish and shrimp?
Yes, once properly sealed and cured. Use aquarium-safe sealants — tinted cement, pond-grade epoxy, or products labeled for aquarium backgrounds — and cure fully per the manufacturer's instructions, then soak the background in water for a week, testing pH before stocking. Unsealed or under-cured foam can leach chemicals. When in doubt, the stacked natural-stone terrace method needs no sealant at all.
How do I stop the background plants from ruining the scale?
Choose slow growers where scale matters most — Anubias, Bucephalandra, and mosses hold their size for months — and put fast stems only where you will trim weekly. Set a calendar reminder: topping background stems is perspective maintenance, not optional gardening. The moment background plants outgrow the midground in apparent size, the depth illusion collapses.
Can I build a diorama aquascape without CO2?
You can, but the plant palette narrows. Low-tech dioramas lean on Anubias, Bucephalandra, mosses, ferns, and slow carpets like Marsilea instead of HC Cuba and fast stems, with the hardscape and background doing more of the visual work — a moss-and-stone canyon needs almost no CO2. Expect slower fill-in (months, not weeks) and design around plants that hold scale without constant trimming.
A diorama aquascape is the closest aquascaping gets to pure storytelling — a landscape you build grain by grain until a stranger walks up to your tank and asks how you fit a whole valley in there. Start with the vanishing point, respect the shrinking scale, keep the background soft, and let the plants do the talking. The first one will teach you more about composition than a year of conventional layouts.
Tissue-culture plants are the exception — they’re grown in sterile gel and adapt with minimal melting, which is part of what you’re paying for. Plants bought submersed from another hobbyist’s tank also transition with little melt, since they’re already in the right form.
Which Plants Melt Most (and Least)
Heavy melters (expect significant leaf loss)
- Cryptocorynes — infamous for “crypt melt,” sometimes dropping every leaf after any disturbance. They almost always recover from the roots within weeks.
- Stem plants grown emersed — rotala, ludwigia, and hygrophila often shed lower emersed leaves while the growing tips transition.
- Amazon swords — emersed-grown swords typically lose their broad oval aerial leaves and replace them with longer submersed ribbon leaves.
Light melters
- Anubias, java fern, bucephalandra — slow-growing rhizome plants transition gradually; occasional old-leaf melt but rarely dramatic.
- Vallisneria — usually transitions well, though it dislikes the move itself and may sulk for a week.
- Floating plants — minimal melt since their leaves were already at the air-water interface.
The Acclimation Protocol
Step 1: Quarantine or dip first
Before acclimating to your tank’s conditions, make sure you’re not acclimating pests along with the plant. Run new arrivals through our quarantine and dip protocol — it adds days upfront but prevents months of regret.
Step 2: Float to temperature-match (30 minutes)
Float the bag or container in your tank for 20–30 minutes to equalize temperature. Plants are less temperature-sensitive than fish, but a 10°F shock on top of transplant stress is an avoidable insult.
Step 3: Trim before planting
Remove any leaves that are already damaged, yellowing, or heavily algae-covered — they won’t recover and they’ll rot in your tank, feeding algae. For stem plants, trim off the bottom inch and any emersed leaves that look unlikely to adapt; the plant wastes energy maintaining leaves it’s going to shed anyway. Keep the healthy growing tips — that’s where recovery starts.
Step 4: Plant correctly the first time
Follow our planting guide — right depth, crown exposed on rosettes, rhizomes unburied on epiphytes. Every uprooting and replanting restarts the acclimation clock, so get placement right on the first attempt. Decide where each plant goes before it goes in the water.
Step 5: Run a gentle first week
For the first 7 days after planting:
- Moderate light — run your normal photoperiod but consider dropping intensity 20–30% if your light is dimmable. Blast-level light on a melting plant grows algae on the dying leaves, not recovery.
- Stable CO2 — if you inject CO2, keep it consistent. Fluctuating CO2 during acclimation is a melt accelerator. If you’re low-tech, this doesn’t apply — see growing without CO2.
- Half-strength fertilizer — new plants with damaged leaves can’t use full dosing, and the excess feeds algae. Ramp to full strength over 2–3 weeks per our fertilizer schedule.
- No disturbance — don’t move, trim, or “check on” new plants for at least two weeks. Every touch resets root establishment. This is especially critical for crypts.
Step 6: Remove melt, keep the base
As emersed leaves melt, remove the mushy material promptly — decaying leaves release ammonia and grow fungus that can spread to healthy tissue. But never discard the plant while the crown, rhizome, or roots are firm and alive. A crypt that’s lost every leaf but has firm roots is a plant that’s about to recover, not a dead plant. Give it 3–4 weeks before judging.
Telling Normal Melt From Real Problems
Normal transition melt:
- Affects oldest/emersed leaves first, newest growth last
- New submersed leaves emerge even as old ones dissolve
- Roots and crown stay firm and white/green
- Timeline: 1–4 weeks, then obvious new growth
Concerning melt (see our full melting diagnosis guide):
- New growth also melts or emerges deformed
- Rhizome or crown turns mushy and brown — this is rot, not transition
- Entire plant dissolves within days with no new growth after 4+ weeks
- Melting spreads to established plants that weren’t recently moved
Buying Tips to Minimize Melt
- Buy submersed-grown when available — hobbyist-grown cuttings transition with almost no melt.
- Choose tissue culture for sensitive species — crypts and delicate stems establish far more reliably from sterile cups.
- Avoid plants already melting in the store tank — some melt is normal, but a plant that’s mostly mush at purchase has less energy for recovery.
- Transport carefully — keep plants damp and out of direct sun/heat. A plant that dries out or cooks in a hot car melts far worse than one transported properly.
The First-Month Timeline: What to Expect Week by Week
Knowing what’s normal when removes most acclimation anxiety. Here’s the typical timeline for a healthy plant adapting to a new tank:
Week 1: The quiet week
Almost nothing visible happens. The plant is growing roots you can’t see and assessing its new environment. Some species (vallisneria, stem plants) may start shedding their lowest leaves. This is normal. Resist the urge to “help” — no moving, no extra fertilizer, no light changes. The most common beginner mistake is intervening during a week when the correct action is nothing.
Week 2: Melt peaks
This is when emersed leaves give up in earnest. Crypts may drop everything; swords shed their broad aerial leaves; stem plants lose lower foliage. It looks catastrophic and it’s usually fine. Keep removing mushy material, keep conditions stable, and watch the crown and growing tips — if those are firm and green, recovery is already underway.
Week 3: The turn
New submersed-adapted leaves emerge — smaller, thinner, often a slightly different shade of green than the emersed foliage. Stem plant tips start growing visibly; crypts push tiny curled leaves from the crown; swords unfurl narrow ribbon leaves. This is the moment most beginners exhale for the first time.
Week 4+: Established
New growth outpaces melt, and the plant is functionally yours. You can resume full-strength fertilizer, normal trimming, and stop treating it as fragile. Some slow growers (anubias, bucephalandra) take 6–8 weeks to show obvious progress — that’s their normal speed, not a problem.
Acclimating Different Plant Formats
Tissue-culture cups
Sterile, pest-free, and already adapted to high-humidity (not emersed) growth — tissue cultures melt the least of any format. Rinse the agar gel off gently (leftover gel rots and feeds fungus), split the portion into small plantlets, and plant per our planting guide. They establish slowly for the first two weeks, then accelerate. No dip needed, minimal acclimation stress — this is the premium experience you’re paying for.
Potted plants
Remove the pot and strip away the rockwool completely — leftover rockwool traps debris and rots. Tease the root mass apart gently; if it’s a dense mat, splitting it into 2–3 smaller portions actually establishes faster than planting one big clump (more growing points, better water flow around roots). Potted plants are usually emersed-grown, so expect the standard 2–4 week melt cycle.
Bare-root / bunched stems
Typically sold as weighted bunches. Remove any bands, foam, or weights, strip the lower leaves, and plant stems individually or in small groups. Bunched stems from the store are often already transitioning — check for new submersed growth at the tips, which tells you the plant is mid-adaptation and will settle quickly.
Hobbyist cuttings
Already submersed-grown and the fastest to establish — often showing new growth within days. The main acclimation factor is water-parameter difference between the two tanks. Float to temperature-match, plant promptly, and they’ll usually take off with minimal melt. This is why experienced hobbyists prefer trading cuttings over buying potted plants.
Frequently Asked Questions
Should I use a “plant starter” or transplant fertilizer?
Products marketed for transplant shock are mostly B-vitamins and mild hormones. They don’t hurt, but there’s no strong evidence they help aquarium plants specifically. Stable conditions and patience outperform any bottle. Save the money for more plants.
My new plant melted completely — bare crown, no leaves. Is it dead?
Probably not, if the crown or rhizome is firm. Crypts and swords routinely lose 100% of their leaves and regrow from the base within a month. The test is firmness: firm and pale/green means alive; mushy and brown/black means rot. Give firm-but-leafless plants a full 4 weeks before declaring them dead.
Can I speed up acclimation with extra light or CO2?
No — and trying usually backfires. A melting plant can’t use extra light; the excess just grows algae on its dying leaves. Keep light moderate and CO2 stable (not boosted) during acclimation. Growth speed comes from the plant’s own adaptation timeline, which you can’t rush, only avoid delaying.
Should new plants go straight into my main display tank?
After quarantine/dipping, yes — there’s no benefit to a separate “growing-in” tank for most plants. They acclimate to your water fastest in the tank they’ll live in. The exception is very delicate species going into a tank with boisterous fish; give those a few weeks in a calm corner or breeder box first.
The Patience Rule
The single most important acclimation skill is restraint: plant it right, set gentle conditions, remove decay, and then leave it alone for a month. The hobbyists with the best plant growth aren’t doing something clever in week one — they’re simply not interfering in weeks two through four while the plants do what they’ve evolved to do. Melt looks like failure and feels like failure, but in most cases it’s the visible part of a plant successfully becoming yours.