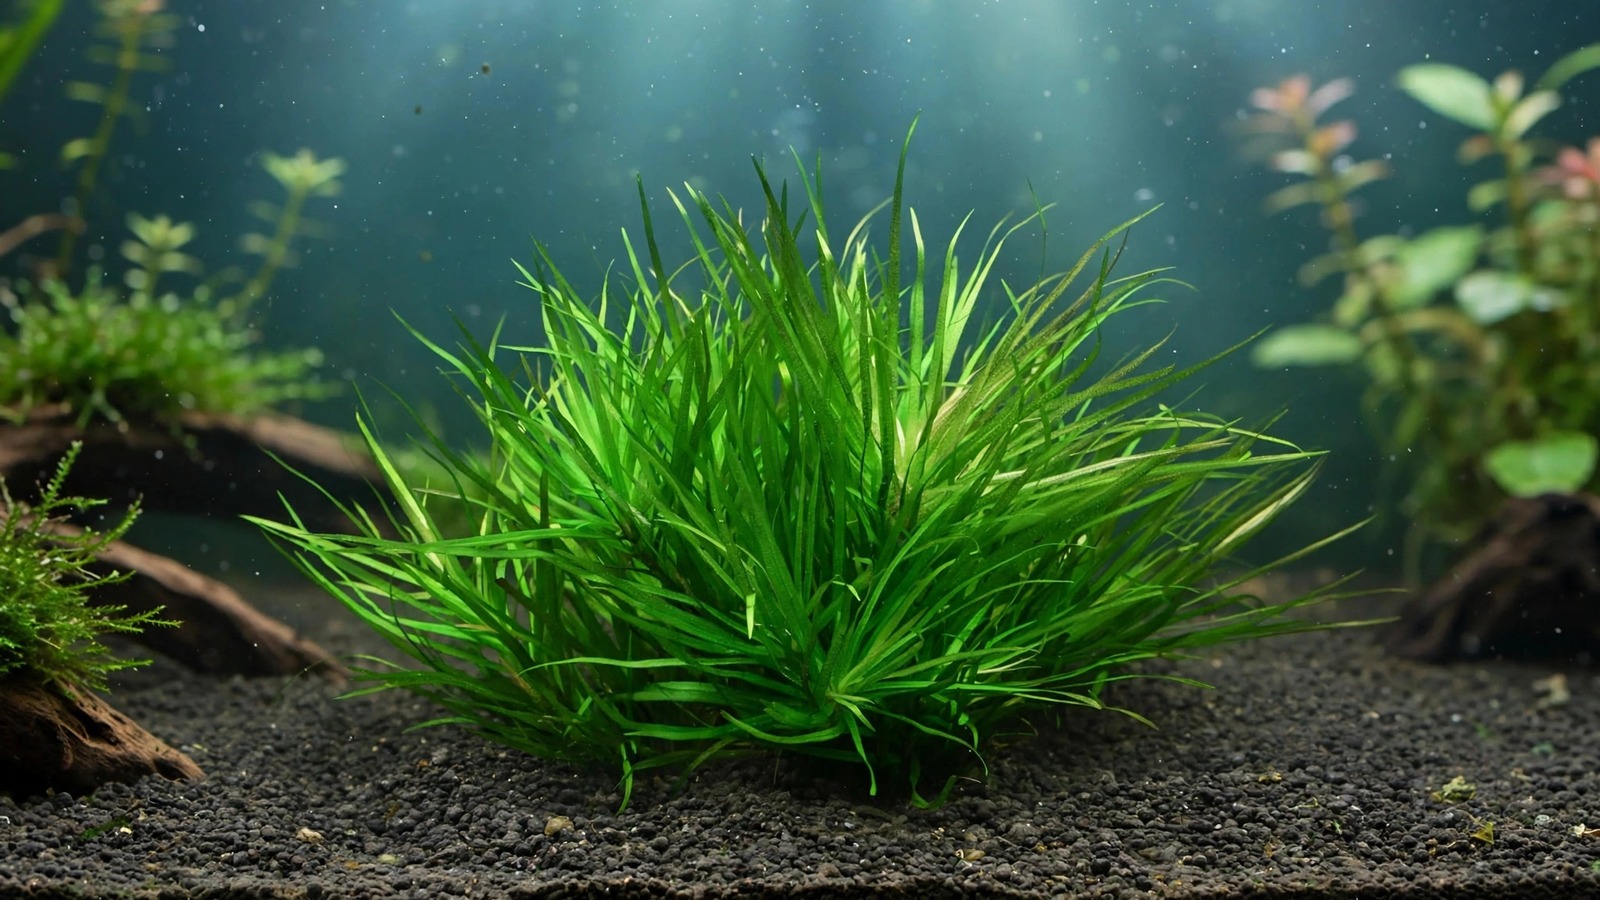
Blyxa japonica has earned a devoted following among aquascapers for one simple reason: few plants create midground texture as beautifully as this grassy, bamboo-like rosette. If your search for "blyxa japonica care" brought you here, you're likely weighing it for a nature-style aquascape or troubleshooting a patch that isn't thriving. This guide covers its distinctive rosette form, placement strategies, lighting, CO2, substrate, propagation, and the common problems that cause melting or pale blades.
What Is Blyxa Japonica?
Blyxa japonica is a grass-like aquatic rosette plant native to the still or slow-moving waters of Japan and East Asia, where it grows in flooded rice paddies, ponds, and marshes. Each plant forms a dense rosette of narrow, light-green, bamboo-like blades that radiate from a central crown, typically reaching 10–15 cm (4–6 inches) in height. The blades have a slightly translucent, almost feathery quality under strong light, and when truly thriving the plant can develop a subtle golden or reddish tint at the leaf tips.
What makes it special in the hobby is its role as a texture bridge. Stems and large-leaf rosettes dominate the background, carpets of Marsilea hirsuta or similar foreground plants cover the floor, and Blyxa fills the middle distance with fine, swaying grass blades that soften hardscape transitions. Its popularity surged with the IAPLC-style nature aquascapes of the 2000s, where it became a signature midground plant — and steady demand has kept it a staple of planted-tank shops worldwide.
The plant is sometimes confused with other Blyxa species such as Blyxa novoguineensis or the much larger Blyxa auberti, but Blyxa japonica's compact size and narrower blades set it apart. True Blyxa japonica stays midground-sized under aquarium conditions.
Blyxa Japonica Care Profile
Here is the quick-reference summary. The sections below explain every value in practical detail.
| Attribute | Value |
|---|---|
| Scientific name | Blyxa japonica |
| Common names | Bamboo plant, Japanese blyxa |
| Difficulty | Moderate |
| Light | Moderate (40–60 PAR at substrate); adaptable to low-medium with slower growth |
| CO2 | Recommended for dense, compact growth; will grow without it but stays sparse |
| Placement | Midground, ideally between hardscape and carpet |
| Growth rate | Moderate (faster with CO2 and lean but consistent fertilization) |
| pH range | 5.5–7.5 |
| Temperature | 20–28°C (68–82°F) |
| GH/KH | Soft to moderately hard water preferred (GH 3–10, KH 1–6) |
| Propagation | Side shoots from the crown; divide and replant |
Placement: Where Blyxa Japonica Shines
Blyxa japonica is first and foremost a midground plant. Its 10–15 cm height sits naturally between a foreground carpet and taller background stems, filling the visual "middle third" of the tank without demanding attention.
The texture-bridge technique
In nature-style layouts, the classic use is planting Blyxa in loose clusters where hardscape meets carpet — tucked along the base of a Hygrophila pinnatifida-clad stone or wood piece, or softening the transition from carpet to a Myriophyllum stem thicket. Because each rosette sways independently in the current, a band of Blyxa creates gentle movement against the stillness of rock. Plant rosettes 3–5 cm apart; they fill in through side shoots over several weeks.
Avoid using it as a solo background plant — it rarely exceeds 15 cm and will look stunted against a 45–60 cm water column. Conversely, it can work as a tall foreground accent in nano tanks under 30 cm, where a single rosette provides a striking grass-tuft focal point.
Pairing with fine-textured midgrounds
Blyxa pairs best with plants that share its fine texture but contrast in form. Combinations that work reliably:
- Cryptocoryne parva or crypt wendtii 'brown' — darker, broader rosettes set off Blyxa's pale blades.
- Hydrocotyle tripartita — clover-like leaves creeping between rosettes add a second layer of midground interest.
- Staurogyne repens — compact, rigid carpeting that frames the looser Blyxa grass.
- Banana plants — the quirky tuberous base of Nymphoides aquatica contrasts playfully with Blyxa's upright grass.
- Java fern 'Windelov' — lace-edged fronds on hardscape behind a Blyxa band create depth.
Avoid pairing it with coarse, dominant plants directly adjacent — a huge Amazon sword or a curtain of water sprite will swallow the fine texture you're trying to showcase.
Lighting Requirements
Blyxa japonica is more light-flexible than its reputation suggests, but light level directly controls how it looks. Under moderate light (roughly 40–60 PAR at the substrate), it grows compactly with the tight, grassy rosette most aquascapers want. Under lower light it survives but grows taller and sparser as blades stretch for the surface — still green, but losing the dense bamboo look.
Under high light (60+ PAR) combined with CO2 and good fertilization, growth is fastest and blades develop an attractive golden-red tint at the tips. High light without CO2 and nutrients, however, invites algae onto the blades. Match your light to your CO2 situation: low-tech setups should keep light moderate and accept slower, greener growth. Above all, keep the photoperiod stable — a consistent 6–8 hour day on a timer beats erratic long days.
CO2: Helpful But Adaptable
Pressurized CO2 is the single biggest upgrade you can give Blyxa japonica. At 20–30 ppm (typically a lime-green drop checker), plants grow denser, produce side shoots faster, and develop the compact form that makes them famous. CO2 also shortens the post-planting transition period from 4–6 weeks to 1–2.
Without CO2, Blyxa still grows — just slowly and sparsely, and melting after replanting is more common. Compensate with lower light, a rich substrate, and patience. Whatever method you use, raise CO2 gradually over several days and watch fish behavior; Blyxa's needs never justify pushing CO2 past safe levels for livestock.
Substrate and Planting
Blyxa japonica is a genuine root feeder, and substrate choice is the factor most beginners underestimate. It grows best in a nutrient-rich aquasoil that buffers pH slightly acidic. In inert gravel or sand with water-column dosing alone, plants tend to be pale and slow.
On inert substrates, push iron-rich root tabs into the substrate around each cluster every 6–8 weeks; this alone transforms Blyxa performance in low-tech tanks. A mineral-rich base can also work well — see our guide on calcined clay substrates for planted tanks for how mineral-heavy bases support root feeders.
To plant, separate the pot into individual rosettes or small clumps of 2–3, and push each crown in just deep enough that the base is buried — the crown itself should sit at or slightly above the substrate line. Planting too deep rots the crown; too shallow and rosettes drift loose.
Fertilization
Blyxa japonica's fine blades are honest indicators of nutrient status: pale new growth means it wants more. In most setups, the winning strategy is a modest, consistent fertilizer routine rather than heavy dosing.
- High-tech (CO2 + moderate/high light): a complete all-in-one fertilizer at the manufacturer's standard dose, dosed weekly or split daily, plus iron-rich root tabs at the roots. Macros (nitrogen, phosphorus, potassium) keep blades long and green; iron keeps the green deep.
- Low-tech (no CO2): cut the standard dose roughly in half and rely more on root tabs. In low-tech tanks, excess water-column nutrients with limited plant growth speed is an algae invitation.
- Key deficiencies to watch: pale, yellowish new blades = iron or nitrogen shortage; stunted, curled new blades = calcium/magnesium imbalance; old blades melting from the outside in = potassium shortage. Address the likeliest deficiency one change at a time.
Lean, stable dosing beats alternating feast and famine. If you prefer mixing your own solutions, follow conservative recipes and the "start low, observe" approach — our guide to mixing dry fertilizers for planted tanks walks through safe starting ratios. Blyxa responds to iron both at the roots and in the water column, so a chelated iron supplement can deepen blade color within a week or two.
Water Parameters
Blyxa japonica performs best in soft to moderately hard, slightly acidic to neutral water: pH 5.5–7.5, GH 3–10, KH 1–6, and temperatures of 20–28°C (68–82°F). Sudden parameter swings — particularly when moving from a shop's hard water to a soft-water aquasoil tank — are the most common trigger for transition melting.
Clean, well-filtered water matters more than chasing an exact number. Gentle flow keeps debris off the fine blades; dead spots in dense plantings collect detritus and invite algae. A weekly 30–50% water change schedule suits most setups.
Trimming vs. Uprooting
Unlike stem plants, Blyxa japonica cannot be trimmed like a hedge — cutting blade tips leaves blunt, scarred ends that stop growing. Manage overgrowth by removal and division instead.
When a cluster gets too dense or tall, gently uproot the whole rosette, pull it apart at the crown into smaller rosettes (each with roots), and replant the healthiest portions. Replanted divisions usually re-establish within 1–2 weeks, especially with CO2. Uprooting and replanting every 4–6 months also refreshes the planting, clearing trapped detritus from the crown area.
If a rosette has grown leggy with a long bare stem below the crown, trim the roots short, replant the crown deeper, and discard the leggy portion. The crown regrows roots from its base; expect a brief transition melt afterward.
Propagation: Side Shoots
Blyxa japonica propagates through side shoots that emerge from the base of the mother rosette. Once a shoot has 4–5 blades of its own, you can gently tease it away and plant it separately.
Encourage propagation by keeping the plant healthy: adequate light, root feeding, and crowns that aren't buried. In CO2 conditions a thriving mother rosette can produce a new side shoot every 2–4 weeks; without CO2, every month or two. Over time a single rosette naturally becomes a cluster — exactly the look most aquascapers want.
Common Problems and Solutions
Melting after planting or transition
This is the number one Blyxa complaint. Plants arrive and blades turn translucent and dissolve — caused by transition stress: different water, different light, emersed-to-submerged conversion, or root damage from uprooting. Leave crowns alone, keep parameters stable, and look for tiny new green blades from the crown center within 1–3 weeks. If the crown itself is firm and green, the plant is alive. Remove mushy dead blades gently so they don't foul the water.
Pale or yellowing blades
Pale new growth signals a nutrient gap — usually iron, nitrogen, or both. First check the substrate: inert gravel without root tabs is the classic culprit. Push iron-rich root tabs under the clusters and ensure your liquid fertilizer is being dosed on schedule. Yellow-white new blades with green old blades points to iron; yellowing old blades first suggests nitrogen or potassium.
Algae on the blades
Fine, slow-growing blades are prime real estate for thread, staghorn, and brush algae when the tank is imbalanced — usually too much light relative to CO2 and nutrients. Fix the imbalance rather than spot-treating: reduce photoperiod or intensity, keep CO2 and dosing steady, and improve flow through the cluster. Amano shrimp and Otocinclus graze blade algae without harming the plant.
Sparse, leggy growth
Tall, thin rosettes with widely spaced blades mean the plant is reaching for light. Raise light intensity gradually, or thin overhanging plants that shade it. A tight cluster also grows more compactly than a solitary rosette. If light is adequate, check CO2 consistency — fluctuating CO2 produces weak growth even under good light.
Blyxa Japonica in Contest-Style Scapes
Blyxa japonica earned its reputation in the IAPLC era as a midground that photographs beautifully. If you're preparing a scape for the camera, plant final clusters 8–12 weeks before you shoot — freshly planted Blyxa looks sparse and needs time to develop the dense, flowing look. Time your final maintenance (removing old outer blades, dividing overgrown clusters) about two weeks before photography so plants look fresh but settled. For the full walkthrough, see our guide on aquascape contest submission preparation.
Pairing With Background and Foreground Plants
If you're planning the background your Blyxa midground sits against, our roundup of tall background aquarium plants for deep tanks covers species that pair well behind it. For fine-textured companions, look at Utricularia graminifolia (a grassy carpet that complements Blyxa's tufts) and guppy grass — the latter can fill background gaps while your Blyxa cluster matures.
Frequently Asked Questions
Is Blyxa japonica a beginner plant?
It's best described as intermediate rather than true beginner. Hardy plants like Java fern or guppy grass tolerate almost anything, but Blyxa wants decent light, root feeding, and stable parameters to look its best. A beginner with a decent light, aquasoil or root tabs, and a consistent fertilizer routine can absolutely succeed — just expect a transition period and don't panic if the first blades melt.
Can Blyxa japonica grow without CO2?
Yes, it survives and grows slowly without injected CO2, provided light is moderate and the substrate feeds the roots. Expect sparser, greener, slower growth — a rosette that would thicken in weeks with CO2 takes months without it. Lower your light to match the slower growth rate to avoid algae, and consider root tabs as the single most effective low-tech upgrade for this plant.
Why is my Blyxa japonica melting?
Melting is usually transition stress: new environment, different water parameters, or the emersed-to-submerged switch. Keep the crowns planted and undisturbed, maintain stable water conditions, and watch the crown center for new green blades within one to three weeks. A firm, green crown means the plant is alive even if all old blades dissolve — new growth will follow.
How do you trim Blyxa japonica?
Don't trim the blades like a stem plant — cut tips scar and stop growing, looking ragged. Instead, uproot overgrown rosettes, divide them at the crown into smaller plantlets with roots, and replant the best ones. This division approach every four to six months also refreshes the cluster, clears trapped debris, and encourages new side shoots.
How fast does Blyxa japonica grow and spread?
Growth rate is moderate: with CO2 and good light, expect visible new blades within a week and new side shoots every two to four weeks, filling a 10 cm cluster in two to three months. Without CO2, growth is roughly half to a third as fast. It spreads by side shoots from the crown rather than runners, so it stays where you plant it — a well-behaved midground plant.
Does Blyxa japonica need special substrate?
It performs best in nutrient-rich aquasoil, but it doesn't demand it. In inert gravel or sand, iron-rich root tabs pushed around each cluster every six to eight weeks produce excellent results, and regular water-column fertilization supports the blades. The combination most hobbyists settle on is whatever substrate they have, plus targeted root feeding — simple, cheap, and effective.
A Reliable Midground Classic
Blyxa japonica rewards the patient aquascaper. Give it moderate light matched to your CO2 level, feed its roots, plant it where its fine grass texture bridges hardscape and carpet, and leave it undisturbed through the inevitable transition melt. Start with a few healthy rosettes in loose clusters, and let the side shoots do the rest.
For authoritative species data, check the Tropica plant database entry for Blyxa japonica, and for nature-style layout inspiration the ADA nature aquarium resources showcase the scaping philosophy this plant was made for.
Tissue-culture plants are the exception — they’re grown in sterile gel and adapt with minimal melting, which is part of what you’re paying for. Plants bought submersed from another hobbyist’s tank also transition with little melt, since they’re already in the right form.
Which Plants Melt Most (and Least)
Heavy melters (expect significant leaf loss)
- Cryptocorynes — infamous for “crypt melt,” sometimes dropping every leaf after any disturbance. They almost always recover from the roots within weeks.
- Stem plants grown emersed — rotala, ludwigia, and hygrophila often shed lower emersed leaves while the growing tips transition.
- Amazon swords — emersed-grown swords typically lose their broad oval aerial leaves and replace them with longer submersed ribbon leaves.
Light melters
- Anubias, java fern, bucephalandra — slow-growing rhizome plants transition gradually; occasional old-leaf melt but rarely dramatic.
- Vallisneria — usually transitions well, though it dislikes the move itself and may sulk for a week.
- Floating plants — minimal melt since their leaves were already at the air-water interface.
The Acclimation Protocol
Step 1: Quarantine or dip first
Before acclimating to your tank’s conditions, make sure you’re not acclimating pests along with the plant. Run new arrivals through our quarantine and dip protocol — it adds days upfront but prevents months of regret.
Step 2: Float to temperature-match (30 minutes)
Float the bag or container in your tank for 20–30 minutes to equalize temperature. Plants are less temperature-sensitive than fish, but a 10°F shock on top of transplant stress is an avoidable insult.
Step 3: Trim before planting
Remove any leaves that are already damaged, yellowing, or heavily algae-covered — they won’t recover and they’ll rot in your tank, feeding algae. For stem plants, trim off the bottom inch and any emersed leaves that look unlikely to adapt; the plant wastes energy maintaining leaves it’s going to shed anyway. Keep the healthy growing tips — that’s where recovery starts.
Step 4: Plant correctly the first time
Follow our planting guide — right depth, crown exposed on rosettes, rhizomes unburied on epiphytes. Every uprooting and replanting restarts the acclimation clock, so get placement right on the first attempt. Decide where each plant goes before it goes in the water.
Step 5: Run a gentle first week
For the first 7 days after planting:
- Moderate light — run your normal photoperiod but consider dropping intensity 20–30% if your light is dimmable. Blast-level light on a melting plant grows algae on the dying leaves, not recovery.
- Stable CO2 — if you inject CO2, keep it consistent. Fluctuating CO2 during acclimation is a melt accelerator. If you’re low-tech, this doesn’t apply — see growing without CO2.
- Half-strength fertilizer — new plants with damaged leaves can’t use full dosing, and the excess feeds algae. Ramp to full strength over 2–3 weeks per our fertilizer schedule.
- No disturbance — don’t move, trim, or “check on” new plants for at least two weeks. Every touch resets root establishment. This is especially critical for crypts.
Step 6: Remove melt, keep the base
As emersed leaves melt, remove the mushy material promptly — decaying leaves release ammonia and grow fungus that can spread to healthy tissue. But never discard the plant while the crown, rhizome, or roots are firm and alive. A crypt that’s lost every leaf but has firm roots is a plant that’s about to recover, not a dead plant. Give it 3–4 weeks before judging.
Telling Normal Melt From Real Problems
Normal transition melt:
- Affects oldest/emersed leaves first, newest growth last
- New submersed leaves emerge even as old ones dissolve
- Roots and crown stay firm and white/green
- Timeline: 1–4 weeks, then obvious new growth
Concerning melt (see our full melting diagnosis guide):
- New growth also melts or emerges deformed
- Rhizome or crown turns mushy and brown — this is rot, not transition
- Entire plant dissolves within days with no new growth after 4+ weeks
- Melting spreads to established plants that weren’t recently moved
Buying Tips to Minimize Melt
- Buy submersed-grown when available — hobbyist-grown cuttings transition with almost no melt.
- Choose tissue culture for sensitive species — crypts and delicate stems establish far more reliably from sterile cups.
- Avoid plants already melting in the store tank — some melt is normal, but a plant that’s mostly mush at purchase has less energy for recovery.
- Transport carefully — keep plants damp and out of direct sun/heat. A plant that dries out or cooks in a hot car melts far worse than one transported properly.
The First-Month Timeline: What to Expect Week by Week
Knowing what’s normal when removes most acclimation anxiety. Here’s the typical timeline for a healthy plant adapting to a new tank:
Week 1: The quiet week
Almost nothing visible happens. The plant is growing roots you can’t see and assessing its new environment. Some species (vallisneria, stem plants) may start shedding their lowest leaves. This is normal. Resist the urge to “help” — no moving, no extra fertilizer, no light changes. The most common beginner mistake is intervening during a week when the correct action is nothing.
Week 2: Melt peaks
This is when emersed leaves give up in earnest. Crypts may drop everything; swords shed their broad aerial leaves; stem plants lose lower foliage. It looks catastrophic and it’s usually fine. Keep removing mushy material, keep conditions stable, and watch the crown and growing tips — if those are firm and green, recovery is already underway.
Week 3: The turn
New submersed-adapted leaves emerge — smaller, thinner, often a slightly different shade of green than the emersed foliage. Stem plant tips start growing visibly; crypts push tiny curled leaves from the crown; swords unfurl narrow ribbon leaves. This is the moment most beginners exhale for the first time.
Week 4+: Established
New growth outpaces melt, and the plant is functionally yours. You can resume full-strength fertilizer, normal trimming, and stop treating it as fragile. Some slow growers (anubias, bucephalandra) take 6–8 weeks to show obvious progress — that’s their normal speed, not a problem.
Acclimating Different Plant Formats
Tissue-culture cups
Sterile, pest-free, and already adapted to high-humidity (not emersed) growth — tissue cultures melt the least of any format. Rinse the agar gel off gently (leftover gel rots and feeds fungus), split the portion into small plantlets, and plant per our planting guide. They establish slowly for the first two weeks, then accelerate. No dip needed, minimal acclimation stress — this is the premium experience you’re paying for.
Potted plants
Remove the pot and strip away the rockwool completely — leftover rockwool traps debris and rots. Tease the root mass apart gently; if it’s a dense mat, splitting it into 2–3 smaller portions actually establishes faster than planting one big clump (more growing points, better water flow around roots). Potted plants are usually emersed-grown, so expect the standard 2–4 week melt cycle.
Bare-root / bunched stems
Typically sold as weighted bunches. Remove any bands, foam, or weights, strip the lower leaves, and plant stems individually or in small groups. Bunched stems from the store are often already transitioning — check for new submersed growth at the tips, which tells you the plant is mid-adaptation and will settle quickly.
Hobbyist cuttings
Already submersed-grown and the fastest to establish — often showing new growth within days. The main acclimation factor is water-parameter difference between the two tanks. Float to temperature-match, plant promptly, and they’ll usually take off with minimal melt. This is why experienced hobbyists prefer trading cuttings over buying potted plants.
Frequently Asked Questions
Should I use a “plant starter” or transplant fertilizer?
Products marketed for transplant shock are mostly B-vitamins and mild hormones. They don’t hurt, but there’s no strong evidence they help aquarium plants specifically. Stable conditions and patience outperform any bottle. Save the money for more plants.
My new plant melted completely — bare crown, no leaves. Is it dead?
Probably not, if the crown or rhizome is firm. Crypts and swords routinely lose 100% of their leaves and regrow from the base within a month. The test is firmness: firm and pale/green means alive; mushy and brown/black means rot. Give firm-but-leafless plants a full 4 weeks before declaring them dead.
Can I speed up acclimation with extra light or CO2?
No — and trying usually backfires. A melting plant can’t use extra light; the excess just grows algae on its dying leaves. Keep light moderate and CO2 stable (not boosted) during acclimation. Growth speed comes from the plant’s own adaptation timeline, which you can’t rush, only avoid delaying.
Should new plants go straight into my main display tank?
After quarantine/dipping, yes — there’s no benefit to a separate “growing-in” tank for most plants. They acclimate to your water fastest in the tank they’ll live in. The exception is very delicate species going into a tank with boisterous fish; give those a few weeks in a calm corner or breeder box first.
The Patience Rule
The single most important acclimation skill is restraint: plant it right, set gentle conditions, remove decay, and then leave it alone for a month. The hobbyists with the best plant growth aren’t doing something clever in week one — they’re simply not interfering in weeks two through four while the plants do what they’ve evolved to do. Melt looks like failure and feels like failure, but in most cases it’s the visible part of a plant successfully becoming yours.