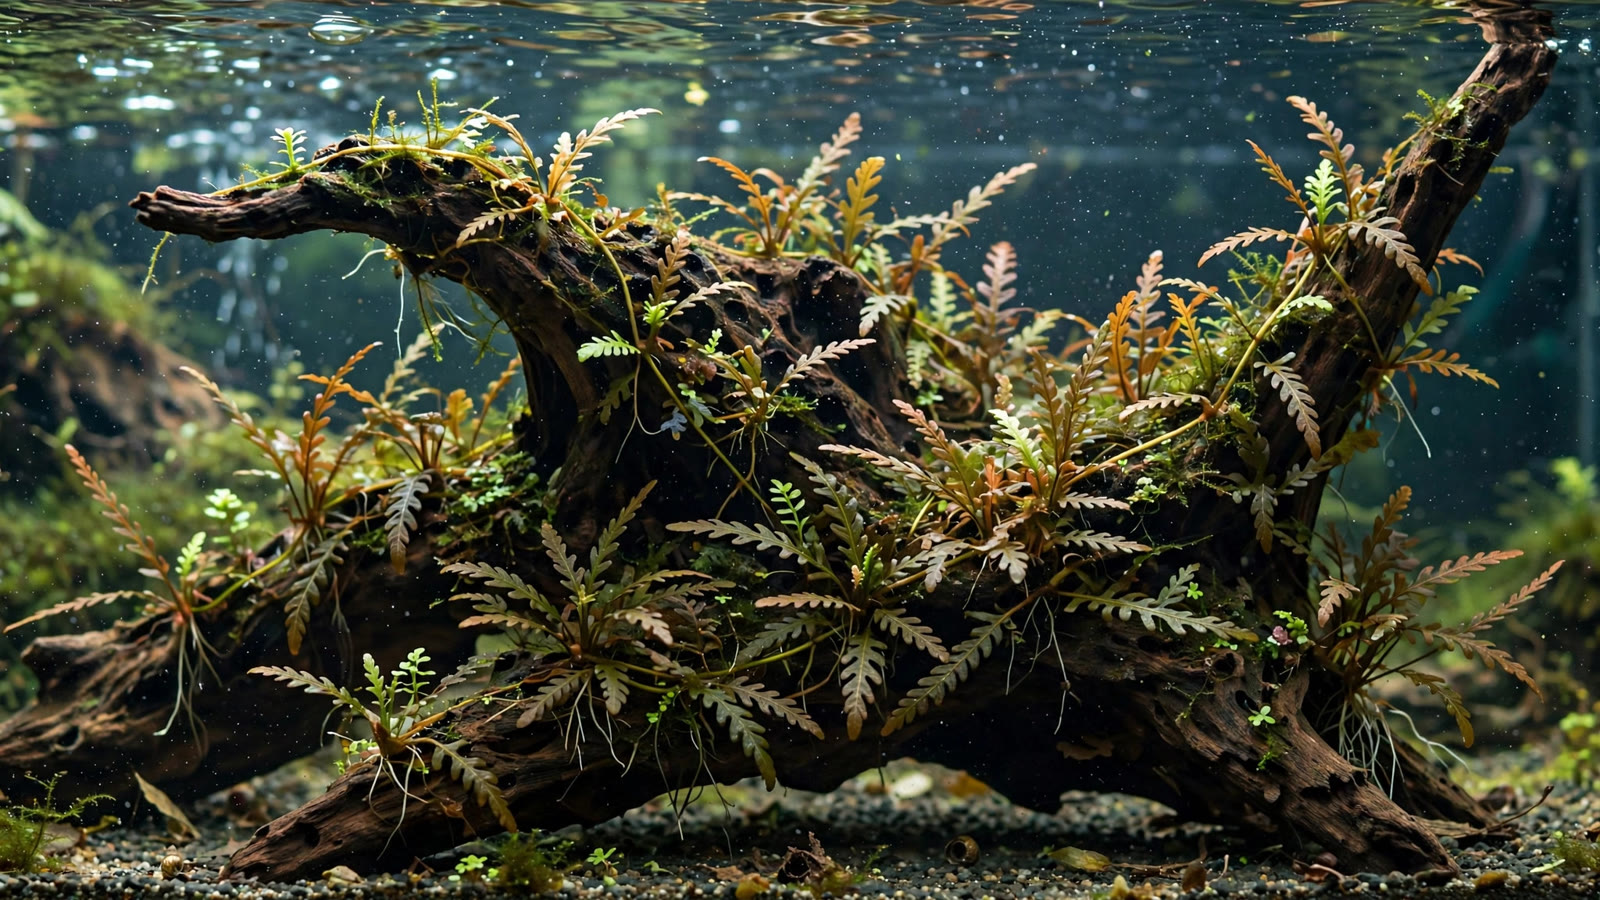
Few aquarium plants look as striking as Hygrophila pinnatifida grown well: deep olive-to-bronze leaves with fern-like, feathered edges, creeping sideways along driftwood like a miniature mountain climber rather than standing upright like a typical stem plant. Learning Hygrophila pinnatifida care rewards aquascapers with one of the most textured midground plants in the hobby — but it demands a mental reset, because this is not a plant you push into the substrate. Grown mounted on wood or rock like an epiphyte, given moderate light and steady potassium, it spreads in a dense, natural carpet of lobed foliage that no other plant quite imitates.
Native to streams in the Indian states of Maharashtra and Goa, Hygrophila pinnatifida entered the hobby in the early 2010s and quickly became a favorite in aquascaping contest layouts, where designers draped it over spiderwood for a distinctive naturalistic look. In its habitat it grows amphibiously — sometimes submerged in flowing streams, sometimes emersed on wet banks — which explains both its adaptability and its most dramatic quirk: the leaves it grows in air look nothing like the leaves it grows underwater.
Understanding the Two Faces of Hygrophila Pinnatifida
Almost every specimen sold in stores is grown emersed (out of water) in nursery farms, and emersed Hygrophila pinnatifida looks like a completely different plant: small, rounded, slightly wavy green leaves on upright stems. New aquascapers sometimes panic when these round leaves melt within days of planting — but that melt is normal. The plant is rebuilding itself for submerged life.
Underwater, with adequate light and nutrients, it produces its signature pinnate leaves: elongated blades with deep fern-like lobes along the margins, olive green on top and a distinctive reddish-brown to burgundy underside. Mature submerged leaves can reach 10–15 cm, and under strong light the tops pick up bronze and copper tones. If your plant stays rounded and plain-leafed for months, that is a diagnostic signal: light or nutrients are insufficient for it to express its submerged form.
Hygrophila Pinnatifida Care: The Epiphyte Habit
Hygrophila pinnatifida's most distinctive — and most misunderstood — trait is that it prefers to grow as an epiphyte, anchored to driftwood or rock rather than rooted in substrate. In nature it clings to rocks in fast-flowing streams, and its root system is adapted for gripping rather than feeding. The roots it sends out are thin, wiry holdfasts that cement themselves to porous surfaces within a few weeks.
How to Mount It Correctly
Mounting is straightforward and follows the same principles used for Anubias on driftwood or Java fern, fellow epiphytes that rot when buried:
- Choose textured hardscape. Spiderwood, mangrove root, and rough lava rock give the holdfast roots the best grip. Smooth river stones work poorly — the roots slide off before they establish.
- Attach with thread or glue. Wrap the stem bases against the wood with dark cotton thread, or use a small dab of cyanoacrylate gel super glue on a dry section of wood and press the stem against it. Both work; thread rots away harmlessly once the plant grips.
- Orient horizontally. Lay stems along the wood's surface rather than pointing them upward. The plant's natural creeping habit does the rest — new growth hugs the surface and spreads.
- Position in the midground. Hygrophila pinnatifida shines when it creeps across a piece of hardscape between the foreground and background, softening the transition.
What happens if you plant it in the substrate anyway? Usually it survives but grows leggy and upright, losing the creeping habit that makes it special. Some aquascapers plant it intentionally in nutrient-rich substrate for faster growth, but it rarely develops the tight, cascading look that wins contests.
Care Parameters at a Glance
| Parameter | Recommended range | Notes |
|---|---|---|
| Light | Moderate to high (30–50+ PAR at plant level) | Pinnate form develops reliably at moderate+ light; low light keeps leaves small and rounded |
| CO₂ | Beneficial but optional (10–30 mg/L) | Grows fine without injected CO₂, but color, leaf size, and creeping vigor improve dramatically with it |
| Temperature | 20–28°C (68–82°F) | Slows noticeably below 20°C; tolerates brief highs with good flow |
| pH | 6.0–7.5 | Prefers slightly acidic to neutral water; adaptable within range |
| Placement | Midground, mounted on wood or rock | Also used draped over filter intakes or along stone seams |
| Growth rate | Medium | Faster with CO₂; slow but steady in low-tech setups |
| Difficulty | Easy to moderate | Easy to keep alive; moderate to make it truly thrive and color up |
Light: The Key to the Pinnate Form
Light intensity is the single biggest lever in Hygrophila pinnatifida care. Under low light the plant stays green, compact, and disappointingly plain — leaves stay small and only weakly lobed. Raise the intensity to a solid moderate level and the transformation begins: leaves lengthen, lobes deepen, undersides flush red-brown, and olive and copper tones appear.
A quality LED fixture run at 60–80% over a standard tank, with the plant in the midground, is usually enough — extreme high-tech lighting is not required. If the plant creeps in one direction only, it is telling you where the better light is.
One caution: brighter light raises the plant's metabolic appetite. A bright tank with lean fertilization produces pale, stunted pinnatifida with the nutrient problems described below. Raise light and feeding together.
CO₂ and Water Flow
Hygrophila pinnatifida does not require pressurized CO₂, which is part of its appeal. In a low-tech tank it grows slowly, with smaller, greener leaves — still attractive, just less dramatic. Add CO₂ and everything scales up: leaf size, growth rate, color depth, and the density of the creeping mat. Unlike its cousin Hygrophila polysperma, which tends to grow aggressively weedy in any conditions, pinnatifida stays manageable.
Flow deserves special attention. Because this plant evolved in streams, it responds well to moderate water movement — gentle circulation keeps leaves clean of biofilm and delivers CO₂ and nutrients to foliage that cannot rely on substrate roots. Mounted in a dead-flow corner, it stagnates; the same plant mounted where filter outflow brushes past it thrives. Think of it like Bolbitis heudelotii, another stream-dwelling epiphyte that rewards current.
Fertilization and the Potassium Sensitivity
Here is the detail every pinnatifida keeper eventually learns: this plant is famously sensitive to potassium deficiency, and its leaves are among the clearest early-warning indicators in the hobby. The first sign is small pinholes in older leaves, often ringed with yellowing, enlarging as the tissue dies back from the margins.
If you see this pattern, do not tear the plant out — diagnose first. Our guide on pinholes in aquarium plant leaves walks through the full diagnostic, but the short version is: pinholes concentrated in older leaves, with new growth still healthy, almost always points to mobile-nutrient deficiency, and potassium is the prime suspect for this species.
Practical fertilization approach:
- Start lean, then observe. A balanced all-in-one liquid fertilizer dosed at the manufacturer's low-to-moderate recommendation is the right starting point. Watch for 2–3 weeks before changing anything.
- Watch the old leaves. Pinholes appearing on mature foliage while new leaves emerge clean is your signal to raise potassium — either through a potassium-specific supplement or a richer all-in-one dose.
- Increase slowly. Raise dosing in small steps (for example, 25% more) and wait two weeks. Livestock safety comes first: never chase perfect plant growth by overdosing in a stocked tank.
- Don't ignore the rest of the recipe. Iron and magnesium support the red-brown undersides and overall vigor; nitrogen and phosphate keep growth steady. Pinnatifida is not a nitrogen hog, so modest macros usually suffice.
One common mistake is blaming pinholes on algae or "too much light" and dimming the tank — which weakens the plant further while the real deficiency continues. Deficiency symptoms are the plant communicating; read the leaves before adjusting the fixture.
Trimming for Compact, Creeping Growth
Left alone, Hygrophila pinnatifida grows upward and rangy, especially under modest light — which defeats the purpose of choosing it. Regular trimming converts a scraggly plant into the dense, fern-like mat seen in showcase tanks.
The Two-Stage Trim
- Top the upright stems. When vertical stems reach 10–15 cm, cut them back to 3–5 cm above the mounting point. This is the same heading-back technique used with stem plants, and it works because pinnatifida branches readily from nodes below the cut.
- Redirect the runners. The plant sends out horizontal creeping stems along the wood. Guide these into bare areas by gently repositioning them and pinning with thread if needed. Each runner node can root and sprout a new leaf rosette.
Trim frequently rather than rarely — small, monthly maintenance keeps the mat tight, while an annual hack-back leaves ugly bare wood. Healthy cuttings can be mounted elsewhere in the tank, which is the easiest way to propagate the plant; use the tops to fill gaps and discard yellowing or pinhole-damaged lower leaves.
After a hard trim the plant may sulk for a week, producing smaller leaves while it re-establishes. This is normal. New growth with deeper lobes follows within two to three weeks under stable conditions.
The Emersed-to-Submerged Transition
Because nearly all store stock is grown emersed, expect a transition period of 2–6 weeks after mounting. The timeline usually runs:
- Week 1–2: Round emersed leaves yellow and melt, often alarmingly fast. The stem and nodes stay firm — this is the signal the plant is alive and adapting.
- Week 2–4: Tiny new leaves emerge from nodes, initially small and weakly lobed.
- Week 4–6+: New leaves grow progressively more pinnate, larger, and more colorful as the plant commits to submerged form.
Do not remove melting leaves prematurely unless they are visibly rotting — the plant reabsorbs nutrients from them, and stripping foliage starves the transition. Do not move or re-mount the plant during this window either; every disturbance restarts the clock. Stable water parameters matter more than any supplement during the first month. Tissue-culture cups are the exception: gel-grown plants often transition faster, though they still need a few weeks to build true submerged foliage.
Placement and Aquascaping Ideas
This is where Hygrophila pinnatifida earns its reputation. Its creeping habit and fern-like texture make it ideal for softening hardscape:
- Spiderwood coverage. The classic use — mount along the main branches of a centerpiece spiderwood so the foliage drapes and cascades, creating the illusion of vegetation colonizing the wood. This is the signature look in countless contest scapes.
- Stone seams. Tuck runners into the crevices between stacked stones; the plant creeps across the rock faces and hides the joints.
- Midground transitions. Plant it between a carpeting foreground (like Hemianthus callitrichoides or Monte Carlo) and taller background stems — its texture bridges the two scales beautifully.
- Companion epiphytes. Combine with Bucephalandra or moss on the same wood for layered texture: pinnatifida's bold lobed leaves above, finer moss or buce detail below. Our Christmas moss and flame moss profiles cover good moss partners.
For visual contrast, pair it against fine-leaved background plants — the broad lobed foliage reads even more dramatic next to something delicate like Rotala wallichii or Limnophila sessiliflora.
Common Problems and Fixes
Leaves stay round, never turn pinnate
Almost always a light or maturity issue. Confirm the plant is getting genuine moderate light at its position (not shaded by overhanging stems), give it 6–8 weeks of stable growth, and ensure fertilization is adequate. Emersed-form persistence is the plant conserving energy.
Pinholes and ragged older leaves
Classic potassium deficiency — see the fertilization section above. Increase potassium gradually, and trim away badly damaged leaves so the plant redirects energy to healthy growth.
Melting right after planting
Normal emersed-to-submerged transition if the stems and nodes stay firm. Only worry if the stems turn mushy and translucent — that indicates rot, usually from burial or poor water quality.
Leggy, upward growth
The plant is reaching for light. Increase intensity at its position, trim upright stems back to encourage branching, and redirect runners horizontally along the wood.
Roots won't grip the wood
The surface is too smooth, or the attachment point keeps shifting. Move to rougher hardscape, secure with thread for 3–4 weeks, and avoid disturbing the area — flow that rocks the stems prevents holdfast formation.
Frequently Asked Questions
Can Hygrophila pinnatifida grow without CO₂?
Yes — it grows without injected CO₂, just more slowly and with smaller, greener, less deeply lobed leaves. Many low-tech aquascapers keep it successfully as a textured midground plant. Adding CO₂ improves leaf size, color depth, and creeping vigor, but it is a genuine optional upgrade rather than a requirement, which is unusual for a plant this dramatic.
Should I plant Hygrophila pinnatifida in the substrate?
Mounting on wood or rock is strongly preferred — its roots are holdfasts adapted for gripping surfaces, and buried stems often rot or grow leggy. If you do try substrate, use only the lowest portion buried in porous, nutrient-rich substrate and let the rest creep over hardscape. Most successful long-term specimens in the hobby are mounted epiphytes.
Why are the leaves on my new plant melting?
Your plant was almost certainly grown emersed (in air) at the farm, and its round emersed leaves cannot function underwater. They melt within days to weeks while the plant grows new submerged, pinnate foliage from the nodes. This is expected — keep the stems in place, don't move the plant, and look for tiny new leaves emerging from nodes within 2–4 weeks.
What causes pinholes in the leaves?
Pinholes in older leaves are the classic sign of potassium deficiency, to which this species is especially sensitive. Increase potassium gradually through your fertilizer regimen and trim away badly damaged foliage. If pinholes appear alongside stunted new growth or yellowing veins, a broader nutrient review is worthwhile — but for pinnatifida, potassium is the first suspect.
How fast does Hygrophila pinnatifida grow?
Moderate — faster than Anubias or Bucephalandra but far slower than weedy stems like Hygrophila polysperma. Expect a mounted cutting to establish grip in 3–4 weeks and form a respectable creeping patch within 2–3 months. CO₂, good light, and adequate potassium each noticeably accelerate it; low light and lean feeding slow it to a crawl.
Is Hygrophila pinnatifida suitable for beginners?
Reasonably, yes — it is hard to kill, tolerant of a wide pH and temperature range, and doesn't demand CO₂. The "moderate" part of its difficulty rating is about achieving the pinnate, colorful form: that needs solid light, stable nutrients (especially potassium), and regular trimming. A beginner can keep it alive easily; a patient beginner who learns its signals will make it thrive.
Bringing It All Together
Hygrophila pinnatifida rewards the aquascaper who thinks like its native streams do: give it something to grip, decent light, potassium-rich feeding, and trimming with intent. In return you get one of the hobby's most distinctive textures — fern-like foliage creeping across wood in olive, bronze, and burgundy — and a plant that tells you what it needs through its leaves. For detailed species data, the Tropica plant database entry for Hygrophila pinnatifida is an excellent reference alongside this guide.
Tissue-culture plants are the exception — they’re grown in sterile gel and adapt with minimal melting, which is part of what you’re paying for. Plants bought submersed from another hobbyist’s tank also transition with little melt, since they’re already in the right form.
Which Plants Melt Most (and Least)
Heavy melters (expect significant leaf loss)
- Cryptocorynes — infamous for “crypt melt,” sometimes dropping every leaf after any disturbance. They almost always recover from the roots within weeks.
- Stem plants grown emersed — rotala, ludwigia, and hygrophila often shed lower emersed leaves while the growing tips transition.
- Amazon swords — emersed-grown swords typically lose their broad oval aerial leaves and replace them with longer submersed ribbon leaves.
Light melters
- Anubias, java fern, bucephalandra — slow-growing rhizome plants transition gradually; occasional old-leaf melt but rarely dramatic.
- Vallisneria — usually transitions well, though it dislikes the move itself and may sulk for a week.
- Floating plants — minimal melt since their leaves were already at the air-water interface.
The Acclimation Protocol
Step 1: Quarantine or dip first
Before acclimating to your tank’s conditions, make sure you’re not acclimating pests along with the plant. Run new arrivals through our quarantine and dip protocol — it adds days upfront but prevents months of regret.
Step 2: Float to temperature-match (30 minutes)
Float the bag or container in your tank for 20–30 minutes to equalize temperature. Plants are less temperature-sensitive than fish, but a 10°F shock on top of transplant stress is an avoidable insult.
Step 3: Trim before planting
Remove any leaves that are already damaged, yellowing, or heavily algae-covered — they won’t recover and they’ll rot in your tank, feeding algae. For stem plants, trim off the bottom inch and any emersed leaves that look unlikely to adapt; the plant wastes energy maintaining leaves it’s going to shed anyway. Keep the healthy growing tips — that’s where recovery starts.
Step 4: Plant correctly the first time
Follow our planting guide — right depth, crown exposed on rosettes, rhizomes unburied on epiphytes. Every uprooting and replanting restarts the acclimation clock, so get placement right on the first attempt. Decide where each plant goes before it goes in the water.
Step 5: Run a gentle first week
For the first 7 days after planting:
- Moderate light — run your normal photoperiod but consider dropping intensity 20–30% if your light is dimmable. Blast-level light on a melting plant grows algae on the dying leaves, not recovery.
- Stable CO2 — if you inject CO2, keep it consistent. Fluctuating CO2 during acclimation is a melt accelerator. If you’re low-tech, this doesn’t apply — see growing without CO2.
- Half-strength fertilizer — new plants with damaged leaves can’t use full dosing, and the excess feeds algae. Ramp to full strength over 2–3 weeks per our fertilizer schedule.
- No disturbance — don’t move, trim, or “check on” new plants for at least two weeks. Every touch resets root establishment. This is especially critical for crypts.
Step 6: Remove melt, keep the base
As emersed leaves melt, remove the mushy material promptly — decaying leaves release ammonia and grow fungus that can spread to healthy tissue. But never discard the plant while the crown, rhizome, or roots are firm and alive. A crypt that’s lost every leaf but has firm roots is a plant that’s about to recover, not a dead plant. Give it 3–4 weeks before judging.
Telling Normal Melt From Real Problems
Normal transition melt:
- Affects oldest/emersed leaves first, newest growth last
- New submersed leaves emerge even as old ones dissolve
- Roots and crown stay firm and white/green
- Timeline: 1–4 weeks, then obvious new growth
Concerning melt (see our full melting diagnosis guide):
- New growth also melts or emerges deformed
- Rhizome or crown turns mushy and brown — this is rot, not transition
- Entire plant dissolves within days with no new growth after 4+ weeks
- Melting spreads to established plants that weren’t recently moved
Buying Tips to Minimize Melt
- Buy submersed-grown when available — hobbyist-grown cuttings transition with almost no melt.
- Choose tissue culture for sensitive species — crypts and delicate stems establish far more reliably from sterile cups.
- Avoid plants already melting in the store tank — some melt is normal, but a plant that’s mostly mush at purchase has less energy for recovery.
- Transport carefully — keep plants damp and out of direct sun/heat. A plant that dries out or cooks in a hot car melts far worse than one transported properly.
The First-Month Timeline: What to Expect Week by Week
Knowing what’s normal when removes most acclimation anxiety. Here’s the typical timeline for a healthy plant adapting to a new tank:
Week 1: The quiet week
Almost nothing visible happens. The plant is growing roots you can’t see and assessing its new environment. Some species (vallisneria, stem plants) may start shedding their lowest leaves. This is normal. Resist the urge to “help” — no moving, no extra fertilizer, no light changes. The most common beginner mistake is intervening during a week when the correct action is nothing.
Week 2: Melt peaks
This is when emersed leaves give up in earnest. Crypts may drop everything; swords shed their broad aerial leaves; stem plants lose lower foliage. It looks catastrophic and it’s usually fine. Keep removing mushy material, keep conditions stable, and watch the crown and growing tips — if those are firm and green, recovery is already underway.
Week 3: The turn
New submersed-adapted leaves emerge — smaller, thinner, often a slightly different shade of green than the emersed foliage. Stem plant tips start growing visibly; crypts push tiny curled leaves from the crown; swords unfurl narrow ribbon leaves. This is the moment most beginners exhale for the first time.
Week 4+: Established
New growth outpaces melt, and the plant is functionally yours. You can resume full-strength fertilizer, normal trimming, and stop treating it as fragile. Some slow growers (anubias, bucephalandra) take 6–8 weeks to show obvious progress — that’s their normal speed, not a problem.
Acclimating Different Plant Formats
Tissue-culture cups
Sterile, pest-free, and already adapted to high-humidity (not emersed) growth — tissue cultures melt the least of any format. Rinse the agar gel off gently (leftover gel rots and feeds fungus), split the portion into small plantlets, and plant per our planting guide. They establish slowly for the first two weeks, then accelerate. No dip needed, minimal acclimation stress — this is the premium experience you’re paying for.
Potted plants
Remove the pot and strip away the rockwool completely — leftover rockwool traps debris and rots. Tease the root mass apart gently; if it’s a dense mat, splitting it into 2–3 smaller portions actually establishes faster than planting one big clump (more growing points, better water flow around roots). Potted plants are usually emersed-grown, so expect the standard 2–4 week melt cycle.
Bare-root / bunched stems
Typically sold as weighted bunches. Remove any bands, foam, or weights, strip the lower leaves, and plant stems individually or in small groups. Bunched stems from the store are often already transitioning — check for new submersed growth at the tips, which tells you the plant is mid-adaptation and will settle quickly.
Hobbyist cuttings
Already submersed-grown and the fastest to establish — often showing new growth within days. The main acclimation factor is water-parameter difference between the two tanks. Float to temperature-match, plant promptly, and they’ll usually take off with minimal melt. This is why experienced hobbyists prefer trading cuttings over buying potted plants.
Frequently Asked Questions
Should I use a “plant starter” or transplant fertilizer?
Products marketed for transplant shock are mostly B-vitamins and mild hormones. They don’t hurt, but there’s no strong evidence they help aquarium plants specifically. Stable conditions and patience outperform any bottle. Save the money for more plants.
My new plant melted completely — bare crown, no leaves. Is it dead?
Probably not, if the crown or rhizome is firm. Crypts and swords routinely lose 100% of their leaves and regrow from the base within a month. The test is firmness: firm and pale/green means alive; mushy and brown/black means rot. Give firm-but-leafless plants a full 4 weeks before declaring them dead.
Can I speed up acclimation with extra light or CO2?
No — and trying usually backfires. A melting plant can’t use extra light; the excess just grows algae on its dying leaves. Keep light moderate and CO2 stable (not boosted) during acclimation. Growth speed comes from the plant’s own adaptation timeline, which you can’t rush, only avoid delaying.
Should new plants go straight into my main display tank?
After quarantine/dipping, yes — there’s no benefit to a separate “growing-in” tank for most plants. They acclimate to your water fastest in the tank they’ll live in. The exception is very delicate species going into a tank with boisterous fish; give those a few weeks in a calm corner or breeder box first.
The Patience Rule
The single most important acclimation skill is restraint: plant it right, set gentle conditions, remove decay, and then leave it alone for a month. The hobbyists with the best plant growth aren’t doing something clever in week one — they’re simply not interfering in weeks two through four while the plants do what they’ve evolved to do. Melt looks like failure and feels like failure, but in most cases it’s the visible part of a plant successfully becoming yours.