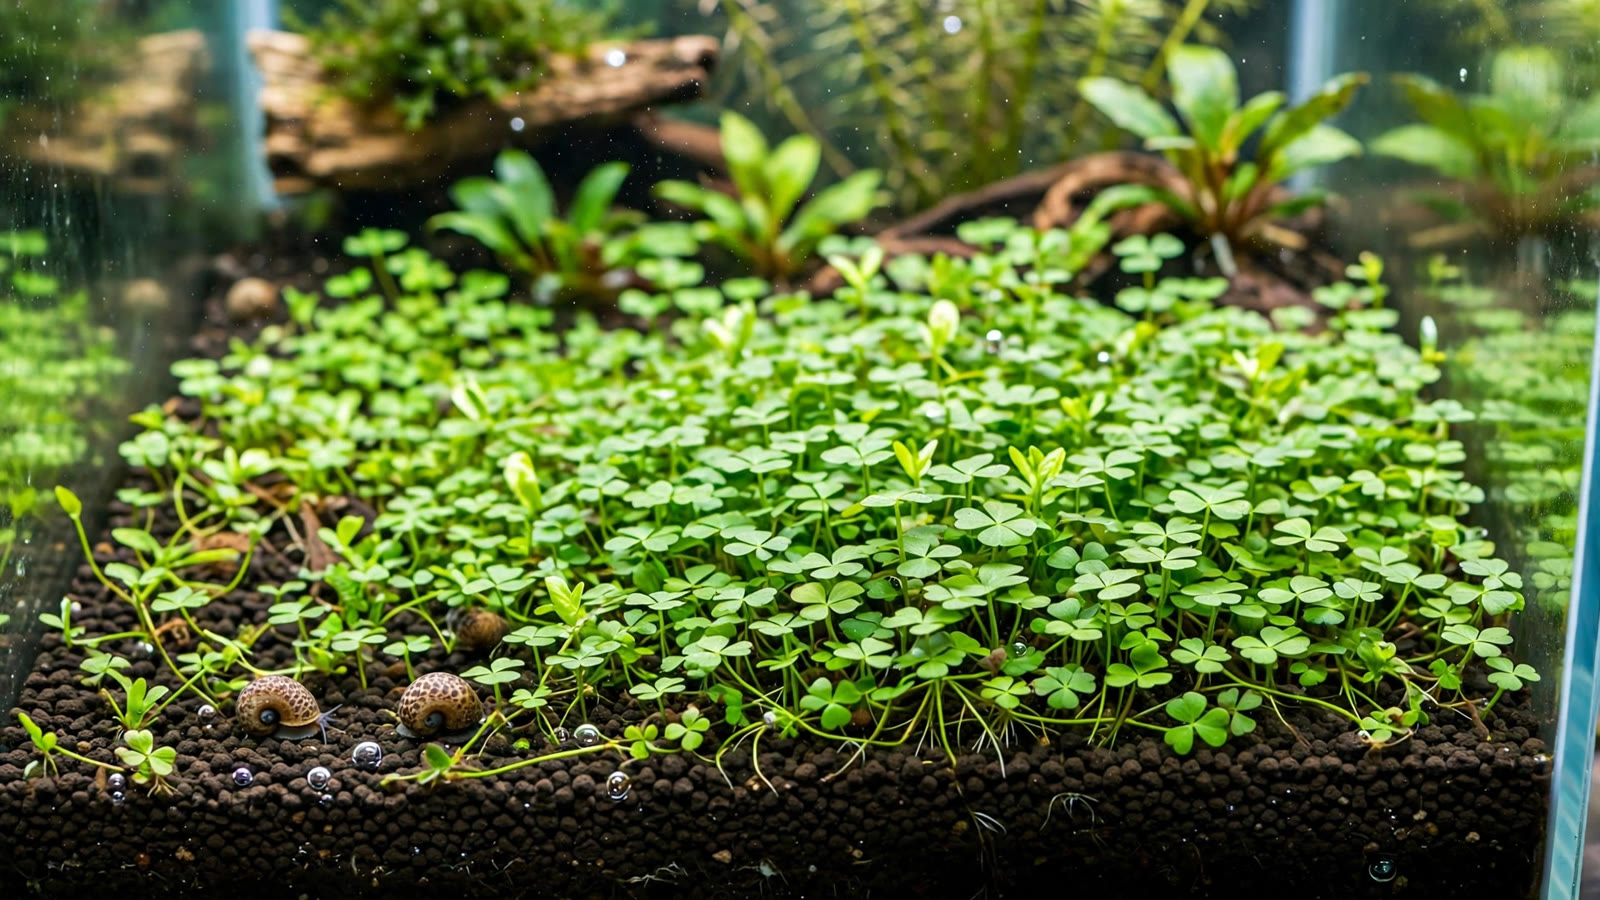
Most low-tech carpets die of two things: light hunger and impatience. Dwarf hairgrass without CO2 stretches into a stringy mess, Monte Carlo sulks in dim tanks, and glosso refuses to stay down. Marsilea hirsuta care breaks that pattern, which is why this Australian water fern — sold as dwarf clover — has become the quiet favorite of low-tech aquascapers. It carpets under moderate light, survives without injected CO2, forgives beginner mistakes, and looks like a meadow of four-leaf clovers while it does it. This guide covers everything from its two leaf personalities to the three carpeting methods that actually work, so you can start a carpet today and still have one next year.
Marsilea Hirsuta at a Glance
Marsilea hirsuta is a true aquatic fern (family Marsileaceae) native to Australia, where it grows in shallow seasonal wetlands, creek edges, and floodplains that alternate between flooded and exposed. That wetland upbringing is the secret to its aquarium resilience: the plant is built to survive water level swings, muddy substrate, and shifting light. In the aquarium trade it usually arrives as tissue culture in an emersed clover-leaf form, though potted or nursery-grown specimens are increasingly common. Whatever form you buy, the plant eventually adapts its leaves to whatever conditions you give it — and then carpets by sending out creeping runners.
| Parameter | Recommended range |
|---|---|
| Scientific name | Marsilea hirsuta |
| Common names | Dwarf clover, four-leaf clover fern |
| Origin | Australia |
| Placement | Foreground carpet |
| Carpet height | 2–10 cm (light dependent) |
| Growth rate | Slow to medium |
| Light demand | Low to medium (medium keeps it flat) |
| CO2 | Optional — faster, denser carpet with it |
| Temperature | 18–28 °C (64–82 °F) |
| pH | 6.0–7.5 |
| Substrate | Fine, nutrient-rich substrate preferred |
| Difficulty | Easy |
The plant spreads through horizontal rhizomes — runners that creep just under or along the substrate surface, sending up leaf stalks (petioles) at each node. New leaves unfurl pale gold or yellow-green before settling into a deeper green, which gives a freshly spreading carpet a beautiful two-tone shimmer. Because it is a fern, it never flowers in the aquarium; all growth is vegetative, and propagation is simply a matter of separating runners.
Emersed vs Submerged: Two Plants in One
The single most confusing thing about Marsilea hirsuta is that it barely looks like the same plant in air and water. This is heterophylly — the ability to produce different leaf shapes depending on whether the leaf grows in air or underwater — and understanding it saves you from the number-one beginner panic: "my plant changed shape, is it dying?"
The emersed form (how most tissue-culture cups and nursery pots arrive) has the classic four-lobed clover leaves, sometimes two- or three-lobed, on longer stalks. It is the plant's "wetland exposed" mode, built for growing in muddy banks between floods.
The submerged form develops once the plant settles underwater. Under moderate light it keeps low, producing single rounded leaves like an oversized glossostigma pad, or the familiar two-to-four-lobed clover fronds at just a few centimeters tall. Under low light it stretches — petioles lengthen toward the surface and leaves become single and taller, which is why weak lighting gives you a lanky "clover meadow" instead of a flat carpet.
The transition takes a few weeks. Old emersed leaves often yellow and melt as submerged leaves take over. Do not rip the plant out during this phase; it is adapting, not failing. The new submerged foliage is the growth you should judge. If you buy from a supplier, the Dennerle plant database entry for Marsilea hirsuta shows the clover form most plants arrive in, which helps you confirm you received the right species.
Three Carpeting Methods That Actually Work
Marsilea hirsuta will carpet by any route — the question is how fast you want it and how much patience you have. These are the three methods that reliably succeed, from slowest to fastest.
1. Direct Planting (the straightforward route)
This is what most people do: fill the tank, plant, and wait. Divide your portion into small clumps of 5–10 leaf stalks each and plant them with tweezers on a grid, roughly 2–4 cm apart, pushing each clump about a centimeter into the substrate so only the leaves are exposed. Depth matters more than density — clumps planted too shallowly float loose, and in a stocked tank, curious fish and shrimp will excavate them overnight.
Keep the tank at moderate light (around 6–8 hours to start, extending to 8–10 once established) and give the substrate real nutrition, either a nutrient-rich aquasoil or root tabs under a sand cap. In a no-CO2 tank, expect the first runners after 2–4 weeks and a visibly joining carpet in 3–6 months. It is slow, but the plant does the work. This method pairs beautifully with a mature, stable tank where parameters do not swing — a perfect match if you are already running dwarf sagittaria or cryptocoryne parva as low-tech companions.
2. Dry Start (the fastest carpet, before water ever enters)
The dry-start method exploits the plant's wetland nature: it grows emersed just as happily as submerged, and usually faster. Spread moist (not soggy) aquasoil in the empty tank, plant your clumps exactly as above, then seal the tank with cling film, leaving a small gap for air exchange. Keep the substrate damp with a daily misting and give it 10–12 hours of light.
Because the leaves grow in air, there is no transplant melt, no CO2 limitation, and no algae war — the plant just spreads. In 4–8 weeks a sparse planting can become a solid clover meadow. Then flood the tank slowly, filling over plastic wrap laid on the substrate to avoid disturbing the new roots. Keep the lights at full strength after flooding; the plant will convert to its submerged form over a few weeks, shedding the taller emersed leaves. One caution: flood too fast or leave the tank sealed airtight, and mold can colonize the damp soil. Airflow and gentle misting beat heavy soaking every time.
3. Dark Start (the low-maintenance middle ground)
A dark start borrows patience from nature: plant the tank, fill it, but run the lights for only 2–4 hours daily — or not at all — for the first few weeks while the substrate and bacterial colonies mature. Marsilea hirsuta anchors its roots in near-darkness, drawing on its rhizome reserves while algae, which needs strong light, starves.
After 3–6 weeks, ramp the photoperiod up in stages over two weeks to a normal schedule. The carpet that emerges skips the usual new-tank algae phase that plagues so many foregrounds. It will not be as fast as a dry start — the plant still grows slowly underwater — but it is the easiest route for anyone who wants to set a tank up and mostly leave it alone. If your setup also leans Walstad-style or low-intervention, this method fits the philosophy of letting biology settle before pushing growth.
Runner and Trimming Management
Marsilea hirsuta has no vertical ambitions — it has horizontal ones. Its runners creep across the substrate, and your job is to decide where they are allowed to go. This is management, not rescue: the plant does the growing, you do the directing.
- Guiding runners: When a runner heads somewhere you do not want it (up a slope, into a path, under a rock), gently lift it with tweezers and re-pin it along your intended boundary. Runners are flexible until they root; once rooted, redirecting them means lifting the rooted node too.
- Trimming: Unlike stem plants, you do not top marsilea. Thin the carpet by pulling out entire leaf stalks at the base when a patch gets too tall or leggy, and remove older yellowing leaves the same way. Thinning keeps light reaching the runners, which is what maintains a dense carpet instead of a sparse meadow of tall stalks.
- Density control: In high-light, high-CO2 setups the carpet can grow almost too well, forming a mat so thick that the substrate underneath goes anaerobic. Lift and thin patches every few months, replanting the best runners elsewhere or sharing them. Thick mats also trap detritus — a gentle wave of a net or a careful gravel-vac hover keeps mulm from settling in.
- Boundaries: If you want the carpet to stop at a rock or driftwood line, trim runners at that line regularly. Marsilea respects obstacles slowly; without boundary work it will eventually creep over them.
Compared with fussy carpets like dwarf baby tears or Monte Carlo, which demand frequent trimming and CO2 to stay flat, marsilea's runner habit is forgiving. Miss a trimming session and it still looks good — it just gets a little wilder.
Algae and Melt Pitfalls
Marsilea hirsuta is hardy, but two problems account for nearly every failed carpet: algae in new tanks and melt during transitions.
Algae: The slow early growth phase is the danger window. Sparse, slow-spreading leaves collect spot algae (GSA and thread algae especially) when light is high but plant mass is low — the plant cannot outcompete algae until its runners join up. Counter this by starting with shorter photoperiods (6 hours), keeping phosphate and nitrates balanced but not excessive, and planting densely from day one if you can afford the extra portions. Once the carpet knits together, it becomes remarkably algae-resistant: the dense mat shades the substrate and outcompetes newcomers. New leaves emerging pale gold are normal; leaves coated in dark green spots are an algae signal, not a growth stage.
Melt: Marsilea melts in three situations — the emersed-to-submerged transition, sudden parameter swings (temperature crashes, massive water changes), and exposure to liquid carbon products dosed above recommendations. The first is expected and self-resolving: keep the runners, remove only leaves that are fully mushy, and wait. The second and third are preventable: match temperature on water changes and dose liquid carbon conservatively, or skip it entirely since marsilea does not need it. If melt strikes, resist the urge to replant or disturb the substrate — the runners almost always hold the comeback.
Tank-Mate Notes
Marsilea hirsuta's shrimp-safe, fish-safe, snail-safe reputation is well earned — it is non-toxic, and its dense runners are excellent micro-fauna habitat. But "safe" and "compatible" are not the same thing.
Shrimp (neocaridina, caridina): Ideal partners. Shrimp graze the biofilm off the carpet, keeping it algae-free, and the mat gives shrimplets cover. Tissue-culture cups are the safest starting plant for shrimp tanks since they arrive pest- and pesticide-free.
Bottom feeders (corydoras, kuhli loaches, small plecos): Fine with an established carpet, but risky during planting. A cory school rooting through fresh clumps can uproot a day's work overnight. Plant, let roots anchor for 2–3 weeks, then add the diggers.
Cichlids and goldfish: Avoid. Diggers and grazers like Oscars, mbuna, and fancy goldfish will destroy any foreground carpet, marsilea included. This is not a plant weakness — it is a fish lifestyle.
Snails: Pest snails will not eat healthy marsilea, though they may rasp dying leaves. That is actually useful: snail cleanup of melting transition leaves keeps the carpet tidy.
Thematically, marsilea pairs well in low-tech scapes with Staurogyne repens as a midground step-up, pearl weed in the background for contrast, and dwarf hairgrass only if you can give the grass the stronger light it wants — otherwise the hairgrass stretches while the marsilea stays flat, and the mismatch shows.
Frequently Asked Questions
Does Marsilea hirsuta need CO2 to carpet?
No, but CO2 changes the timeline and the texture. Without injected CO2, marsilea still carpets — it just takes 3–6 months and grows slightly taller with looser spacing. With CO2, carpets knit together in 6–10 weeks, stay flatter, and produce the tight four-lobed clover look most aquascapers want. If you are committed to low-tech, compensate with moderate light and rich substrate; the plant will do the rest on its own schedule.
Why is my Marsilea hirsuta growing tall instead of carpeting?
It is reaching for light. Under low light, petioles stretch upward and leaves stay single and tall — the plant's wetland survival strategy. Raise your light intensity (or reduce depth by raising the fixture) and new growth will hug the substrate. Do not expect old tall leaves to shrink; trim them at the base and let fresh low runners take over.
Can I plant Marsilea hirsuta in sand?
Yes, if the sand is fine-grained and you add root tabs, because marsilea feeds mostly through its roots. Coarse gravel is the real problem — clumps sit loosely between pebbles, float away, and runners struggle to anchor. Fine sand capped over aquasoil, or plain fine sand with regularly replaced root tabs, both work well.
How long does a dry-start Marsilea hirsuta carpet take?
From clumps spaced 2–4 cm apart, expect a joined carpet in 4–8 weeks of humid, sealed dry-start growth at 10–12 hours of light per day. After flooding, add 2–4 more weeks for the emersed-to-submerged leaf conversion. Denser initial planting and healthy root nutrition both shorten the timeline.
Is Marsilea hirsuta invasive in outdoor ponds?
It can be vigorous outdoors in warm climates, spreading by runners the same way it does indoors — and Australia's native species has naturalized in some regions. If you keep it in an outdoor pond, treat it like any spreading foreground: plant it in contained zones and never dump aquarium water or trimmings into local waterways. Check your region's aquatic plant regulations before pond use.
The Carpet That Rewards the Patient
Marsilea hirsuta is not the fastest carpet, the tiniest carpet, or the flashiest carpet — it is the one that actually survives a normal person's tank. It tolerates low CO2, forgives dim months, recovers from melt via indestructible runners, and asks only for moderate light and food at its roots. Whether you go the slow-and-steady direct route, the fast-and-damp dry start, or the hands-off dark start, the formula is the same: plant it, feed it, give it time, and thin it when it gets ambitious. In a hobby full of carpets that demand laboratory conditions, a clover meadow that thrives on neglect is a small miracle — and it looks like one too.
Tissue-culture plants are the exception — they’re grown in sterile gel and adapt with minimal melting, which is part of what you’re paying for. Plants bought submersed from another hobbyist’s tank also transition with little melt, since they’re already in the right form.
Which Plants Melt Most (and Least)
Heavy melters (expect significant leaf loss)
- Cryptocorynes — infamous for “crypt melt,” sometimes dropping every leaf after any disturbance. They almost always recover from the roots within weeks.
- Stem plants grown emersed — rotala, ludwigia, and hygrophila often shed lower emersed leaves while the growing tips transition.
- Amazon swords — emersed-grown swords typically lose their broad oval aerial leaves and replace them with longer submersed ribbon leaves.
Light melters
- Anubias, java fern, bucephalandra — slow-growing rhizome plants transition gradually; occasional old-leaf melt but rarely dramatic.
- Vallisneria — usually transitions well, though it dislikes the move itself and may sulk for a week.
- Floating plants — minimal melt since their leaves were already at the air-water interface.
The Acclimation Protocol
Step 1: Quarantine or dip first
Before acclimating to your tank’s conditions, make sure you’re not acclimating pests along with the plant. Run new arrivals through our quarantine and dip protocol — it adds days upfront but prevents months of regret.
Step 2: Float to temperature-match (30 minutes)
Float the bag or container in your tank for 20–30 minutes to equalize temperature. Plants are less temperature-sensitive than fish, but a 10°F shock on top of transplant stress is an avoidable insult.
Step 3: Trim before planting
Remove any leaves that are already damaged, yellowing, or heavily algae-covered — they won’t recover and they’ll rot in your tank, feeding algae. For stem plants, trim off the bottom inch and any emersed leaves that look unlikely to adapt; the plant wastes energy maintaining leaves it’s going to shed anyway. Keep the healthy growing tips — that’s where recovery starts.
Step 4: Plant correctly the first time
Follow our planting guide — right depth, crown exposed on rosettes, rhizomes unburied on epiphytes. Every uprooting and replanting restarts the acclimation clock, so get placement right on the first attempt. Decide where each plant goes before it goes in the water.
Step 5: Run a gentle first week
For the first 7 days after planting:
- Moderate light — run your normal photoperiod but consider dropping intensity 20–30% if your light is dimmable. Blast-level light on a melting plant grows algae on the dying leaves, not recovery.
- Stable CO2 — if you inject CO2, keep it consistent. Fluctuating CO2 during acclimation is a melt accelerator. If you’re low-tech, this doesn’t apply — see growing without CO2.
- Half-strength fertilizer — new plants with damaged leaves can’t use full dosing, and the excess feeds algae. Ramp to full strength over 2–3 weeks per our fertilizer schedule.
- No disturbance — don’t move, trim, or “check on” new plants for at least two weeks. Every touch resets root establishment. This is especially critical for crypts.
Step 6: Remove melt, keep the base
As emersed leaves melt, remove the mushy material promptly — decaying leaves release ammonia and grow fungus that can spread to healthy tissue. But never discard the plant while the crown, rhizome, or roots are firm and alive. A crypt that’s lost every leaf but has firm roots is a plant that’s about to recover, not a dead plant. Give it 3–4 weeks before judging.
Telling Normal Melt From Real Problems
Normal transition melt:
- Affects oldest/emersed leaves first, newest growth last
- New submersed leaves emerge even as old ones dissolve
- Roots and crown stay firm and white/green
- Timeline: 1–4 weeks, then obvious new growth
Concerning melt (see our full melting diagnosis guide):
- New growth also melts or emerges deformed
- Rhizome or crown turns mushy and brown — this is rot, not transition
- Entire plant dissolves within days with no new growth after 4+ weeks
- Melting spreads to established plants that weren’t recently moved
Buying Tips to Minimize Melt
- Buy submersed-grown when available — hobbyist-grown cuttings transition with almost no melt.
- Choose tissue culture for sensitive species — crypts and delicate stems establish far more reliably from sterile cups.
- Avoid plants already melting in the store tank — some melt is normal, but a plant that’s mostly mush at purchase has less energy for recovery.
- Transport carefully — keep plants damp and out of direct sun/heat. A plant that dries out or cooks in a hot car melts far worse than one transported properly.
The First-Month Timeline: What to Expect Week by Week
Knowing what’s normal when removes most acclimation anxiety. Here’s the typical timeline for a healthy plant adapting to a new tank:
Week 1: The quiet week
Almost nothing visible happens. The plant is growing roots you can’t see and assessing its new environment. Some species (vallisneria, stem plants) may start shedding their lowest leaves. This is normal. Resist the urge to “help” — no moving, no extra fertilizer, no light changes. The most common beginner mistake is intervening during a week when the correct action is nothing.
Week 2: Melt peaks
This is when emersed leaves give up in earnest. Crypts may drop everything; swords shed their broad aerial leaves; stem plants lose lower foliage. It looks catastrophic and it’s usually fine. Keep removing mushy material, keep conditions stable, and watch the crown and growing tips — if those are firm and green, recovery is already underway.
Week 3: The turn
New submersed-adapted leaves emerge — smaller, thinner, often a slightly different shade of green than the emersed foliage. Stem plant tips start growing visibly; crypts push tiny curled leaves from the crown; swords unfurl narrow ribbon leaves. This is the moment most beginners exhale for the first time.
Week 4+: Established
New growth outpaces melt, and the plant is functionally yours. You can resume full-strength fertilizer, normal trimming, and stop treating it as fragile. Some slow growers (anubias, bucephalandra) take 6–8 weeks to show obvious progress — that’s their normal speed, not a problem.
Acclimating Different Plant Formats
Tissue-culture cups
Sterile, pest-free, and already adapted to high-humidity (not emersed) growth — tissue cultures melt the least of any format. Rinse the agar gel off gently (leftover gel rots and feeds fungus), split the portion into small plantlets, and plant per our planting guide. They establish slowly for the first two weeks, then accelerate. No dip needed, minimal acclimation stress — this is the premium experience you’re paying for.
Potted plants
Remove the pot and strip away the rockwool completely — leftover rockwool traps debris and rots. Tease the root mass apart gently; if it’s a dense mat, splitting it into 2–3 smaller portions actually establishes faster than planting one big clump (more growing points, better water flow around roots). Potted plants are usually emersed-grown, so expect the standard 2–4 week melt cycle.
Bare-root / bunched stems
Typically sold as weighted bunches. Remove any bands, foam, or weights, strip the lower leaves, and plant stems individually or in small groups. Bunched stems from the store are often already transitioning — check for new submersed growth at the tips, which tells you the plant is mid-adaptation and will settle quickly.
Hobbyist cuttings
Already submersed-grown and the fastest to establish — often showing new growth within days. The main acclimation factor is water-parameter difference between the two tanks. Float to temperature-match, plant promptly, and they’ll usually take off with minimal melt. This is why experienced hobbyists prefer trading cuttings over buying potted plants.
Frequently Asked Questions
Should I use a “plant starter” or transplant fertilizer?
Products marketed for transplant shock are mostly B-vitamins and mild hormones. They don’t hurt, but there’s no strong evidence they help aquarium plants specifically. Stable conditions and patience outperform any bottle. Save the money for more plants.
My new plant melted completely — bare crown, no leaves. Is it dead?
Probably not, if the crown or rhizome is firm. Crypts and swords routinely lose 100% of their leaves and regrow from the base within a month. The test is firmness: firm and pale/green means alive; mushy and brown/black means rot. Give firm-but-leafless plants a full 4 weeks before declaring them dead.
Can I speed up acclimation with extra light or CO2?
No — and trying usually backfires. A melting plant can’t use extra light; the excess just grows algae on its dying leaves. Keep light moderate and CO2 stable (not boosted) during acclimation. Growth speed comes from the plant’s own adaptation timeline, which you can’t rush, only avoid delaying.
Should new plants go straight into my main display tank?
After quarantine/dipping, yes — there’s no benefit to a separate “growing-in” tank for most plants. They acclimate to your water fastest in the tank they’ll live in. The exception is very delicate species going into a tank with boisterous fish; give those a few weeks in a calm corner or breeder box first.
The Patience Rule
The single most important acclimation skill is restraint: plant it right, set gentle conditions, remove decay, and then leave it alone for a month. The hobbyists with the best plant growth aren’t doing something clever in week one — they’re simply not interfering in weeks two through four while the plants do what they’ve evolved to do. Melt looks like failure and feels like failure, but in most cases it’s the visible part of a plant successfully becoming yours.