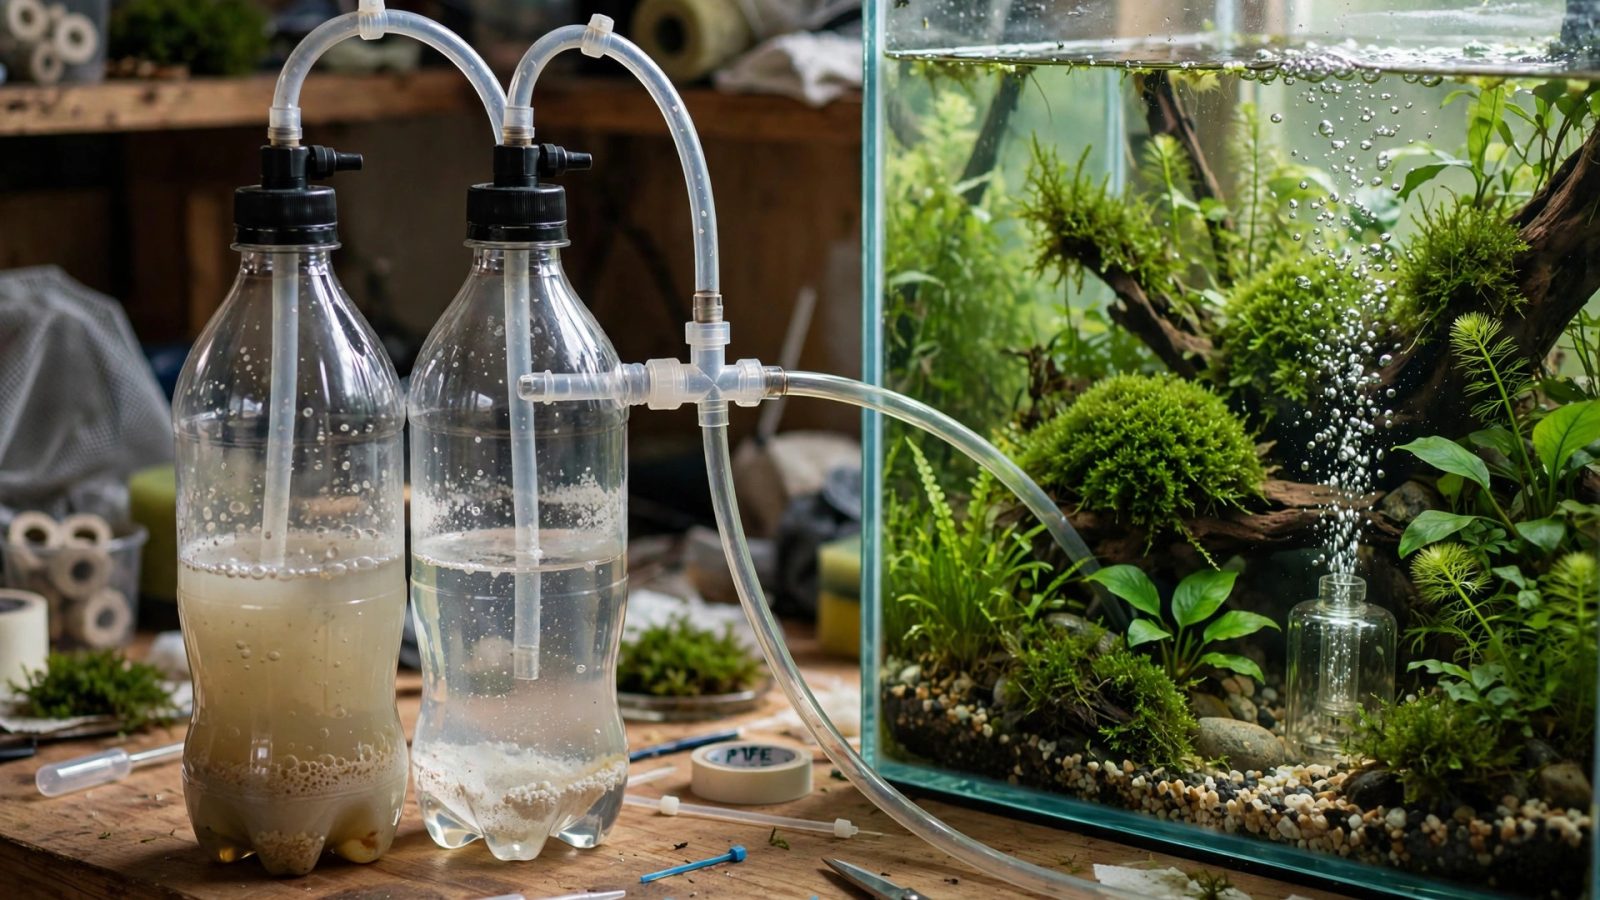
DIY CO2 — generating carbon dioxide with yeast fermentation or the citric acid/baking soda reaction — is the most accessible path to injected CO2. No cylinder deposits, no regulator purchases, just kitchen chemistry feeding your plants. Done right, DIY CO2 meaningfully boosts growth on small tanks. Done wrong, it’s an inconsistent, leaky mess. This guide gives you both proven methods with exact recipes, realistic output expectations, and the safety rules that matter.
How DIY CO2 Works
Both methods produce CO2 gas in a sealed bottle, which travels through airline tubing into a diffuser in the tank. A needle valve (or simple clamp) controls the rate, and a check valve prevents back-siphoning. The chemistry differs:
- Yeast method: yeast ferments sugar → ethanol + CO2. Output starts strong, peaks in days, then declines over 2–4 weeks as sugar depletes and alcohol poisons the yeast.
- Citric acid method: citric acid + baking soda + water → sodium citrate + CO2 + water. Output is steadier and pressure-driven, lasting 2–4 weeks per charge with more consistent pressure.
Method 1: Yeast + Sugar (The Classic)
Recipe (2-liter bottle, ~20-gallon tank)
- 2 cups white sugar
- 1/2 teaspoon baker’s yeast (not brewer’s — baker’s is cheaper and works fine)
- 1 teaspoon baking soda (buffers pH, extends yeast life)
- Warm (not hot) water to fill ~3/4 of the bottle
Mix sugar and warm water until dissolved, add baking soda, then sprinkle yeast on top — don’t stir vigorously. Cap with a drilled cap fitted with airline tubing, sealed with silicone. Gas production starts within 2–12 hours.
Output curve (realistic)
- Days 1–3: ramping up, inconsistent
- Days 4–14: peak production — this is your useful window
- Days 15–25: declining; time to start the next bottle
The two-bottle rotation
The key to stable yeast CO2: run two bottles, started one week apart. When bottle A declines, bottle B is peaking. This smooths the curve dramatically. Yes, it’s twice the maintenance — that’s the price of yeast stability.
Method 2: Citric Acid + Baking Soda (The Upgrade)
Recipe (per charge, standard generator kit)
- 200g citric acid dissolved in 600ml water (bottle A)
- 200g baking soda dissolved in 600ml water (bottle B)
Purpose-built generator kits connect the bottles with pressure tubing: pressure in the reaction bottle pushes acid into the soda bottle on demand, self-regulating output via the needle valve. This is the method worth buying a $40–60 kit for — improvised citric setups without pressure regulation are finicky.
Why citric beats yeast
- Steadier output: pressure-regulated rather than biologically decaying
- Longer per charge: 3–4 weeks typical vs 2 for yeast
- Cleaner: no fermentation smell, no yeast gunk
- Restartable: close the valve and the reaction pauses; yeast keeps fermenting whether you want it or not
Head-to-Head Comparison
- Cost to start: yeast ~$15 (bottles, tubing, diffuser); citric ~$60–90 (generator kit)
- Monthly running cost: yeast ~$3 (sugar); citric ~$8 (chemicals)
- Stability: citric wins clearly
- Maintenance: yeast needs bottle swaps every 2 weeks; citric every 3–4
- Tank size suitability: both suit tanks under 30 gallons; above that, output can’t hold 30 ppm — consider budget pressurized instead
Essential Equipment (Both Methods)
- Diffuser: a proper ceramic/glass diffuser, not an airstone. DIY CO2 pressure is low — fine-bubble diffusers work, but keep them clean.
- Check valve: mandatory. DIY bottles sit below or beside the tank; a siphon backflow floods the mixture into your aquarium.
- Bubble counter: even a DIY inline counter (small water-filled vial) lets you track output decline.
- Drop checker: yes, even for DIY. It’s the only way to know your actual levels — see our drop checker guide.
- Needle valve or clamp: citric kits include one; for yeast, a simple airline control valve suffices given the low pressure.
Safety: Preventing Bottle Bombs
The fear is overblown but the rules are real:
- Never seal the system without a gas path to the tank. Pressure must always have somewhere to go. A kinked line + active fermentation = a burst bottle.
- Use pressure-rated bottles (soda bottles, not thin water bottles) for citric systems, which run at higher pressure.
- Keep bottles upright and below the tank rim so gravity can’t siphon mixture into the aquarium.
- Vent before opening. Release pressure slowly via the needle valve before unscrewing any cap.
- Keep away from heat. Warmth accelerates yeast dramatically — a bottle fine at 70°F can over-pressurize at 85°F.
- Replace tubing yearly. CO2 degrades standard airline over time; check for brittleness.
Follow these and DIY CO2 is as safe as any aquarium equipment. Ignore them and you’ll mop the floor at least once.
What DIY CO2 Can and Can’t Do
Realistic expectations: on a 10–20 gallon tank, good DIY CO2 holds roughly 15–25 ppm — enough to transform growth versus no CO2, but short of the 30 ppm pressurized standard. Carpets spread, stems bush out, colors improve. You’ll see maybe 70% of pressurized results at 20% of the cost.
What it can’t do: hold rock-steady levels (fluctuation grows some algae — keep light moderate), serve large tanks, or run unattended for a month. If you find yourself fighting the maintenance schedule, that’s the signal to graduate to pressurized. Many hobbyists run DIY for 6–12 months, get convinced by the results, and upgrade — which is exactly the right path.
DIY + Low-Tech: A Note on Balance
DIY CO2 pairs best with moderate light. Blasting high light with fluctuating DIY CO2 is worse than moderate light with no CO2 at all — instability is algae’s favorite food. Keep your fixture dimmed to medium, run the standard 7-hour photoperiod, dose a complete fertilizer, and let the DIY CO2 do its steady work. For the full low-tech philosophy, see growing plants without CO2 — DIY sits halfway between that and full high-tech.
Troubleshooting DIY CO2
No gas production after 12 hours (yeast)
- Water too hot killed the yeast (keep under 105°F/40°C when mixing) — restart with fresh yeast and lukewarm water.
- Water too cold slows startup dramatically — move the bottle somewhere warmer; production starts eventually.
- Old/dead yeast — check the expiry date. Fresh packets matter.
- Leak in the cap seal — submerge connections in water and look for escaping bubbles; reseal with silicone.
Production stops after a few days (yeast)
- Too much yeast initially — a vigorous start exhausts sugar fast. Use less yeast (1/4 tsp) for longer, steadier output.
- Alcohol buildup — the 2-week lifespan is normal. Rotate bottles rather than fighting chemistry.
- Temperature drop — yeast slows significantly below 65°F. Insulate the bottle in winter.
Citric system pressure won’t build
- Check all bottle seals — citric systems run at higher pressure and leak at weak seals.
- Verify the acid/soda ratio — too little acid starves the reaction.
- Needle valve fully open dumps pressure as fast as it’s made — close it down and let pressure accumulate.
Yeast mixture foams into the tubing
Overfilled bottle or too-warm fermentation. Leave 4+ inches of headspace, add a gas separator (small secondary bottle between generator and tank that catches foam), and keep the bottle cool. Foam reaching the tank is harmless but ugly — the separator prevents it.
Soda bottle smells like a bakery
Normal yeast off-gassing. A carbon air filter on a vent (not on the CO2 line) reduces it. Citric systems don’t have this issue — another reason many switch.
Advanced: Staggering and Dosing Schedules
For the committed DIY user, a three-bottle yeast rotation (started 5 days apart) produces remarkably stable output — each bottle’s decline is covered by another’s peak. Label bottles A/B/C with start dates on masking tape. Total maintenance: one bottle refresh per week, ~10 minutes. This is the closest DIY gets to pressurized stability, and it’s how many long-term DIY users operate.
For citric systems, keep pre-measured chemical portions in sealed bags — recharging becomes a 5-minute pour-and-go rather than a measuring session. Buy citric acid and baking soda in bulk (5 lb bags); the per-charge cost drops to ~$2.
DIY CO2 for Specific Setups
- Betta tanks (5–10 gal): half-recipe yeast bottle or small citric charge. Bettas prefer calm water — keep diffusion gentle and surface agitation low, but never zero. See our betta plant guide for compatible species.
- Shrimp tanks: shrimp are CO2-sensitive. Run DIY at modest rates, keep the drop checker blue-green (not full green), and ensure good oxygenation. Many shrimp keepers skip CO2 entirely — mosses and anubias don’t need it.
- Multiple small tanks: one citric generator can feed 2–3 nano tanks via a manifold (T-splitters with individual needle valves). Economical — but a leak or failure affects all tanks, so check valves on every line are mandatory.
Knowing When to Graduate
DIY CO2 has a natural lifespan in most hobbyists’ journeys. Graduate to pressurized when: you’re refilling bottles more often than doing water changes, you’ve lost a batch of livestock to a CO2 swing, your tank grew past 30 gallons, or you simply want your weekends back. There’s no shame in the upgrade — DIY is the gateway, not the destination, for most serious planted tanks. The budget pressurized guide keeps the next step affordable.
Recipe Variations Worth Trying
Long-life yeast recipe
For steadier output over 3+ weeks: 1.5 cups sugar, 1/4 tsp yeast, 1 tsp baking soda, plus 1 packet unflavored gelatin dissolved in the warm water before adding sugar. The gelatin creates a slow-release matrix — yeast works through it gradually instead of feasting all at once. Output is lower but remarkably flat. The tradeoff: total CO2 is less, so this suits tanks under 15 gallons.
High-output yeast recipe
For maximum CO2 on a small tank: 2.5 cups sugar, 1 tsp yeast, no baking soda, warm spot (75–78°F). Peaks hard for 7–10 days then crashes. Useful for jump-starting a new aquascape’s growth, not for long-term stability. Watch the drop checker — this recipe can push small tanks yellow.
Champagne yeast upgrade
Brewer’s champagne yeast tolerates higher alcohol (up to 18% vs baker’s ~12%), extending each bottle’s productive life by several days. Costs slightly more per packet but fewer packets per year. Available at homebrew shops — a nice middle ground between basic baker’s yeast and citric systems.
Winter and Summer: Temperature Management
Yeast is temperature-sensitive — the forgotten variable in DIY CO2:
- Winter: cold rooms (below 65°F) slow fermentation to a crawl. Insulate bottles (towel wrap, styrofoam box) or move them to a warmer spot. A seedling heat mat on a thermostat ($20) keeps output consistent year-round.
- Summer: heat waves accelerate yeast dangerously — a bottle tuned at 72°F can double output at 85°F. Move bottles to the coolest spot available during heat waves, and check the drop checker daily.
- Citric systems are far less temperature-sensitive — another point in their favor for variable climates.
DIY CO2 Myths
- “DIY CO2 can’t grow carpets”: it can on small tanks. Monte Carlo and dwarf hairgrass carpet under DIY CO2 in 10–20 gallon tanks regularly — just slower than pressurized.
- “Yeast CO2 adds alcohol to the tank”: the alcohol stays in the bottle. Only CO2 gas travels through the tubing (plus trace fermentation odors, which is why a gas separator is nice).
- “DIY is always cheaper”: true for the first year on small tanks. By year two of citric chemicals on a 30-gallon, budget pressurized pulls even — and your time has value.
- “You can’t run DIY on a timer”: partially true for yeast (it ferments 24/7), but citric systems with solenoids can shut off at night like pressurized. Another citric advantage.
Diffuser Options for DIY Pressure Levels
DIY systems produce lower working pressure than cylinders, which affects diffuser choice:
- Glass/ceramic nano diffusers: work well — their fine pores don’t need high pressure. The standard choice.
- Inline atomizers: need higher pressure than DIY typically delivers. Skip these for DIY; they’re designed for pressurized systems.
- Ladder/flip diffusers: old-school but effective at low pressure — CO2 bubbles zigzag up a spiral track, dissolving as they rise. Nearly clog-proof and DIY-friendly.
- Powerhead injection: feed the CO2 line into a small powerhead’s venturi intake. The impeller smashes bubbles into micro-mist. Highly effective, slightly noisy, and the mist can irritate sensitive fish — position carefully.
- Airstone (last resort): coarse bubbles, poor efficiency, but better than nothing while waiting for a proper diffuser to arrive.
Whatever you use, clean it monthly. DIY mixtures carry more particulates than cylinder gas, and clogged diffusers are the #1 cause of “my DIY stopped working” complaints that are actually diffusion failures.