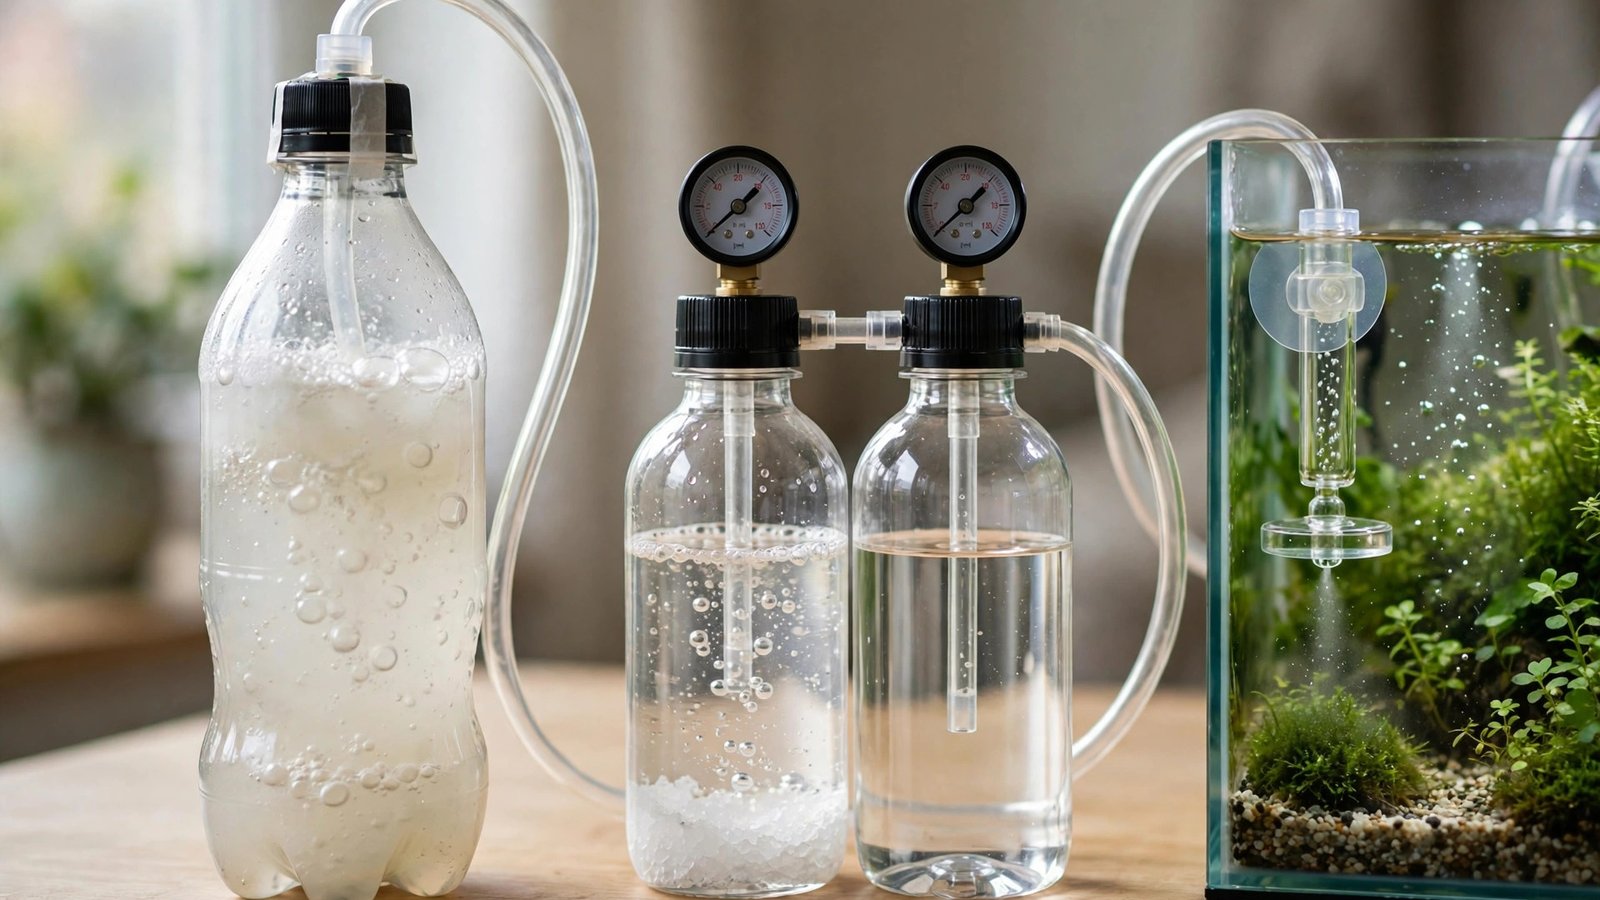
If you have been priced out of a pressurized CO2 rig but your plants are begging for more carbon, you have probably run into the same fork in the road every budget aquarist faces: yeast fermentation or a citric acid and baking soda reaction. The yeast vs citric acid CO2 aquarium debate is one of the most argued topics in planted-tank circles, and both camps claim their DIY system grows healthier, faster plants. The truth is that both methods can genuinely transform a low-tech tank — but they behave so differently in cost, consistency, and effort that the right choice depends entirely on your tank size, patience, and how steady you can keep the gas flowing.
Why DIY CO2 Works at All
Plants are carbon-hungry. In most tap-water aquariums, dissolved CO2 sits around 3–5 parts per million, which is fine for anubias and java fern but starves demanding species like carpeting plants and fast-growing stems. Adding even a modest 10–15 ppm through DIY CO2 for aquarium plants can double growth rates, deepen reds in species like rotala, and trigger the visible pearling that tells you photosynthesis is humming. You do not need a £200 regulator to get there — you need a controlled chemical or biological reaction and a way to get the gas into the water. If you are still deciding whether supplemental carbon is right for your setup, read our guide on whether aquarium plants really need CO2 first.
How the Yeast System Works
The yeast method is the oldest trick in the book. Sugar water, baker's yeast, and sometimes a pinch of baking soda go into a 2-litre soda bottle; the yeast ferments the sugar and releases carbon dioxide as a byproduct. A line of airline tubing carries the gas to a CO2 diffuser in the tank, and that is essentially the whole system.
Typical Recipe and Output
A standard recipe uses about 2 cups of sugar, 1 litre of dechlorinated water, half a teaspoon of baker's yeast, and a quarter teaspoon of baking soda to buffer pH. Once fermentation starts (usually within 4–12 hours), the bottle produces a gentle, continuous stream of CO2 — often described as a steady "burp" of one bubble every couple of seconds — for 2 to 4 weeks before the yeast exhausts the sugar and production fades. Because fermentation is biological, output follows a curve: a slow ramp-up, a peak of a week or two, then a gradual decline until you remix the bottle.
The Yeast Method's Strengths
- Dirt cheap. Sugar and yeast cost pennies per batch; the bottle, tubing, and a simple diffuser are often under £15 total.
- Very forgiving. No pressure vessels, no acid handling, and no risk of a sudden CO2 dump — fermentation simply cannot produce gas faster than the biology allows.
- Works well on nano tanks. A single 2-litre bottle suits tanks up to about 60 litres, making it ideal for a first planted betta or shrimp tank.
The Yeast Method's Weaknesses
- Output swings with temperature. A cold room slows fermentation dramatically, so winter production can be a fraction of summer output — and fluctuating CO2 is one of the main triggers of algae outbreaks when plants cannot adapt.
- No on/off control. Fermentation runs around the clock, so gas keeps flowing at night when plants are not photosynthesizing. Most users simply accept this and keep some surface agitation so excess CO2 off-gasses while plants respire at night.
- Re-mixing every few weeks. When the curve drops, you mix a fresh bottle — cheap but a recurring chore, and a weak batch can starve plants just as they were getting going.
- Alcohol and smell. Old bottles smell like a brewery, and if a bottle gets sucked back into the tank (always use a check valve), the alcohol-laden liquid can harm livestock.
How the Citric Acid System Works
The citric acid method is a chemistry-set upgrade. Two connected bottles hold (A) citric acid dissolved in water and (B) baking soda dissolved in water; pressure from the first bottle pushes citric acid into the second, where it reacts with the baking soda and releases CO2. A needle valve on the generator cap lets you dial the bubble rate precisely, and many commercial DIY kits (metal or PET bottle caps sold as complete sets) use exactly this reaction.
Typical Recipe and Output
A common starting mix is 200g citric acid in 600ml water (bottle A) and 200g baking soda in 400ml water (bottle B). Once primed, the system builds 1–2 bar of working pressure and delivers an adjustable stream of CO2 for roughly 2 to 3 weeks per fill, depending on your bubble rate. Crucially, the needle valve gives you something yeast cannot: you can slow the gas to a whisper at night or shut it down entirely, and you can crank it up on water-change day.
The Citric Acid Method's Strengths
- Adjustable and on-demand. A needle valve plus a solenoid and timer (on fancier cap kits) gives near-pressurized levels of control — gas only when the lights are on.
- Steady output. Pressure-driven flow does not drift with room temperature the way fermentation does, so your drop checker stays in the green instead of swinging.
- Cleaner to run. No brewing smell, no slimy yeast residue — just salt water and CO2 when you recharge.
The Citric Acid Method's Weaknesses
- Higher startup cost. You need pressure-rated bottles and a proper generator cap with a needle valve — budget kits run £20–40, and cheap improvised caps can leak or, worse, fail under pressure.
- Chemical handling. Citric acid is a skin and eye irritant in concentrated form; refills mean measuring powders and mixing solutions every couple of weeks.
- Dump risk if tuned wrong. Open the needle valve too far and the reaction can run away, dumping a tank's worth of CO2 in hours — which is why a fish-safety routine and a drop checker are non-negotiable with this method.
- Recharge frequency. At higher bubble rates a fill may last under two weeks, so the "cheap" label depends on how hard you push it.
Yeast vs Citric Acid CO2 Aquarium Systems: Head-to-Head Comparison
Here is how the two systems stack up on the factors that actually matter for plant health and your wallet.
| Factor | Yeast Fermentation | Citric Acid + Baking Soda |
|---|---|---|
| Upfront cost | ~£10–15 (bottle, tubing, diffuser) | ~£20–40 (generator caps, pressure bottles) |
| Running cost | Pennies per batch (sugar + yeast) | Low–moderate (citric acid + baking soda refills) |
| Output stability | Rises, peaks, fades; temperature-sensitive | Steady at set pressure; temperature-stable |
| Adjustability | None — biology sets the rate | Needle valve; can shut off at night |
| Best tank size | Up to ~60 litres (nano/small) | 60–200 litres with 2 bottles in series |
| Batch duration | 2–4 weeks | 2–3 weeks (depends on bubble rate) |
| Safety profile | Very safe; can't over-pressurize | Needs pressure-rated parts; dump risk if mis-set |
| Maintenance | Re-mix bottle; rinse out yeast sludge | Measure and mix two solutions; check seals |
Which System Grows Healthier Plants?
Here is the honest answer: plants do not care which chemistry produced the CO2 — they care about stability and dosage. A yeast bottle that holds 10 ppm steady for three weeks will grow healthier plants than a citric acid rig whose owner keeps fiddling with the valve and swinging between 5 and 30 ppm. That said, the citric acid system has a structural advantage: steadier output and night shutoff mean fewer of the fluctuations that stall growth and invite algae, so a careful user will usually get better results from citric acid, especially in tanks over 60 litres.
Yeast wins when you are just testing whether CO2 is worth it. It is the cheapest possible experiment, it cannot hurt your fish through a sudden dump, and on a nano tank its gentle output is genuinely enough to transform growth. Pair it with a good bubble counter so you can see when the curve is fading, and re-mix before production collapses rather than after.
Citric acid wins when you are committed to CO2 as a permanent part of your routine. The needle-valve control lets you match output to your lighting schedule, shut gas off overnight, and hold a stable 20–30 ppm — the range where demanding stems and carpets really take off. If you already suspect you will upgrade to a budget pressurized setup within a year, citric acid is also the better training ground because it teaches you drop-checker reading and valve discipline.
Setup Tips for Either System
- Always use a check valve on the airline. Both systems can back-siphon tank water into the bottle (yeast) or siphon acidic solution toward the tank (citric acid) if pressure drops — a 50p check valve prevents a disaster.
- Diffuse properly. CO2 that just bubbles to the surface is wasted. A fine-pore diffuser under the filter outflow, or one of the diffusion methods compared in our guide, keeps dissolution high.
- Watch livestock first. Fish gasping at the surface in the morning means too much CO2 — vent the room-air into the tank, increase surface agitation, and dial the system back. Review our CO2 fish-safety guide before your first run.
- Match light to carbon. Extra CO2 with weak light grows algae, not plants. Confirm your lighting is adequate with our guide on how much light aquarium plants need before adding any CO2 source.
- Track the batch. Note the mix date on the bottle with a marker. Yeast users should re-mix at the first sign of fading output, not when the bottle goes quiet — a week of declining CO2 is when algae strikes.
When to Skip DIY and Go Pressurized
DIY systems have a ceiling. If you are running a tank over 200 litres, keeping sensitive livestock like discus, or chasing a high-tech carpeted aquascape, the labour of re-mixing bottles every two weeks quickly outweighs the savings. At that point a proper cylinder with a regulator, solenoid timer, and drop checker pays for itself in stability — and stability is what grows the healthiest plants of all. For a side-by-side look at the upgrade path, see liquid carbon vs pressurized CO2.
Aquarium plant specialists at Tropica consistently emphasize in their care guides that consistent CO2 levels matter more than peak concentrations — a finding that matches exactly what experienced DIY users report: the steadier system wins, whichever chemistry you choose.
Frequently Asked Questions
Can I run two yeast bottles at once for a bigger tank?
Yes — staggering two 2-litre bottles a week apart smooths the fermentation curve, because one is always near peak output while the other ramps or fades. Tee their airline outputs together before the diffuser and alternate re-mixes. This trick works well up to about 100 litres, but beyond that the bottle farm becomes unwieldy and a citric acid system or pressurized cylinder is more practical.
Is citric acid CO2 safe for shrimp and fish?
It is safe when set up correctly, because the CO2 itself is identical regardless of source — only the dose matters. The real risk is user error: a needle valve opened too far can dump CO2 and crash oxygen levels fast. Always start with one bubble per second or less, watch a drop checker for 24 hours before increasing, and keep surface agitation moderate so excess gas can escape overnight.
Why did my yeast CO2 stop after one week?
Three usual culprits: too much yeast (a fast, hot ferment burns through the sugar in days), a cold room (fermentation nearly stalls below about 18°C), or a leak in the cap or tubing (gas escapes before reaching the tank). Use half a teaspoon of yeast, keep the bottle in a warm spot like an airing cupboard, and test every joint with soapy water. A recipe that lasts two weeks or more is doing well.
Do I need to turn DIY CO2 off at night?
With yeast you cannot — fermentation runs 24/7, and that is fine as long as you keep some surface agitation so excess CO2 off-gasses while plants respire at night. With citric acid you can close the needle valve at lights-out, which saves solution and reduces overnight pH swings. If you add a solenoid to a citric acid kit, you can automate the shutoff on the same timer as your lights.
Which method is cheaper over a full year?
Yeast is cheaper, full stop — sugar and baker's yeast cost a few pounds per year for a nano tank. A citric acid system costs more in consumables (bulk citric acid and baking soda) and the pricier hardware, though buying chemicals in kilogram bags keeps it reasonable. Neither approaches the running cost of disposable CO2 cartridges, which is why both DIY methods remain popular budget options.
The Bottom Line
For a nano tank and a first experiment with carbon, start with yeast: it is nearly free, it cannot fail dangerously, and it teaches you how plants respond to extra CO2. For anything larger — or once you are hooked and want stable, adjustable, shut-off-at-night performance — step up to a citric acid system with a quality needle valve. Whichever route you take, remember that the healthiest plants come from the steadiest CO2, not the fanciest hardware. Keep the gas consistent, match it to your light, watch your livestock, and your plants will do the rest.
Tissue-culture plants are the exception — they’re grown in sterile gel and adapt with minimal melting, which is part of what you’re paying for. Plants bought submersed from another hobbyist’s tank also transition with little melt, since they’re already in the right form.
Which Plants Melt Most (and Least)
Heavy melters (expect significant leaf loss)
- Cryptocorynes — infamous for “crypt melt,” sometimes dropping every leaf after any disturbance. They almost always recover from the roots within weeks.
- Stem plants grown emersed — rotala, ludwigia, and hygrophila often shed lower emersed leaves while the growing tips transition.
- Amazon swords — emersed-grown swords typically lose their broad oval aerial leaves and replace them with longer submersed ribbon leaves.
Light melters
- Anubias, java fern, bucephalandra — slow-growing rhizome plants transition gradually; occasional old-leaf melt but rarely dramatic.
- Vallisneria — usually transitions well, though it dislikes the move itself and may sulk for a week.
- Floating plants — minimal melt since their leaves were already at the air-water interface.
The Acclimation Protocol
Step 1: Quarantine or dip first
Before acclimating to your tank’s conditions, make sure you’re not acclimating pests along with the plant. Run new arrivals through our quarantine and dip protocol — it adds days upfront but prevents months of regret.
Step 2: Float to temperature-match (30 minutes)
Float the bag or container in your tank for 20–30 minutes to equalize temperature. Plants are less temperature-sensitive than fish, but a 10°F shock on top of transplant stress is an avoidable insult.
Step 3: Trim before planting
Remove any leaves that are already damaged, yellowing, or heavily algae-covered — they won’t recover and they’ll rot in your tank, feeding algae. For stem plants, trim off the bottom inch and any emersed leaves that look unlikely to adapt; the plant wastes energy maintaining leaves it’s going to shed anyway. Keep the healthy growing tips — that’s where recovery starts.
Step 4: Plant correctly the first time
Follow our planting guide — right depth, crown exposed on rosettes, rhizomes unburied on epiphytes. Every uprooting and replanting restarts the acclimation clock, so get placement right on the first attempt. Decide where each plant goes before it goes in the water.
Step 5: Run a gentle first week
For the first 7 days after planting:
- Moderate light — run your normal photoperiod but consider dropping intensity 20–30% if your light is dimmable. Blast-level light on a melting plant grows algae on the dying leaves, not recovery.
- Stable CO2 — if you inject CO2, keep it consistent. Fluctuating CO2 during acclimation is a melt accelerator. If you’re low-tech, this doesn’t apply — see growing without CO2.
- Half-strength fertilizer — new plants with damaged leaves can’t use full dosing, and the excess feeds algae. Ramp to full strength over 2–3 weeks per our fertilizer schedule.
- No disturbance — don’t move, trim, or “check on” new plants for at least two weeks. Every touch resets root establishment. This is especially critical for crypts.
Step 6: Remove melt, keep the base
As emersed leaves melt, remove the mushy material promptly — decaying leaves release ammonia and grow fungus that can spread to healthy tissue. But never discard the plant while the crown, rhizome, or roots are firm and alive. A crypt that’s lost every leaf but has firm roots is a plant that’s about to recover, not a dead plant. Give it 3–4 weeks before judging.
Telling Normal Melt From Real Problems
Normal transition melt:
- Affects oldest/emersed leaves first, newest growth last
- New submersed leaves emerge even as old ones dissolve
- Roots and crown stay firm and white/green
- Timeline: 1–4 weeks, then obvious new growth
Concerning melt (see our full melting diagnosis guide):
- New growth also melts or emerges deformed
- Rhizome or crown turns mushy and brown — this is rot, not transition
- Entire plant dissolves within days with no new growth after 4+ weeks
- Melting spreads to established plants that weren’t recently moved
Buying Tips to Minimize Melt
- Buy submersed-grown when available — hobbyist-grown cuttings transition with almost no melt.
- Choose tissue culture for sensitive species — crypts and delicate stems establish far more reliably from sterile cups.
- Avoid plants already melting in the store tank — some melt is normal, but a plant that’s mostly mush at purchase has less energy for recovery.
- Transport carefully — keep plants damp and out of direct sun/heat. A plant that dries out or cooks in a hot car melts far worse than one transported properly.
The First-Month Timeline: What to Expect Week by Week
Knowing what’s normal when removes most acclimation anxiety. Here’s the typical timeline for a healthy plant adapting to a new tank:
Week 1: The quiet week
Almost nothing visible happens. The plant is growing roots you can’t see and assessing its new environment. Some species (vallisneria, stem plants) may start shedding their lowest leaves. This is normal. Resist the urge to “help” — no moving, no extra fertilizer, no light changes. The most common beginner mistake is intervening during a week when the correct action is nothing.
Week 2: Melt peaks
This is when emersed leaves give up in earnest. Crypts may drop everything; swords shed their broad aerial leaves; stem plants lose lower foliage. It looks catastrophic and it’s usually fine. Keep removing mushy material, keep conditions stable, and watch the crown and growing tips — if those are firm and green, recovery is already underway.
Week 3: The turn
New submersed-adapted leaves emerge — smaller, thinner, often a slightly different shade of green than the emersed foliage. Stem plant tips start growing visibly; crypts push tiny curled leaves from the crown; swords unfurl narrow ribbon leaves. This is the moment most beginners exhale for the first time.
Week 4+: Established
New growth outpaces melt, and the plant is functionally yours. You can resume full-strength fertilizer, normal trimming, and stop treating it as fragile. Some slow growers (anubias, bucephalandra) take 6–8 weeks to show obvious progress — that’s their normal speed, not a problem.
Acclimating Different Plant Formats
Tissue-culture cups
Sterile, pest-free, and already adapted to high-humidity (not emersed) growth — tissue cultures melt the least of any format. Rinse the agar gel off gently (leftover gel rots and feeds fungus), split the portion into small plantlets, and plant per our planting guide. They establish slowly for the first two weeks, then accelerate. No dip needed, minimal acclimation stress — this is the premium experience you’re paying for.
Potted plants
Remove the pot and strip away the rockwool completely — leftover rockwool traps debris and rots. Tease the root mass apart gently; if it’s a dense mat, splitting it into 2–3 smaller portions actually establishes faster than planting one big clump (more growing points, better water flow around roots). Potted plants are usually emersed-grown, so expect the standard 2–4 week melt cycle.
Bare-root / bunched stems
Typically sold as weighted bunches. Remove any bands, foam, or weights, strip the lower leaves, and plant stems individually or in small groups. Bunched stems from the store are often already transitioning — check for new submersed growth at the tips, which tells you the plant is mid-adaptation and will settle quickly.
Hobbyist cuttings
Already submersed-grown and the fastest to establish — often showing new growth within days. The main acclimation factor is water-parameter difference between the two tanks. Float to temperature-match, plant promptly, and they’ll usually take off with minimal melt. This is why experienced hobbyists prefer trading cuttings over buying potted plants.
Frequently Asked Questions
Should I use a “plant starter” or transplant fertilizer?
Products marketed for transplant shock are mostly B-vitamins and mild hormones. They don’t hurt, but there’s no strong evidence they help aquarium plants specifically. Stable conditions and patience outperform any bottle. Save the money for more plants.
My new plant melted completely — bare crown, no leaves. Is it dead?
Probably not, if the crown or rhizome is firm. Crypts and swords routinely lose 100% of their leaves and regrow from the base within a month. The test is firmness: firm and pale/green means alive; mushy and brown/black means rot. Give firm-but-leafless plants a full 4 weeks before declaring them dead.
Can I speed up acclimation with extra light or CO2?
No — and trying usually backfires. A melting plant can’t use extra light; the excess just grows algae on its dying leaves. Keep light moderate and CO2 stable (not boosted) during acclimation. Growth speed comes from the plant’s own adaptation timeline, which you can’t rush, only avoid delaying.
Should new plants go straight into my main display tank?
After quarantine/dipping, yes — there’s no benefit to a separate “growing-in” tank for most plants. They acclimate to your water fastest in the tank they’ll live in. The exception is very delicate species going into a tank with boisterous fish; give those a few weeks in a calm corner or breeder box first.
The Patience Rule
The single most important acclimation skill is restraint: plant it right, set gentle conditions, remove decay, and then leave it alone for a month. The hobbyists with the best plant growth aren’t doing something clever in week one — they’re simply not interfering in weeks two through four while the plants do what they’ve evolved to do. Melt looks like failure and feels like failure, but in most cases it’s the visible part of a plant successfully becoming yours.