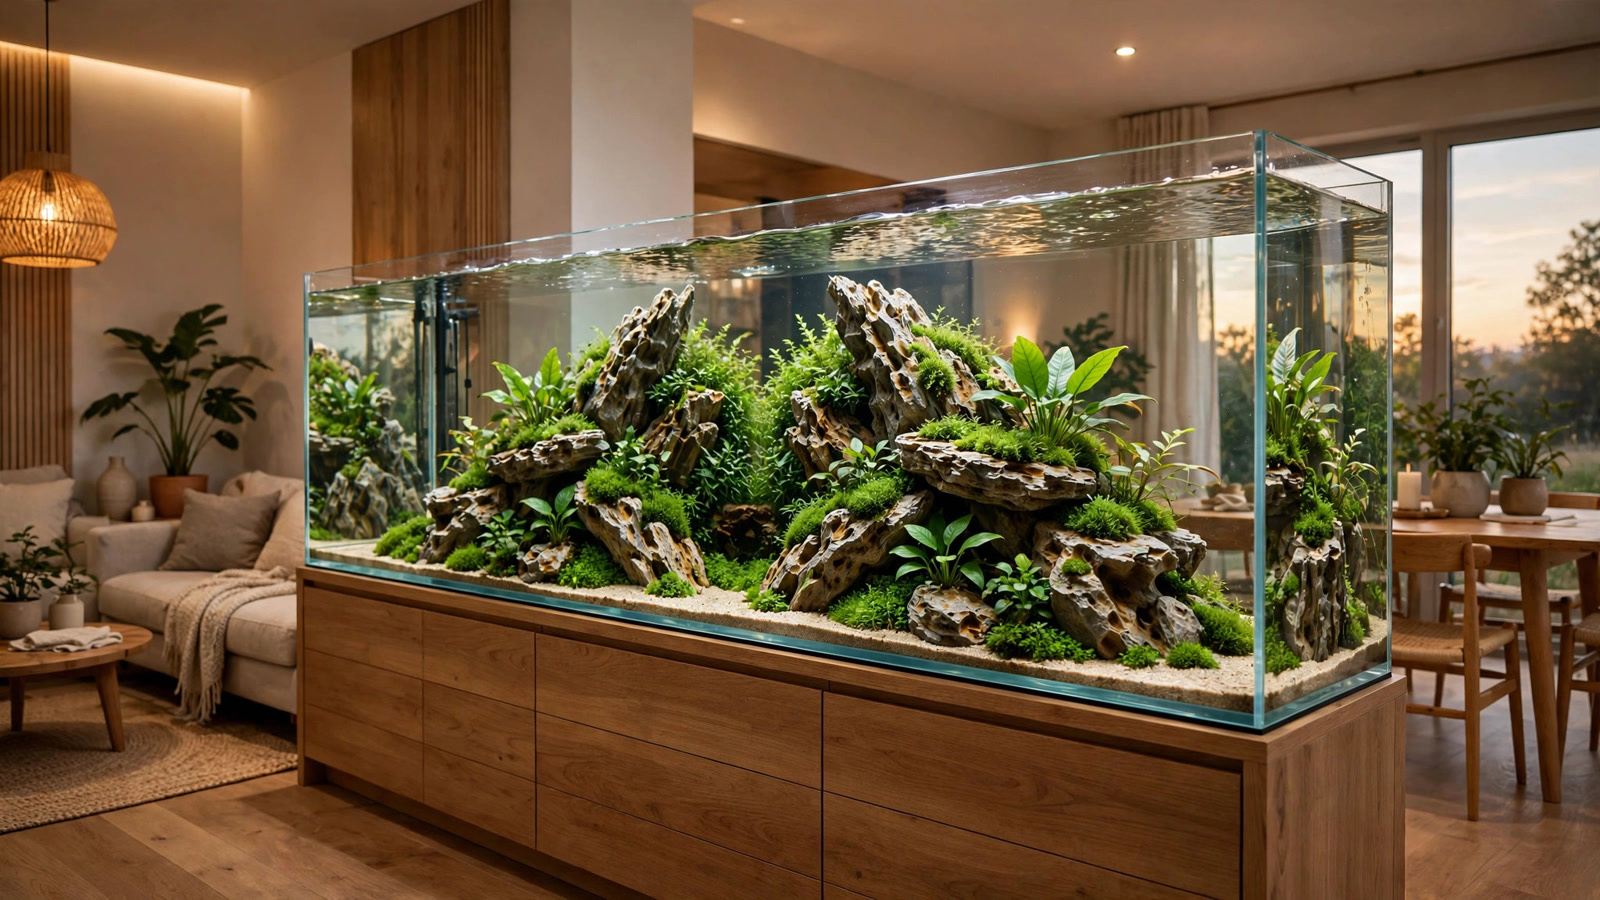
A peninsula tank sits where a room splits in two: on a stand jutting from a wall, between kitchen and living room, or dividing an open office. Instead of one front pane, you get three — roughly 270 degrees of viewing, with no "back" to hide behind. That is exactly what makes a peninsula aquarium aquascape so tricky to design. Classic techniques — sloping substrate toward the rear glass, hiding equipment behind background plants, one composition for a single viewpoint — all have to be thrown out. This guide covers layouts that work from all three sides, hardscape that reads in the round, equipment and flow tricks that keep the view clean, and maintenance habits for room-divider tanks.
Why Peninsula Tanks Break the Normal Rules
In a standard rectangular aquascape, the back glass is your best friend: it hides filter intakes, heater cables, and the thicket of stem plants masking the plumbing. A peninsula tank has no back glass — only one short "closed" end and three open sides. Any lazy choice is exposed. That changes three fundamentals:
- Depth runs the wrong way. Classic depth techniques slope substrate and shrink plant height from front to back. In a peninsula, the "front" is whichever pane you stand at. Depth gets built inward from the edges toward a central structure, not toward a rear plane.
- Equipment has nowhere to hide. Lily pipes, intakes, heaters, and CO2 diffusers are visible from at least one side no matter what. The solution is concealment inside the scape itself.
- Composition is 360-degree design. A hero composition framed for one viewpoint falls apart the moment someone walks to the other side. The strongest peninsula layouts read like sculpture: interesting from every angle, with layers that shift as you move.
Peninsula Aquarium Aquascape Layouts That Work
Every successful peninsula layout shares one idea: a central structure — a ridge, an island, or a spine — that anchors the tank while the open glass stays clear. These are the five patterns that work best.
1. The Central Island
The most reliable option. Build one self-contained island of hardscape and planting in the middle of the tank, ringed by open swimming space or low carpet on all sides — essentially an island-style aquascape stretched along the tank's long axis. Keep the island's footprint to roughly 40–50% of the floor so it reads as sculpture, not clutter. Tall center sloping down to carpeted edges — works from 20 gallons to 200.
2. The Twin Peaks Ridge
Two hardscape peaks — one near the closed end, one near the open end — joined by a lower saddle of rock or wood, like a mountain ridge. The dip between them becomes a natural valley where schooling fish gather. Strong in long peninsulas (4 feet and up) because it gives the eye two anchors as you walk the side. Keep a roughly 2:3 height ratio between peaks — equal heights look staged.
3. The Offset Spine
A diagonal ridge of rock or driftwood from one corner of the closed end toward the opposite corner near the open end. The offset creates longer sightlines than a centered ridge and gives each viewing side a different foreground distance, so the scape genuinely looks different from each pane. Bank sloped substrate against the ridge to sell the elevation.
4. The Valley Cut
The inverse of the island: hardscape and tall planting hug both long edges (both long panes are "fronts"), leaving a winding open corridor down the center. Bold, but in wide peninsulas (18+ inches) it creates a canyon you can walk alongside. Give both valley walls the full hardscape treatment so the composition stays balanced from either long pane.
5. The Lone Monolith
One dramatic piece — a tall stone tower or sculptural branch — planted minimally and surrounded by carpet or low meadow plants. The minimalist option and the easiest to keep clean from every angle. Best in shallower peninsulas where a single vertical element can dominate. Our single driftwood layouts cover building around one hero piece.
| Layout style | Best tank size | Difficulty | Strength from all sides |
|---|---|---|---|
| Central Island | 30+ gallons | Beginner | Excellent — balanced in the round |
| Twin Peaks Ridge | 4 ft+ long | Intermediate | Excellent — dual anchors |
| Offset Spine | 40+ gallons | Intermediate | Very good — differs per side |
| Valley Cut | Wide (18"+) | Advanced | Good — mirrored canyon |
| Lone Monolith | Shallow, any length | Beginner | Excellent — one hero element |
Hardscape That Reads From Every Angle
Ordinary hardscape is two-dimensional: a nice silhouette from the front, flat and awkward from the side. In a peninsula you have three fronts, so the hardscape must carry the scape in the round. The golden rule: every major stone or branch should look intentional from any direction you can approach the tank.
Choose chunky, three-dimensional pieces
Thin, flat slate stacks and delicate twigs disappear edge-on. Favor chunky seiryu or dragon stone with real depth, and branching driftwood whose limbs fork in multiple directions. Test every key piece by setting it on a table and walking around it before it goes in the tank.
Anchor the center, graduate outward
Place the tallest, heaviest hardscape along the central axis and step heights down toward all four glass edges — the classic triangular composition rotated 360 degrees. The hardscape-first method (finalize the stone and wood skeleton before planting) matters even more when every angle must work.
Mind the gaps between stones
Crevices that look fine head-on can read as accidental holes from the side. Pack gaps with smaller rubble and attach epiphytes (Anubias, Bucephalandra, mosses) to stone faces all the way around. A stone lush on one side and naked on the other is the most common peninsula giveaway.
Equipment Placement: Hide It Inside the Scape
There is no "behind" a peninsula, so equipment must vanish inside the layout itself. Here is how.
Filter intake and outflow
The cleanest solution is a canister filter with glass lily pipes — the glass nearly disappears against water, and pipes at the closed end read as part of the scape rather than hardware. Run intake and outflow from the closed end: viewers rarely stare through it, and cables drop straight down behind the stand from there. In rimless peninsulas, mount pipes tight to the closed-end glass and let the ridge hardscape swallow the lower half.
Heaters and CO2
Use an inline heater on the canister filter's return line so no heater enters the tank. For CO2, an inline atomizer or external reactor on the same return line keeps diffusers and bubble streams out of sight. Whatever must sit in the tank — thermometer probe, drop checker — goes at the closed end or tucks behind the central hardscape.
Cables and plumbing
Everything exits through the closed end. Route cables, filter hoses, and CO2 lines down through the stand's wall-side panel and clip them so no tubing loop dangles visible through the side glass. If the closed end is viewable too (a true floating divider), run cables inside the stand cabinet — or use a sump in the cabinet with only two near-invisible pipes entering the tank.
For more camouflage techniques, see our guide to hiding aquarium equipment in aquascapes.
Flow and Circulation From the Open End
Peninsula tanks are long, and detritus settles at the closed end — where the equipment strategy above clusters the hardware. The fix: separate filtration hardware from flow shaping.
- Main return at the closed end, aimed slightly downward along the long axis, so the current sweeps the full tank length toward the open end.
- A small circulation pump at the open end, mounted low and aimed back along the axis, prevents dead zones in the far corner. Hide it behind the end-most hardscape or inside a planted cluster.
- Keep the central structure permeable. A solid wall of rock blocks flow and traps debris. Leave swim-through gaps in the ridge or island.
- Watch the surface. Long tanks with a single return often film over at the open end. A lily pipe angled toward the surface, or a tiny skimmer at the closed end, handles it.
Planting for 360-Degree Viewing
Plant grouping follows the same center-out logic as the hardscape: tallest in the middle, shortest at the glass.
Layer heights concentrically
Think in rings: carpet or low foreground plants (Monte Carlo, dwarf hairgrass, Marsilea) within a few inches of every pane; midground clusters (Cryptocoryne, Anubias on the hardscape) at the base of the central structure; background-height stems riding the ridge itself. There is no traditional "background planting" — the tank's center is the background. Our guide to creating depth in an aquascape shows how layered heights sell distance; bend the principle around a center and it works here.
Use negative space deliberately
Open sand or carpet between the island and the glass is not wasted space — it is the viewing corridor. Resist the urge to fill every inch; breathing room is what makes the central structure read as sculpture. This is the discipline behind negative space aquascaping, and peninsulas punish its absence more than any other format.
Choose plants that look good from above and the side
You will often look slightly down into a peninsula from a standing position, so rosette plants and carpets that read well from above (Cryptocoryne parva, S. repens, hairgrass) earn their place — the Tropica plant database is a reliable reference for mature heights. Avoid tall, leggy stems as the dominant plant: from three sides, bare lower stems are three times as visible. Use stems in dense clusters at the ridge peak, where their height is the point.
Trim symmetrically
A stem cluster pruned flat on the kitchen side and shaggy on the living-room side is immediately obvious. After every trim, walk the full perimeter before you put the scissors away.
Maintenance Access in a Room-Divider Tank
A peninsula is often hemmed in by furniture — plan maintenance access as part of the design, not after it.
- Leave a service corridor. Keep 6–8 inches of clear space along at least one long side so you can stand there with a vacuum or scraper. Measure before filling the tank.
- Magnet cleaners are mandatory. You clean three panes instead of one; a magnetic cleaner makes it a two-minute job. Keep one on the glass at all times, tucked at the closed end.
- Prune from the open end inward so trimmed debris drifts toward you, not into the ridge.
- Plan the water-change route. A siphon hose needs a path from the tank to a sink or door that doesn't cross the living room. Test it dry first.
- Photograph all sides monthly. Algae often starts on the least-viewed pane; a walk-around photo catches it early.
Lighting a Peninsula Evenly
Peninsula tanks are long, so a single central fixture leaves the ends dim — and dim ends are dim from somebody's favorite chair. Match the light's spread to the tank length: one long fixture, or two smaller ones spaced evenly, mounted so legs or hanging kits don't interrupt sightlines. Suspended lights give the cleanest look — no rim hardware, and the top-down view stays clear. Keep intensity even rather than dramatic; a hot spot in the middle with dark ends reads as a mistake in the round.
Common Peninsula Mistakes to Avoid
- Building a "back" anyway. The classic failure: scaping it like a normal tank with a tall planted wall along one long pane. From the other pane it looks like the back of someone else's aquarium. Commit to a center-out design.
- Under-sizing the tank. Narrow peninsulas (under ~14 inches wide) barely fit a central structure plus viewing corridors. 16+ inches of width is far more forgiving, and large-tank aquascaping principles scale up cleanly.
- Forgetting the top-down view. People constantly look down into peninsulas. Bare substrate, visible equipment tops, and surface film are all top-down sins.
- One-sided epiphyte planting. Moss and Anubias only on the "front" faces of wood is the fastest way to look half-finished. Plant the hardscape in the round.
- Blocking the open end. Tall hardscape at the open end reads as a wall. Keep it low — carpet, low rocks, open swimming space.
Frequently Asked Questions
What size tank works best for a peninsula aquascape?
A 40-gallon breeder footprint (36 x 18 inches) is the sweet spot: long enough for a ridge or island with real presence, wide enough for viewing corridors on both panes. Under 30 gallons, central structures get cramped. For dedicated room dividers, 75–120 gallon long tanks are the most dramatic — and the easiest to scape well.
Can I use a hang-on-back filter on a peninsula tank?
You can, but it will be visible from at least one side. A canister filter with lily pipes at the closed end is the standard recommendation. If budget forces a HOB, mount it on the closed end, choose the slimmest model available, and mask it with hardscape or tall plants directly in front.
How do I keep the far end of a long peninsula clean?
Combine directed flow with access planning: aim the main return along the tank's axis, add a small circulation pump at the open end to kill dead zones, and make sure you can reach that end with a gravel vacuum. Most chronic "dirty far end" problems are dead-zone flow plus unreachable corners — not filtration capacity.
Do peninsula tanks need more light than standard tanks?
Not more total light — better-distributed light. The challenge is even coverage across a long footprint, not raw intensity. One long fixture or two evenly spaced smaller ones beats a single powerful central light. If you can measure PAR, the ends should read within about 20 percent of the center.
What fish suit a peninsula layout best?
Schooling fish that use the full tank length — rummynose tetras, harlequin rasboras, cardinal tetras — are ideal, because their movement connects the composition as you walk around. Avoid species that claim one corner and sit there. A single bold centerpiece works if it patrols.
Is a peninsula tank harder to maintain than a regular tank?
Slightly — you clean three panes instead of one, trim symmetrically, and plan access around furniture. But once the layout is designed for maintenance (service corridor, magnetic cleaner, permeable hardscape, even lighting), the extra work is a few extra minutes per session. Most owners find the viewing payoff easily worth it.
Bringing It All Together
A great peninsula aquascape is an exercise in letting go: the back wall, the single perfect viewpoint, the equipment hidden behind glass. What replaces them is a living sculpture — a ridge or island of stone and planting that rewards you differently from every side of the room. Start with a center-out hardscape, hide hardware inside the layout, shape flow deliberately, plant in concentric rings. If you are sizing up from a standard rectangle, a good primer on long, shallow footprints helps before you commit. Then your room divider becomes the best seat in the house — on all three sides.
Tissue-culture plants are the exception — they’re grown in sterile gel and adapt with minimal melting, which is part of what you’re paying for. Plants bought submersed from another hobbyist’s tank also transition with little melt, since they’re already in the right form.
Which Plants Melt Most (and Least)
Heavy melters (expect significant leaf loss)
- Cryptocorynes — infamous for “crypt melt,” sometimes dropping every leaf after any disturbance. They almost always recover from the roots within weeks.
- Stem plants grown emersed — rotala, ludwigia, and hygrophila often shed lower emersed leaves while the growing tips transition.
- Amazon swords — emersed-grown swords typically lose their broad oval aerial leaves and replace them with longer submersed ribbon leaves.
Light melters
- Anubias, java fern, bucephalandra — slow-growing rhizome plants transition gradually; occasional old-leaf melt but rarely dramatic.
- Vallisneria — usually transitions well, though it dislikes the move itself and may sulk for a week.
- Floating plants — minimal melt since their leaves were already at the air-water interface.
The Acclimation Protocol
Step 1: Quarantine or dip first
Before acclimating to your tank’s conditions, make sure you’re not acclimating pests along with the plant. Run new arrivals through our quarantine and dip protocol — it adds days upfront but prevents months of regret.
Step 2: Float to temperature-match (30 minutes)
Float the bag or container in your tank for 20–30 minutes to equalize temperature. Plants are less temperature-sensitive than fish, but a 10°F shock on top of transplant stress is an avoidable insult.
Step 3: Trim before planting
Remove any leaves that are already damaged, yellowing, or heavily algae-covered — they won’t recover and they’ll rot in your tank, feeding algae. For stem plants, trim off the bottom inch and any emersed leaves that look unlikely to adapt; the plant wastes energy maintaining leaves it’s going to shed anyway. Keep the healthy growing tips — that’s where recovery starts.
Step 4: Plant correctly the first time
Follow our planting guide — right depth, crown exposed on rosettes, rhizomes unburied on epiphytes. Every uprooting and replanting restarts the acclimation clock, so get placement right on the first attempt. Decide where each plant goes before it goes in the water.
Step 5: Run a gentle first week
For the first 7 days after planting:
- Moderate light — run your normal photoperiod but consider dropping intensity 20–30% if your light is dimmable. Blast-level light on a melting plant grows algae on the dying leaves, not recovery.
- Stable CO2 — if you inject CO2, keep it consistent. Fluctuating CO2 during acclimation is a melt accelerator. If you’re low-tech, this doesn’t apply — see growing without CO2.
- Half-strength fertilizer — new plants with damaged leaves can’t use full dosing, and the excess feeds algae. Ramp to full strength over 2–3 weeks per our fertilizer schedule.
- No disturbance — don’t move, trim, or “check on” new plants for at least two weeks. Every touch resets root establishment. This is especially critical for crypts.
Step 6: Remove melt, keep the base
As emersed leaves melt, remove the mushy material promptly — decaying leaves release ammonia and grow fungus that can spread to healthy tissue. But never discard the plant while the crown, rhizome, or roots are firm and alive. A crypt that’s lost every leaf but has firm roots is a plant that’s about to recover, not a dead plant. Give it 3–4 weeks before judging.
Telling Normal Melt From Real Problems
Normal transition melt:
- Affects oldest/emersed leaves first, newest growth last
- New submersed leaves emerge even as old ones dissolve
- Roots and crown stay firm and white/green
- Timeline: 1–4 weeks, then obvious new growth
Concerning melt (see our full melting diagnosis guide):
- New growth also melts or emerges deformed
- Rhizome or crown turns mushy and brown — this is rot, not transition
- Entire plant dissolves within days with no new growth after 4+ weeks
- Melting spreads to established plants that weren’t recently moved
Buying Tips to Minimize Melt
- Buy submersed-grown when available — hobbyist-grown cuttings transition with almost no melt.
- Choose tissue culture for sensitive species — crypts and delicate stems establish far more reliably from sterile cups.
- Avoid plants already melting in the store tank — some melt is normal, but a plant that’s mostly mush at purchase has less energy for recovery.
- Transport carefully — keep plants damp and out of direct sun/heat. A plant that dries out or cooks in a hot car melts far worse than one transported properly.
The First-Month Timeline: What to Expect Week by Week
Knowing what’s normal when removes most acclimation anxiety. Here’s the typical timeline for a healthy plant adapting to a new tank:
Week 1: The quiet week
Almost nothing visible happens. The plant is growing roots you can’t see and assessing its new environment. Some species (vallisneria, stem plants) may start shedding their lowest leaves. This is normal. Resist the urge to “help” — no moving, no extra fertilizer, no light changes. The most common beginner mistake is intervening during a week when the correct action is nothing.
Week 2: Melt peaks
This is when emersed leaves give up in earnest. Crypts may drop everything; swords shed their broad aerial leaves; stem plants lose lower foliage. It looks catastrophic and it’s usually fine. Keep removing mushy material, keep conditions stable, and watch the crown and growing tips — if those are firm and green, recovery is already underway.
Week 3: The turn
New submersed-adapted leaves emerge — smaller, thinner, often a slightly different shade of green than the emersed foliage. Stem plant tips start growing visibly; crypts push tiny curled leaves from the crown; swords unfurl narrow ribbon leaves. This is the moment most beginners exhale for the first time.
Week 4+: Established
New growth outpaces melt, and the plant is functionally yours. You can resume full-strength fertilizer, normal trimming, and stop treating it as fragile. Some slow growers (anubias, bucephalandra) take 6–8 weeks to show obvious progress — that’s their normal speed, not a problem.
Acclimating Different Plant Formats
Tissue-culture cups
Sterile, pest-free, and already adapted to high-humidity (not emersed) growth — tissue cultures melt the least of any format. Rinse the agar gel off gently (leftover gel rots and feeds fungus), split the portion into small plantlets, and plant per our planting guide. They establish slowly for the first two weeks, then accelerate. No dip needed, minimal acclimation stress — this is the premium experience you’re paying for.
Potted plants
Remove the pot and strip away the rockwool completely — leftover rockwool traps debris and rots. Tease the root mass apart gently; if it’s a dense mat, splitting it into 2–3 smaller portions actually establishes faster than planting one big clump (more growing points, better water flow around roots). Potted plants are usually emersed-grown, so expect the standard 2–4 week melt cycle.
Bare-root / bunched stems
Typically sold as weighted bunches. Remove any bands, foam, or weights, strip the lower leaves, and plant stems individually or in small groups. Bunched stems from the store are often already transitioning — check for new submersed growth at the tips, which tells you the plant is mid-adaptation and will settle quickly.
Hobbyist cuttings
Already submersed-grown and the fastest to establish — often showing new growth within days. The main acclimation factor is water-parameter difference between the two tanks. Float to temperature-match, plant promptly, and they’ll usually take off with minimal melt. This is why experienced hobbyists prefer trading cuttings over buying potted plants.
Frequently Asked Questions
Should I use a “plant starter” or transplant fertilizer?
Products marketed for transplant shock are mostly B-vitamins and mild hormones. They don’t hurt, but there’s no strong evidence they help aquarium plants specifically. Stable conditions and patience outperform any bottle. Save the money for more plants.
My new plant melted completely — bare crown, no leaves. Is it dead?
Probably not, if the crown or rhizome is firm. Crypts and swords routinely lose 100% of their leaves and regrow from the base within a month. The test is firmness: firm and pale/green means alive; mushy and brown/black means rot. Give firm-but-leafless plants a full 4 weeks before declaring them dead.
Can I speed up acclimation with extra light or CO2?
No — and trying usually backfires. A melting plant can’t use extra light; the excess just grows algae on its dying leaves. Keep light moderate and CO2 stable (not boosted) during acclimation. Growth speed comes from the plant’s own adaptation timeline, which you can’t rush, only avoid delaying.
Should new plants go straight into my main display tank?
After quarantine/dipping, yes — there’s no benefit to a separate “growing-in” tank for most plants. They acclimate to your water fastest in the tank they’ll live in. The exception is very delicate species going into a tank with boisterous fish; give those a few weeks in a calm corner or breeder box first.
The Patience Rule
The single most important acclimation skill is restraint: plant it right, set gentle conditions, remove decay, and then leave it alone for a month. The hobbyists with the best plant growth aren’t doing something clever in week one — they’re simply not interfering in weeks two through four while the plants do what they’ve evolved to do. Melt looks like failure and feels like failure, but in most cases it’s the visible part of a plant successfully becoming yours.