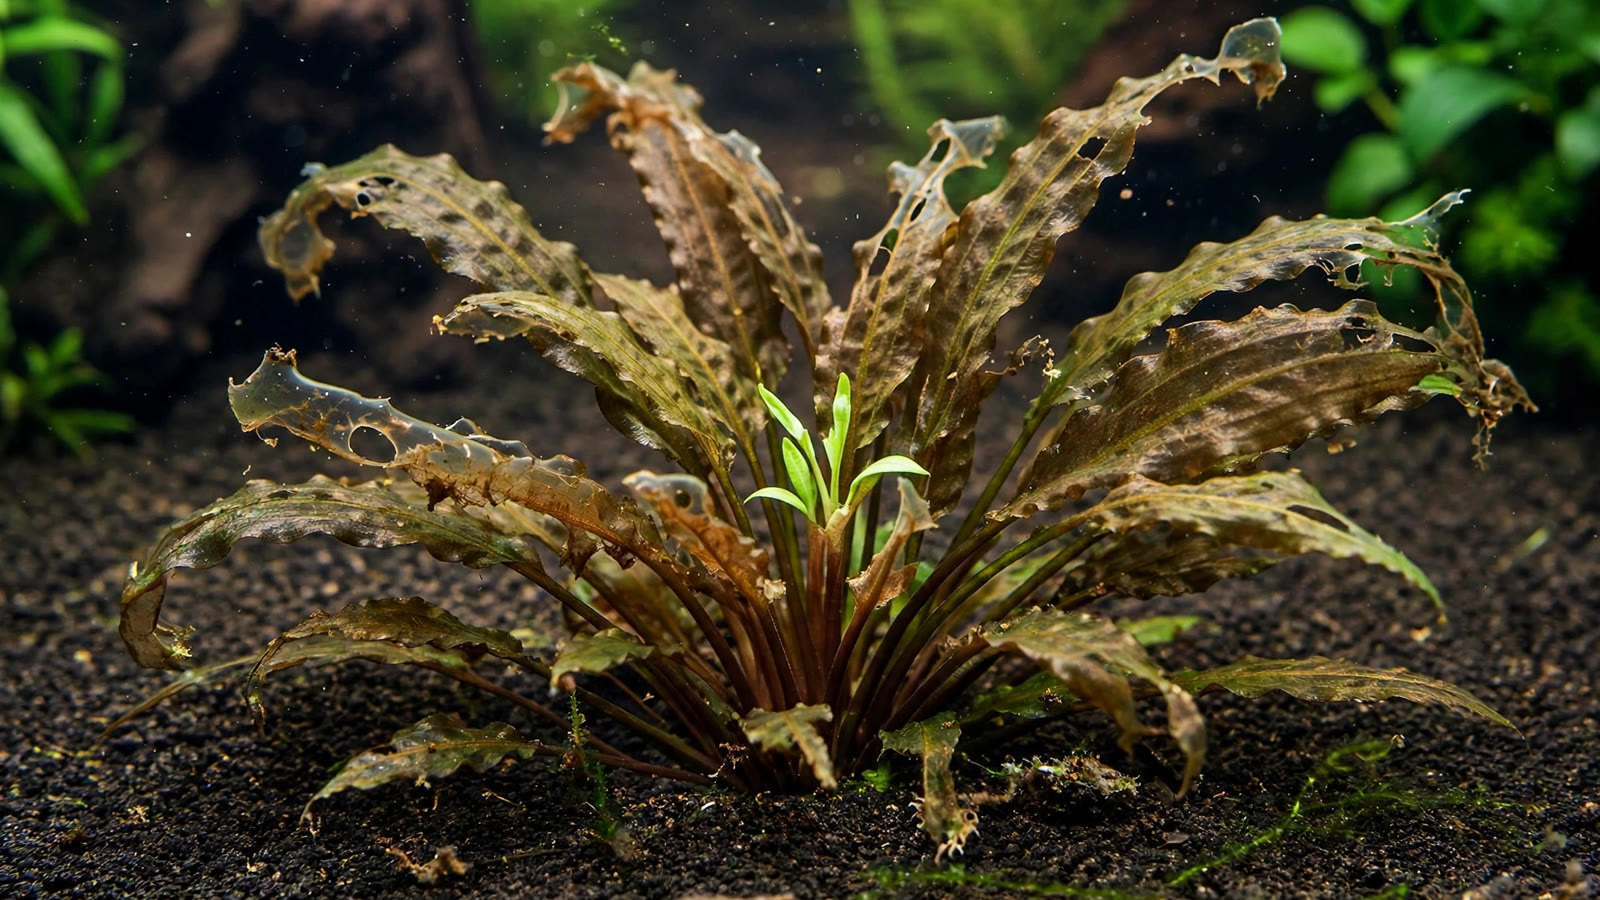
You check your tank one morning and the lush Cryptocoryne you planted last week has collapsed into translucent slime — every leaf a jelly-like ribbon drifting away from a sad little crown. If you're wondering why are my crypts melting, take a breath: this is one of the most common and most misunderstood events in the planted-aquarium hobby. Crypt melt is a normal stress response, not a death sentence, and knowing what your crypt is doing biologically will save you from the classic beginner mistake of ripping the plant out just as it was about to recover.
What Cryptocoryne "Melt" Actually Is
"Melt" is the hobby's word for a rapid, controlled self-destruction of foliage. The leaves don't slowly yellow and decay like a starving plant — they turn glassy and transparent within a day or two, then collapse into mush that disintegrates at a touch. This is not random rot. It is an active, hormone-driven response: the plant releases ethylene and adjusts auxin signaling in response to a perceived environmental emergency, then walls off each leaf at the petiole (the leaf stalk) and deliberately sheds it, much like a deciduous tree dropping leaves before winter.
Here is the critical part most beginners miss: the melt targets the leaves, not the root system. Cryptocorynes grow from a rhizome — a thick horizontal stem at the base that stores energy — plus a dense tuft of roots. When the foliage melts, the rhizome and roots are usually completely intact underground. From the plant's perspective, this is a sensible trade. Crypt leaves are expensive organs tuned to a specific set of conditions: a particular light level, water chemistry, carbon availability, and humidity. When those conditions change suddenly, the old leaves become a liability — they leak nutrients and invite infection. Jettisoning them and regrowing fresh leaves adapted to the new conditions is the plant's survival strategy, perfected over millions of years in the seasonally flooding streams of Sri Lanka and Southeast Asia.
That's why the number-one rule of crypt melt is: don't uproot the plant. The crown and roots are still alive, and disturbing them restarts the stress clock. Leave the plant exactly where it is, gently siphon or tweeze away the melted mush so it doesn't foul your water, and wait.
The Five Triggers That Cause Crypts to Melt
Almost every crypt melt traces back to one of five causes. Identifying yours tells you how long recovery will take and whether you need to change anything.
1. Sudden Water-Parameter Swings
This is the classic trigger and the one behind the phenomenon hobbyists call "crypt melt disease" — there is no disease, just chemistry. A sharp swing in pH, temperature, hardness, or dissolved CO₂ shocks the plant into shedding leaves built for the old conditions. Typical scenarios: a CO₂ system runs empty and the pH climbs overnight, a heater malfunctions, or you move a plant straight from a soft-water tank into a hard-water one. If your plants show the same glassy-leaf collapse as plants melting after CO₂ changes, a recent parameter swing is almost always the culprit. Crypts forgive a lot, but they do not forgive abrupt change.
2. New-Tank Melt
Freshly planted crypts in a newly set-up aquarium melt so reliably that experienced aquarists just expect it. A new tank is unstable by definition: the bacterial colony is immature, aquasoil is dumping ammonia and tannins, light and CO₂ levels are being dialed in by guesswork, and water chemistry drifts daily. The crypt's existing leaves were grown for some other tank's conditions, so the plant sheds them and waits for stability. This is the same mechanism behind melt in fresh aquasoil: the first weeks in aquasoil are chemically the most turbulent period of a tank's life.
3. Transplant and Replanting Shock
Moving a crypt — even within the same aquarium — damages its fine root hairs and exposes the rhizome to air or altered chemistry. Because Cryptocorynes are heavy root feeders with enormous root systems relative to their size, root disturbance hits them harder than it hits stem plants. Every uproot-and-replant resets the plant's adjustment: it melts its leaves, spends energy rebuilding roots, and only then pushes new foliage. This is why the golden rule with crypts is to plant them once and leave them alone for months. If you must move one, do it quickly, keep the roots wet, replant at exactly the same crown depth, and expect a melt — that's normal, not failure.
4. Liquid Carbon (Glutaraldehyde) Exposure
Liquid carbon products — glutaraldehyde-based supplements used as a CO₂ alternative or algae treatment — are notoriously hard on Cryptocorynes. Many crypts respond to dosing, especially overdosing or direct application near the plant, with rapid leaf melt. The mechanism isn't fully settled, but the plant appears to read the chemical as a toxic event and sheds foliage in response. Some aquarists dose liquid carbon for years with crypts thriving; others melt an entire crypt bed with one enthusiastic spot treatment. If your melt started within days of beginning or increasing liquid carbon, you have your answer. Stop dosing, do a water change, and the rhizome will usually recover on its own.
5. The Emersed-to-Submerged Transition
Most store-bought crypts — potted plants and tissue-culture cups alike — are grown emersed (out of water, in humid air), because nurseries can grow them far faster that way. Emersed leaves are built for air: thicker cuticles, different stomata arrangements, and a different photosynthesis setup. Submerged in your aquarium, those leaves simply cannot function underwater, so the plant melts every one of them and grows a new set of submerged-form leaves with thinner blades and different anatomy. This transition melt is the most total and the most alarming-looking — sometimes literally 100% of the visible plant dissolves — but it is also the most benign, because the new growth that follows is fully adapted to your tank.
Which Crypt Species Melt Most Easily
Not all crypts panic equally. Sensitivity varies by species and even by variety, roughly following how specialized the plant's native habitat is versus how adaptable the cultivar has become through decades of aquarium breeding.
| Species / Variety | Melt Sensitivity | Notes |
|---|---|---|
| Cryptocoryne wendtii (green, brown, 'Mi Oya') | Low | The classic beginner crypt; melts less and bounces back fastest. Green forms are the hardiest. |
| Cryptocoryne wendtii 'Tropica' / 'Red' | Low–moderate | Colored varieties are slightly more sensitive than the plain green form. |
| Cryptocoryne parva | Moderate | Tiny and slow; melt looks dramatic on a 5 cm plant, and regrowth is slow — patience is mandatory. |
| Cryptocoryne beckettii / walkeri | Low | Tough, adaptable Sri Lankan species that usually just shrug off transitions. |
| Cryptocoryne crispatula / balansae | Moderate–high | Long strap leaves melt readily after parameter swings; the crown is tenacious though. |
| Cryptocoryne usteriana | High | Large and dramatic, and famous for melting to nothing at the slightest provocation — then returning. |
| Cryptocoryne aponogetifolia | High | Bullate (hammered) leaves are sensitive; often melts after big water changes. |
The pattern is consistent: the wendtii family and other long-domesticated species are forgiving, while the big, wild-collected, and hammered-leaf species are drama queens. But even the most sensitive crypt follows the same rule — the rhizome survives. Official species profiles, such as Tropica's plant database entry for Cryptocoryne wendtii 'Green', confirm the low-tech, adaptable nature of the domesticated varieties, which is why they recover so reliably.
The Recovery Timeline: What to Expect Week by Week
Crypt recovery is slow but predictable. Here is the typical timeline after a full melt, assuming the rhizome survived (it almost always does) and tank conditions are stable:
Days 1–7: The ugly phase. All damaged leaves turn transparent and slimy. Gently remove the mush with tweezers or during water changes — it rots fast and can spike ammonia if left in quantity. Do not dig the plant up to "check" it. The crown may look like a bare nub; this is normal.
Weeks 2–3: Stillness. Nothing visible happens, and this is where beginners panic. Underground, the plant is rebuilding root hairs and mobilizing stored energy from the rhizome. Keep parameters stable, keep up gentle fertilization, and don't intervene. If the rhizome is firm and pale when you (gently) brush substrate away, it is alive.
Weeks 3–5: The first comeback sign. Tiny new leaves emerge from the center of the crown — usually small, pale-green, and often a different shape than the melted leaves, because these are true submerged-form leaves. This is your confirmation: the plant is re-growing, not dying. Growth is slow at first, maybe one leaf every few days.
Weeks 6–10: Steady fill-in. New leaves arrive faster, grow larger, and take on their mature color and texture. Wendtii varieties often look respectable by week 8; slower species like parva can take three months or more to form a full rosette. Once the new foliage is established, the plant is actually hardier than before — it is now fully adapted to your water.
The single biggest variable is stability. A plant left alone in steady water recovers on schedule; a plant subjected to weekly parameter swings, repeated moves, or aggressive algae treatments will stall. If you want a benchmark for what a healthy-versus-stalled plant looks like during this period, compare against plants that stall without dying — a melting crypt that has begun pushing new submerged leaves is progressing, even if it looks pathetic.
How to Tell Melt from Actual Death
Because melt looks so catastrophic, it's worth knowing the difference between a recovering plant and a genuinely dead one. A live rhizome is firm, pale cream to light green, and smells like nothing when you gently expose it. A dead rhizome is soft, brown or black, and smells foul — at that point it is rhizome rot, not melt, and the salvage protocol is different (excise the rot, keep only firm tissue). In the overwhelming majority of melt cases, the rhizome is firm and healthy. New growth emerging from the crown is the definitive proof of life — and it also distinguishes crypt melt from the general aquarium plant melting seen in stem plants, where melted stems often can't recover from a bare node.
Crypt Melt Prevention Checklist
You can't prevent transition melt entirely — it's the plant's programming — but you can make melts rarer, milder, and shorter:
- Stabilize before planting. Let a new tank run for 2–3 weeks before adding sensitive crypts, so the wildest aquasoil chemistry has settled.
- Acclimate gradually. Float or drip-acclimate new plants, especially if your water differs markedly from the shop's. Even 30 minutes of gradual mixing helps.
- Plant once, leave it. Decide the crypt's permanent spot on day one. Every replant triggers a fresh adjustment cycle.
- Keep water changes modest. Crypts hate big swings; 20–30% weekly beats occasional 70% overhauls. If your plants react badly after big changes, see plants struggling after large water changes.
- Start CO₂ low and ramp slowly. A sudden jump in injected CO₂ (or a system running dry) is a top melt trigger — dial changes in gradually.
- Go easy on liquid carbon. Never spot-dose directly onto crypts, and start any liquid carbon regimen at half strength.
- Feed the roots. Crypts are heavy root feeders; root tabs under the crown give the plant energy reserves that speed recovery.
- Don't prune during melt. Remove only fully-melted mush. Leave half-melted leaves attached — the plant is still reclaiming nutrients from them.
Frequently Asked Questions
Will my crypts grow back after melting completely?
Yes, in the vast majority of cases. Crypt melt destroys leaves, not the rhizome and root system, and the rhizome stores enough energy to push an entirely new set of submerged-adapted leaves. Expect the first tiny leaves in 3–5 weeks and a respectable plant in 8–12 weeks, provided water parameters stay stable. Only a soft, foul-smelling rhizome is truly dead — firm and pale means alive.
Should I remove melting crypt leaves or leave them?
Remove leaves that have fully melted into transparent mush — they rot quickly and can foul your water. But leave partially-melted leaves that are still firm at the base attached, because the plant is actively pulling nutrients out of them before shedding them. Never uproot the plant during a melt; disturbing the roots restarts the recovery clock and can turn a two-week setback into a two-month one.
How long does crypt melt last?
The visible melting phase usually lasts 1–3 weeks from the trigger event. Then comes a quiet 2–3 week period with no visible growth while the plant rebuilds roots underground. New leaves typically appear in weeks 3–5, and full recovery takes 2–3 months for fast species like C. wendtii and longer for slow growers like C. parva. If no new growth appears after 6–8 weeks, gently check that the rhizome is still firm.
Does liquid carbon cause crypt melt?
It frequently does. Glutaraldehyde-based liquid carbon products are one of the most reported melt triggers for Cryptocorynes, especially when spot-dosed near the plant or started at full strength. Not every crypt reacts — some tanks dose for years without issue — but if your melt began within days of starting or increasing liquid carbon, stop dosing, perform a water change, and the rhizome will typically recover on its own.
Why did my crypts melt after a water change?
Large water changes swing temperature, pH, hardness, and dissolved gas levels all at once — exactly the combination crypts read as an emergency. Tap water chemistry can also differ from tank water more than you expect. Smaller, more frequent changes (20–30%) keep swings gentle, and matching temperature plus dechlorinating before the water enters the tank removes most of the shock that triggers post-water-change melts.
Is crypt melt contagious to other plants?
No. Crypt melt is a stress response of the individual plant, not an infection, so it cannot spread to neighboring crypts, let alone to other species. That said, if several crypts melt at once, the shared cause — a parameter swing, new CO₂ regimen, or fresh aquasoil — affects the whole tank, so check your water rather than treating the plants. Melting in other genera like melting anubias follows the same stress-response logic but has its own specific triggers.
The Bottom Line: Trust the Rhizome
Crypt melt looks like a disaster and behaves like a strategy. The plant is not dying — it is discarding leaves built for conditions that no longer exist and rebuilding itself for your tank, from the rhizome up. Your entire job is to provide the one thing the plant is asking for: stability. Keep parameters steady, leave the plant undisturbed, remove the mush, and let the timeline play out. In two to three months you'll have a crypt tougher and better adapted than the one that melted — and next time you'll recognize it instantly and not panic at all. For more on the science of how nurseries describe the transition, the retailer product page for Cryptocoryne wendtii 'Green' is a useful sanity check for what healthy, nursery-grown plants look like before planting.
Tissue-culture plants are the exception — they’re grown in sterile gel and adapt with minimal melting, which is part of what you’re paying for. Plants bought submersed from another hobbyist’s tank also transition with little melt, since they’re already in the right form.
Which Plants Melt Most (and Least)
Heavy melters (expect significant leaf loss)
- Cryptocorynes — infamous for “crypt melt,” sometimes dropping every leaf after any disturbance. They almost always recover from the roots within weeks.
- Stem plants grown emersed — rotala, ludwigia, and hygrophila often shed lower emersed leaves while the growing tips transition.
- Amazon swords — emersed-grown swords typically lose their broad oval aerial leaves and replace them with longer submersed ribbon leaves.
Light melters
- Anubias, java fern, bucephalandra — slow-growing rhizome plants transition gradually; occasional old-leaf melt but rarely dramatic.
- Vallisneria — usually transitions well, though it dislikes the move itself and may sulk for a week.
- Floating plants — minimal melt since their leaves were already at the air-water interface.
The Acclimation Protocol
Step 1: Quarantine or dip first
Before acclimating to your tank’s conditions, make sure you’re not acclimating pests along with the plant. Run new arrivals through our quarantine and dip protocol — it adds days upfront but prevents months of regret.
Step 2: Float to temperature-match (30 minutes)
Float the bag or container in your tank for 20–30 minutes to equalize temperature. Plants are less temperature-sensitive than fish, but a 10°F shock on top of transplant stress is an avoidable insult.
Step 3: Trim before planting
Remove any leaves that are already damaged, yellowing, or heavily algae-covered — they won’t recover and they’ll rot in your tank, feeding algae. For stem plants, trim off the bottom inch and any emersed leaves that look unlikely to adapt; the plant wastes energy maintaining leaves it’s going to shed anyway. Keep the healthy growing tips — that’s where recovery starts.
Step 4: Plant correctly the first time
Follow our planting guide — right depth, crown exposed on rosettes, rhizomes unburied on epiphytes. Every uprooting and replanting restarts the acclimation clock, so get placement right on the first attempt. Decide where each plant goes before it goes in the water.
Step 5: Run a gentle first week
For the first 7 days after planting:
- Moderate light — run your normal photoperiod but consider dropping intensity 20–30% if your light is dimmable. Blast-level light on a melting plant grows algae on the dying leaves, not recovery.
- Stable CO2 — if you inject CO2, keep it consistent. Fluctuating CO2 during acclimation is a melt accelerator. If you’re low-tech, this doesn’t apply — see growing without CO2.
- Half-strength fertilizer — new plants with damaged leaves can’t use full dosing, and the excess feeds algae. Ramp to full strength over 2–3 weeks per our fertilizer schedule.
- No disturbance — don’t move, trim, or “check on” new plants for at least two weeks. Every touch resets root establishment. This is especially critical for crypts.
Step 6: Remove melt, keep the base
As emersed leaves melt, remove the mushy material promptly — decaying leaves release ammonia and grow fungus that can spread to healthy tissue. But never discard the plant while the crown, rhizome, or roots are firm and alive. A crypt that’s lost every leaf but has firm roots is a plant that’s about to recover, not a dead plant. Give it 3–4 weeks before judging.
Telling Normal Melt From Real Problems
Normal transition melt:
- Affects oldest/emersed leaves first, newest growth last
- New submersed leaves emerge even as old ones dissolve
- Roots and crown stay firm and white/green
- Timeline: 1–4 weeks, then obvious new growth
Concerning melt (see our full melting diagnosis guide):
- New growth also melts or emerges deformed
- Rhizome or crown turns mushy and brown — this is rot, not transition
- Entire plant dissolves within days with no new growth after 4+ weeks
- Melting spreads to established plants that weren’t recently moved
Buying Tips to Minimize Melt
- Buy submersed-grown when available — hobbyist-grown cuttings transition with almost no melt.
- Choose tissue culture for sensitive species — crypts and delicate stems establish far more reliably from sterile cups.
- Avoid plants already melting in the store tank — some melt is normal, but a plant that’s mostly mush at purchase has less energy for recovery.
- Transport carefully — keep plants damp and out of direct sun/heat. A plant that dries out or cooks in a hot car melts far worse than one transported properly.
The First-Month Timeline: What to Expect Week by Week
Knowing what’s normal when removes most acclimation anxiety. Here’s the typical timeline for a healthy plant adapting to a new tank:
Week 1: The quiet week
Almost nothing visible happens. The plant is growing roots you can’t see and assessing its new environment. Some species (vallisneria, stem plants) may start shedding their lowest leaves. This is normal. Resist the urge to “help” — no moving, no extra fertilizer, no light changes. The most common beginner mistake is intervening during a week when the correct action is nothing.
Week 2: Melt peaks
This is when emersed leaves give up in earnest. Crypts may drop everything; swords shed their broad aerial leaves; stem plants lose lower foliage. It looks catastrophic and it’s usually fine. Keep removing mushy material, keep conditions stable, and watch the crown and growing tips — if those are firm and green, recovery is already underway.
Week 3: The turn
New submersed-adapted leaves emerge — smaller, thinner, often a slightly different shade of green than the emersed foliage. Stem plant tips start growing visibly; crypts push tiny curled leaves from the crown; swords unfurl narrow ribbon leaves. This is the moment most beginners exhale for the first time.
Week 4+: Established
New growth outpaces melt, and the plant is functionally yours. You can resume full-strength fertilizer, normal trimming, and stop treating it as fragile. Some slow growers (anubias, bucephalandra) take 6–8 weeks to show obvious progress — that’s their normal speed, not a problem.
Acclimating Different Plant Formats
Tissue-culture cups
Sterile, pest-free, and already adapted to high-humidity (not emersed) growth — tissue cultures melt the least of any format. Rinse the agar gel off gently (leftover gel rots and feeds fungus), split the portion into small plantlets, and plant per our planting guide. They establish slowly for the first two weeks, then accelerate. No dip needed, minimal acclimation stress — this is the premium experience you’re paying for.
Potted plants
Remove the pot and strip away the rockwool completely — leftover rockwool traps debris and rots. Tease the root mass apart gently; if it’s a dense mat, splitting it into 2–3 smaller portions actually establishes faster than planting one big clump (more growing points, better water flow around roots). Potted plants are usually emersed-grown, so expect the standard 2–4 week melt cycle.
Bare-root / bunched stems
Typically sold as weighted bunches. Remove any bands, foam, or weights, strip the lower leaves, and plant stems individually or in small groups. Bunched stems from the store are often already transitioning — check for new submersed growth at the tips, which tells you the plant is mid-adaptation and will settle quickly.
Hobbyist cuttings
Already submersed-grown and the fastest to establish — often showing new growth within days. The main acclimation factor is water-parameter difference between the two tanks. Float to temperature-match, plant promptly, and they’ll usually take off with minimal melt. This is why experienced hobbyists prefer trading cuttings over buying potted plants.
Frequently Asked Questions
Should I use a “plant starter” or transplant fertilizer?
Products marketed for transplant shock are mostly B-vitamins and mild hormones. They don’t hurt, but there’s no strong evidence they help aquarium plants specifically. Stable conditions and patience outperform any bottle. Save the money for more plants.
My new plant melted completely — bare crown, no leaves. Is it dead?
Probably not, if the crown or rhizome is firm. Crypts and swords routinely lose 100% of their leaves and regrow from the base within a month. The test is firmness: firm and pale/green means alive; mushy and brown/black means rot. Give firm-but-leafless plants a full 4 weeks before declaring them dead.
Can I speed up acclimation with extra light or CO2?
No — and trying usually backfires. A melting plant can’t use extra light; the excess just grows algae on its dying leaves. Keep light moderate and CO2 stable (not boosted) during acclimation. Growth speed comes from the plant’s own adaptation timeline, which you can’t rush, only avoid delaying.
Should new plants go straight into my main display tank?
After quarantine/dipping, yes — there’s no benefit to a separate “growing-in” tank for most plants. They acclimate to your water fastest in the tank they’ll live in. The exception is very delicate species going into a tank with boisterous fish; give those a few weeks in a calm corner or breeder box first.
The Patience Rule
The single most important acclimation skill is restraint: plant it right, set gentle conditions, remove decay, and then leave it alone for a month. The hobbyists with the best plant growth aren’t doing something clever in week one — they’re simply not interfering in weeks two through four while the plants do what they’ve evolved to do. Melt looks like failure and feels like failure, but in most cases it’s the visible part of a plant successfully becoming yours.