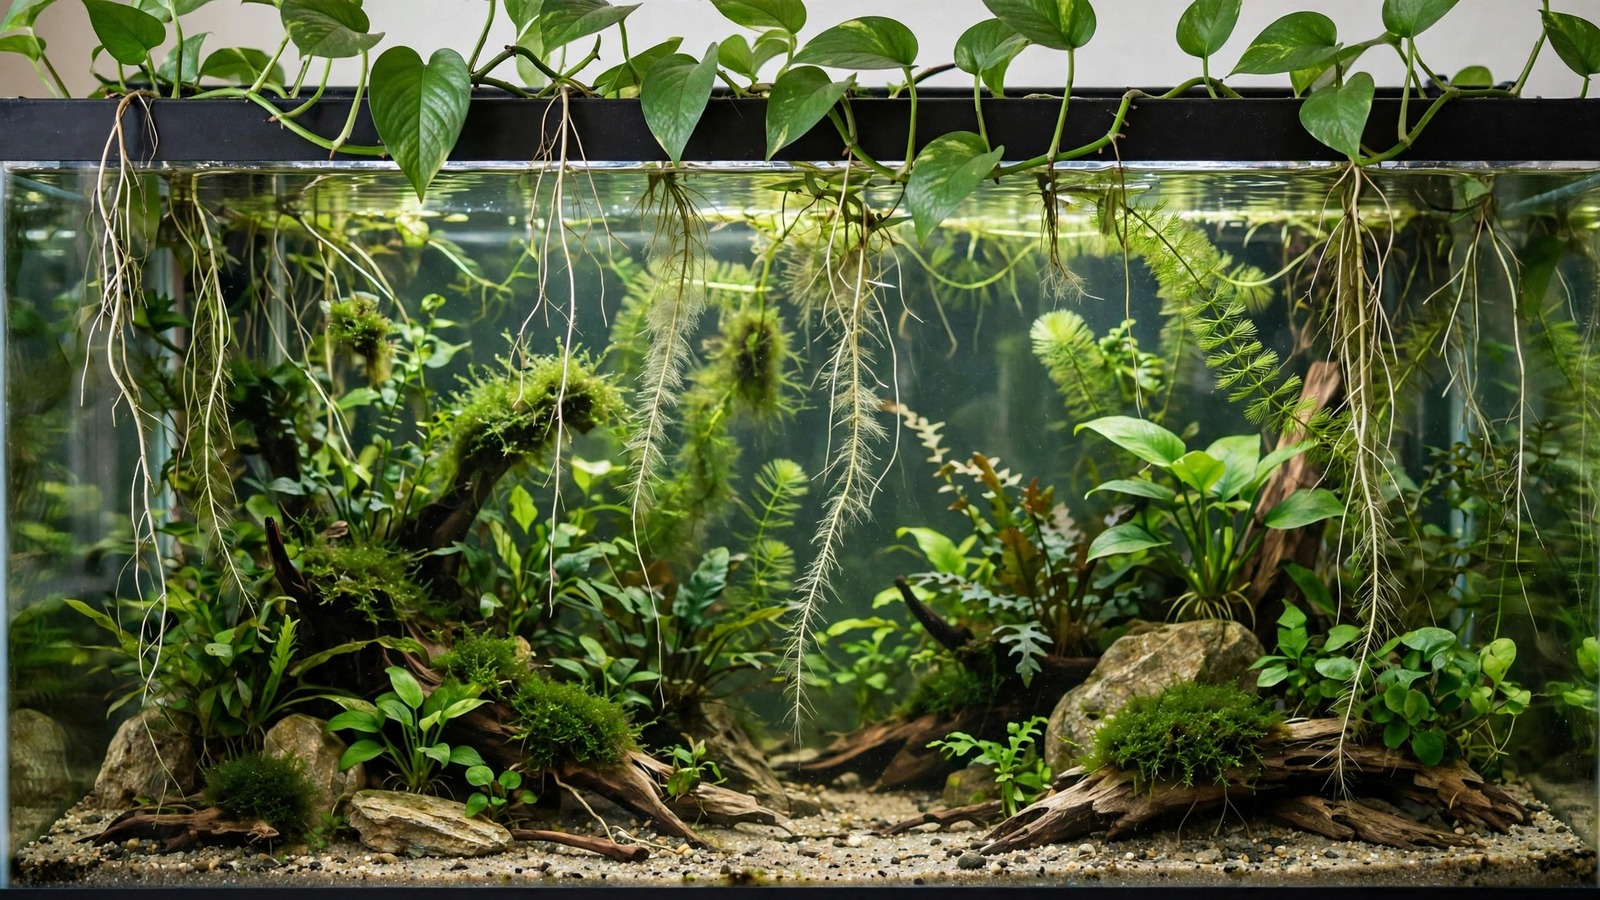
If you have ever looked at your pothos trailing off a bookshelf and wondered whether those vines could live in your fish tank, the answer is yes — and your fish will thank you for it. Pothos in aquariums is one of the simplest ways to keep nitrates low, because the plant's fast-growing roots drink up nitrogen compounds straight from the water. Unlike submerged plants, pothos grows emersed: its roots dangle in the tank while its leaves stay in the air, giving it unlimited access to carbon dioxide and making it an absolute nitrate-eating machine.
This guide covers the whole process — how to add pothos to your aquarium safely, the best ways to hold cuttings in place, how to care for the plant long term, and the common mistakes that turn a great idea into rotting mush. Whether you are battling chronically high nitrates or you just love the look of vines cascading over the rim of a planted tank, you will find everything you need here.
Why Pothos Works So Well in Aquariums
Pothos (Epipremnum aureum), also sold as devil's ivy, is a tropical aroid from the Solomon Islands. In nature it climbs trees with aerial roots, drawing moisture and nutrients from humid air and leaf litter. That lifestyle makes it a perfect candidate for the top of a fish tank: the roots adapt to water quickly, and because the leaves are in the open air, the plant never has to compete with algae for dissolved CO2. It photosynthesizes in full-strength atmospheric CO2, and all that growth energy translates into voracious nutrient uptake below the waterline.
The mechanism is simple nitrate assimilation. Fish waste breaks down into ammonia, bacteria convert it to nitrate, and nitrate accumulates as the end of the nitrogen cycle. Fast-growing emergent plants like pothos pull nitrate directly out of the water through their roots. Once a vine is mature, many hobbyists report cutting nitrate accumulation rates in half and stretching water changes from weekly to biweekly.
Beyond nitrate control, pothos roots offer side benefits: they give shy fish and fry extra cover, they compete with algae for nutrients, and they add a lush, riparium-style look that makes a standard glass box look like a slice of jungle. If you are curious about growing other aquarium plants partially above the waterline, our guide to growing aquarium plants emersed covers the broader technique.
Is Pothos Safe for Fish and Invertebrates?
This is the most common worry, so let us address it directly: yes, pothos is safe for fish, shrimp, and snails when used the normal way — roots in the water, leaves in the air. The concern comes from the fact that pothos contains calcium oxalate crystals, which make the leaves and stems mildly toxic if chewed by cats, dogs, or people (university plant databases like NC State Extension's plant profile note this toxicity for pets). In an aquarium, it is a non-issue as long as no one is eating the plant.
That said, two common-sense rules apply:
- Only the roots and lower stem go underwater. Leaves left submerged will rot, and rotting plant matter releases ammonia — exactly what you are trying to remove. Trim leaves off any node you place below the waterline.
- Do not add the plant if your tank is bare and your fish are nibblers. Most fish ignore roots, but notorious chewers like goldfish, large cichlids, and silver dollars may shred fine root tips. In heavily nibbled tanks, pothos will struggle and pollute the water with damaged tissue.
Shrimp tanks are an ideal use case: neocaridina shrimp graze biofilm off pothos roots and fry use the root mass as a nursery. If you are also exploring other houseplants for the tops of tanks, watering houseplants with aquarium water is the mirror-image habit — your tank water is fertilizer.
How to Add Pothos to Your Aquarium: Step by Step
1. Choose your cuttings
Start with a healthy parent pothos — golden, jade, marble queen, and neon varieties all work; golden pothos (Epipremnum aureum 'Aureum') is the cheapest and hardiest. Take 6–10 inch cuttings with at least 3–4 nodes (the brown bumps where leaves and roots emerge). Aerial roots already poking out of the nodes will adapt fastest, but plain cuttings root within a week or two.
2. Prepare the cuttings
Strip the lower two or three leaves from each cutting so no leaf will sit underwater — only bare stem and nodes go in. Let the cut ends callus for an hour or two on the counter if you like, though this is optional. Rinse the cuttings gently to remove soil if you are taking them from a potted plant; residual potting soil (especially anything with fertilizer beads or perlite) should not go in the tank.
3. Place them in the tank
Submerge just the bottom 2–4 inches of stem with the nodes underwater and the top leaves well above the rim. This is the critical detail: leaves must stay dry. Here are the most popular mounting methods, from simplest to most involved:
- Wedge behind the filter intake or heater. Free, instant, and keeps cuttings from drifting. Works best for a cutting or two in a small tank.
- Hang over the rim. Drape cuttings over the glass edge so the stem rests on the rim and the nodes sit below the waterline. A strip of aquarium-safe foam or a folded filter pad on the rim prevents the stem from slipping.
- Suction-cup holders and clips. Inexpensive riparium clips with suction cups stick to the glass and hold stems at the perfect height. This is the neatest option for multiple cuttings.
- Planting baskets. Small plastic aquarium baskets zip-tied to the rim or hung from the lid hold several cuttings and look intentional rather than improvised.
- Hang-on-back filter baskets. Tucking cuttings into the outflow chamber of an HOB filter is a classic trick — the constant flow brings nutrients right to the roots.
4. Light it
Pothos needs light on its leaves, not underwater. Normal room lighting is often enough; a windowsill-adjacent tank gets ideal brightness. If the tank sits in a dim corner, the room's existing ceiling light or a small desk lamp aimed at the foliage will do. Variegated varieties (marble queen, golden) keep their pattern better with brighter light, while plain green jade tolerates the dimmest spots. Note that algae concerns apply to the submerged half: if your tank light is strong and runs long hours, manage it the same way you would for managing floating plants, since pothos roots do not shade the tank the way floating leaves do.
5. Wait and watch
Within 1–3 weeks you should see fine white roots sprouting from the nodes, and new leaves unfurling from the top within a month. There is nothing to dose — the fish waste is the fertilizer. Resist the urge to add root tabs or liquid fertilizer for the pothos; it feeds from the water column already.
Caring for Pothos Long Term
Once established, pothos is famously low-maintenance — but "low-maintenance" is not "no-maintenance," and a few habits keep it thriving instead of merely surviving.
- Trim regularly. Pothos can grow several feet per year. Vines trailing to the floor look dramatic but become top-heavy and pull cuttings out of their holders. Trim vines back to a node every couple of months, and drop the trimmings back into the tank to multiply your nitrate-scrubbing power.
- Wipe leaves occasionally. Dust on indoor leaves slows photosynthesis. A damp cloth wipe every month or two keeps the foliage working at full capacity.
- Remove dead roots and leaves promptly. A few dead root tips are normal, but pull out any brown, slimy root mass or fallen leaves before they decompose. Think of it the same way you would reviving a dying aquarium plant — clean dead tissue early and the healthy growth continues unhindered.
- Watch for root-bound congestion. After 6–12 months a dense root mass can clog filter intakes. Keep roots trimmed to a manageable handful and relocate intakes if needed.
One responsibility note: never dump trimmings or tank water containing plant fragments down drains, into gardens, or into local waterways. Pothos (Epipremnum aureum) is invasive in subtropical regions such as Florida and Hawaii, and aquarium waste is a real pathway into the wild. Check your local rules and dispose of trimmings in household trash or compost instead.
Can pothos replace water changes?
No. Pothos removes nitrate and some dissolved organics, but it does not replenish minerals, stabilize pH buffering, or remove the compounds fish release. Use pothos to reduce water-change frequency (from weekly to every two or three weeks in a well-planted setup), not eliminate it. Regular partial water changes remain the backbone of fish health.
How Much Nitrate Can Pothos Actually Remove?
Expectations matter here. A single small cutting in a 20-gallon tank will make a barely measurable dent. The effect becomes meaningful when the plant is mature — roughly one healthy vine per 5–10 gallons of water, each with a solid root mass. In that setup, hobbyist before-and-after testing consistently shows nitrate accumulation dropping by roughly a third to a half compared with the same tank plantless.
Several factors determine how well it works:
- Leaf area. More leaves in the air means more photosynthesis, which drives more root uptake. Let the vine grow long.
- Light. Bright indirect light on the foliage turbo-charges growth and uptake; dim corners give slow results.
- Stocking level. Pothos shines in moderately stocked tanks. In an overstocked tank it helps, but no plant can outrun a biologically overloaded filter.
- Water chemistry. Low-mineral water such as rainwater is fine for pothos, though extremely soft water may slightly slow root growth at first.
One important interaction to know about: pothos competes with your submerged plants for the same nitrogen. In a heavily planted aquascape with demanding species, a huge pothos can starve your carpeting plants of nitrate and trigger nitrogen deficiency in them. If your underwater plants start yellowing at the tips after the pothos explodes, either dose a little nitrate back for the tank plants or thin the pothos roots. Balance is the goal.
Common Mistakes (and How to Fix Them)
| Mistake | Why it fails | The fix |
|---|---|---|
| Submerging leaves | Leaves rot underwater within days, releasing ammonia | Keep all foliage above the rim; trim leaves off submerged nodes |
| One tiny cutting in a big tank | Negligible nitrate uptake | Start with 4–6 cuttings; scale vines to tank volume |
| Cuttings drifting freely | Leaves dip underwater as the cutting shifts | Secure stems with clips, baskets, or the filter |
| No light on the foliage | Growth stalls; plant drops leaves | Give the leaves room light or a nearby lamp |
| Ignoring root overgrowth | Roots clog filters and trap debris | Trim the root mass every few months |
| Expecting it to replace water changes | Minerals deplete, pH buffering drops | Keep up partial water changes on a longer schedule |
Other Houseplants You Can Try Next
Pothos is the gateway, but the same emersed trick works with several houseplants. Lucky bamboo (Dracaena sanderiana) is a classic, spider plants root readily from their offsets, peace lily (Spathiphyllum) thrives with wet roots, and monstera cuttings will grow enormous if you give them room. Avoid succulents and anything with soft, easily rotted stems, and keep the leaves-above-water rule for everything. For background on how nutrient uptake works in aquatic plants generally, Tropica's plant care resources are a solid authority. Start with one species, get it thriving, then experiment.
Frequently Asked Questions
Will pothos roots hurt my fish or clog my filter?
Healthy roots are harmless to fish, shrimp, and snails — shrimp graze biofilm off them and fry hide in the root mass. The only real risk is mechanical: after a year, a dense root tangle can slow a filter intake. Prevent this by trimming the root mass to a modest handful every few months and keeping intakes a few inches from the densest growth. If flow drops, a quick root trim fixes it immediately.
How long does it take pothos to start absorbing nitrates?
Cuttings develop water roots within 1–3 weeks and reach meaningful uptake once the root mass and foliage establish, typically 2–3 months. One cutting's contribution is small at first, so start with several cuttings and give the plant a full season to hit its stride. Test nitrates weekly before and after adding pothos to watch your own numbers change.
Can I use pothos from a potted plant or store-bought cutting?
Yes. Cuttings from a healthy potted pothos adapt fastest. Rinse soil off the stems before placing them in the tank, and never add potting mix, fertilizer beads, or perlite to the water. Cuttings bought pre-rooted in water from aquarium or plant sellers are the most convenient option if you do not own a parent plant.
Does pothos need fertilizer or CO2 in the aquarium?
Neither. Pothos draws all its CO2 from the air and all its nitrogen from the fish waste already in your water — that is exactly why it works so well. Liquid fertilizer is unnecessary and can encourage algae. The one exception: if leaves yellow while nitrates test at zero, the tank is too clean for it, and it may be starving your submerged plants of nitrogen.
Which pothos variety is best for aquariums?
Golden pothos is the default recommendation: fastest-growing, cheapest, and toughest. Jade works equally well in lower light. Marble queen and neon are slightly slower but perfectly usable. Avoid highly variegated boutique cultivars for a first attempt — the extra variegation means slower growth and slower nitrate uptake.
My pothos leaves are turning yellow. What is wrong?
Yellowing usually means one of three things: the tank is very low in nitrogen (the plant is working too well and starving itself, common in lightly stocked tanks), the foliage is not getting enough light, or a stem section is rotting where it contacts water. Check nitrates first; if they read near zero, trim the pothos back or feed the tank slightly more.
The Bottom Line
Growing pothos in your aquarium is one of the highest-value, lowest-effort upgrades in the hobby. For the price of a few cuttings and a suction-cup clip, you get a natural nitrate filter, algae competition, fry cover, and a striking riparium look — all with a plant that forgives neglect better than almost anything else in the hobby. Start with four to six golden pothos cuttings, keep the leaves above the waterline, give the foliage some light, and trim when it takes off. Your nitrates will drop, your water changes will stretch further apart, and your tank will look fantastic doing it.
Tissue-culture plants are the exception — they’re grown in sterile gel and adapt with minimal melting, which is part of what you’re paying for. Plants bought submersed from another hobbyist’s tank also transition with little melt, since they’re already in the right form.
Which Plants Melt Most (and Least)
Heavy melters (expect significant leaf loss)
- Cryptocorynes — infamous for “crypt melt,” sometimes dropping every leaf after any disturbance. They almost always recover from the roots within weeks.
- Stem plants grown emersed — rotala, ludwigia, and hygrophila often shed lower emersed leaves while the growing tips transition.
- Amazon swords — emersed-grown swords typically lose their broad oval aerial leaves and replace them with longer submersed ribbon leaves.
Light melters
- Anubias, java fern, bucephalandra — slow-growing rhizome plants transition gradually; occasional old-leaf melt but rarely dramatic.
- Vallisneria — usually transitions well, though it dislikes the move itself and may sulk for a week.
- Floating plants — minimal melt since their leaves were already at the air-water interface.
The Acclimation Protocol
Step 1: Quarantine or dip first
Before acclimating to your tank’s conditions, make sure you’re not acclimating pests along with the plant. Run new arrivals through our quarantine and dip protocol — it adds days upfront but prevents months of regret.
Step 2: Float to temperature-match (30 minutes)
Float the bag or container in your tank for 20–30 minutes to equalize temperature. Plants are less temperature-sensitive than fish, but a 10°F shock on top of transplant stress is an avoidable insult.
Step 3: Trim before planting
Remove any leaves that are already damaged, yellowing, or heavily algae-covered — they won’t recover and they’ll rot in your tank, feeding algae. For stem plants, trim off the bottom inch and any emersed leaves that look unlikely to adapt; the plant wastes energy maintaining leaves it’s going to shed anyway. Keep the healthy growing tips — that’s where recovery starts.
Step 4: Plant correctly the first time
Follow our planting guide — right depth, crown exposed on rosettes, rhizomes unburied on epiphytes. Every uprooting and replanting restarts the acclimation clock, so get placement right on the first attempt. Decide where each plant goes before it goes in the water.
Step 5: Run a gentle first week
For the first 7 days after planting:
- Moderate light — run your normal photoperiod but consider dropping intensity 20–30% if your light is dimmable. Blast-level light on a melting plant grows algae on the dying leaves, not recovery.
- Stable CO2 — if you inject CO2, keep it consistent. Fluctuating CO2 during acclimation is a melt accelerator. If you’re low-tech, this doesn’t apply — see growing without CO2.
- Half-strength fertilizer — new plants with damaged leaves can’t use full dosing, and the excess feeds algae. Ramp to full strength over 2–3 weeks per our fertilizer schedule.
- No disturbance — don’t move, trim, or “check on” new plants for at least two weeks. Every touch resets root establishment. This is especially critical for crypts.
Step 6: Remove melt, keep the base
As emersed leaves melt, remove the mushy material promptly — decaying leaves release ammonia and grow fungus that can spread to healthy tissue. But never discard the plant while the crown, rhizome, or roots are firm and alive. A crypt that’s lost every leaf but has firm roots is a plant that’s about to recover, not a dead plant. Give it 3–4 weeks before judging.
Telling Normal Melt From Real Problems
Normal transition melt:
- Affects oldest/emersed leaves first, newest growth last
- New submersed leaves emerge even as old ones dissolve
- Roots and crown stay firm and white/green
- Timeline: 1–4 weeks, then obvious new growth
Concerning melt (see our full melting diagnosis guide):
- New growth also melts or emerges deformed
- Rhizome or crown turns mushy and brown — this is rot, not transition
- Entire plant dissolves within days with no new growth after 4+ weeks
- Melting spreads to established plants that weren’t recently moved
Buying Tips to Minimize Melt
- Buy submersed-grown when available — hobbyist-grown cuttings transition with almost no melt.
- Choose tissue culture for sensitive species — crypts and delicate stems establish far more reliably from sterile cups.
- Avoid plants already melting in the store tank — some melt is normal, but a plant that’s mostly mush at purchase has less energy for recovery.
- Transport carefully — keep plants damp and out of direct sun/heat. A plant that dries out or cooks in a hot car melts far worse than one transported properly.
The First-Month Timeline: What to Expect Week by Week
Knowing what’s normal when removes most acclimation anxiety. Here’s the typical timeline for a healthy plant adapting to a new tank:
Week 1: The quiet week
Almost nothing visible happens. The plant is growing roots you can’t see and assessing its new environment. Some species (vallisneria, stem plants) may start shedding their lowest leaves. This is normal. Resist the urge to “help” — no moving, no extra fertilizer, no light changes. The most common beginner mistake is intervening during a week when the correct action is nothing.
Week 2: Melt peaks
This is when emersed leaves give up in earnest. Crypts may drop everything; swords shed their broad aerial leaves; stem plants lose lower foliage. It looks catastrophic and it’s usually fine. Keep removing mushy material, keep conditions stable, and watch the crown and growing tips — if those are firm and green, recovery is already underway.
Week 3: The turn
New submersed-adapted leaves emerge — smaller, thinner, often a slightly different shade of green than the emersed foliage. Stem plant tips start growing visibly; crypts push tiny curled leaves from the crown; swords unfurl narrow ribbon leaves. This is the moment most beginners exhale for the first time.
Week 4+: Established
New growth outpaces melt, and the plant is functionally yours. You can resume full-strength fertilizer, normal trimming, and stop treating it as fragile. Some slow growers (anubias, bucephalandra) take 6–8 weeks to show obvious progress — that’s their normal speed, not a problem.
Acclimating Different Plant Formats
Tissue-culture cups
Sterile, pest-free, and already adapted to high-humidity (not emersed) growth — tissue cultures melt the least of any format. Rinse the agar gel off gently (leftover gel rots and feeds fungus), split the portion into small plantlets, and plant per our planting guide. They establish slowly for the first two weeks, then accelerate. No dip needed, minimal acclimation stress — this is the premium experience you’re paying for.
Potted plants
Remove the pot and strip away the rockwool completely — leftover rockwool traps debris and rots. Tease the root mass apart gently; if it’s a dense mat, splitting it into 2–3 smaller portions actually establishes faster than planting one big clump (more growing points, better water flow around roots). Potted plants are usually emersed-grown, so expect the standard 2–4 week melt cycle.
Bare-root / bunched stems
Typically sold as weighted bunches. Remove any bands, foam, or weights, strip the lower leaves, and plant stems individually or in small groups. Bunched stems from the store are often already transitioning — check for new submersed growth at the tips, which tells you the plant is mid-adaptation and will settle quickly.
Hobbyist cuttings
Already submersed-grown and the fastest to establish — often showing new growth within days. The main acclimation factor is water-parameter difference between the two tanks. Float to temperature-match, plant promptly, and they’ll usually take off with minimal melt. This is why experienced hobbyists prefer trading cuttings over buying potted plants.
Frequently Asked Questions
Should I use a “plant starter” or transplant fertilizer?
Products marketed for transplant shock are mostly B-vitamins and mild hormones. They don’t hurt, but there’s no strong evidence they help aquarium plants specifically. Stable conditions and patience outperform any bottle. Save the money for more plants.
My new plant melted completely — bare crown, no leaves. Is it dead?
Probably not, if the crown or rhizome is firm. Crypts and swords routinely lose 100% of their leaves and regrow from the base within a month. The test is firmness: firm and pale/green means alive; mushy and brown/black means rot. Give firm-but-leafless plants a full 4 weeks before declaring them dead.
Can I speed up acclimation with extra light or CO2?
No — and trying usually backfires. A melting plant can’t use extra light; the excess just grows algae on its dying leaves. Keep light moderate and CO2 stable (not boosted) during acclimation. Growth speed comes from the plant’s own adaptation timeline, which you can’t rush, only avoid delaying.
Should new plants go straight into my main display tank?
After quarantine/dipping, yes — there’s no benefit to a separate “growing-in” tank for most plants. They acclimate to your water fastest in the tank they’ll live in. The exception is very delicate species going into a tank with boisterous fish; give those a few weeks in a calm corner or breeder box first.
The Patience Rule
The single most important acclimation skill is restraint: plant it right, set gentle conditions, remove decay, and then leave it alone for a month. The hobbyists with the best plant growth aren’t doing something clever in week one — they’re simply not interfering in weeks two through four while the plants do what they’ve evolved to do. Melt looks like failure and feels like failure, but in most cases it’s the visible part of a plant successfully becoming yours.