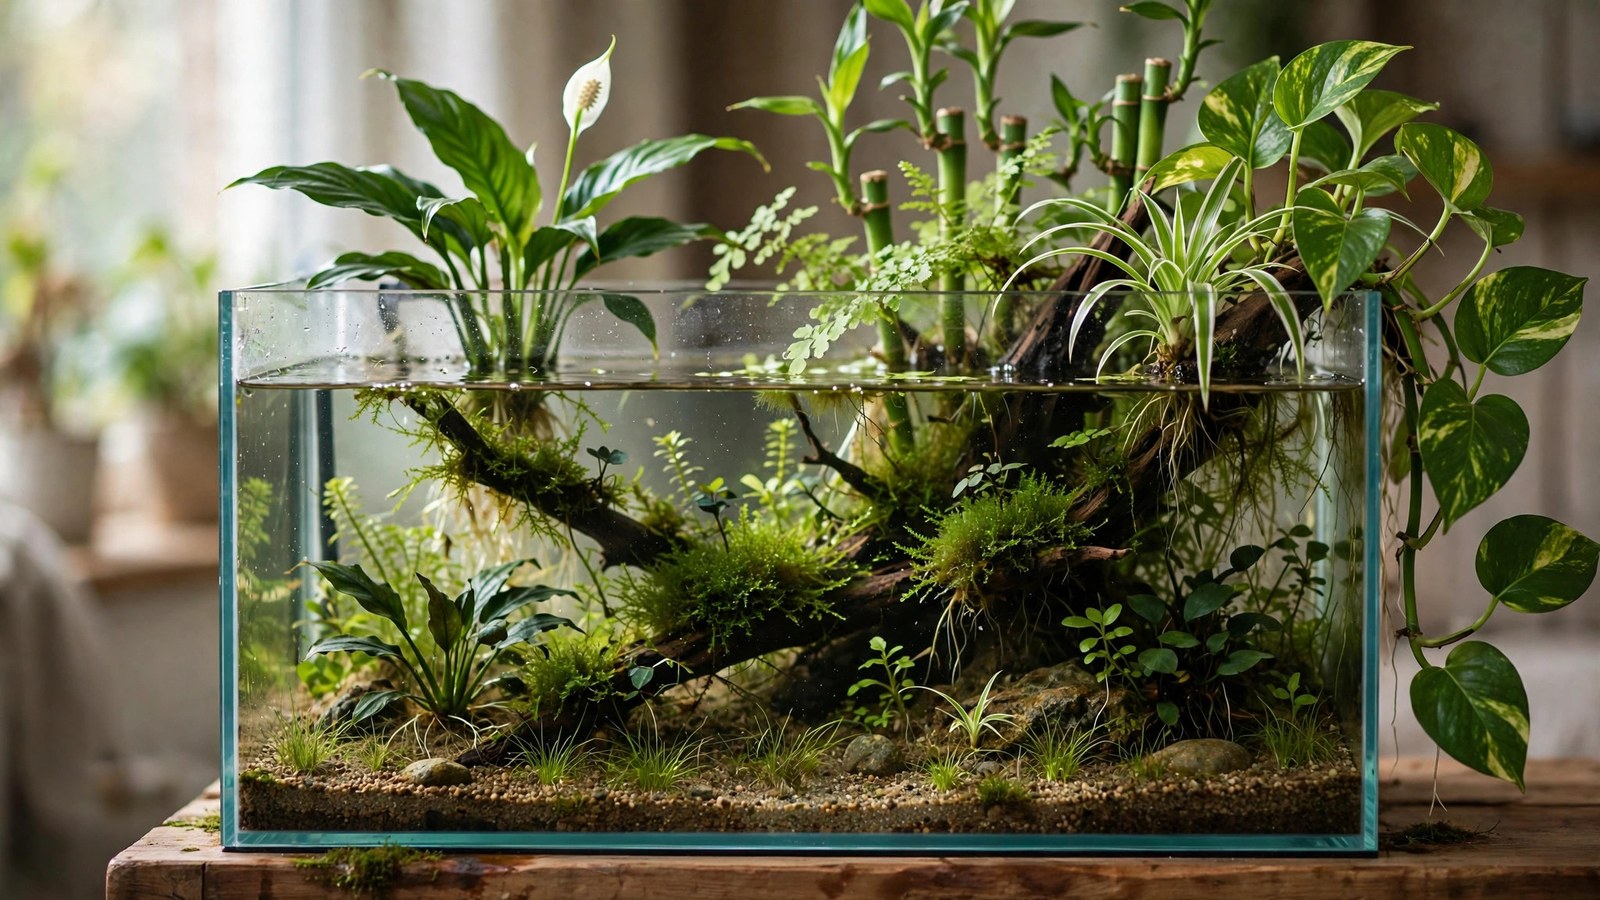
A riparium is the aquarium's rebellious cousin: instead of planting everything underwater, you grow plants emerging from the water — roots submerged, foliage in the air. The result looks like a riverbank sliced in cross-section, with dramatic height, zero CO2 needed for the emersed growth, and fish swimming through a forest of roots. It's one of the most striking planted setups you can build, and far easier than it looks.
What a Riparium Actually Is
The term covers a spectrum. At one end, a few pothos cuttings trailing from a hang-on-back filter. At the other, a purpose-built riparium with marginal pond plants in hanging planters, waterline at mid-tank, and a full emersed garden above a swimming space below. This guide builds the real thing: a dedicated riparium with proper planters, appropriate species, and balanced ecology.
Why it works so well: emersed plants grow in open air with unlimited CO2, so they grow fast, absorb enormous amounts of nitrate, and never need injected CO2 or high light underwater. The submerged zone can be simple — even plant-free — because the emersed garden does the heavy filtration lifting.
Tank Choice and Water Level
Ripariums want tall tanks — height is the canvas. Good options:
- 20-gallon high / 29-gallon: the classic riparium footprint; enough height for dramatic emersed growth
- 40-gallon breeder: wide and versatile, though less vertical drama
- Tall column tanks: spectacular for ripariums; the format aquascapers avoid is the riparium's best friend
Fill to 50–70% of the tank height. The waterline placement is aesthetic — lower water means more emersed room and a bolder look, higher water means more swimming space. Leave 4–6 inches of clearance between the tallest expected growth and the lid or rim; emersed plants grow fast and will hit the top.
Planters: How Emersed Plants Live in a Tank
Emersed plants need their roots wet and crowns dry. The standard solutions:
- Hanging shower-caddy planters: suction-cup or rim-hanging plastic planters filled with substrate, positioned so the bottom sits in water. Cheap, effective, widely used.
- DIY raft planters: floating foam or plastic mesh rafts with net pots — plants float at the surface with roots dangling. Great for the back of the tank.
- Built-in background planters: foam or textured backgrounds with integrated planting pockets — the high-end look, holding substrate above the waterline with wicking moisture.
- Wicking planters: pots sitting above the waterline with a wick drawing water up — useful for plants that want moist but not submerged roots.
Fill planters with inert gravel, expanded clay pebbles, or aquatic planting media — not potting soil, which fouls the water. The tank water itself fertilizes the plants; fish waste is premium plant food delivered continuously.
The Riparium Plant List
Choose marginal and bog plants — species that naturally grow at water's edge with wet roots:
Showpiece plants
- Peace lily (Spathiphyllum) — the riparium classic: dramatic white blooms, huge leaves, thrives with wet roots. The definitive centerpiece.
- Pothos (Epipremnum aureum) — nearly indestructible; trailing vines or trained upward. Roots in water, leaves anywhere. Grows fast and drinks nitrate greedily.
- Lucky bamboo (Dracaena sanderiana) — architectural vertical stalks; only the bottom in water, leaves must stay dry.
- Umbrella plant / papyrus (Cyperus alternifolius) — explosive vertical growth, very thirsty, dramatic silhouette.
Fillers and texture
- Spider plant — arching striped leaves; adapts well to wet roots.
- Philodendron (heartleaf, Brasil) — trailers that drape beautifully over the tank edge.
- Wandering dude (Tradescantia) — fast purple-silver trailers; trim aggressively.
- Marsh plants: dwarf papyrus, water celery, marsh marigold, bacopa (grown emersed) — authentic riverbank species.
- Mondo grass / lilyturf — grass-like clumps for the waterline edge.
Plants to avoid
Succulents and cacti (rot in constant moisture), plants needing dry dormancy, and anything toxic if you keep fish that nibble roots. Also avoid aggressive spreaders like mint unless you enjoy monthly warfare.
The Submerged Zone
Below the waterline, keep it simple and complementary:
- Substrate: sand or fine gravel, 1–2 inches — mainly aesthetic since the emersed plants do the filtration.
- Submerged plants (optional): anubias, java fern, and crypts on wood add underwater interest without competing with the emersed garden. Our low-tech planted tank setup covers these species.
- Hardscape: driftwood rising above the waterline bridges the two zones beautifully — wood emerging from water into the plant canopy is the signature riparium image.
- Floating plants: optional; frogbit adds surface interest but competes with emersed roots for nutrients (not a problem — there's plenty).
Lighting: Two Zones, One Fixture (Usually)
Emersed plants want bright light; the submerged zone wants moderate light. A single strong LED fixture above the tank usually serves both — emersed foliage near the light gets high intensity, underwater gets attenuated leftovers. Run 8–10 hours daily; emersed plants aren't algae-prone the way submerged ones are, so longer photoperiods are safe.
Supplemental lighting (a clip-on grow light aimed at the emersed zone) helps in deep tanks where the main fixture sits far above the foliage. Full-spectrum "daylight" bulbs (5000–6500K) grow emersed plants best.
Filtration, Humidity, and Practicalities
Filtration: a hang-on-back or small canister for mechanical/biological filtration. The emersed plants handle nitrate; the filter handles particulates and ammonia conversion. Pre-filter sponges on intakes as always.
Humidity and lids: emersed plants raise room humidity — in dry climates this is a feature; in humid ones, ventilate. A glass lid with a gap, or an open top with a light suspended above, both work. Open tops grow plants better (airflow prevents mold) but evaporate more and let fish jump — know your livestock.
Fertilization: usually unnecessary — fish waste feeds the emersed garden. If growth stalls with pale leaves, the tank is too clean; add a few more fish or dose a general houseplant fertilizer at quarter strength into the planters (never enough to affect the water).
Algae: dramatically reduced versus submerged-only tanks, because emersed plants outcompete algae for nutrients so thoroughly. The glass below the waterline still needs occasional cleaning.
Stocking the Riparium
Choose fish that use the whole water column and appreciate root tangles:
- Small schooling fish: tetras, rasboras, danios — they weave through submerged roots naturally
- Bettas: a single betta in a riparium is spectacular — labyrinth fish evolved in vegetated shallows. See our planted betta tank setup.
- Guppies, platies: hardy, active, breed in the root tangles
- Shrimp: cherry shrimp colonies thrive grazing the submerged root masses — our planted shrimp tank setup principles apply underwater here
Avoid large cichlids and diggers that uproot planters, and jumpers if running open-top. Stock modestly — the plants filter well, but swimming space is reduced by the lower waterline.
Build Sequence
- Position the tank — ripariums are viewed from front and sides; emersed growth is the display, so place it where the top is visible.
- Install hardscape — wood pieces rising above the planned waterline; anchor firmly.
- Add substrate and fill halfway — plant any submerged species now, before planters go in.
- Install planters — position at the back and sides, leaving the front-center open for viewing.
- Plant the emersed garden — tallest plants center-back, trailers at the edges. Rinse all nursery soil from roots first.
- Fill to the waterline, start filtration — run the system plant-only for 1–2 weeks.
- Add livestock gradually — the emersed plants establish in days, but let the submerged cycle complete per our faster cycling guide.
Maintenance
- Trim emersed growth monthly — it grows fast; keep it from blocking light or escaping the tank.
- Top off evaporation frequently — open-top ripariums evaporate significantly; top off with RO/distilled to avoid mineral creep.
- 25% water change every 2 weeks — lighter schedule than submerged tanks, thanks to the emersed nitrate uptake.
- Clean glass below waterline as needed; wipe planter exteriors of algae.
- Rotate/replace planter media yearly — it accumulates detritus; rinse or replace.
Frequently Asked Questions
Will pothos roots harm my fish?
No — pothos roots in aquariums are safe and beneficial, hosting biofilm and absorbing waste. The old worry about pothos toxicity applies to ingested leaves by mammals, not roots in water. Millions of aquariums run pothos in filters and tanks without issue. Just keep the leaves out of reach of curious cats.
Do I need special lights for the emersed plants?
Not necessarily — a decent full-spectrum aquarium LED grows most riparium plants well. Light-hungry species (papyrus, peace lily blooms) appreciate stronger light or a supplemental grow light. If emersed growth is leggy and pale, that's the signal to add light, not fertilizer.
Can I convert my existing aquarium into a riparium?
Yes — lower the waterline, add hanging planters or a floating raft, and plant the margins. The existing filter and livestock stay. It's one of the easiest dramatic transformations in the hobby: an ordinary tank becomes a riverbank in an afternoon. Just ensure remaining swimming space suits your fish.
How do I stop mold on the emersed plants?
Airflow is the answer — mold grows in still, humid air. An open top or a small fan providing gentle air movement prevents it. Remove dead leaves promptly (they're mold's foothold), avoid misting the foliage, and don't overcrowd the emersed zone. Established ripariums with good airflow rarely have mold issues.
Will the emersed plants really filter the water?
Yes — dramatically. Emersed plants with access to atmospheric CO2 grow 5–10x faster than submerged plants and pull proportionally more nitrate and phosphate from the water. A well-planted riparium can run near-zero nitrates with a normal fish load. It's the highest filtration-per-effort of any planted approach.
What about fish jumping out of an open-top riparium?
Choose non-jumping species (bettas jump — lid their section), or run a mesh top over the water while leaving the emersed zone open above it. Many riparium keepers use a split approach: mesh over the water surface, open air above for the plants. Know your species' jumping habits before going fully open.
The Riparium Payoff
A riparium is two ecosystems in one glass box — a garden above, an aquarium below, roots stitching them together. It filters better than any submerged setup, grows dramatic plants with zero CO2, and looks like nothing else in the hobby. Build the planters, choose riverbank species, give it light and airflow, and you'll have a living cross-section of the water's edge.
For the plant science behind emersed growth, see the 2Hr Aquarist aquarium plant care guides.
Tissue-culture plants are the exception — they’re grown in sterile gel and adapt with minimal melting, which is part of what you’re paying for. Plants bought submersed from another hobbyist’s tank also transition with little melt, since they’re already in the right form.
Which Plants Melt Most (and Least)
Heavy melters (expect significant leaf loss)
- Cryptocorynes — infamous for “crypt melt,” sometimes dropping every leaf after any disturbance. They almost always recover from the roots within weeks.
- Stem plants grown emersed — rotala, ludwigia, and hygrophila often shed lower emersed leaves while the growing tips transition.
- Amazon swords — emersed-grown swords typically lose their broad oval aerial leaves and replace them with longer submersed ribbon leaves.
Light melters
- Anubias, java fern, bucephalandra — slow-growing rhizome plants transition gradually; occasional old-leaf melt but rarely dramatic.
- Vallisneria — usually transitions well, though it dislikes the move itself and may sulk for a week.
- Floating plants — minimal melt since their leaves were already at the air-water interface.
The Acclimation Protocol
Step 1: Quarantine or dip first
Before acclimating to your tank’s conditions, make sure you’re not acclimating pests along with the plant. Run new arrivals through our quarantine and dip protocol — it adds days upfront but prevents months of regret.
Step 2: Float to temperature-match (30 minutes)
Float the bag or container in your tank for 20–30 minutes to equalize temperature. Plants are less temperature-sensitive than fish, but a 10°F shock on top of transplant stress is an avoidable insult.
Step 3: Trim before planting
Remove any leaves that are already damaged, yellowing, or heavily algae-covered — they won’t recover and they’ll rot in your tank, feeding algae. For stem plants, trim off the bottom inch and any emersed leaves that look unlikely to adapt; the plant wastes energy maintaining leaves it’s going to shed anyway. Keep the healthy growing tips — that’s where recovery starts.
Step 4: Plant correctly the first time
Follow our planting guide — right depth, crown exposed on rosettes, rhizomes unburied on epiphytes. Every uprooting and replanting restarts the acclimation clock, so get placement right on the first attempt. Decide where each plant goes before it goes in the water.
Step 5: Run a gentle first week
For the first 7 days after planting:
- Moderate light — run your normal photoperiod but consider dropping intensity 20–30% if your light is dimmable. Blast-level light on a melting plant grows algae on the dying leaves, not recovery.
- Stable CO2 — if you inject CO2, keep it consistent. Fluctuating CO2 during acclimation is a melt accelerator. If you’re low-tech, this doesn’t apply — see growing without CO2.
- Half-strength fertilizer — new plants with damaged leaves can’t use full dosing, and the excess feeds algae. Ramp to full strength over 2–3 weeks per our fertilizer schedule.
- No disturbance — don’t move, trim, or “check on” new plants for at least two weeks. Every touch resets root establishment. This is especially critical for crypts.
Step 6: Remove melt, keep the base
As emersed leaves melt, remove the mushy material promptly — decaying leaves release ammonia and grow fungus that can spread to healthy tissue. But never discard the plant while the crown, rhizome, or roots are firm and alive. A crypt that’s lost every leaf but has firm roots is a plant that’s about to recover, not a dead plant. Give it 3–4 weeks before judging.
Telling Normal Melt From Real Problems
Normal transition melt:
- Affects oldest/emersed leaves first, newest growth last
- New submersed leaves emerge even as old ones dissolve
- Roots and crown stay firm and white/green
- Timeline: 1–4 weeks, then obvious new growth
Concerning melt (see our full melting diagnosis guide):
- New growth also melts or emerges deformed
- Rhizome or crown turns mushy and brown — this is rot, not transition
- Entire plant dissolves within days with no new growth after 4+ weeks
- Melting spreads to established plants that weren’t recently moved
Buying Tips to Minimize Melt
- Buy submersed-grown when available — hobbyist-grown cuttings transition with almost no melt.
- Choose tissue culture for sensitive species — crypts and delicate stems establish far more reliably from sterile cups.
- Avoid plants already melting in the store tank — some melt is normal, but a plant that’s mostly mush at purchase has less energy for recovery.
- Transport carefully — keep plants damp and out of direct sun/heat. A plant that dries out or cooks in a hot car melts far worse than one transported properly.
The First-Month Timeline: What to Expect Week by Week
Knowing what’s normal when removes most acclimation anxiety. Here’s the typical timeline for a healthy plant adapting to a new tank:
Week 1: The quiet week
Almost nothing visible happens. The plant is growing roots you can’t see and assessing its new environment. Some species (vallisneria, stem plants) may start shedding their lowest leaves. This is normal. Resist the urge to “help” — no moving, no extra fertilizer, no light changes. The most common beginner mistake is intervening during a week when the correct action is nothing.
Week 2: Melt peaks
This is when emersed leaves give up in earnest. Crypts may drop everything; swords shed their broad aerial leaves; stem plants lose lower foliage. It looks catastrophic and it’s usually fine. Keep removing mushy material, keep conditions stable, and watch the crown and growing tips — if those are firm and green, recovery is already underway.
Week 3: The turn
New submersed-adapted leaves emerge — smaller, thinner, often a slightly different shade of green than the emersed foliage. Stem plant tips start growing visibly; crypts push tiny curled leaves from the crown; swords unfurl narrow ribbon leaves. This is the moment most beginners exhale for the first time.
Week 4+: Established
New growth outpaces melt, and the plant is functionally yours. You can resume full-strength fertilizer, normal trimming, and stop treating it as fragile. Some slow growers (anubias, bucephalandra) take 6–8 weeks to show obvious progress — that’s their normal speed, not a problem.
Acclimating Different Plant Formats
Tissue-culture cups
Sterile, pest-free, and already adapted to high-humidity (not emersed) growth — tissue cultures melt the least of any format. Rinse the agar gel off gently (leftover gel rots and feeds fungus), split the portion into small plantlets, and plant per our planting guide. They establish slowly for the first two weeks, then accelerate. No dip needed, minimal acclimation stress — this is the premium experience you’re paying for.
Potted plants
Remove the pot and strip away the rockwool completely — leftover rockwool traps debris and rots. Tease the root mass apart gently; if it’s a dense mat, splitting it into 2–3 smaller portions actually establishes faster than planting one big clump (more growing points, better water flow around roots). Potted plants are usually emersed-grown, so expect the standard 2–4 week melt cycle.
Bare-root / bunched stems
Typically sold as weighted bunches. Remove any bands, foam, or weights, strip the lower leaves, and plant stems individually or in small groups. Bunched stems from the store are often already transitioning — check for new submersed growth at the tips, which tells you the plant is mid-adaptation and will settle quickly.
Hobbyist cuttings
Already submersed-grown and the fastest to establish — often showing new growth within days. The main acclimation factor is water-parameter difference between the two tanks. Float to temperature-match, plant promptly, and they’ll usually take off with minimal melt. This is why experienced hobbyists prefer trading cuttings over buying potted plants.
Frequently Asked Questions
Should I use a “plant starter” or transplant fertilizer?
Products marketed for transplant shock are mostly B-vitamins and mild hormones. They don’t hurt, but there’s no strong evidence they help aquarium plants specifically. Stable conditions and patience outperform any bottle. Save the money for more plants.
My new plant melted completely — bare crown, no leaves. Is it dead?
Probably not, if the crown or rhizome is firm. Crypts and swords routinely lose 100% of their leaves and regrow from the base within a month. The test is firmness: firm and pale/green means alive; mushy and brown/black means rot. Give firm-but-leafless plants a full 4 weeks before declaring them dead.
Can I speed up acclimation with extra light or CO2?
No — and trying usually backfires. A melting plant can’t use extra light; the excess just grows algae on its dying leaves. Keep light moderate and CO2 stable (not boosted) during acclimation. Growth speed comes from the plant’s own adaptation timeline, which you can’t rush, only avoid delaying.
Should new plants go straight into my main display tank?
After quarantine/dipping, yes — there’s no benefit to a separate “growing-in” tank for most plants. They acclimate to your water fastest in the tank they’ll live in. The exception is very delicate species going into a tank with boisterous fish; give those a few weeks in a calm corner or breeder box first.
The Patience Rule
The single most important acclimation skill is restraint: plant it right, set gentle conditions, remove decay, and then leave it alone for a month. The hobbyists with the best plant growth aren’t doing something clever in week one — they’re simply not interfering in weeks two through four while the plants do what they’ve evolved to do. Melt looks like failure and feels like failure, but in most cases it’s the visible part of a plant successfully becoming yours.