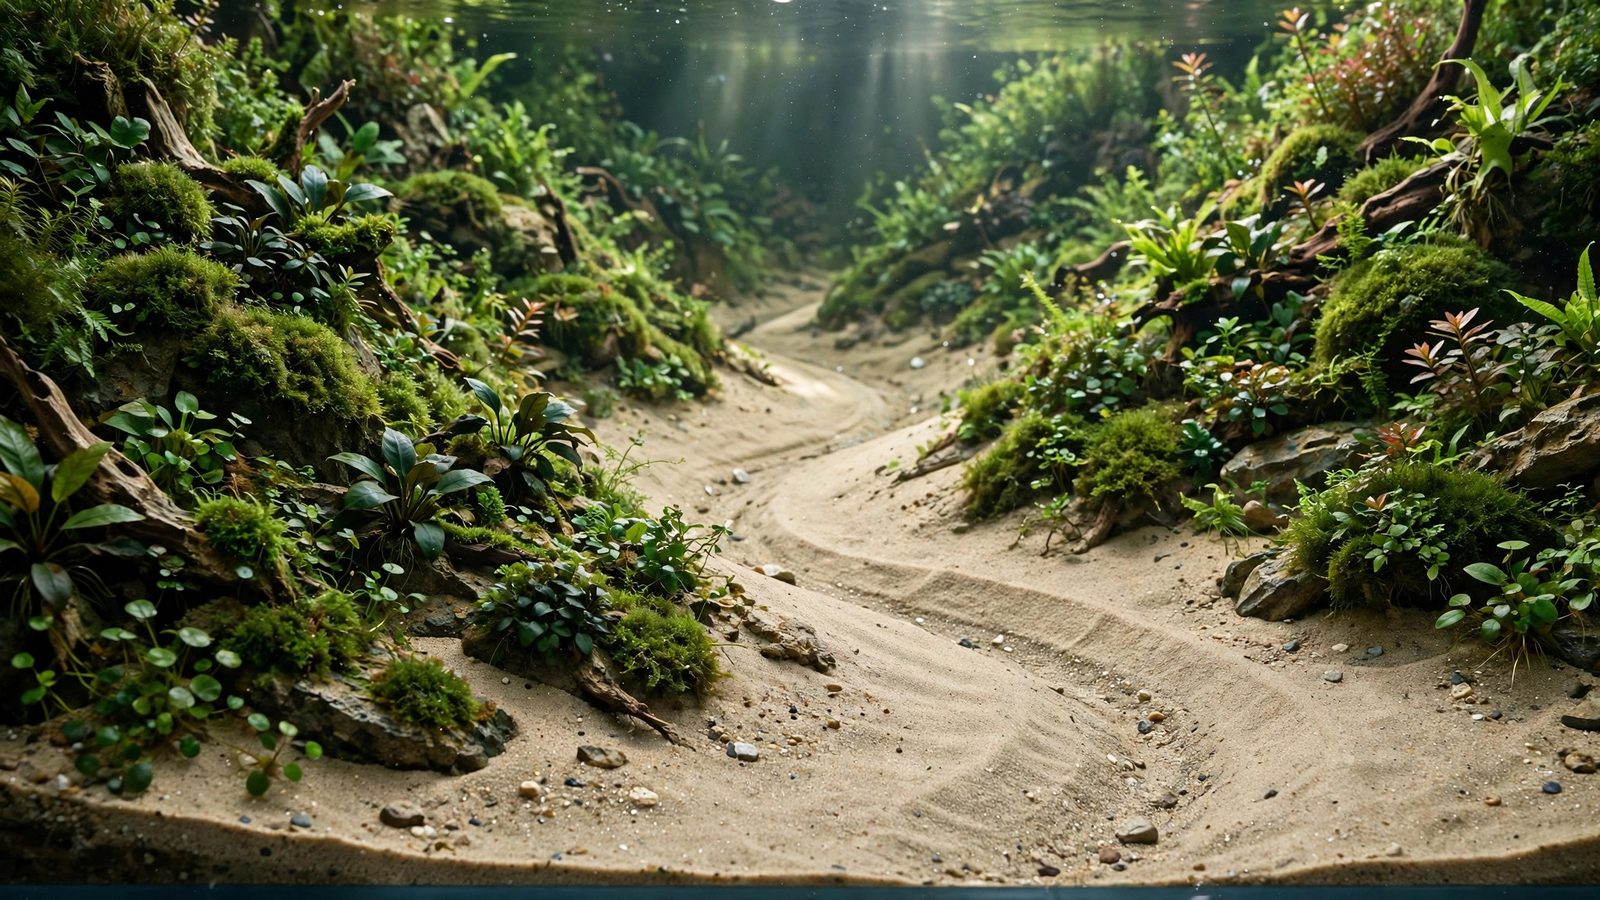
Of all the aquascaping styles, the valley aquascape is the one that most convincingly fakes a second world inside glass. Two forested hillsides slope down from the corners, converging on an open valley floor that pulls the eye straight into the back glass. Done well, a valley aquascape makes a 90 cm tank feel twice as deep as it is. This guide walks you through the full layout method: rock lines that act as mountain ridges, substrate slopes that force perspective, plant zoning from background to valley floor, and the maintenance routine that keeps the valley open instead of swallowed by growth.
What Makes a Valley Aquascape Work
A valley composition is built on a simple visual contract: the sides go up, the middle stays down. Unlike the Iwagumi layout, which derives power from sparse minimalism, the valley style gets its drama from density contrast. Tall planted hillsides frame a deliberately empty central corridor. The eye rides the converging lines of the hillsides, the rocks, and the substrate straight to the vanishing point at the back center of the tank.
Three elements must be in place before anything looks right:
- Converging sides: Left and right structures rise highest at the front corners and descend toward the back, or rise at the back corners and descend toward the front — but always mirrored-ish so the middle reads as a floor.
- A continuous valley floor: One unbroken ribbon of open space — sand or low carpet — running from front glass to back. If plants from both sides touch in the middle, the valley is gone and you have a jungle.
- Forced perspective: Everything shrinks toward the vanishing point: rock sizes, plant leaf sizes, even substrate grain. Small versions of background elements placed at the back sell the illusion that the valley keeps going.
This is fundamentally a depth game, so reading the techniques for creating depth in an aquascape alongside this guide pays off twice.
Planning the Valley First (Before Water)
Valley scapes fail most often at the drawing stage, not the planting stage. Sketch the tank from the front and from above. On the front view, draw two hill profiles like parentheses facing each other: tall at the outer thirds, low in the center third. The valley floor should occupy roughly the middle 30–40% of the tank width at the front glass, narrowing slightly toward the back.
On the top-down view, place a central spine line from front center to back center — this is your valley floor. Mark where the tallest rock on each side will stand; these are your ridge anchors. The aquascape planning process matters more here than in any other style, because slope and perspective decisions get baked into the hardscape and are miserable to change once planted.
Rock Placement: Building Mountain Lines
In the valley style, rocks are geology, not decoration. They should read as exposed mountain ridgelines running down each hillside. Work from large to small, and commit each stone's position before touching plants.
The ridge anchors
Choose one dominant rock per side — the oyaishi in spirit, though valley layouts allow two anchors where strict Iwagumi allows one. Each anchor sits at the outer third of the tank, roughly 25–35% back from the front glass, tilted so its longest axis points toward the valley's vanishing point. Every other rock on that side should point the same way. Randomly oriented stones are the fastest way to kill the illusion; in real valleys, strata all run one direction.
Rock size tiers toward the vanishing point
Buy more stone than you think you need, in graded sizes. The tiering below is for a 60–90 cm tank; scale proportionally:
| Position | Role | Typical size |
|---|---|---|
| Outer thirds, front–mid | Ridge anchor (dominant) | 25–40 cm tall |
| Mid-hillside, both sides | Supporting ridges | 12–20 cm |
| Back corners approaching the vanishing point | Distant ridge stubs | 6–10 cm |
| Vanishing point itself | Distant peaks (partially buried) | 3–6 cm |
| Valley floor | None or a single small accent pebble at most | — |
Bury stones a third of their height into the substrate so they look like they emerge from the hill rather than sitting on it. If you're placing plants directly on rock, the techniques for attaching aquarium plants to rocks keep epiphytes fixed without damaging rhizomes. Avoid symmetry: offset the two anchors slightly — one a touch taller, one a touch further forward — since perfect mirror symmetry looks staged, a classic beginner aquascaping mistake.
Substrate: Sloping for Forced Depth
The substrate slope is what physically forces the perspective. A valley floor that actually rises toward the back looks deeper than a flat one, because the viewer's brain reads "uphill and smaller" as "farther away."
- Front glass: valley floor at 2–3 cm depth.
- Back glass: substrate rising to 8–12 cm under the hillsides, 5–7 cm at the vanishing point.
- Hillside cores: build the bulk of the hills with inert lava rock or mesh bags of substrate, then cap with your planting soil — pure aquasoil slopes slump over months.
- Retaining: wedge small stones or use a hidden plastic barrier at the base of each hill to stop soil creeping into the valley floor.
The floor itself is best as pale sand or fine gravel in a contrasting color to the soil — the contrast edge is what reads as "path" and strengthens the composition, similar to how an aquascape sand pathway guides the eye. See the full method for sloping substrate for depth if you want the measurements dialed in for your exact tank size.
Clean, uniform sand holds slopes and reads as riverbed: pool filter sand.

Covia AquaQuartz Pool Filter Sand
Check Price on AmazonPlant Selection and Zoning
Plant choice in a valley scape serves one purpose: reinforcing the perspective gradient. Leaf and plant sizes must step down from the front corners toward the vanishing point, without exception. The zoning below assumes a CO2-injected setup; low-tech versions of this style are possible but grow painfully slowly on the hillsides.
Background hillsides (the forested slopes)
Use tall, fine-textured stems: Rotala rotundifolia, Rotala H'ra, Limnophila sessiliflora, or Myriophyllum. Fine leaves read as "distant forest canopy" much better than broad ones. Plant densely — the hillsides should be solid masses with rocks emerging from them, not sparse stems with visible soil.
Midground transitions
Step the leaf size down: Cryptocoryne wendtii 'brown', Anubias nana 'petite' on the rocks, Bucephalandra varieties. Epiphytes on the ridge rocks are the valley style's signature detail — green seams running along the mountain lines.
Valley floor (keep it empty)
The floor should be nearly bare: sand, or a very low carpet like Eleocharis 'mini' or Marsilea hirsuta trimmed flat. This restraint is the hardest part of the style. A floor crowded with plants is just a Dutch tank with hills. If you're working in a compact tank, the principles in the shallow tank aquascaping guide help keep small-scale valley floors proportionate.
Vanishing-point miniatures
At the very back center, plant small versions of your background stems and tiny rocks. This is forced perspective in its purest form — the same plants at one-third scale, telling the eye the valley continues far beyond the glass. The forced-perspective diorama guide takes this trick to its extreme, but the valley layout only needs a hint of it.
Planting Plan Walkthrough (Hardscape-First Order)
Always finish the hardscape before a single plant goes in. The hardscape-first method is non-negotiable for valley layouts because the composition lives or dies on rock positions and slopes.
- Dry hardscape: Place rocks, build hill cores, lay the substrate slope. Photograph from the front — the composition must already read as a valley with zero plants.
- Valley floor first: Lay the sand path along the center spine. This locks the floor in place and keeps soil from migrating during planting.
- Background stems: Plant the hillsides from the back forward, densest at the vanishing point (miniatures) and full size toward the front corners.
- Midground epiphytes: Tie Anubias and Bucephalandra onto the ridge rocks; wedge Crypts into the slope bases.
- Carpet the floor edges (optional): A thin strip of mini carpet along the floor's borders sharpens the contrast line — keep it trimmed flat.
- Flood and fill: Fill slowly over a plastic sheet or plate to avoid blowing the slopes apart. Cycle normally before adding livestock.
Positioning the visual weight correctly is what makes the layout feel deliberate rather than accidental; the rules for focal point placement explain exactly where the eye lands and why.
Maintenance: Keeping the Valley Open
A valley scape is a fight against its own success. Healthy plants want to close the valley, and you trim to keep it open — this is October rescape-season work, when many hobbyists replant hillsides after summer growth sprees.
- Trim hillsides inward, not outward: Always cut stems back toward the hillside core, never let trimmings' regrowth creep over the valley floor. Replant tops on the slopes, never on the floor edges.
- Weekly floor patrol: Runners from carpet plants (especially Eleocharis) will invade the sand path within weeks. Pluck them during water changes; a 2-minute habit saves a 2-hour rescue.
- Re-sculpt slopes monthly: Substrate migrates downhill with every water change. Push soil back up the hillsides and re-sharpen the sand/soil boundary line with a credit card or spatula.
- Thin the vanishing point: Background stems at the back center grow fastest toward the light. Trim these most aggressively — if the back fills in, the depth illusion dies.
- Rock cleaning: Algae on the ridge anchors ruins the mountain read. A soft toothbrush during water changes keeps the stone faces clean.
Full trimming schedules and tool choices are covered in the aquascape trimming and maintenance guide and the aquascaping tools guide.
Common Mistakes That Kill the Valley
Valley too shallow. The single most common failure. If the hillside tops are less than twice the height of the floor clearance, the layout reads as "lumpy flat tank." Don't be timid — build the hills high and let the valley floor stay dramatically low. In small tanks this needs care, which is why the vertical aquascaping guide pairs well with nano valley attempts.
Symmetric rocks. Two identical anchors mirrored across the center line look like a gate, not a landscape. Offset heights, distances, and angles. Nature never mirrors perfectly.
Cluttered floor. Every plant, pebble, or ornament placed on the valley floor weakens the composition. One accent at most. If you love detail work, redirect that energy to the negative space on the hillsides instead — rock texture, epiphyte seams, shadow pockets.
No perspective gradient. Same-size rocks front to back, same-size leaves throughout. Without the shrink-toward-the-vanishing-point gradient, it's two hills and a ditch, not a valley.
Ignoring the rule of thirds. The vanishing point and both ridge anchors should sit near thirds intersections, not dead center. The rule of thirds guide and the golden ratio guide both apply directly — a valley is a composition first and a planting second.
Rescape without a plan. When the valley closes up after months of growth, the temptation is to rip everything out. Follow a structured aquarium rescape process instead — often just re-sculpting slopes and resetting the floor line restores the layout without a full teardown. Comparing with other compositional frames like the concave layout, triangle composition, diagonal composition, and crescent composition can also tell you whether a valley is really the right frame for your next scape or whether another geometry fits your hardscape better. And if you want to lean on texture rather than size for the gradient, texture contrast techniques add a second layer of depth cues. For a one-stone minimalist counterpoint, the single-rock layout guide shows the opposite extreme.
Frequently Asked Questions
What tank size works best for a valley aquascape?
A 60–90 cm tank is the sweet spot: wide enough for distinct hillsides and a real valley floor, deep enough front-to-back for a convincing vanishing point. Nano tanks under 45 cm can work but the gradient gets cramped — hillsides need room to be meaningfully taller than the floor. Very long tanks (120 cm+) need a second, smaller valley rhythm or the composition stretches thin.
Does a valley aquascape need CO2?
Technically no, but practically yes for the classic look. The style depends on dense, healthy hillsides and a crisp carpet edge, both of which grow far better with injected CO2. Without it, stem backgrounds grow leggy and sparse, and the hillsides never reach the density that makes the valley floor pop. Low-tech valley scapes succeed with slow growers like Crypts, Anubias, and Bucephalandra, but expect a year of patience.
How do I stop substrate from sliding into the valley floor?
Build hillsides over inert cores (lava rock, mesh bags) so only the cap layer can move, wedge small stones along the base of each hill as retaining walls, and keep the slope angle gentle — under about 30 degrees where possible. Aquasoil alone will slump within months on steep slopes. During water changes, pour gently over a plate to avoid blasting soil downhill.
What fish suit a valley layout?
Schooling fish that use the open valley floor as a "river" are ideal: ember tetras, neon tetras, chili rasboras, or celestial pearl danios. A tight school moving down the valley corridor is the living payoff of the whole composition. Avoid large diggers or aggressive bottom-sifters that disturb the sand path and slope bases — cichlids and big loaches will erase your boundary lines.
How often should I trim to keep the valley open?
Fast-growing stems on the hillsides need trimming every 1–2 weeks in a CO2 tank; the valley floor needs runner patrol weekly. The vanishing-point background grows toward the light fastest and needs the most aggressive cuts. If you skip a month, the sides will close over the floor and you'll need a proper rescape session — prevention is far less work than rescue.
Can I convert an existing scape into a valley layout?
Yes, and October is a natural time for it. Keep your existing plants, but rebuild the hardscape: pull the hardscape, re-grade the substrate into two hills and a central floor, reset the rocks as ridge lines pointing at a new vanishing point, then replant by zone. It's roughly half a day's work for a 60 cm tank, and most of your existing plant mass can be reused on the hillsides.
Your Valley, Your River
A valley aquascape rewards the patient builder more than almost any other style. The composition does the heavy lifting — converging lines, graded rocks, a rising floor — and the plants just dress the geology. Sketch it, build the bones dry, verify the valley reads with zero plants, and only then flood. Keep the floor open, the perspective honest, and the trimmers busy, and you'll have a tank that looks like it goes on forever.