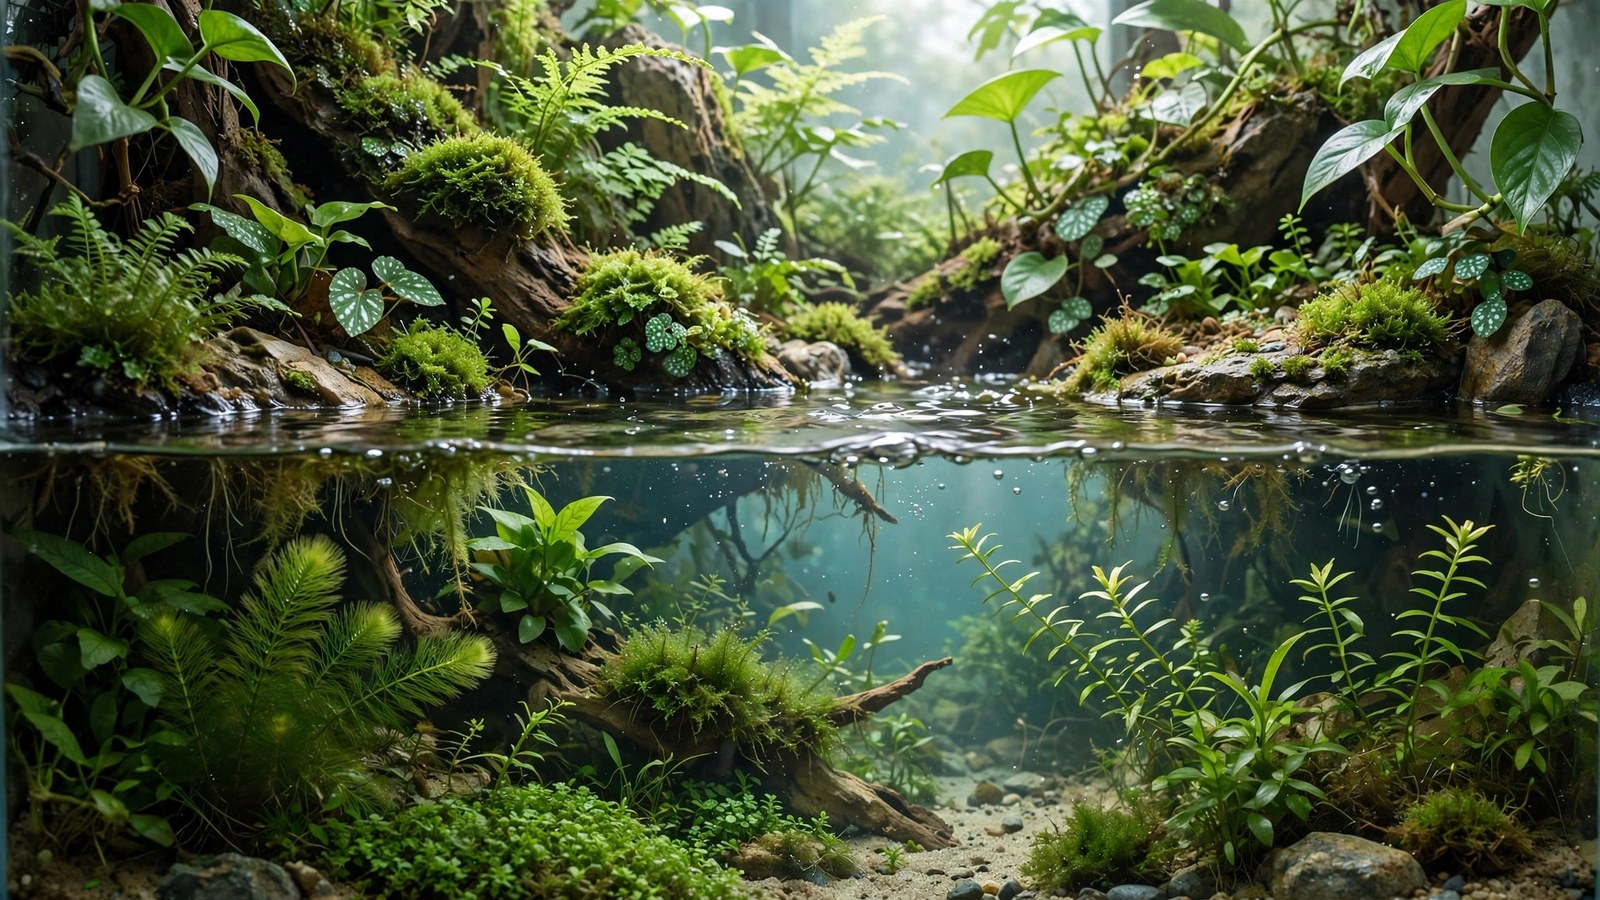
A paludarium is where the aquarium grows a shoreline — part underwater world, part terrestrial garden, with plants living in both zones and the fascinating transition between them. Paludarium plants are the whole game: choose species that thrive with wet roots and humid air, design the land-to-water gradient deliberately, and you get a living ecosystem that looks like a riverbank sliced out of the jungle. This guide covers plant selection for every zone, the humidity and lighting they need, and the build techniques that keep both worlds healthy.
Understanding the Three Zones
Every paludarium has three planting zones, and each wants different plants:
- Submerged zone: fully underwater — behaves like a regular planted aquarium. Anubias, java fern, crypts, mosses on the underwater hardscape.
- Marginal/emergent zone: the shoreline — roots wet or submerged, foliage in humid air. This is the paludarium's signature zone: plants growing out of the water. Cryptocoryne, Anubias, Bucephalandra, Hygrophila, and Bacopa all grow emersed beautifully.
- Terrestrial zone: above the waterline on land areas — needs humidity tolerance but not wet roots. Ferns, mosses, orchids, bromeliads, creeping figs, pilea, and small aroids.
The magic of the paludarium is that many aquarium plants are amphibious — they grow both submerged and emersed, often looking dramatically different in each form. A Cryptocoryne wendtii grown emersed at the waterline will flower; the same plant submerged stays vegetative. Planting one species across the waterline so it transitions forms is the most characteristically "paludarium" planting move you can make.
Building the Land: Structure Before Plants
Plants need something to grow on, so the land structure comes first. Common approaches:
- False bottom / egg-crate riser: egg-crate light diffuser raised on PVC legs creates a land platform with a water reservoir beneath — great drainage, hidden water volume, easy plumbing.
- Expanding foam + silicone + substrate: Great Stuff foam carved into banks and backgrounds, coated in silicone pressed with coco fiber or aquasoil. The classic DIY paludarium background that grows moss like a cliff face.
- Cork bark and driftwood: cork tubes and flats siliconed into place create instant plantable ledges; epiphytes mount directly on them.
- Planter baskets: simple plastic pond baskets filled with aquasoil, hidden behind hardscape — the beginner-friendly option.
Key structural rules: the land must drain (waterlogged terrestrial roots rot — the false bottom or a drainage layer of LECA/clay balls under the land substrate is non-negotiable), the waterline transition should be gradual (a slope of substrate or mossy wood, not a cliff), and you need access — you'll be pruning the land section regularly, so don't seal it behind glass you can't reach.
For the underwater portion, standard aquascaping applies: our hardscape-first method and substrate sloping guide work exactly the same below the waterline.
Marginal Zone Plants: The Stars of the Show
These grow with wet feet and humid leaves, right at and above the waterline:
- Anubias species: the ultimate cross-zone plant. Grows submerged, emersed, and everywhere between. Emersed anubias grows faster and may flower — plant it straddling the waterline.
- Bucephalandra: like anubias but smaller and more colorful; emersed growth is vigorous and flowering is common in high humidity.
- Cryptocoryne (wendtii, beckettii, parva, lucens): most crypts grow emersed readily; emersed forms often have different leaf shapes and will produce the characteristic spathe flowers.
- Hygrophila (corymbosa, difformis): explosive emersed growth — these become bushy marginal plants that can dominate; trim aggressively.
- Bacopa caroliniana, Ludwigia repens: classic stem plants that transition to emersed form and flower above water.
- Acorus gramineus (dwarf sweet flag): grass-like, loves wet feet, perfect for the shoreline edge.
- Spathiphyllum (peace lily): roots in water, leaves in air — nearly indestructible marginal plant, though large varieties outgrow small paludariums; use dwarf cultivars.
- Pothos (Epipremnum aureum): roots dangle in the water (excellent nitrate sponge), vines climb the background. Practically unkillable.
Terrestrial Zone Plants: The Humid Garden
Above the waterline, with drainage beneath, you can grow a miniature tropical garden:
- Ferns: bird's nest fern (Asplenium), button fern, rabbit's foot fern — humidity lovers that look prehistoric on a paludarium background.
- Mosses: java moss, Christmas moss, and terrestrial mosses (sphagnum, pillow moss) colonize foam backgrounds and wood — mist them and they spread into living green walls.
- Creeping fig (Ficus pumila): climbs backgrounds aggressively; trim monthly or it eats the tank.
- Pilea (glauca, depressa): tiny-leaved trailers perfect for small paludariums.
- Bromeliads (Neoregelia): mount on wood/background; their central cups hold water and become micro-habitats. Dwarf varieties for smaller tanks.
- Orchids (miniature Phalaenopsis, jewel orchids like Ludisia): jewel orchids especially — dark veined leaves that glow under paludarium lighting.
- Begonia (rex and rhizomatous types): spectacular foliage, loves humidity, hates wet feet — perfect for upper background.
- Selaginella (spike moss): primitive, ferny, loves constant humidity — the "forest floor" groundcover.
- Marcgravia, Monstera dubia (shingling plants): climb flat against backgrounds for that rainforest-wall effect.
Size discipline: the #1 paludarium planting mistake is using full-size houseplants. A regular peace lily or bird's nest fern will outgrow a 20-gallon paludarium in months. Buy dwarf/miniature cultivars and check mature sizes before planting. Everything in a paludarium grows toward the light and the glass — plan for it.
Submerged Zone: Don't Neglect Underwater
It's tempting to focus all energy on the land, but the underwater section still needs proper aquascaping — it's half the viewing experience. Plant it like a low-tech aquascape: anubias and ferns on the submerged wood, crypts in the substrate, mosses softening edges. Our jungle aquascape guide for low-tech tanks is directly applicable — paludarium water sections are almost always low-tech since the light is optimized for the land above.
One advantage: emergent and floating plants are nutrient sponges with access to atmospheric CO2, so they grow fast and starve algae underwater. A paludarium with vigorous emersed growth is naturally algae-resistant below the waterline. Pothos roots dangling in the water are practically a filter.
Humidity, Ventilation, and Lighting
Humidity: most paludarium plants want 70–90% humidity. A glass top or mostly-closed lid retains it; daily misting (manual or automated mister) keeps mosses and epiphytes happy. A small computer fan on a timer providing a few hours of air exchange prevents stagnation.
Ventilation balance: sealed = high humidity but mold risk and stagnant air; open = healthy air but dried mosses. The sweet spot: mostly closed with a vent strip or timed fan. If you see mold on wood, increase airflow; if mosses crisp, reduce it.
Lighting: one light must serve two worlds. A full-spectrum LED bar spanning the tank works; terrestrial plants generally want more light than the submerged section, so position accordingly. Photoperiod 10–12 hours. Avoid hot lights (old fluorescents, halides) — they'll cook the humid air and crack glass tops with condensation cycling.
Water: the water section gets standard aquarium care — small weekly changes, gentle filtration. But note: fertilizers dosed for underwater plants also feed the emersed giants, so dose lean; the land plants will tell you (pale new growth = feed a bit more).
Livestock: The Complete Ecosystem
Paludariums can house aquatic, semi-aquatic, and (in large builds) terrestrial animals — but restraint matters:
- Aquatic: small fish (ember tetras, endlers, bettas — see our betta tank layouts), shrimp (our shrimp tank guide applies underwater), snails.
- Semi-aquatic: vampire crabs and fiddler crabs (need land access and a sealed lid — they're escape artists), mudskippers (brackish specialists), newts.
- Terrestrial (large paludariums only): dart frogs, small geckos — research species-specific needs thoroughly; vertebrate care is a serious commitment.
Escape-proofing is mandatory for anything that climbs. Crabs, shrimp, and snails will all test the lid. A tight glass top with no gaps is non-negotiable.
Frequently Asked Questions
What size tank works best for a first paludarium?
A standard 20-gallon long or an 18×18×24" terrarium-style tank is ideal — enough height for a land section plus meaningful water depth. Below 10 gallons, the zones get cramped and humidity swings wildly. Our 20-gallon long aquascape ideas can inspire the underwater portion's layout.
Can I convert an existing aquarium into a paludarium?
Yes — lower the water level, build up a land section with egg crate or foam, and plant the margins. It's one of the best uses for a spare tank. Keep the existing filter running (adjust intake depth) and expect a 2–3 week settling period as emersed plants establish. Don't convert a tank with fish that need full depth — rehome deep-water swimmers first.
How do I stop mold on the land section?
Mold on new wood and fresh backgrounds is normal for the first weeks — springtails (tiny beneficial cleanup insects) eat it and are the paludarium keeper's secret weapon; seed them deliberately. Long-term, ensure airflow (vent or timed fan), don't over-mist, and remove rotting plant matter promptly. Persistent mold means too wet and too still.
Will aquarium plants really grow out of the water?
Most will — Anubias, Bucephalandra, Cryptocoryne, Hygrophila, Bacopa, and Ludwigia all have emersed forms, since many are marsh plants in nature. Transition them gradually: high humidity is essential while emersed leaves develop, because submerged leaves desiccate in dry air. Plant them at the waterline and let them grow out on their own schedule.
How often do I prune a paludarium?
More often than an aquarium — emersed growth with atmospheric CO2 is fast. Expect to trim aggressive growers (pothos, creeping fig, Hygrophila) every 2–4 weeks and do a full land-section haircut every couple of months. Underwater, trim on the normal aquarium schedule per our trimming maintenance guide.
Do paludariums need CO2 injection?
Almost never. Emersed and floating plants breathe atmospheric CO2 (roughly 400 ppm, free and unlimited), so the fastest growers in the system don't need supplementation. The submerged section is low-energy by design. Save the CO2 system for a dedicated high-tech aquascape.
Two Worlds, One Tank
A paludarium is the most forgiving "advanced" project in the hobby: the emergent plants filter the water, the humidity grows the garden, and mistakes in one zone rarely crash the other. Start with a simple build — false-bottom land, pothos and anubias at the margins, ferns and moss above, shrimp and small fish below — and let it teach you. Within months you'll have a riverbank in your living room, flowering crypts at the waterline, and a new appreciation for the plants you thought you knew. When the underwater section matures, photograph the whole system with our aquascape photography tips — paludariums photograph spectacularly because they have what flat aquascapes lack: a horizon.
Tissue-culture plants are the exception — they’re grown in sterile gel and adapt with minimal melting, which is part of what you’re paying for. Plants bought submersed from another hobbyist’s tank also transition with little melt, since they’re already in the right form.
Which Plants Melt Most (and Least)
Heavy melters (expect significant leaf loss)
- Cryptocorynes — infamous for “crypt melt,” sometimes dropping every leaf after any disturbance. They almost always recover from the roots within weeks.
- Stem plants grown emersed — rotala, ludwigia, and hygrophila often shed lower emersed leaves while the growing tips transition.
- Amazon swords — emersed-grown swords typically lose their broad oval aerial leaves and replace them with longer submersed ribbon leaves.
Light melters
- Anubias, java fern, bucephalandra — slow-growing rhizome plants transition gradually; occasional old-leaf melt but rarely dramatic.
- Vallisneria — usually transitions well, though it dislikes the move itself and may sulk for a week.
- Floating plants — minimal melt since their leaves were already at the air-water interface.
The Acclimation Protocol
Step 1: Quarantine or dip first
Before acclimating to your tank’s conditions, make sure you’re not acclimating pests along with the plant. Run new arrivals through our quarantine and dip protocol — it adds days upfront but prevents months of regret.
Step 2: Float to temperature-match (30 minutes)
Float the bag or container in your tank for 20–30 minutes to equalize temperature. Plants are less temperature-sensitive than fish, but a 10°F shock on top of transplant stress is an avoidable insult.
Step 3: Trim before planting
Remove any leaves that are already damaged, yellowing, or heavily algae-covered — they won’t recover and they’ll rot in your tank, feeding algae. For stem plants, trim off the bottom inch and any emersed leaves that look unlikely to adapt; the plant wastes energy maintaining leaves it’s going to shed anyway. Keep the healthy growing tips — that’s where recovery starts.
Step 4: Plant correctly the first time
Follow our planting guide — right depth, crown exposed on rosettes, rhizomes unburied on epiphytes. Every uprooting and replanting restarts the acclimation clock, so get placement right on the first attempt. Decide where each plant goes before it goes in the water.
Step 5: Run a gentle first week
For the first 7 days after planting:
- Moderate light — run your normal photoperiod but consider dropping intensity 20–30% if your light is dimmable. Blast-level light on a melting plant grows algae on the dying leaves, not recovery.
- Stable CO2 — if you inject CO2, keep it consistent. Fluctuating CO2 during acclimation is a melt accelerator. If you’re low-tech, this doesn’t apply — see growing without CO2.
- Half-strength fertilizer — new plants with damaged leaves can’t use full dosing, and the excess feeds algae. Ramp to full strength over 2–3 weeks per our fertilizer schedule.
- No disturbance — don’t move, trim, or “check on” new plants for at least two weeks. Every touch resets root establishment. This is especially critical for crypts.
Step 6: Remove melt, keep the base
As emersed leaves melt, remove the mushy material promptly — decaying leaves release ammonia and grow fungus that can spread to healthy tissue. But never discard the plant while the crown, rhizome, or roots are firm and alive. A crypt that’s lost every leaf but has firm roots is a plant that’s about to recover, not a dead plant. Give it 3–4 weeks before judging.
Telling Normal Melt From Real Problems
Normal transition melt:
- Affects oldest/emersed leaves first, newest growth last
- New submersed leaves emerge even as old ones dissolve
- Roots and crown stay firm and white/green
- Timeline: 1–4 weeks, then obvious new growth
Concerning melt (see our full melting diagnosis guide):
- New growth also melts or emerges deformed
- Rhizome or crown turns mushy and brown — this is rot, not transition
- Entire plant dissolves within days with no new growth after 4+ weeks
- Melting spreads to established plants that weren’t recently moved
Buying Tips to Minimize Melt
- Buy submersed-grown when available — hobbyist-grown cuttings transition with almost no melt.
- Choose tissue culture for sensitive species — crypts and delicate stems establish far more reliably from sterile cups.
- Avoid plants already melting in the store tank — some melt is normal, but a plant that’s mostly mush at purchase has less energy for recovery.
- Transport carefully — keep plants damp and out of direct sun/heat. A plant that dries out or cooks in a hot car melts far worse than one transported properly.
The First-Month Timeline: What to Expect Week by Week
Knowing what’s normal when removes most acclimation anxiety. Here’s the typical timeline for a healthy plant adapting to a new tank:
Week 1: The quiet week
Almost nothing visible happens. The plant is growing roots you can’t see and assessing its new environment. Some species (vallisneria, stem plants) may start shedding their lowest leaves. This is normal. Resist the urge to “help” — no moving, no extra fertilizer, no light changes. The most common beginner mistake is intervening during a week when the correct action is nothing.
Week 2: Melt peaks
This is when emersed leaves give up in earnest. Crypts may drop everything; swords shed their broad aerial leaves; stem plants lose lower foliage. It looks catastrophic and it’s usually fine. Keep removing mushy material, keep conditions stable, and watch the crown and growing tips — if those are firm and green, recovery is already underway.
Week 3: The turn
New submersed-adapted leaves emerge — smaller, thinner, often a slightly different shade of green than the emersed foliage. Stem plant tips start growing visibly; crypts push tiny curled leaves from the crown; swords unfurl narrow ribbon leaves. This is the moment most beginners exhale for the first time.
Week 4+: Established
New growth outpaces melt, and the plant is functionally yours. You can resume full-strength fertilizer, normal trimming, and stop treating it as fragile. Some slow growers (anubias, bucephalandra) take 6–8 weeks to show obvious progress — that’s their normal speed, not a problem.
Acclimating Different Plant Formats
Tissue-culture cups
Sterile, pest-free, and already adapted to high-humidity (not emersed) growth — tissue cultures melt the least of any format. Rinse the agar gel off gently (leftover gel rots and feeds fungus), split the portion into small plantlets, and plant per our planting guide. They establish slowly for the first two weeks, then accelerate. No dip needed, minimal acclimation stress — this is the premium experience you’re paying for.
Potted plants
Remove the pot and strip away the rockwool completely — leftover rockwool traps debris and rots. Tease the root mass apart gently; if it’s a dense mat, splitting it into 2–3 smaller portions actually establishes faster than planting one big clump (more growing points, better water flow around roots). Potted plants are usually emersed-grown, so expect the standard 2–4 week melt cycle.
Bare-root / bunched stems
Typically sold as weighted bunches. Remove any bands, foam, or weights, strip the lower leaves, and plant stems individually or in small groups. Bunched stems from the store are often already transitioning — check for new submersed growth at the tips, which tells you the plant is mid-adaptation and will settle quickly.
Hobbyist cuttings
Already submersed-grown and the fastest to establish — often showing new growth within days. The main acclimation factor is water-parameter difference between the two tanks. Float to temperature-match, plant promptly, and they’ll usually take off with minimal melt. This is why experienced hobbyists prefer trading cuttings over buying potted plants.
Frequently Asked Questions
Should I use a “plant starter” or transplant fertilizer?
Products marketed for transplant shock are mostly B-vitamins and mild hormones. They don’t hurt, but there’s no strong evidence they help aquarium plants specifically. Stable conditions and patience outperform any bottle. Save the money for more plants.
My new plant melted completely — bare crown, no leaves. Is it dead?
Probably not, if the crown or rhizome is firm. Crypts and swords routinely lose 100% of their leaves and regrow from the base within a month. The test is firmness: firm and pale/green means alive; mushy and brown/black means rot. Give firm-but-leafless plants a full 4 weeks before declaring them dead.
Can I speed up acclimation with extra light or CO2?
No — and trying usually backfires. A melting plant can’t use extra light; the excess just grows algae on its dying leaves. Keep light moderate and CO2 stable (not boosted) during acclimation. Growth speed comes from the plant’s own adaptation timeline, which you can’t rush, only avoid delaying.
Should new plants go straight into my main display tank?
After quarantine/dipping, yes — there’s no benefit to a separate “growing-in” tank for most plants. They acclimate to your water fastest in the tank they’ll live in. The exception is very delicate species going into a tank with boisterous fish; give those a few weeks in a calm corner or breeder box first.
The Patience Rule
The single most important acclimation skill is restraint: plant it right, set gentle conditions, remove decay, and then leave it alone for a month. The hobbyists with the best plant growth aren’t doing something clever in week one — they’re simply not interfering in weeks two through four while the plants do what they’ve evolved to do. Melt looks like failure and feels like failure, but in most cases it’s the visible part of a plant successfully becoming yours.