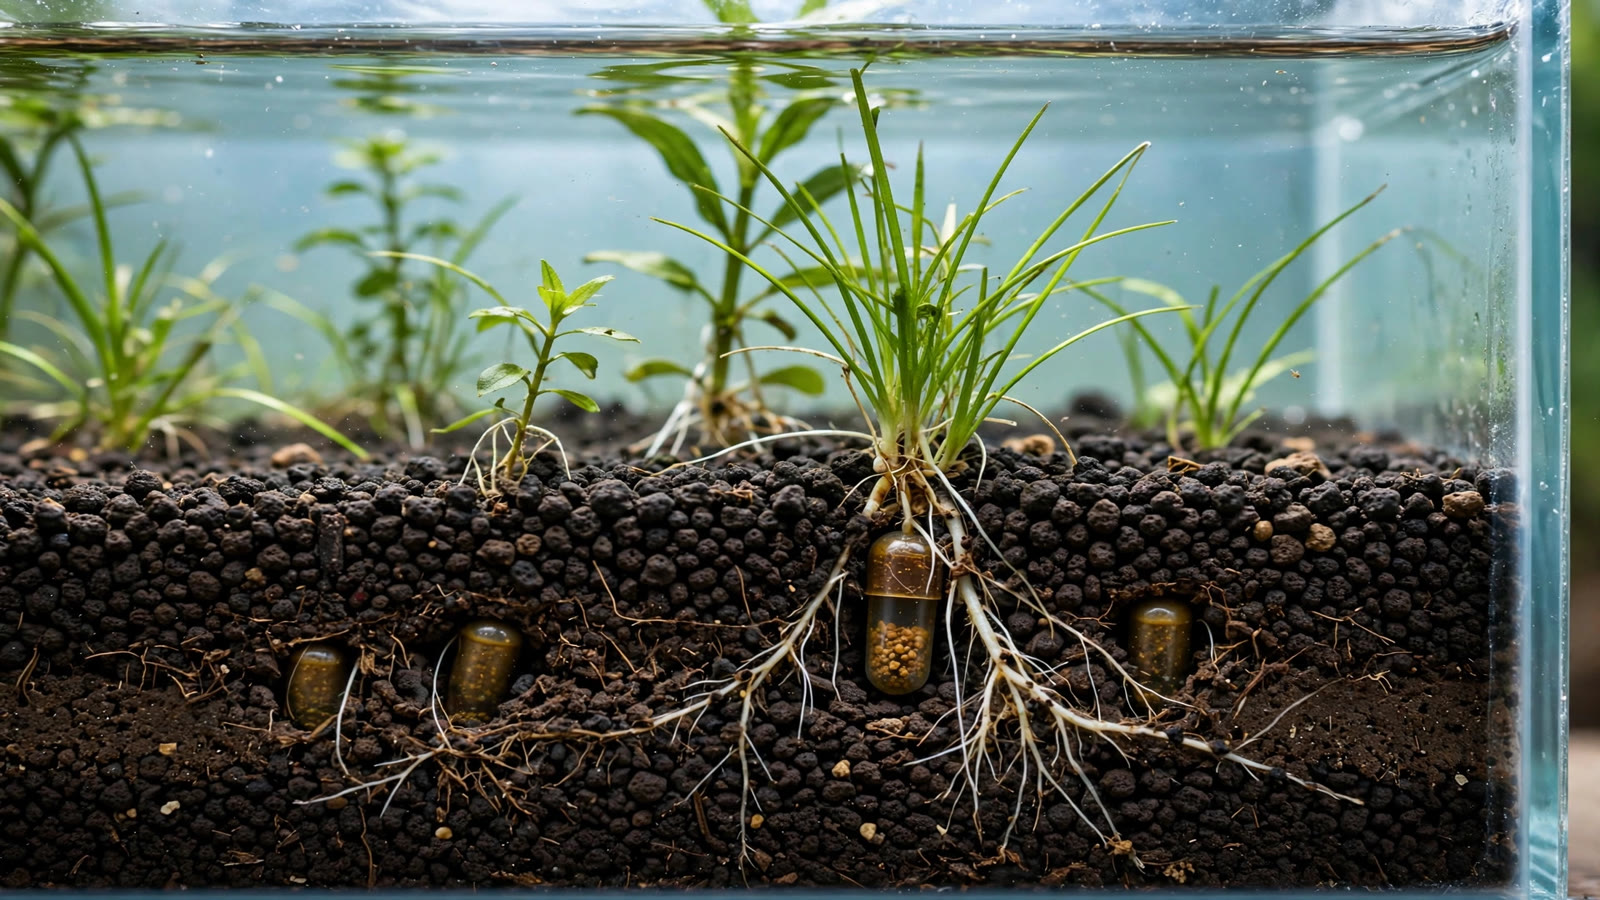
If you suspect your aquasoil is exhausted and you're wondering how to replace the nutrients it once fed your plants — without tearing down a mature, thriving tank — you are in good company. Every aquasoil, from nutrient-rich ADA Amazonia to Tropica to Fluval Stratum, is a finite resource: baked clay granules pre-loaded with nutrients, with a clock on that fertility. The good news is that a full tear-down is rarely necessary. Most tired substrates can be revived with the least invasive method that fits, starting with simple root tabs and only escalating if the soil itself is structurally done.
Aquasoil Exhausted: What "Spent" Really Means (Two Clocks Ticking)
Aquasoil exhaustion is not one event — it is two separate depletion processes running on different schedules. Knowing which clock has run out tells you which fix to reach for.
Clock one: the nutrient load
Aquasoils are baked granules of mineral-rich clay and organic matter, pre-charged with nitrogen, phosphorus, potassium, iron, and trace elements. Root feeders like swords, cryptocorynes, and stem plants draw this reserve down steadily. Once it is gone, the granules become inert structure — like gravel — that roots can grow through but cannot feed from. Heavy root feeders show it first, while Anubias and Java fern feed mainly from the water column and barely notice.
Clock two: cation exchange capacity and buffering
The quieter clock is the soil's cation exchange capacity (CEC) — its ability to grab nutrient ions from the water and hold them where roots can reach, while softening water and pulling pH into the acidic range. In hard tap water especially, those exchange sites fill up with unusable ions, and the buffering fades. When it is spent, a tank that once sat at pH 6.2–6.6 drifts back toward the tap water's natural pH.
The Signs: How to Tell Your Aquasoil Is Spent
Plant growth clues
The classic sign is a growth slowdown in root feeders despite a consistent water-column fertilizer routine. Swords, crypts, and Vallisneria stall while epiphytes keep chugging along. Look for pale new leaves on heavy root feeders, smaller-than-usual leaves on established crypts, and stem plants rooting upward in search of nutrients. Algae often joins in: when plants cannot take up nutrients efficiently, algae fills the gap, especially thread and brush algae on older leaves.
Water test clues
In a tank with still-charged aquasoil, nitrates and phosphates read low even between water changes, because roots are pulling them from the soil. If nitrate starts accumulating faster than before with the same stocking and feeding — and phosphate climbs — the substrate is likely no longer absorbing and cycling those nutrients. Indirect on its own — rule out overfeeding and filter issues first — but a strong signal combined with stalled root feeders.
pH and buffering clues
The second clock is the easiest to test directly. If your pH has crept upward toward your tap water's value after a year or more, or KH no longer stays near zero the way it did in the first months, the buffering is fading. A drift of 0.5–1.0 over a few months — with no change in hardscape, CO2, or water source — is the soil telling you its softening chemistry is spent.
How Long Does Aquasoil Really Last? (Faster Than You Think)
Aquasoil's peak nutrient window is shorter than most hobbyists assume: the majority of easily available nutrients are used up or leached within the first few months in a heavily planted tank. Conservative lifespans:
| Soil type | Peak nutrient window | Buffering (pH/KH softening) | Notes |
|---|---|---|---|
| ADA Aqua Soil Amazonia | 3–6 months strong, tapering through month 12 | 12–24 months | The benchmark; most potent at launch, needs the most root-tab support later |
| Tropica Aquarium Soil | 4–8 months strong, gradual decline | 12–18 months | Slower-release profile; pairs well with Tropica's own liquid dosing line |
| Fluval Stratum | 2–4 months strong, fades quickly | 8–14 months | Lighter nutrient load from the start; root tabs help early |
| UNS Controsoil and similar baked soils | 3–6 months strong | 10–16 months | Comparable to Amazonia II; excellent granule durability |
| APT Feast (2Hr Aquarist) | Designed for ~2 months per region before top-up | 12+ months | Made to be replenished with dedicated top-up media rather than replaced |
Three things stretch or shrink these numbers: plant density (a jungle of stems drains soil faster than a low-tech crypt tank), substrate depth (deeper soil holds more total nutrients — a deeper active substrate will last longer before depleting — which is why getting substrate depth right from day one pays dividends), and water chemistry (hard tap water exhausts buffering far faster than soft or RO water). In practice, a lightly planted tank on soft water can coast for two years on root tabs, while a CO2-injected Dutch-style tank on hard tap water may need help by month eight.
How to Replace Exhausted Aquasoil: Options Ranked From Least to Most Invasive
Work down this list in order. Most tanks never need to go past option three.
Option 1: Root tab supplementation
The first and usually the last line of defense. Slow-release root tabs pushed deep into the substrate recharge the nutrient load exactly where root feeders need it, without disturbing the tank at all. One tab per 4–6 inches in heavy root-feeder zones, buried under at least an inch of soil so nothing leaches into the water column, repeated every 2–3 months. For tanks whose granules are still structurally sound, this can keep things running indefinitely. Compare products and placement in our root tabs vs aquasoil guide.
Option 2: Capping or refreshing the top layer
If surface granules have crumbled into dust, a fresh 1-inch cap of new aquasoil over the worst areas restores nutrients and appearance, while the old layer below keeps working as a mineral base. Many aquascapers cap with fine sand instead — see our capping aquasoil with sand guide. Do it in sections across two water changes, never the whole tank at once, so bacteria and livestock are never stressed simultaneously.
Option 3: Aquasoil in mesh bags
The smartest long-term strategy, and one you can retrofit: put fresh aquasoil into fine-mesh filter media bags and bury them in the planting zones. Roots and water pass through; the soil stays contained — so the next refresh is as simple as pulling the old bag out and dropping a new one in, with no clouding and no disturbed anaerobic pockets. Bag size, fill level, and hiding techniques are covered in our aquasoil in mesh bags guide.
Option 4: Partial section replacement
When one zone is clearly spent — the dense sword garden on the left while the carpet on the right is fine — scoop out the exhausted section during a water change and refill with fresh soil. Work in portions no larger than a quarter of the footprint per session, siphoning aggressively as you go. Fresh aquasoil releases an initial ammonia pulse just like on day one, so test ammonia daily for a week after each section. Wait two weeks between sections; the scape and livestock stay put throughout.
Option 5: Full tear-down (the genuine last resort)
Reserve this for soil that has structurally collapsed — granules turned to mud throughout, compaction so severe roots cannot penetrate, anaerobic black patches spreading despite good maintenance. At that point the substrate is actively harming the tank and no tabs will fix it. Livestock into a holding tub, plants into buckets — and since you are rebuilding, compare aquasoil vs gravel with fresh eyes. Slower growth with intact granules does not need this option.
The No-Tear-Down Refresh: Step by Step
The conservative method combining options 1–3 for a tank with exhausted nutrients but structurally sound soil. About 45 minutes, and not a single fish moves.
- Test first, act on evidence. Record pH, KH, nitrate, and phosphate; photograph the struggling plants. You want a before-and-after record to judge in 3–4 weeks whether the refresh worked.
- Start with root tabs. With the filter running, use planting tweezers to push one slow-release tab 1–2 inches deep for every 4–6 square inches of heavy root-feeder territory. Place and cover each tab in seconds.
- Bag and bury fresh soil. Fill fine-mesh media bags three-quarters full with fresh aquasoil (room for water to circulate), and bury them just below the surface in the weakest zones — behind the sword cluster, under the crypt colony. Cover with existing substrate so nothing shows.
- Cap the crumbling spots. Where surface granules have turned to dust, lay a thin fresh layer — new soil or pool filter sand for a clean look — over those spots only, no more than an inch.
- Do a 30–40% water change right after. Siphon the surface gently to lift disturbed dust; the water change dilutes any mild ammonia or phosphate pulse from the fresh material.
- Test ammonia daily for three days, then weekly. If ammonia spikes above 0.5 ppm, do an extra water change and dose a detoxifier.
- Reassess at week four. New leaf growth on root feeders is your verdict. If growth resumed, set a reminder to re-tab in 2–3 months. If nothing changed, the problem may be light, CO2, or water-column dosing rather than the substrate.
What NOT to Do
- Do not deep-stir old substrate. Substrate older than a year develops anaerobic pockets where organics decomposed without oxygen. Churning them up releases hydrogen sulfide and concentrated waste at once — the most common cause of "I just cleaned the substrate and now everything is dying" crashes. Siphon the surface only; bury new material rather than mixing it in.
- Do not overdose liquid fertilizer to compensate. Extra water-column ferts mostly feed algae when the real problem is at the roots. Match the delivery method to the problem: root-zone problems get root-zone solutions.
- Do not replace the entire substrate at once with livestock in the tank. Between the fresh soil's ammonia pulse, the destroyed bacterial colony, and a year's trapped organics released at once — livestock goes into a holding tub first.
- Do not rinse old aquasoil and reuse it as "refreshed." Rinsing washes out whatever reserve remains and fractures granules further. Dried old soil works as inert filler under a new layer — never as the active nutrient source.
- Do not vacuum aquasoil like gravel. Jamming a gravel vac deep into active soil crushes granules, uproots fine roots, and clouds the tank. Hover the siphon just above the surface and let the soil's biology handle the rest.
Making Fresh Soil Last Longer
Once refreshed, a few habits slow the next countdown. Dose the water column consistently — plants fed from the water draw less from the soil, stretching the reserve. Keep substrate depth generous (2.5–3.5 inches in planting zones) for a larger nutrient reservoir. Avoid over-stocking and overfeeding, since excess organics clog exchange sites faster. Starting with a proven soil matters too — see our roundup of the best aquasoils for planted tanks.
Frequently Asked Questions
Can exhausted aquasoil be recharged with liquid fertilizer alone?
Only partially. Heavy liquid dosing recharges the soil's cation exchange sites, but it cannot restore the slow-release nutrient load baked in at the factory, nor lost buffering capacity. Treat liquid ferts as maintenance for the exchange sites; root tabs and fresh soil are the actual refuel.
How do I know the substrate is the problem and not light or CO2?
Watch which plants struggle. If root feeders (swords, crypts, Vallisneria) stall while water-column feeders like Anubias and Java fern keep growing, the substrate is the prime suspect. If everything stalls equally, suspect light, CO2, or dosing first. A pH drifting upward toward tap-water values over the same period is a second, independent vote for exhausted soil.
Will adding root tabs to exhausted soil cause an algae bloom?
Not if placed correctly. Algae blooms come from nutrients hitting the water column, not the substrate. Push each tab at least an inch deep, away from the glass, and cover it fully with soil. Use the package dose — doubling up "just in case" is what causes trouble. Properly buried tabs are among the safest fertilization methods.
Can I just add a fresh layer of aquasoil on top of the old?
Yes, with two caveats. Keep total depth sensible — piling soil on soil past 4 inches invites the anaerobic compaction you are trying to avoid. And expect a mild ammonia pulse from the fresh layer for a week or two, so test daily and be ready with a water change. Done in sections rather than all at once, a top-up layer is safe and effective.
Does exhausted aquasoil still buffer pH?
Usually not — buffering fades on its own timeline, often before granules physically break down. Once exchange sites saturate with hard-water minerals, the soil can no longer pull pH and KH down. Root tabs restore nutrients but not buffering; only fresh soil (or switching to remineralized RO water) brings the softening effect back. Shrimp keepers often refresh soil for this reason even when plants look fine.
Is it worth replacing aquasoil in a tank older than three years?
Often yes, but selectively. At three-plus years even good granules are usually crumbling, and partial section replacement or mesh bags let you rotate fertility through the tank over a couple of months without disturbing livestock. If the scape is mature and the fish thriving, there is no virtue in a tear-down just to chase a calendar date — refresh the zones that need it and leave the rest alone.
The Bottom Line
Exhausted aquasoil is a maintenance event, not a catastrophe. Read the signs — stalling root feeders, accumulating nitrates, pH drifting toward the tap — and answer with the least invasive fix: root tabs first, then a top-up layer or buried mesh bags, section replacement only where needed, and a tear-down only when the granules give up. Handled this way, a good aquasoil bed serves for years, and the next refresh is an afternoon's work, not a weekend rebuild.
Tissue-culture plants are the exception — they’re grown in sterile gel and adapt with minimal melting, which is part of what you’re paying for. Plants bought submersed from another hobbyist’s tank also transition with little melt, since they’re already in the right form.
Which Plants Melt Most (and Least)
Heavy melters (expect significant leaf loss)
- Cryptocorynes — infamous for “crypt melt,” sometimes dropping every leaf after any disturbance. They almost always recover from the roots within weeks.
- Stem plants grown emersed — rotala, ludwigia, and hygrophila often shed lower emersed leaves while the growing tips transition.
- Amazon swords — emersed-grown swords typically lose their broad oval aerial leaves and replace them with longer submersed ribbon leaves.
Light melters
- Anubias, java fern, bucephalandra — slow-growing rhizome plants transition gradually; occasional old-leaf melt but rarely dramatic.
- Vallisneria — usually transitions well, though it dislikes the move itself and may sulk for a week.
- Floating plants — minimal melt since their leaves were already at the air-water interface.
The Acclimation Protocol
Step 1: Quarantine or dip first
Before acclimating to your tank’s conditions, make sure you’re not acclimating pests along with the plant. Run new arrivals through our quarantine and dip protocol — it adds days upfront but prevents months of regret.
Step 2: Float to temperature-match (30 minutes)
Float the bag or container in your tank for 20–30 minutes to equalize temperature. Plants are less temperature-sensitive than fish, but a 10°F shock on top of transplant stress is an avoidable insult.
Step 3: Trim before planting
Remove any leaves that are already damaged, yellowing, or heavily algae-covered — they won’t recover and they’ll rot in your tank, feeding algae. For stem plants, trim off the bottom inch and any emersed leaves that look unlikely to adapt; the plant wastes energy maintaining leaves it’s going to shed anyway. Keep the healthy growing tips — that’s where recovery starts.
Step 4: Plant correctly the first time
Follow our planting guide — right depth, crown exposed on rosettes, rhizomes unburied on epiphytes. Every uprooting and replanting restarts the acclimation clock, so get placement right on the first attempt. Decide where each plant goes before it goes in the water.
Step 5: Run a gentle first week
For the first 7 days after planting:
- Moderate light — run your normal photoperiod but consider dropping intensity 20–30% if your light is dimmable. Blast-level light on a melting plant grows algae on the dying leaves, not recovery.
- Stable CO2 — if you inject CO2, keep it consistent. Fluctuating CO2 during acclimation is a melt accelerator. If you’re low-tech, this doesn’t apply — see growing without CO2.
- Half-strength fertilizer — new plants with damaged leaves can’t use full dosing, and the excess feeds algae. Ramp to full strength over 2–3 weeks per our fertilizer schedule.
- No disturbance — don’t move, trim, or “check on” new plants for at least two weeks. Every touch resets root establishment. This is especially critical for crypts.
Step 6: Remove melt, keep the base
As emersed leaves melt, remove the mushy material promptly — decaying leaves release ammonia and grow fungus that can spread to healthy tissue. But never discard the plant while the crown, rhizome, or roots are firm and alive. A crypt that’s lost every leaf but has firm roots is a plant that’s about to recover, not a dead plant. Give it 3–4 weeks before judging.
Telling Normal Melt From Real Problems
Normal transition melt:
- Affects oldest/emersed leaves first, newest growth last
- New submersed leaves emerge even as old ones dissolve
- Roots and crown stay firm and white/green
- Timeline: 1–4 weeks, then obvious new growth
Concerning melt (see our full melting diagnosis guide):
- New growth also melts or emerges deformed
- Rhizome or crown turns mushy and brown — this is rot, not transition
- Entire plant dissolves within days with no new growth after 4+ weeks
- Melting spreads to established plants that weren’t recently moved
Buying Tips to Minimize Melt
- Buy submersed-grown when available — hobbyist-grown cuttings transition with almost no melt.
- Choose tissue culture for sensitive species — crypts and delicate stems establish far more reliably from sterile cups.
- Avoid plants already melting in the store tank — some melt is normal, but a plant that’s mostly mush at purchase has less energy for recovery.
- Transport carefully — keep plants damp and out of direct sun/heat. A plant that dries out or cooks in a hot car melts far worse than one transported properly.
The First-Month Timeline: What to Expect Week by Week
Knowing what’s normal when removes most acclimation anxiety. Here’s the typical timeline for a healthy plant adapting to a new tank:
Week 1: The quiet week
Almost nothing visible happens. The plant is growing roots you can’t see and assessing its new environment. Some species (vallisneria, stem plants) may start shedding their lowest leaves. This is normal. Resist the urge to “help” — no moving, no extra fertilizer, no light changes. The most common beginner mistake is intervening during a week when the correct action is nothing.
Week 2: Melt peaks
This is when emersed leaves give up in earnest. Crypts may drop everything; swords shed their broad aerial leaves; stem plants lose lower foliage. It looks catastrophic and it’s usually fine. Keep removing mushy material, keep conditions stable, and watch the crown and growing tips — if those are firm and green, recovery is already underway.
Week 3: The turn
New submersed-adapted leaves emerge — smaller, thinner, often a slightly different shade of green than the emersed foliage. Stem plant tips start growing visibly; crypts push tiny curled leaves from the crown; swords unfurl narrow ribbon leaves. This is the moment most beginners exhale for the first time.
Week 4+: Established
New growth outpaces melt, and the plant is functionally yours. You can resume full-strength fertilizer, normal trimming, and stop treating it as fragile. Some slow growers (anubias, bucephalandra) take 6–8 weeks to show obvious progress — that’s their normal speed, not a problem.
Acclimating Different Plant Formats
Tissue-culture cups
Sterile, pest-free, and already adapted to high-humidity (not emersed) growth — tissue cultures melt the least of any format. Rinse the agar gel off gently (leftover gel rots and feeds fungus), split the portion into small plantlets, and plant per our planting guide. They establish slowly for the first two weeks, then accelerate. No dip needed, minimal acclimation stress — this is the premium experience you’re paying for.
Potted plants
Remove the pot and strip away the rockwool completely — leftover rockwool traps debris and rots. Tease the root mass apart gently; if it’s a dense mat, splitting it into 2–3 smaller portions actually establishes faster than planting one big clump (more growing points, better water flow around roots). Potted plants are usually emersed-grown, so expect the standard 2–4 week melt cycle.
Bare-root / bunched stems
Typically sold as weighted bunches. Remove any bands, foam, or weights, strip the lower leaves, and plant stems individually or in small groups. Bunched stems from the store are often already transitioning — check for new submersed growth at the tips, which tells you the plant is mid-adaptation and will settle quickly.
Hobbyist cuttings
Already submersed-grown and the fastest to establish — often showing new growth within days. The main acclimation factor is water-parameter difference between the two tanks. Float to temperature-match, plant promptly, and they’ll usually take off with minimal melt. This is why experienced hobbyists prefer trading cuttings over buying potted plants.
Frequently Asked Questions
Should I use a “plant starter” or transplant fertilizer?
Products marketed for transplant shock are mostly B-vitamins and mild hormones. They don’t hurt, but there’s no strong evidence they help aquarium plants specifically. Stable conditions and patience outperform any bottle. Save the money for more plants.
My new plant melted completely — bare crown, no leaves. Is it dead?
Probably not, if the crown or rhizome is firm. Crypts and swords routinely lose 100% of their leaves and regrow from the base within a month. The test is firmness: firm and pale/green means alive; mushy and brown/black means rot. Give firm-but-leafless plants a full 4 weeks before declaring them dead.
Can I speed up acclimation with extra light or CO2?
No — and trying usually backfires. A melting plant can’t use extra light; the excess just grows algae on its dying leaves. Keep light moderate and CO2 stable (not boosted) during acclimation. Growth speed comes from the plant’s own adaptation timeline, which you can’t rush, only avoid delaying.
Should new plants go straight into my main display tank?
After quarantine/dipping, yes — there’s no benefit to a separate “growing-in” tank for most plants. They acclimate to your water fastest in the tank they’ll live in. The exception is very delicate species going into a tank with boisterous fish; give those a few weeks in a calm corner or breeder box first.
The Patience Rule
The single most important acclimation skill is restraint: plant it right, set gentle conditions, remove decay, and then leave it alone for a month. The hobbyists with the best plant growth aren’t doing something clever in week one — they’re simply not interfering in weeks two through four while the plants do what they’ve evolved to do. Melt looks like failure and feels like failure, but in most cases it’s the visible part of a plant successfully becoming yours.