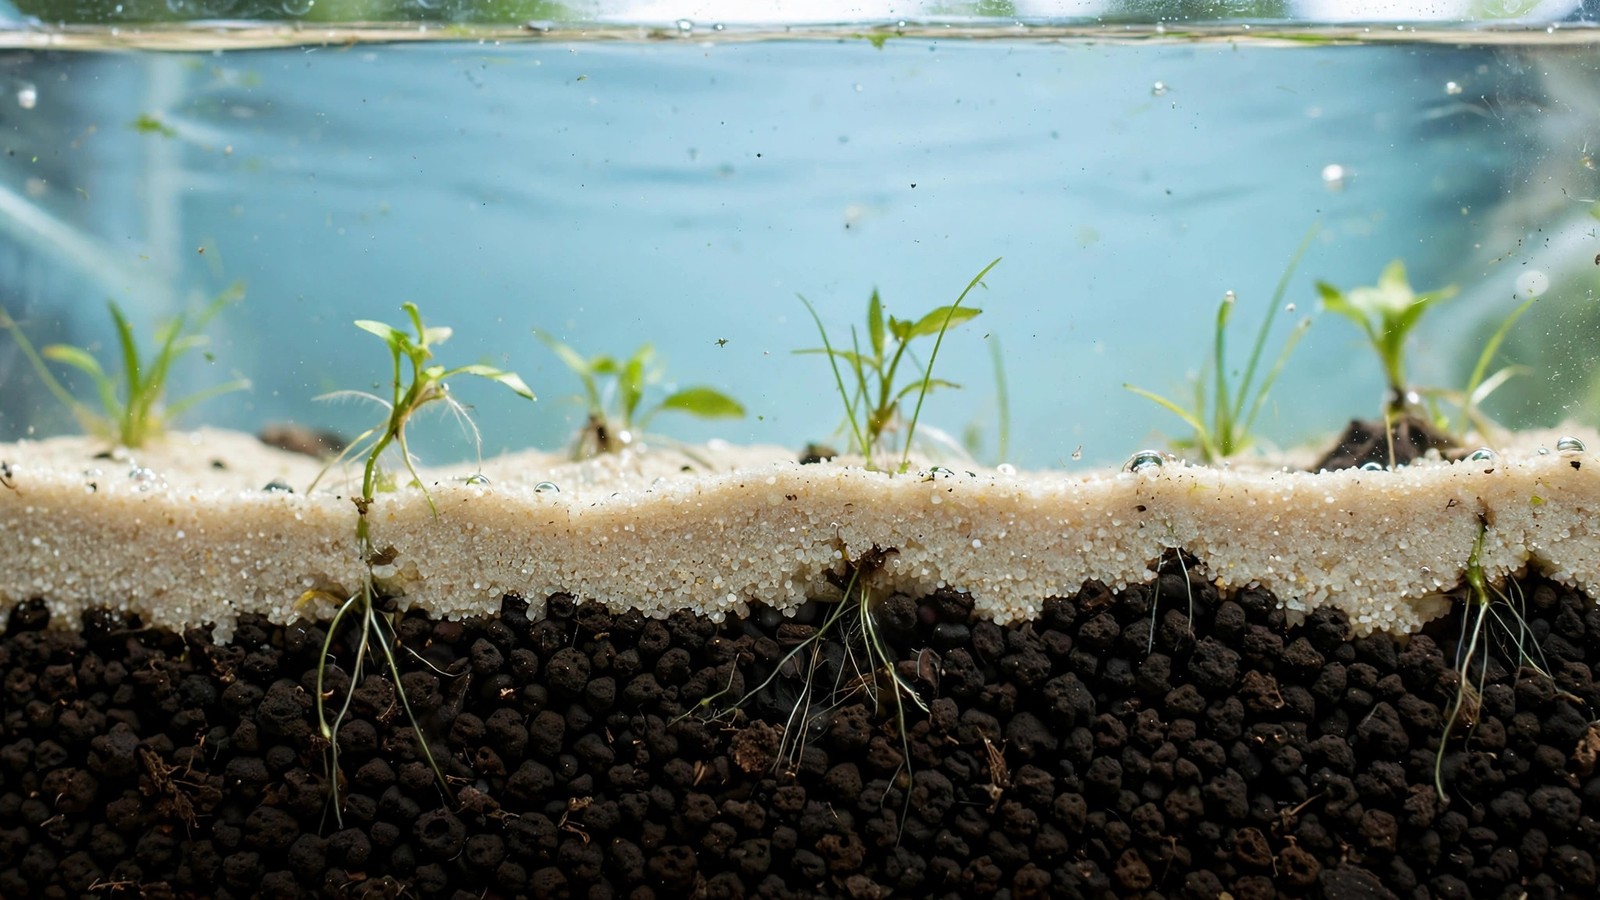
Capping aquasoil with sand is one of the most useful hybrid techniques in the planted-tank hobby: a thin, attractive sand layer sits on top of nutrient-rich aquasoil, giving you the growth power of an active substrate with the clean look and low cost of sand. Done well, the two layers stay separate for years and plants root straight through the cap into the soil below. Done badly, they blend into an unsightly grey-brown sludge within months. This guide covers why you'd cap in the first place, which sands actually work, the thickness rules that keep layers distinct, the layering technique that prevents mixing, how to plant through the cap, and the maintenance mistakes that ruin capped beds.
Why Cap Aquasoil With Sand?
Aquasoil is dark, expensive, and engineered to feed plants — but it isn't always what a scape wants on the surface. Capping solves several real problems at once, which is why the technique keeps showing up in forum build threads and low-tech tanks alike.
Aesthetics and Contrast
The most common reason is pure looks. A bright sand foreground against dark hardscape or a planted background gives a tank depth and contrast that uniform dark soil can't match. Biotope builds imitate riverbeds and lake margins that are pale sand, not black granules, and many fish — pale Corydoras, for example — display better colour and more natural behaviour over light substrate.
Nutrient Lock-In
Fresh aquasoil leaches ammonia for the first weeks of a tank's life — normal and part of cycling, but it also feeds algae in the water column. A sand cap of the right thickness acts as a physical barrier: nutrients still diffuse upward slowly, yet the concentrated burst at the surface is blunted, so the first month tends to run with less green water and thread algae than bare-soil setups. The cap also keeps fine soil dust from clouding the water every time you disturb the bed. More on that early phase in our guide on aquasoil ammonia leaching and cycling.
Cost Savings
Aquasoil is sold by the litre, and deep beds in larger tanks get expensive fast. A common budget move is a thinner aquasoil base — enough to feed roots — topped with cheap sand to reach the visual depth the scape needs. The nutrient layer stays where it matters (under the root zone) while the bulk of the visible bed costs a fraction of the price. Our aquarium soil vs gravel comparison breaks down when active substrate earns its price and when inert material does the job.
Choosing the Right Sand for Your Cap
Not every bag labelled "sand" behaves the same in a capped bed. The wrong choice either compacts into sheets that starve roots, or is so fine it drifts through the soil granules and disappears into the lower layer.
Pool Filter Sand
Pool filter sand is the hobby favourite, and for good reason. It is silica sand graded to a fairly uniform grain size, heavy enough to stay put during water changes, and coarse enough to resist compaction. Rinse it well before use — then it's cheap, widely available, and roots push through it easily. See our dedicated article on using pool filter sand in planted tanks. For most capped setups, this is the default recommendation.
Play Sand
Hardware-store play sand is the cheapest option and the one to be careful with. It is ungraded, so it contains ultra-fine dust alongside the usable grains. Rinse it aggressively in small batches until the water runs clear, keep the cap around 2 cm, and stir or vacuum the surface more often to prevent anaerobic patches. It works — it just asks more of you.
Aquarium Sand
Branded aquarium sands are the most predictable option: pre-washed, colour-graded, available in tones from white to black to match the scape. Performance is on par with pool filter sand — you're paying for convenience and colour choice. Black aquarium sand over dark aquasoil is popular for contest-style scapes where a bright cap would be too loud, and it hides minor mixing better than pale sand.
| Sand type | Grain behaviour | Compaction risk | Cost | Best for |
|---|---|---|---|---|
| Pool filter sand | Uniform ~0.45–0.55 mm | Low | Low | Most capped setups |
| Play sand | Ungraded, dusty | Higher | Lowest | Tight budgets, thin caps |
| Aquarium sand | Graded, colour options | Low | Higher | Colour-matched scapes |
How Thick Should Each Layer Be?
Thickness is the variable that decides whether your cap succeeds or fails. Too thin and the soil shows through; too thick and roots stall in the inert layer.
- Aquasoil base: 2.5–5 cm where plants will root, sloped deeper toward the back (up to 8–10 cm in deep scapes). Shallower soil under the open foreground is fine since little grows there.
- Sand cap: 2–4 cm. Two centimetres is the minimum that visually covers dark soil granules; four is the practical maximum before the inert layer starts isolating roots from the nutrient bed.
- Total bed: keep the combined depth in the front third around 4–6 cm and let it rise toward the back. Deeper beds hold slopes and give stem plants room; shallow beds stay easier to maintain.
One useful trick: make the cap slightly thicker in the foreground (clean, unbroken sand look) and slightly thinner in the planted zones at the back, so roots reach the soil faster. For the full treatment of bed geometry, see our substrate depth guide for aquarium plants.
Capping Aquasoil With Sand: The No-Mixing Technique, Step by Step
This is the procedure that keeps layers distinct. Follow it in order, on a dry tank — every shortcut here is how mixing starts.
- Place hardscape first. Position rocks and wood on the bare glass, then build substrate around them. Heavy hardscape sitting on top of a deep bed sinks and crushes layers together.
- Add the aquasoil base. Pour in dry aquasoil and shape it — slope from front to back, higher behind hardscape for depth. Level it with a ruler or credit card; bumps in the base layer telegraph through the cap.
- Optional: settle the soil. A light misting helps the granules nestle and lock together. You can pour in a litre of water to settle the bed, then drain it back off before capping.
- Add the sand cap gently. Pour rinsed sand over a plastic bag, a plate, or your flattened hand resting just above the soil surface — never a heavy stream straight onto the soil, which craters the layer and mixes on impact. Build up the cap evenly to your target thickness.
- Protect the layers during filling. Lay a plastic bag or shallow dish on the sand and pour water onto it, or use a slow siphon. A hard stream will blast sand off the soil and expose patches you then have to repair.
- Inspect the glass line. Look at the front glass: you should see a clean two-tone band — dark soil below, sand above. Tease any floated soil granules out of the cap with tweezers now; they only get harder to separate later.
An alternative worth knowing: portioning the soil into aquasoil-filled mesh bags before capping. Bags hold steep slopes that loose soil can't, and contained soil barely mixes with the cap — the most rescape-friendly way to build a capped bed.
Planting Through the Cap
Plants don't know about your layers — roots push down through sand into soil without hesitation, as long as the cap isn't compacted. Planting technique just needs small adjustments.
- Use tweezers, plant deep. Grip each stem near its base and push it through the cap so the stem's bottom sits inside the soil layer. The sand's weight then holds the stem upright — this is actually easier than planting in loose soil, and new plantings pull out less.
- Angle matters. Push stems in at a slight angle rather than straight down; the angled hole collapses less readily and the plant anchors better.
- Carpeting plants need patience. Dwarf hairgrass and Monte Carlo root shallowly, so keep their zone of the cap at the thin end (about 2 cm). They'll mat across the sand first, then send roots down — growth can lag bare soil by a week or two.
- Heavy root feeders want contact. Swords and crypts do best with crowns reaching the soil directly. Push a root tab down to the soil–sand boundary beneath them — the cap holds the tab in place, a genuine advantage over dosing tabs into open soil.
- Epiphytes skip the substrate entirely. Anubias, Java fern, and Bucephalandra attach to hardscape, not beds — a capped foreground is the perfect excuse to use them as accent plants without touching the layers at all.
Rescape and Maintenance Pitfalls
Capped beds fail most often during routine maintenance, not at setup. Uprooting a mature stem pulls soil up through the cap; vacuuming carelessly sucks the cap away. Here's how to keep the layers honest long-term.
- Vacuum with the tube hovering. Hold the siphon just above the sand surface to lift mulm without pulling grains. Push the tube into the bed and you'll create craters that expose soil.
- Replant immediately after uprooting. When you pull a plant, backfill the hole with a pinch of clean sand right away instead of letting soil granules sit exposed on the surface.
- Trim stems, don't always uproot. Topping and replanting the crown while leaving established roots in the bed disturbs nothing. Frequent full uprooting is what turns caps into mixtures.
- Top up the cap, not the soil. As the bed settles over the months, add thin lifts of fresh rinsed sand to maintain cap thickness rather than pouring more soil on top.
- Watch for the grey zone. If sand in high-traffic areas starts looking peppery or grey-brown, that is soil migrating upward. Siphon off the mixed surface centimetre and replace it with fresh sand — the look is restored in minutes.
Planning a bigger change later? A capped bed can be rescaped in sections with soil exposure kept brief — our aquarium rescape guide covers how to rework an established tank without turning the substrate into soup.
If you're still deciding whether capping is right for your tank, our sand-cap decision guide compares capped versus bare aquasoil across plant growth, livestock, maintenance load, and longevity — worth reading before you commit to either direction.
Frequently Asked Questions
Can you cap aquasoil with sand, or does it smother the soil?
Yes — and done properly it doesn't smother anything. Roots push through a 2–4 cm sand cap into the soil below within weeks, and nutrients still diffuse upward. Problems only start when the cap is much thicker than 4 cm or uses ultra-fine sand that compacts into an airless sheet; stick to the thickness rules above and a mid-grain sand like pool filter sand.
How thick should the sand cap be over aquasoil?
Two to four centimetres. Two centimetres is the minimum that reliably hides dark soil granules for a clean look; beyond four, roots take longer to reach the nutrient layer and the inert zone can go anaerobic. In planting zones lean toward the thin end so roots reach soil fast; in open foreground areas you can run closer to four for appearance.
Will sand sink into the aquasoil and mix over time?
Some migration is inevitable — fine particles work downward through gaps between soil granules, and uprooting drags soil upward. But a well-built cap with matched grain sizes stays visually distinct for a year or more. Rinse sand thoroughly to remove fines, backfill holes immediately when you uproot plants, and refresh the surface centimetre of sand once a year.
Do I need to rinse the sand before capping?
Yes, always. Rinse every sand in a bucket in small batches until the runoff is clear — typically five to ten rinses for pool filter sand, more for play sand. Unrinsed fines cloud the tank on filling and compact the cap over time. It is tedious, but it is the single highest-leverage prep step in this whole technique.
Can I cap an existing aquasoil tank, or only new setups?
You can cap an existing tank: drain most of the water, add rinsed sand gently over the soil with a cup or plate to avoid craters, then refill slowly. Expect some clouding and a short settling period. Disturb the old soil as little as possible, since mature aquasoil breaks down into dust easily — which is why bagging aquasoil in mesh bags pairs so well with capping when reworking older tanks.
Does capping affect aquasoil's buffering and ammonia leaching?
It softens the initial phase without removing the benefits. The cap slows ammonia release into the water column, so the first weeks tend to run cleaner with less algae pressure, while the soil below still buffers pH and KH as designed. Run the standard cycling water changes during the first month anyway — the cap reduces the spike, it doesn't replace the cycle.
A Layered Bed That Stays Layered
Capping aquasoil with sand is a compromise in the best sense: the plants get a premium nutrient bed, your wallet gets a break, and your eyes get the substrate the scape actually wants. The whole technique rests on three habits — rinse the sand, keep each layer at its thickness, and disturb as little as possible after setup. Do those, and the boundary between dark soil and pale sand will still be crisp when you're trimming the first carpet. For more on the base your cap sits on, the UKAPS Guide to Substrates is a thorough reference on how different substrate products behave, including which ones are designed to be capped.
Tissue-culture plants are the exception — they’re grown in sterile gel and adapt with minimal melting, which is part of what you’re paying for. Plants bought submersed from another hobbyist’s tank also transition with little melt, since they’re already in the right form.
Which Plants Melt Most (and Least)
Heavy melters (expect significant leaf loss)
- Cryptocorynes — infamous for “crypt melt,” sometimes dropping every leaf after any disturbance. They almost always recover from the roots within weeks.
- Stem plants grown emersed — rotala, ludwigia, and hygrophila often shed lower emersed leaves while the growing tips transition.
- Amazon swords — emersed-grown swords typically lose their broad oval aerial leaves and replace them with longer submersed ribbon leaves.
Light melters
- Anubias, java fern, bucephalandra — slow-growing rhizome plants transition gradually; occasional old-leaf melt but rarely dramatic.
- Vallisneria — usually transitions well, though it dislikes the move itself and may sulk for a week.
- Floating plants — minimal melt since their leaves were already at the air-water interface.
The Acclimation Protocol
Step 1: Quarantine or dip first
Before acclimating to your tank’s conditions, make sure you’re not acclimating pests along with the plant. Run new arrivals through our quarantine and dip protocol — it adds days upfront but prevents months of regret.
Step 2: Float to temperature-match (30 minutes)
Float the bag or container in your tank for 20–30 minutes to equalize temperature. Plants are less temperature-sensitive than fish, but a 10°F shock on top of transplant stress is an avoidable insult.
Step 3: Trim before planting
Remove any leaves that are already damaged, yellowing, or heavily algae-covered — they won’t recover and they’ll rot in your tank, feeding algae. For stem plants, trim off the bottom inch and any emersed leaves that look unlikely to adapt; the plant wastes energy maintaining leaves it’s going to shed anyway. Keep the healthy growing tips — that’s where recovery starts.
Step 4: Plant correctly the first time
Follow our planting guide — right depth, crown exposed on rosettes, rhizomes unburied on epiphytes. Every uprooting and replanting restarts the acclimation clock, so get placement right on the first attempt. Decide where each plant goes before it goes in the water.
Step 5: Run a gentle first week
For the first 7 days after planting:
- Moderate light — run your normal photoperiod but consider dropping intensity 20–30% if your light is dimmable. Blast-level light on a melting plant grows algae on the dying leaves, not recovery.
- Stable CO2 — if you inject CO2, keep it consistent. Fluctuating CO2 during acclimation is a melt accelerator. If you’re low-tech, this doesn’t apply — see growing without CO2.
- Half-strength fertilizer — new plants with damaged leaves can’t use full dosing, and the excess feeds algae. Ramp to full strength over 2–3 weeks per our fertilizer schedule.
- No disturbance — don’t move, trim, or “check on” new plants for at least two weeks. Every touch resets root establishment. This is especially critical for crypts.
Step 6: Remove melt, keep the base
As emersed leaves melt, remove the mushy material promptly — decaying leaves release ammonia and grow fungus that can spread to healthy tissue. But never discard the plant while the crown, rhizome, or roots are firm and alive. A crypt that’s lost every leaf but has firm roots is a plant that’s about to recover, not a dead plant. Give it 3–4 weeks before judging.
Telling Normal Melt From Real Problems
Normal transition melt:
- Affects oldest/emersed leaves first, newest growth last
- New submersed leaves emerge even as old ones dissolve
- Roots and crown stay firm and white/green
- Timeline: 1–4 weeks, then obvious new growth
Concerning melt (see our full melting diagnosis guide):
- New growth also melts or emerges deformed
- Rhizome or crown turns mushy and brown — this is rot, not transition
- Entire plant dissolves within days with no new growth after 4+ weeks
- Melting spreads to established plants that weren’t recently moved
Buying Tips to Minimize Melt
- Buy submersed-grown when available — hobbyist-grown cuttings transition with almost no melt.
- Choose tissue culture for sensitive species — crypts and delicate stems establish far more reliably from sterile cups.
- Avoid plants already melting in the store tank — some melt is normal, but a plant that’s mostly mush at purchase has less energy for recovery.
- Transport carefully — keep plants damp and out of direct sun/heat. A plant that dries out or cooks in a hot car melts far worse than one transported properly.
The First-Month Timeline: What to Expect Week by Week
Knowing what’s normal when removes most acclimation anxiety. Here’s the typical timeline for a healthy plant adapting to a new tank:
Week 1: The quiet week
Almost nothing visible happens. The plant is growing roots you can’t see and assessing its new environment. Some species (vallisneria, stem plants) may start shedding their lowest leaves. This is normal. Resist the urge to “help” — no moving, no extra fertilizer, no light changes. The most common beginner mistake is intervening during a week when the correct action is nothing.
Week 2: Melt peaks
This is when emersed leaves give up in earnest. Crypts may drop everything; swords shed their broad aerial leaves; stem plants lose lower foliage. It looks catastrophic and it’s usually fine. Keep removing mushy material, keep conditions stable, and watch the crown and growing tips — if those are firm and green, recovery is already underway.
Week 3: The turn
New submersed-adapted leaves emerge — smaller, thinner, often a slightly different shade of green than the emersed foliage. Stem plant tips start growing visibly; crypts push tiny curled leaves from the crown; swords unfurl narrow ribbon leaves. This is the moment most beginners exhale for the first time.
Week 4+: Established
New growth outpaces melt, and the plant is functionally yours. You can resume full-strength fertilizer, normal trimming, and stop treating it as fragile. Some slow growers (anubias, bucephalandra) take 6–8 weeks to show obvious progress — that’s their normal speed, not a problem.
Acclimating Different Plant Formats
Tissue-culture cups
Sterile, pest-free, and already adapted to high-humidity (not emersed) growth — tissue cultures melt the least of any format. Rinse the agar gel off gently (leftover gel rots and feeds fungus), split the portion into small plantlets, and plant per our planting guide. They establish slowly for the first two weeks, then accelerate. No dip needed, minimal acclimation stress — this is the premium experience you’re paying for.
Potted plants
Remove the pot and strip away the rockwool completely — leftover rockwool traps debris and rots. Tease the root mass apart gently; if it’s a dense mat, splitting it into 2–3 smaller portions actually establishes faster than planting one big clump (more growing points, better water flow around roots). Potted plants are usually emersed-grown, so expect the standard 2–4 week melt cycle.
Bare-root / bunched stems
Typically sold as weighted bunches. Remove any bands, foam, or weights, strip the lower leaves, and plant stems individually or in small groups. Bunched stems from the store are often already transitioning — check for new submersed growth at the tips, which tells you the plant is mid-adaptation and will settle quickly.
Hobbyist cuttings
Already submersed-grown and the fastest to establish — often showing new growth within days. The main acclimation factor is water-parameter difference between the two tanks. Float to temperature-match, plant promptly, and they’ll usually take off with minimal melt. This is why experienced hobbyists prefer trading cuttings over buying potted plants.
Frequently Asked Questions
Should I use a “plant starter” or transplant fertilizer?
Products marketed for transplant shock are mostly B-vitamins and mild hormones. They don’t hurt, but there’s no strong evidence they help aquarium plants specifically. Stable conditions and patience outperform any bottle. Save the money for more plants.
My new plant melted completely — bare crown, no leaves. Is it dead?
Probably not, if the crown or rhizome is firm. Crypts and swords routinely lose 100% of their leaves and regrow from the base within a month. The test is firmness: firm and pale/green means alive; mushy and brown/black means rot. Give firm-but-leafless plants a full 4 weeks before declaring them dead.
Can I speed up acclimation with extra light or CO2?
No — and trying usually backfires. A melting plant can’t use extra light; the excess just grows algae on its dying leaves. Keep light moderate and CO2 stable (not boosted) during acclimation. Growth speed comes from the plant’s own adaptation timeline, which you can’t rush, only avoid delaying.
Should new plants go straight into my main display tank?
After quarantine/dipping, yes — there’s no benefit to a separate “growing-in” tank for most plants. They acclimate to your water fastest in the tank they’ll live in. The exception is very delicate species going into a tank with boisterous fish; give those a few weeks in a calm corner or breeder box first.
The Patience Rule
The single most important acclimation skill is restraint: plant it right, set gentle conditions, remove decay, and then leave it alone for a month. The hobbyists with the best plant growth aren’t doing something clever in week one — they’re simply not interfering in weeks two through four while the plants do what they’ve evolved to do. Melt looks like failure and feels like failure, but in most cases it’s the visible part of a plant successfully becoming yours.