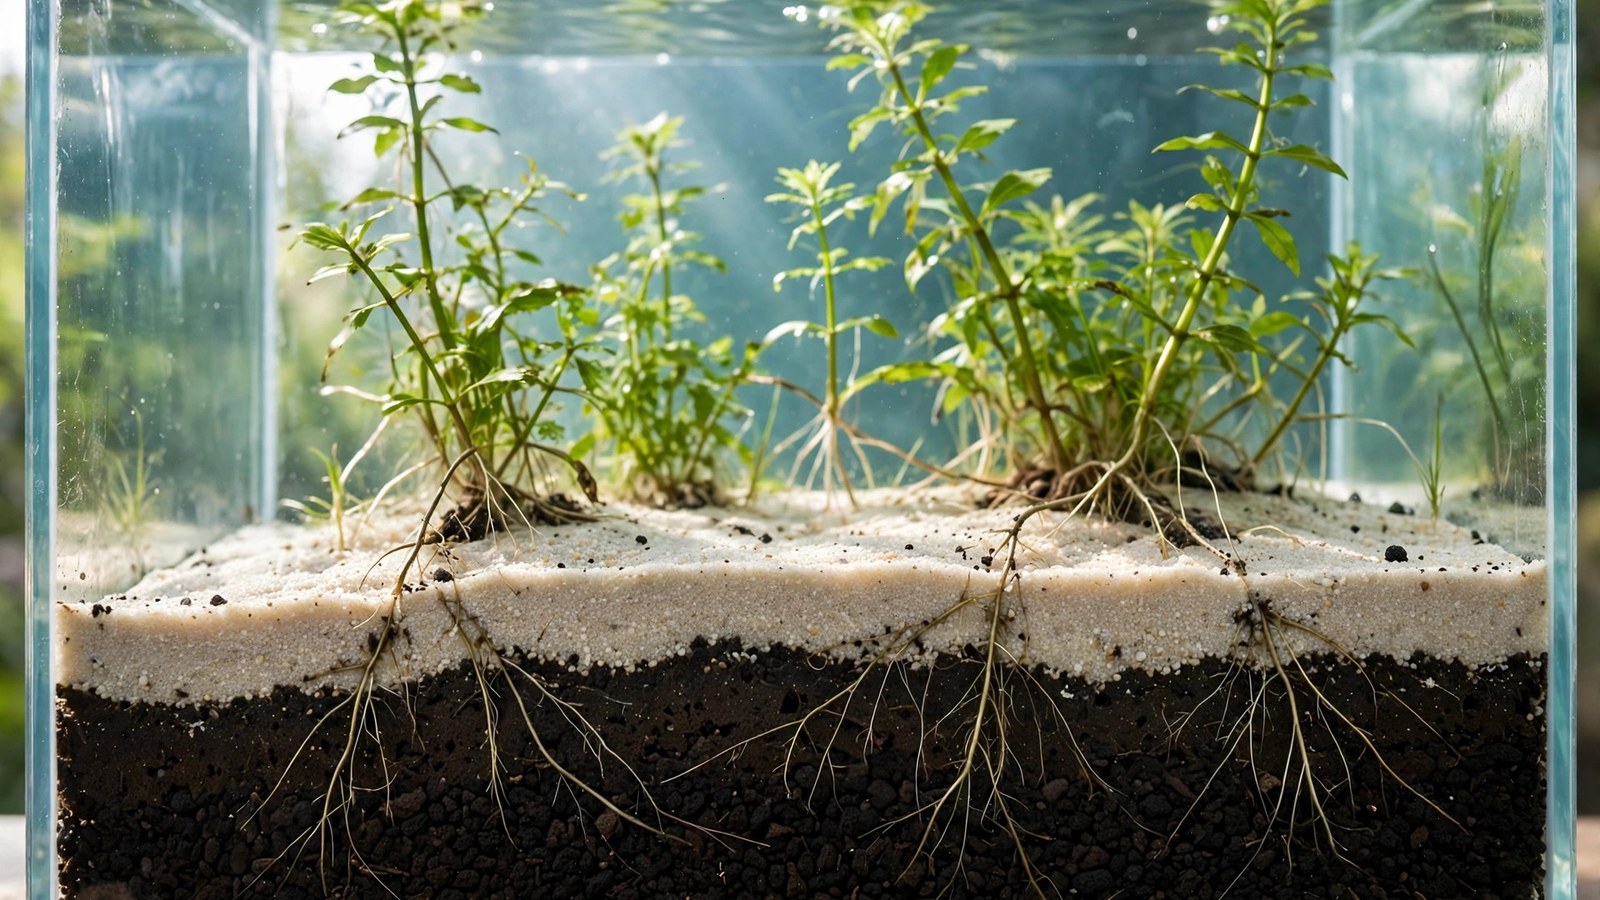
Look at enough aquascaping photos and a pattern starts to emerge: pale sand swept across the foreground, dark aquasoil behind it, lush stems rising from the contrast. If you are setting up a new tank and wondering whether a sand cap aquasoil setup is something you need — or whether bare aquasoil alone will serve you better — you are asking the right question at the right time. Capping is not a requirement of aquasoil, and it is not automatically an upgrade. It is a trade-off: a gain in looks and livestock comfort against a cost in root access and maintenance. This guide helps you decide which side your tank should land on, based on your plants, livestock, tech level, and how you actually run a tank.
What a Sand Cap Over Aquasoil Actually Is
A cap is a 2–3 cm layer of inert sand laid over a nutrient-rich aquasoil base, so the soil feeds plants from below while the sand forms the visible surface. The idea comes from the old dirted-tank tradition — but modern aquasoil is engineered to work perfectly well exposed, so today capping is a stylistic and practical choice, not a necessity. The build process itself is covered in our step-by-step guide to capping aquarium soil with sand without mixing the layers; this guide is about whether you should.
What matters for the decision is what the cap changes: a barrier between roots and soil nutrients, a soft foraging surface for bottom dwellers, different vacuuming and replanting habits, and slow blending of the layers over a year or two of maintenance. Whether those changes help or hurt depends on what you are growing and keeping.
Sand Cap Aquasoil or Bare Aquasoil: The Honest Trade-Offs
Here is the decision in one view. Neither column is "better" — each wins on different factors, and your tank's priorities decide which matters more.
| Factor | Capped (Sand Over Aquasoil) | Bare Aquasoil |
|---|---|---|
| Nutrient access | Reduced at first — roots must push through 2–3 cm of inert sand before reaching the soil | Direct — roots contact nutrients immediately after planting |
| Aesthetics | Pale foreground contrast, beach-style negative space, striking against dark soil hills | Dark, uniform, natural planted look; nothing to maintain visually |
| Bottom-dweller comfort | Excellent — fine sand is gentle on barbels and ideal for sifting species | Good with rounded granules, but some species clearly prefer sand |
| Maintenance | Skim-vacuum only, stir open areas to prevent compaction, top up sand yearly as it thins | Vacuum normally, replant freely, no layer boundary to protect |
| Longevity | Soil exhausts on the same schedule, but root tabs are fussier to push through the cap; layers visibly blend over 1–2 years | Uniform bed stays consistent; root tabs drop in easily for years of extended life |
| Ammonia handling at startup | Slightly slower nutrient diffusion into the water column — a modest effect, not a shortcut | Faster initial release; cycling discipline matters either way |
| Replanting and rescaping | Each replant mixes sand and soil at the planting hole; frequent rescapes degrade the boundary fast | Replant freely; the bed resets without a visible penalty |
Decision Factor 1: Your Plant Selection
This is the factor that should carry the most weight, because the cap's biggest real cost falls on plants.
Heavy root feeders lean toward bare aquasoil
Amazon swords, cryptocorynes, vallisneria, and demanding carpets feed primarily through their roots and establish fastest with direct soil contact. A cap does not starve them — roots will cross 2–3 cm of sand — but it slows initial establishment. If your tank is built around a lush sword centerpiece or a demanding carpet, bare soil gives plants the shortest path to nutrients. See our roundup of the best aquasoils for planted tanks for soils that suit demanding species.
Water-column feeders barely care about the cap
Anubias, Java fern, bucephalandra, mosses, and floating plants pull nutrients from the water, not the bed — for them the cap is irrelevant to growth and purely an aesthetic choice. Stem plants sit in the middle: they root and feed from both, and cross a thin cap easily enough that the difference is marginal. So if your scape is mostly epiphytes and stems with a sand foreground in mind, cap freely. If it is a root-feeder showcase, think twice.
Decision Factor 2: Your Livestock
Corydoras, loaches, and sand-sifters are the strongest case for capping
This is the one scenario where a cap is close to a clear win. Corydoras catfish, kuhli loaches, and similar bottom dwellers evolved to sift soft substrate, and fine sand is kinder to their barbels than any granular soil. A cap gives them that foraging surface while the aquasoil beneath keeps plants fed — genuinely the best of both. If your stocking plan revolves around a corydoras colony, the cap earns its keep on livestock welfare alone. Our guide to the best sands for planted aquariums covers which sand types stay soft and resist compaction.
Shrimp-first and breeding tanks usually skip the cap
Shrimp keepers — especially breeders — tend to prefer bare aquasoil. Buffering works identically either way, but a uniform bed is simpler to manage when optimizing parameters for sensitive species, and baby shrimp graze biofilm directly on the soil granules. A single-substrate bed is also easier to keep clean without disturbing layers. If shrimp breeding is the tank's main purpose, the cap adds maintenance complexity with little payoff.
Decision Factor 3: Tech Level and Fertilization Style
High-tech, plant-first tanks usually go bare
CO2 injection, high light, and demanding species is the context where every bit of growth rate matters — bare aquasoil gives roots unimpeded access while making frequent replanting painless. High-tech tanks also get rescaped often, which is exactly the habit that destroys a cap boundary fastest. If maximum plant performance is the goal, the cap works against you.
Low-tech and low-maintenance tanks can cap happily
In a low-tech setup with easy plants, growth is slow and replanting is rare — so the cap's two main costs (slower establishment, boundary degradation) barely register, and the boundary stays crisp for a year or more. One honest caveat: capping does not meaningfully reduce the cycling burden. Fresh aquasoil still leaches ammonia underneath the sand, so follow a proper startup routine either way — see our guide on how to cycle a tank with aquasoil.
Fertilization style matters less than you think
Whether you dose the water column, use root tabs, or run lean, both setups work — with one practical difference. Once the aquasoil's built-in nutrients run down after a year or two, root tabs become the standard recharge method, and pushing tabs through a sand cap is fussier and disturbs the layers each time. Bare soil accepts tabs with a quick push of the finger. If you plan to run the tank for many years on tab recharges, that small recurring annoyance is worth weighing.
Decision Factor 4: How Often You Rescape
Be honest with yourself here, because this factor quietly decides many caps' fates. If you rearrange plants every few months, a cap will punish you: every uprooted stem pulls soil up through the sand and drags sand down into the soil, and after a few rounds the crisp boundary becomes a mottled blend. Frequent rescaper? Go bare. Plant-once-and-let-it-grow? The cap stays handsome for a long time. For a broader look at how different base substrates age under real use, our comparison of aquarium soil vs gravel covers longevity from another angle.
Who Should Cap — and Who Should Skip
Cap if: your stocking centers on corydoras or other sand-sifting bottom dwellers; you want a pale foreground with dark planted background zones for visual contrast; you run a low-tech tank you will plant once and leave alone; or you are building contoured slopes where the extra surface friction helps hold the shape.
Skip the cap if: maximum plant growth is the priority (high-tech, CO2, demanding carpets); you rescape or replant frequently; you run a shrimp breeding operation; you want the lowest-maintenance substrate possible; or your scape is a minimalist Iwagumi-style layout where a single uniform substrate looks cleaner. Aquasoil on its own is a superb, complete substrate — it does not need a cap to function, and plenty of contest-winning scapes run it bare. The cap is a design and livestock choice, nothing more.
Maintenance Differences Worth Knowing
A capped tank asks for a slightly different rhythm. Vacuum by hovering the siphon just above the sand to lift detritus without sucking up sand or dragging soil through — deep vacuuming into the cap defeats the purpose. Once a month, gently rake unplanted sand areas during a water change to prevent compaction; planted zones are self-aerated by roots, so leave those alone. Expect to add a thin top-up of fresh sand every 6–12 months where the cap has thinned or blended. For the full technique, see our guide to cleaning substrate in planted tanks. Bare aquasoil, by contrast, asks for almost nothing special: vacuum normally, replant freely, and drop in root tabs when the soil's nutrients eventually fade.
If You Decide to Cap: The Short Version
So you have weighed the factors and the cap wins for your tank. The essentials: 3–5 cm of aquasoil underneath, 2–3 cm of sand on top — never 5 cm or more, which invites compaction and anaerobic pockets — planted through the cap into the soil, filled slowly over a plate so the layers do not blast apart, and cycled normally since the soil still leaches ammonia underneath. Everything else — cap-zone layouts, sand types, boundary techniques, troubleshooting — is in our step-by-step guide to capping aquarium soil with sand, which picks up exactly where this decision guide leaves off.
Frequently Asked Questions
Does a sand cap block nutrients from reaching plant roots?
Not entirely, but it slows things down. Roots must grow through 2–3 cm of inert sand before contacting the aquasoil, so heavy root feeders like swords and crypts establish a little more slowly than they would in bare soil. Healthy plants cross the barrier without trouble, and water-column feeders like anubias and Java fern are unaffected. The practical takeaway: a thin cap is a mild handicap for root feeders, not a wall — but if maximum growth speed matters to you, that handicap is real.
I already have bare aquasoil running — is converting to a capped setup worth it?
It depends on your motivation. If you are adding corydoras or want a pale foreground for aesthetic reasons, converting is straightforward: drain the tank halfway, add 2–3 cm of rinsed sand over the soil, smooth it, and refill slowly. Expect a brief ammonia bump from disturbing the bed, so test water for a few days. If your tank is already thriving and you just like the look in photos, the disruption and ongoing maintenance may not be worth it.
Will the sand cap eventually mix into the aquasoil?
Yes, gradually. Sand works its way down between soil granules while lighter soil pieces migrate upward during replanting and maintenance, so the crisp boundary becomes a blended transition zone over 1–2 years. Foreground-only caps in lightly replanted tanks stay sharp longest; full-tank caps in heavily replanted tanks blend fastest. Annual thin top-ups of fresh sand keep the look crisp indefinitely if you are willing to do them.
Does capping change how aquasoil buffers pH?
No, buffering works the same either way. Aquasoil lowers pH and KH through ion exchange, and water circulates through a sand cap freely enough that the chemistry is unaffected — your pH and KH behave exactly as they would with bare aquasoil. This also means a cap offers no protection against the buffering capacity wearing out over time; the soil's active lifespan of roughly 1–2 years is unchanged. Choose or skip the cap for looks and livestock, not water chemistry.
Which setup lasts longer before the aquasoil is exhausted?
The soil itself exhausts on the same schedule either way — typically 1–2 years of strong nutrient output depending on the brand and plant load. The difference is what comes after: bare aquasoil accepts root-tab recharges easily for years of extended life, while a cap makes tab placement fussier and disturbs the layers each time. Over a five-year horizon, the bare setup is simpler and cheaper to keep productive.
Do I still need root tabs with a capped aquasoil tank?
Not at first — fresh aquasoil is nutrient-rich on its own, capped or not. Root tabs enter the picture once the soil's built-in nutrients fade after roughly 1–2 years. At that point they become the main way to keep heavy root feeders thriving, and this is where the cap costs you convenience: you must push each tab through the sand into the soil below without churning the layers. Plan for that extra fuss if you intend to keep the tank long-term.
The Bottom Line
A sand cap over aquasoil is a legitimate, well-understood technique — but it answers specific needs, not a default step. If bottom-dwelling livestock or a pale-foreground design is central to your vision, cap with confidence and keep it thin. If plant performance, frequent rescaping, or low maintenance tops your list, bare aquasoil serves you better and asks less. Either way, you are not compromising on fundamentals: aquasoil grows superb plants capped or bare. Choose the setup that fits the tank you actually want to run.
Tissue-culture plants are the exception — they’re grown in sterile gel and adapt with minimal melting, which is part of what you’re paying for. Plants bought submersed from another hobbyist’s tank also transition with little melt, since they’re already in the right form.
Which Plants Melt Most (and Least)
Heavy melters (expect significant leaf loss)
- Cryptocorynes — infamous for “crypt melt,” sometimes dropping every leaf after any disturbance. They almost always recover from the roots within weeks.
- Stem plants grown emersed — rotala, ludwigia, and hygrophila often shed lower emersed leaves while the growing tips transition.
- Amazon swords — emersed-grown swords typically lose their broad oval aerial leaves and replace them with longer submersed ribbon leaves.
Light melters
- Anubias, java fern, bucephalandra — slow-growing rhizome plants transition gradually; occasional old-leaf melt but rarely dramatic.
- Vallisneria — usually transitions well, though it dislikes the move itself and may sulk for a week.
- Floating plants — minimal melt since their leaves were already at the air-water interface.
The Acclimation Protocol
Step 1: Quarantine or dip first
Before acclimating to your tank’s conditions, make sure you’re not acclimating pests along with the plant. Run new arrivals through our quarantine and dip protocol — it adds days upfront but prevents months of regret.
Step 2: Float to temperature-match (30 minutes)
Float the bag or container in your tank for 20–30 minutes to equalize temperature. Plants are less temperature-sensitive than fish, but a 10°F shock on top of transplant stress is an avoidable insult.
Step 3: Trim before planting
Remove any leaves that are already damaged, yellowing, or heavily algae-covered — they won’t recover and they’ll rot in your tank, feeding algae. For stem plants, trim off the bottom inch and any emersed leaves that look unlikely to adapt; the plant wastes energy maintaining leaves it’s going to shed anyway. Keep the healthy growing tips — that’s where recovery starts.
Step 4: Plant correctly the first time
Follow our planting guide — right depth, crown exposed on rosettes, rhizomes unburied on epiphytes. Every uprooting and replanting restarts the acclimation clock, so get placement right on the first attempt. Decide where each plant goes before it goes in the water.
Step 5: Run a gentle first week
For the first 7 days after planting:
- Moderate light — run your normal photoperiod but consider dropping intensity 20–30% if your light is dimmable. Blast-level light on a melting plant grows algae on the dying leaves, not recovery.
- Stable CO2 — if you inject CO2, keep it consistent. Fluctuating CO2 during acclimation is a melt accelerator. If you’re low-tech, this doesn’t apply — see growing without CO2.
- Half-strength fertilizer — new plants with damaged leaves can’t use full dosing, and the excess feeds algae. Ramp to full strength over 2–3 weeks per our fertilizer schedule.
- No disturbance — don’t move, trim, or “check on” new plants for at least two weeks. Every touch resets root establishment. This is especially critical for crypts.
Step 6: Remove melt, keep the base
As emersed leaves melt, remove the mushy material promptly — decaying leaves release ammonia and grow fungus that can spread to healthy tissue. But never discard the plant while the crown, rhizome, or roots are firm and alive. A crypt that’s lost every leaf but has firm roots is a plant that’s about to recover, not a dead plant. Give it 3–4 weeks before judging.
Telling Normal Melt From Real Problems
Normal transition melt:
- Affects oldest/emersed leaves first, newest growth last
- New submersed leaves emerge even as old ones dissolve
- Roots and crown stay firm and white/green
- Timeline: 1–4 weeks, then obvious new growth
Concerning melt (see our full melting diagnosis guide):
- New growth also melts or emerges deformed
- Rhizome or crown turns mushy and brown — this is rot, not transition
- Entire plant dissolves within days with no new growth after 4+ weeks
- Melting spreads to established plants that weren’t recently moved
Buying Tips to Minimize Melt
- Buy submersed-grown when available — hobbyist-grown cuttings transition with almost no melt.
- Choose tissue culture for sensitive species — crypts and delicate stems establish far more reliably from sterile cups.
- Avoid plants already melting in the store tank — some melt is normal, but a plant that’s mostly mush at purchase has less energy for recovery.
- Transport carefully — keep plants damp and out of direct sun/heat. A plant that dries out or cooks in a hot car melts far worse than one transported properly.
The First-Month Timeline: What to Expect Week by Week
Knowing what’s normal when removes most acclimation anxiety. Here’s the typical timeline for a healthy plant adapting to a new tank:
Week 1: The quiet week
Almost nothing visible happens. The plant is growing roots you can’t see and assessing its new environment. Some species (vallisneria, stem plants) may start shedding their lowest leaves. This is normal. Resist the urge to “help” — no moving, no extra fertilizer, no light changes. The most common beginner mistake is intervening during a week when the correct action is nothing.
Week 2: Melt peaks
This is when emersed leaves give up in earnest. Crypts may drop everything; swords shed their broad aerial leaves; stem plants lose lower foliage. It looks catastrophic and it’s usually fine. Keep removing mushy material, keep conditions stable, and watch the crown and growing tips — if those are firm and green, recovery is already underway.
Week 3: The turn
New submersed-adapted leaves emerge — smaller, thinner, often a slightly different shade of green than the emersed foliage. Stem plant tips start growing visibly; crypts push tiny curled leaves from the crown; swords unfurl narrow ribbon leaves. This is the moment most beginners exhale for the first time.
Week 4+: Established
New growth outpaces melt, and the plant is functionally yours. You can resume full-strength fertilizer, normal trimming, and stop treating it as fragile. Some slow growers (anubias, bucephalandra) take 6–8 weeks to show obvious progress — that’s their normal speed, not a problem.
Acclimating Different Plant Formats
Tissue-culture cups
Sterile, pest-free, and already adapted to high-humidity (not emersed) growth — tissue cultures melt the least of any format. Rinse the agar gel off gently (leftover gel rots and feeds fungus), split the portion into small plantlets, and plant per our planting guide. They establish slowly for the first two weeks, then accelerate. No dip needed, minimal acclimation stress — this is the premium experience you’re paying for.
Potted plants
Remove the pot and strip away the rockwool completely — leftover rockwool traps debris and rots. Tease the root mass apart gently; if it’s a dense mat, splitting it into 2–3 smaller portions actually establishes faster than planting one big clump (more growing points, better water flow around roots). Potted plants are usually emersed-grown, so expect the standard 2–4 week melt cycle.
Bare-root / bunched stems
Typically sold as weighted bunches. Remove any bands, foam, or weights, strip the lower leaves, and plant stems individually or in small groups. Bunched stems from the store are often already transitioning — check for new submersed growth at the tips, which tells you the plant is mid-adaptation and will settle quickly.
Hobbyist cuttings
Already submersed-grown and the fastest to establish — often showing new growth within days. The main acclimation factor is water-parameter difference between the two tanks. Float to temperature-match, plant promptly, and they’ll usually take off with minimal melt. This is why experienced hobbyists prefer trading cuttings over buying potted plants.
Frequently Asked Questions
Should I use a “plant starter” or transplant fertilizer?
Products marketed for transplant shock are mostly B-vitamins and mild hormones. They don’t hurt, but there’s no strong evidence they help aquarium plants specifically. Stable conditions and patience outperform any bottle. Save the money for more plants.
My new plant melted completely — bare crown, no leaves. Is it dead?
Probably not, if the crown or rhizome is firm. Crypts and swords routinely lose 100% of their leaves and regrow from the base within a month. The test is firmness: firm and pale/green means alive; mushy and brown/black means rot. Give firm-but-leafless plants a full 4 weeks before declaring them dead.
Can I speed up acclimation with extra light or CO2?
No — and trying usually backfires. A melting plant can’t use extra light; the excess just grows algae on its dying leaves. Keep light moderate and CO2 stable (not boosted) during acclimation. Growth speed comes from the plant’s own adaptation timeline, which you can’t rush, only avoid delaying.
Should new plants go straight into my main display tank?
After quarantine/dipping, yes — there’s no benefit to a separate “growing-in” tank for most plants. They acclimate to your water fastest in the tank they’ll live in. The exception is very delicate species going into a tank with boisterous fish; give those a few weeks in a calm corner or breeder box first.
The Patience Rule
The single most important acclimation skill is restraint: plant it right, set gentle conditions, remove decay, and then leave it alone for a month. The hobbyists with the best plant growth aren’t doing something clever in week one — they’re simply not interfering in weeks two through four while the plants do what they’ve evolved to do. Melt looks like failure and feels like failure, but in most cases it’s the visible part of a plant successfully becoming yours.