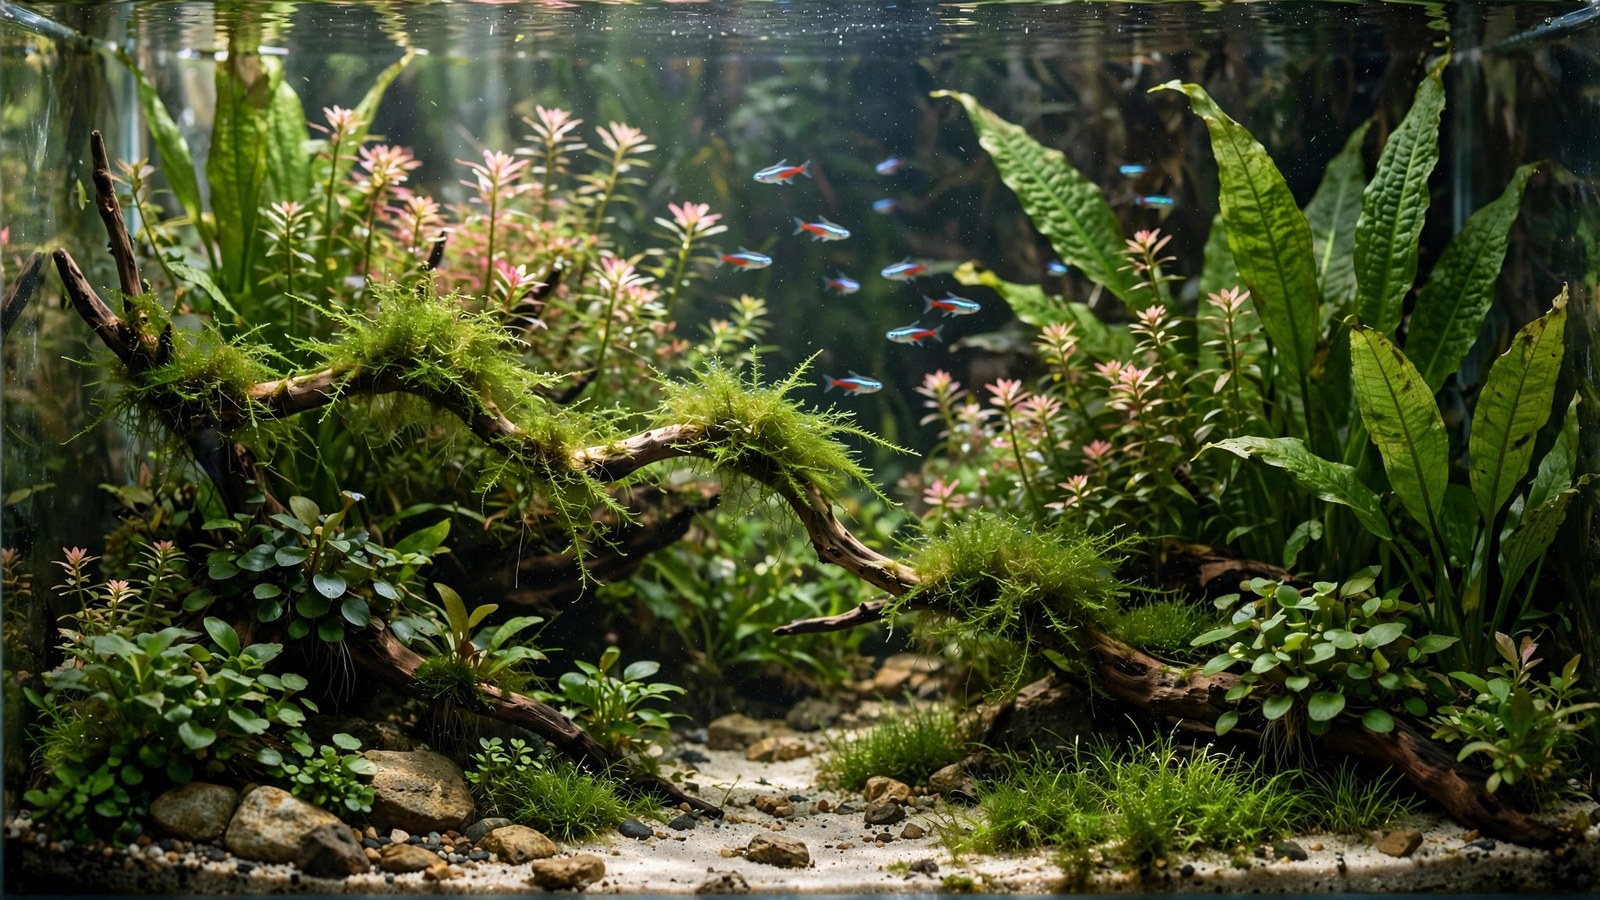
Few sights in the hobby beat a school of neon tetras flashing electric blue and red through dark water and green plants. But neons have a reputation for dying mysteriously in new tanks — a reputation that's almost entirely about setup, not the fish. A planted neon tetra tank done right gives them the dim, soft, stable water they evolved for, and rewards you with a school that schools tightly, colors up brilliantly, and lives for years.
Understanding What Neons Actually Want
Neon tetras come from blackwater tributaries of the Amazon: warm, soft, acidic water stained brown with tannins, dappled light filtering through overhanging forest, and dense marginal vegetation. Every aspect of a good neon tank recreates that: dimmer light, dark substrate, tannin tint, gentle flow, and plants that break up sightlines.
The "mysterious neon deaths" almost always trace to three things: an uncycled or immature tank, hard alkaline water, and bright bare tanks that stress a fish designed for shade. Fix the setup and neons are hardy. Our low-tech planted tank setup guide covers the stable, gentle system neons thrive in.
Tank Size and the School
Neons need horizontal swimming room and a proper school — minimum 10 gallons, minimum 10–12 fish, and more of both is better. A school of 8 in a 10-gallon survives; a school of 20 in a 20-gallon long puts on a show. Small groups in small tanks scatter, hide, and fade; large schools in planted tanks move as one shimmering unit.
Long tanks beat tall tanks for neons. A 20-gallon long gives a school room to stretch out and display; our 20-gallon planted tank setup is the ideal neon platform. Avoid putting neons in brand-new tanks — they're sensitive to immature water chemistry. Let the tank mature 4–6 weeks with plants before the school goes in.
Water Parameters: Soft, Acidic, Stable
| Parameter | Target range |
|---|---|
| Temperature | 72–76°F (22–24°C) |
| pH | 6.0–7.0 |
| GH | 2–8 dGH |
| KH | 1–4 dKH |
| Ammonia / nitrite | 0 ppm |
| Nitrate | Under 20 ppm |
Neons want the opposite of guppies' hard alkaline water — if you keep both, one species is always compromising. Our planted guppy tank setup is the hard-water counterpart to this soft-water build. For the chemistry behind these numbers, see our planted tank water parameters guide.
If your tap water is hard and alkaline, you have options: cut it with RO/distilled water, use active buffering substrate to pull pH down, or add tannin sources (catappa leaves, alder cones, driftwood) that gently acidify. Never chase pH with chemicals — pH-adjusting products cause the swings that kill neons. Stability at pH 7.2 beats a bouncing pH 6.5 every time.
Substrate, Tannins, and the Blackwater Look
Dark substrate is transformative for neons: their blue stripe fluoresces over black sand the way it never does over pale gravel. Use dark sand or fine dark gravel, 1.5–2 inches deep. Active aquasoil works beautifully here since it also softens water — a genuine two-for-one for soft-water species.
Add tannins deliberately. A few catappa (Indian almond) leaves or a bag of alder cones tints the water amber, adds antimicrobial compounds, and makes neons visibly calmer — this is their ancestral water chemistry. The tint fades over weeks; replace leaves monthly. Driftwood both hardscapes and leaches tannins. The result is a tank that looks like a slice of Amazon tributary rather than a swimming pool.
Lighting: Dim Is a Feature
Neons come from dappled forest light and show their best color in dimmer tanks. Run moderate lighting 6–8 hours daily, and let floating plants do the dimming for you — frogbit, salvinia, or red root floaters create the broken, dappled light neons love while absorbing excess nutrients. Our floating plant guide covers the best species.
Bright, shadowless lighting over a bare tank is the classic neon-stress setup: fish pale, scatter, and hide. If your neons look washed out, dim the light before you medicate anything — color often returns within days.
The Neon Plant List
Choose plants that create layers and sightline breaks — neons feel secure weaving through vegetation, not crossing open water:
- Amazon swords — broad leaves give the school landmarks to orient around; a big sword is the classic neon-tank centerpiece.
- Vallisneria — tall ribbons along the back create the vertical curtain neons school in front of.
- Java fern and anubias on driftwood — the tannin-leaching wood doubles as planting surface; broad leaves are perfect midground structure.
- Cryptocoryne wendtii — the definitive soft-water midground plant; bronze and green varieties thrive in exactly the conditions neons want.
- Stem plants (rotala, ludwigia, bacopa) — planted in groups, they form the dense thickets neons retreat into. Trim and replant tops to thicken stands.
- Floating plants — non-negotiable for the dappled-light effect; trailing roots add midwater structure the school weaves through.
- Dwarf sagittaria or micro sword foreground — low carpet-ish coverage that keeps the bottom from looking barren without demanding CO2.
Plant in drifts and groups, not specimen dots — a school needs continuous structure to feel safe. Aim for 60–70% planted from day one; our planting quantity guide helps with amounts.
Filtration and Flow: Gentle Blackwater Current
Amazon tributaries move slowly. Use a sponge filter or a baffled hang-on-back — gentle, diffuse flow that doesn't push the school around. Neons fighting a current all day burn energy and stress; neons drifting in soft flow school tightly and color up.
Cover intakes with pre-filter sponges. Adult neons are strong enough to avoid intakes, but a calm tank with sponge-covered intakes is simply safer and grows bonus biofilm. Match the filtration approach in our planted shrimp tank setup — what's safe for shrimplets is luxurious for neons.
Tankmates: Peaceful and Small
Neons do best with tankmates that share soft, acidic water and won't eat or harass them:
- Corydoras (small species) — perfect bottom companions; panda or pygmy corys share water preferences exactly.
- Otocinclus — gentle algae crew that ignores neons completely.
- Cherry shrimp — coexist beautifully; neons may pick off newborn shrimplets but leave adults alone in a planted tank.
- Other small tetras and rasboras — ember tetras, chili rasboras, harlequin rasboras. See our schooling fish for planted tanks guide for the full compatibility picture.
- Honey gourami — a calm centerpiece that shares water preferences and won't threaten neons.
Avoid: angelfish (they eat neons — it's their natural prey), bettas (fin-nipping stress both ways), large gouramis, and anything big enough to fit a neon in its mouth.
Feeding and Daily Behavior
Neons are micro-predators: feed small foods twice daily — quality micro-pellets or crushed flake as the staple, frozen daphnia or baby brine shrimp 2–3 times weekly. Small frequent meals beat one big feeding; their stomachs are tiny. A varied diet is what keeps the red stripe truly red — carotenoids come from food, not water.
Healthy neon behavior in a planted tank: the school moves as a loose unit through the midwater, flashing in unison when light catches them, retreating into plant thickets when startled and re-emerging within seconds. Neons that hide constantly, clamp fins, or isolate from the school are telling you about water quality — test before you treat.
Cycling and Introduction
Plant heavily, cycle the tank, then wait — neons go into mature tanks, not freshly cycled ones. Four to six weeks of plant growth and biofilm development after the cycle completes is the safe window. Our plant-assisted cycling guide speeds the cycle itself, but don't skip the maturation wait.
Add the whole school at once (10–12 minimum) after drip acclimation — introducing neons in dribs and drabs stresses both the newcomers and the residents. Buy from a reputable source; mass-market neons have been weakened by intensive farming, and "neon tetra disease" (a microsporidian infection) is genuinely common in poor stock. Quarantine new fish 2–3 weeks.
Maintenance
- 20–25% weekly water change with temperature-matched, dechlorinated water. In soft-water tanks, keep changes modest — large swaps swing the low KH buffer.
- Trim stems every 2–3 weeks and replant tops to keep thickets dense.
- Thin floaters weekly — they multiply fast and total shade stalls the plants below.
- Replace catappa leaves monthly as they break down; siphon out the skeletons.
- Test GH/KH monthly — active substrate exhausts over 1–2 years; when pH starts creeping up, the soil is spent.
Frequently Asked Questions
Why do my neon tetras keep dying in a new tank?
New tank syndrome, almost always: immature biofiltration, parameter swings, or hard alkaline water the fish can't adapt to. Neons are sensitive to ammonia and nitrite at levels other fish tolerate, and they need stable soft water. Wait until the tank is 4–6 weeks mature, verify zero ammonia/nitrite for a week straight, match their soft-water needs, and losses usually stop.
What is neon tetra disease and can I treat it?
Neon tetra disease (Pleistophora) is a microsporidian parasite causing white patches, spinal curvature, and restlessness — and it has no cure. Remove and euthanize affected fish promptly; it spreads through cannibalism of dead tankmates. The real defense is buying healthy stock and quarantining: most outbreaks trace to already-infected store fish, not anything in your tank.
Can neon tetras live with bettas?
Sometimes, but it's a gamble. In a large (20+ gallon), heavily planted tank with a calm betta, it can work — the plants break sightlines and the space dilutes aggression. In small tanks, bettas harass neons relentlessly and nip fins. Have a backup plan for separating them, and never try it in under 15 gallons.
How long do neon tetras live?
Five to eight years in a good planted tank — far longer than most people expect. The "neons die in months" reputation comes from poor stock and immature tanks. In stable, soft, planted water with a proper school, they're genuinely long-lived fish.
Do neon tetras need a heater?
Yes, in most homes. They want a steady 72–76°F; room-temperature tanks that dip into the 60s at night suppress their immune systems and invite disease. Cooler than many tropicals prefer, but still heated — an adjustable heater set to 74°F is ideal.
Why did my neons lose their color?
Neons pale for three reasons: stress (new tank, bullies, bright light), poor diet (no carotenoids), or illness. They also have a daily rhythm — colors dim at night and flare at "dawn," which is normal. If the whole school is persistently washed out during the day, check water parameters and lighting before anything else.
The Neon Tank Done Right
A planted neon tank is an exercise in restraint: dim the light, darken the substrate, soften the water, plant in drifts, and let the school be the star. Do that, and the fish repay you with one of the most beautiful sights in freshwater — twenty neons turning in unison through green water, flashing blue fire with every turn. It's worth every week of patient maturation.
For the wild-habitat data behind these water parameters, see SeriouslyFish’s neon tetra species profile.
Tissue-culture plants are the exception — they’re grown in sterile gel and adapt with minimal melting, which is part of what you’re paying for. Plants bought submersed from another hobbyist’s tank also transition with little melt, since they’re already in the right form.
Which Plants Melt Most (and Least)
Heavy melters (expect significant leaf loss)
- Cryptocorynes — infamous for “crypt melt,” sometimes dropping every leaf after any disturbance. They almost always recover from the roots within weeks.
- Stem plants grown emersed — rotala, ludwigia, and hygrophila often shed lower emersed leaves while the growing tips transition.
- Amazon swords — emersed-grown swords typically lose their broad oval aerial leaves and replace them with longer submersed ribbon leaves.
Light melters
- Anubias, java fern, bucephalandra — slow-growing rhizome plants transition gradually; occasional old-leaf melt but rarely dramatic.
- Vallisneria — usually transitions well, though it dislikes the move itself and may sulk for a week.
- Floating plants — minimal melt since their leaves were already at the air-water interface.
The Acclimation Protocol
Step 1: Quarantine or dip first
Before acclimating to your tank’s conditions, make sure you’re not acclimating pests along with the plant. Run new arrivals through our quarantine and dip protocol — it adds days upfront but prevents months of regret.
Step 2: Float to temperature-match (30 minutes)
Float the bag or container in your tank for 20–30 minutes to equalize temperature. Plants are less temperature-sensitive than fish, but a 10°F shock on top of transplant stress is an avoidable insult.
Step 3: Trim before planting
Remove any leaves that are already damaged, yellowing, or heavily algae-covered — they won’t recover and they’ll rot in your tank, feeding algae. For stem plants, trim off the bottom inch and any emersed leaves that look unlikely to adapt; the plant wastes energy maintaining leaves it’s going to shed anyway. Keep the healthy growing tips — that’s where recovery starts.
Step 4: Plant correctly the first time
Follow our planting guide — right depth, crown exposed on rosettes, rhizomes unburied on epiphytes. Every uprooting and replanting restarts the acclimation clock, so get placement right on the first attempt. Decide where each plant goes before it goes in the water.
Step 5: Run a gentle first week
For the first 7 days after planting:
- Moderate light — run your normal photoperiod but consider dropping intensity 20–30% if your light is dimmable. Blast-level light on a melting plant grows algae on the dying leaves, not recovery.
- Stable CO2 — if you inject CO2, keep it consistent. Fluctuating CO2 during acclimation is a melt accelerator. If you’re low-tech, this doesn’t apply — see growing without CO2.
- Half-strength fertilizer — new plants with damaged leaves can’t use full dosing, and the excess feeds algae. Ramp to full strength over 2–3 weeks per our fertilizer schedule.
- No disturbance — don’t move, trim, or “check on” new plants for at least two weeks. Every touch resets root establishment. This is especially critical for crypts.
Step 6: Remove melt, keep the base
As emersed leaves melt, remove the mushy material promptly — decaying leaves release ammonia and grow fungus that can spread to healthy tissue. But never discard the plant while the crown, rhizome, or roots are firm and alive. A crypt that’s lost every leaf but has firm roots is a plant that’s about to recover, not a dead plant. Give it 3–4 weeks before judging.
Telling Normal Melt From Real Problems
Normal transition melt:
- Affects oldest/emersed leaves first, newest growth last
- New submersed leaves emerge even as old ones dissolve
- Roots and crown stay firm and white/green
- Timeline: 1–4 weeks, then obvious new growth
Concerning melt (see our full melting diagnosis guide):
- New growth also melts or emerges deformed
- Rhizome or crown turns mushy and brown — this is rot, not transition
- Entire plant dissolves within days with no new growth after 4+ weeks
- Melting spreads to established plants that weren’t recently moved
Buying Tips to Minimize Melt
- Buy submersed-grown when available — hobbyist-grown cuttings transition with almost no melt.
- Choose tissue culture for sensitive species — crypts and delicate stems establish far more reliably from sterile cups.
- Avoid plants already melting in the store tank — some melt is normal, but a plant that’s mostly mush at purchase has less energy for recovery.
- Transport carefully — keep plants damp and out of direct sun/heat. A plant that dries out or cooks in a hot car melts far worse than one transported properly.
The First-Month Timeline: What to Expect Week by Week
Knowing what’s normal when removes most acclimation anxiety. Here’s the typical timeline for a healthy plant adapting to a new tank:
Week 1: The quiet week
Almost nothing visible happens. The plant is growing roots you can’t see and assessing its new environment. Some species (vallisneria, stem plants) may start shedding their lowest leaves. This is normal. Resist the urge to “help” — no moving, no extra fertilizer, no light changes. The most common beginner mistake is intervening during a week when the correct action is nothing.
Week 2: Melt peaks
This is when emersed leaves give up in earnest. Crypts may drop everything; swords shed their broad aerial leaves; stem plants lose lower foliage. It looks catastrophic and it’s usually fine. Keep removing mushy material, keep conditions stable, and watch the crown and growing tips — if those are firm and green, recovery is already underway.
Week 3: The turn
New submersed-adapted leaves emerge — smaller, thinner, often a slightly different shade of green than the emersed foliage. Stem plant tips start growing visibly; crypts push tiny curled leaves from the crown; swords unfurl narrow ribbon leaves. This is the moment most beginners exhale for the first time.
Week 4+: Established
New growth outpaces melt, and the plant is functionally yours. You can resume full-strength fertilizer, normal trimming, and stop treating it as fragile. Some slow growers (anubias, bucephalandra) take 6–8 weeks to show obvious progress — that’s their normal speed, not a problem.
Acclimating Different Plant Formats
Tissue-culture cups
Sterile, pest-free, and already adapted to high-humidity (not emersed) growth — tissue cultures melt the least of any format. Rinse the agar gel off gently (leftover gel rots and feeds fungus), split the portion into small plantlets, and plant per our planting guide. They establish slowly for the first two weeks, then accelerate. No dip needed, minimal acclimation stress — this is the premium experience you’re paying for.
Potted plants
Remove the pot and strip away the rockwool completely — leftover rockwool traps debris and rots. Tease the root mass apart gently; if it’s a dense mat, splitting it into 2–3 smaller portions actually establishes faster than planting one big clump (more growing points, better water flow around roots). Potted plants are usually emersed-grown, so expect the standard 2–4 week melt cycle.
Bare-root / bunched stems
Typically sold as weighted bunches. Remove any bands, foam, or weights, strip the lower leaves, and plant stems individually or in small groups. Bunched stems from the store are often already transitioning — check for new submersed growth at the tips, which tells you the plant is mid-adaptation and will settle quickly.
Hobbyist cuttings
Already submersed-grown and the fastest to establish — often showing new growth within days. The main acclimation factor is water-parameter difference between the two tanks. Float to temperature-match, plant promptly, and they’ll usually take off with minimal melt. This is why experienced hobbyists prefer trading cuttings over buying potted plants.
Frequently Asked Questions
Should I use a “plant starter” or transplant fertilizer?
Products marketed for transplant shock are mostly B-vitamins and mild hormones. They don’t hurt, but there’s no strong evidence they help aquarium plants specifically. Stable conditions and patience outperform any bottle. Save the money for more plants.
My new plant melted completely — bare crown, no leaves. Is it dead?
Probably not, if the crown or rhizome is firm. Crypts and swords routinely lose 100% of their leaves and regrow from the base within a month. The test is firmness: firm and pale/green means alive; mushy and brown/black means rot. Give firm-but-leafless plants a full 4 weeks before declaring them dead.
Can I speed up acclimation with extra light or CO2?
No — and trying usually backfires. A melting plant can’t use extra light; the excess just grows algae on its dying leaves. Keep light moderate and CO2 stable (not boosted) during acclimation. Growth speed comes from the plant’s own adaptation timeline, which you can’t rush, only avoid delaying.
Should new plants go straight into my main display tank?
After quarantine/dipping, yes — there’s no benefit to a separate “growing-in” tank for most plants. They acclimate to your water fastest in the tank they’ll live in. The exception is very delicate species going into a tank with boisterous fish; give those a few weeks in a calm corner or breeder box first.
The Patience Rule
The single most important acclimation skill is restraint: plant it right, set gentle conditions, remove decay, and then leave it alone for a month. The hobbyists with the best plant growth aren’t doing something clever in week one — they’re simply not interfering in weeks two through four while the plants do what they’ve evolved to do. Melt looks like failure and feels like failure, but in most cases it’s the visible part of a plant successfully becoming yours.