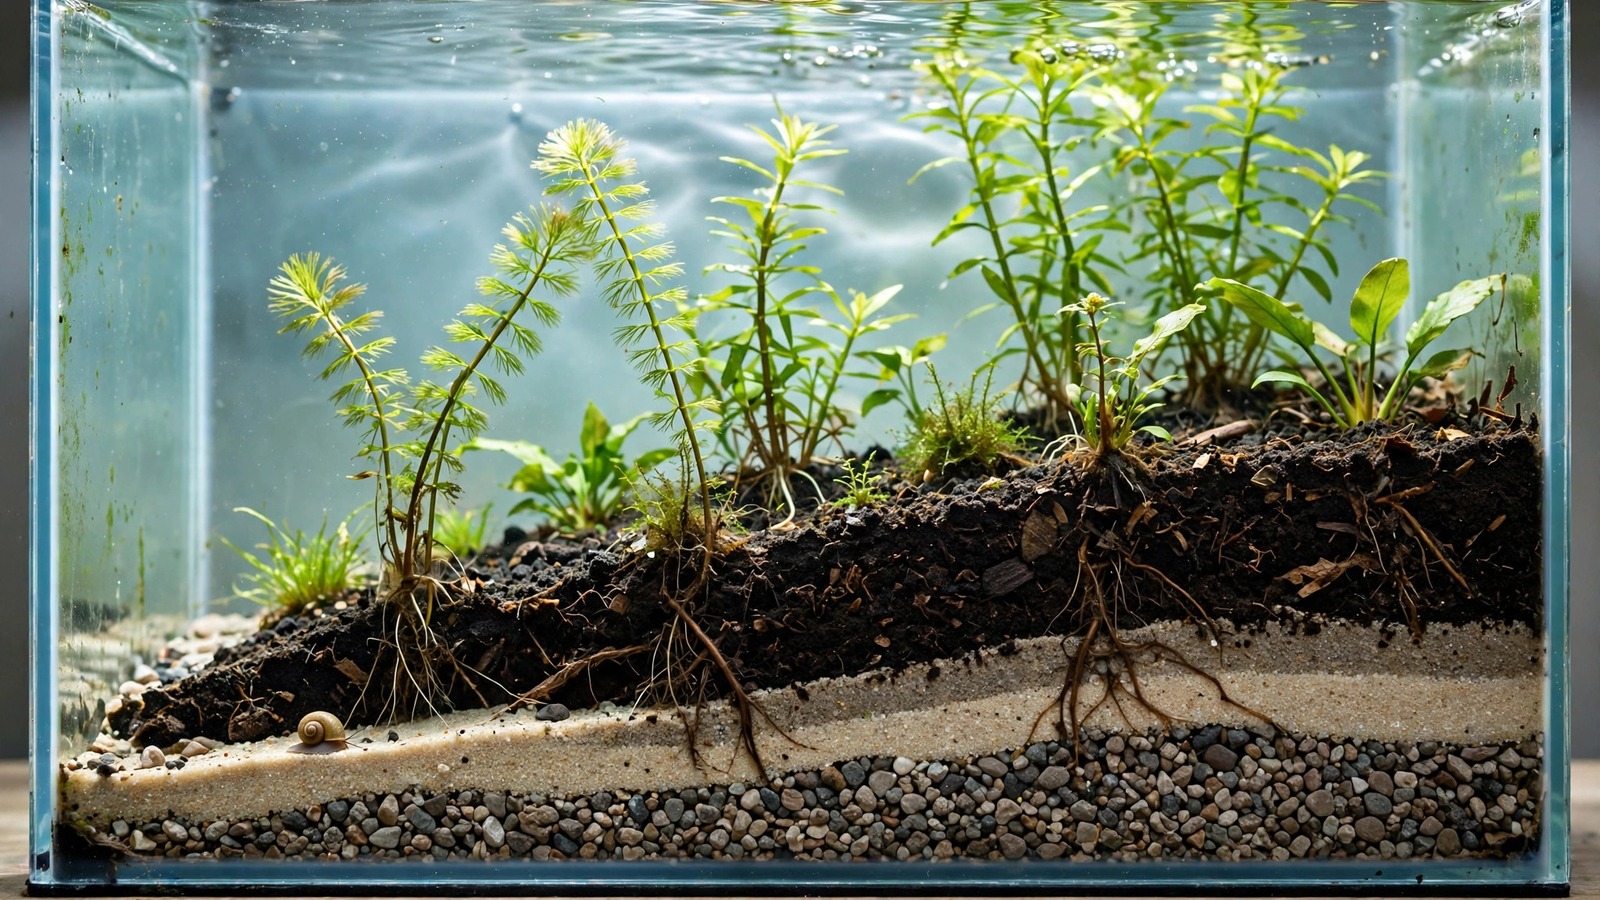
If you have spent any time watching planted-tank build videos, you have seen the shot: someone pours substrate into an empty aquarium until the bed is shockingly deep — four, six, even eight inches of layered soil, sand, and gravel before a single plant goes in. That is the deep substrate aquarium method in action, a low-tech approach to planted tanks that treats the substrate bed itself as the engine of the ecosystem. Instead of thin gravel and heavy water-column fertilizing, the deep substrate method builds a thick, biologically active layer that feeds plant roots, hosts denitrifying bacteria, and buffers the whole tank. This guide explains how it works, how to set it up safely, and where the real risks (and myths) lie.
What Is the Deep Substrate Aquarium Method?
The deep substrate method is a natural-style planted tank setup in which the substrate is built to a depth of roughly 10–20 cm (4–8 inches), usually in layers: a nutrient-rich base under a coarse or fine cap. The idea is simple but powerful. In a shallow bed, waste accumulates on the surface and the biological filter lives almost entirely in the filter media. In a deep bed, the lower layers become oxygen-poor (anaerobic) over time, and a different community of bacteria takes over — bacteria that can convert nitrates into harmless nitrogen gas, a process called denitrification.
Combined with the nutrient reservoir held in the soil layer, a mature deep-substrate bed becomes a largely self-sustaining system under your plants — hobbyists use it to run lush planted tanks with minimal dosing and often minimal filtration. Though, as with any natural method, setup details and stocking matter more than the label.
It shares DNA with several familiar techniques. Like a dirted tank setup, it uses a soil-based nutrient layer. Like the Walstad method, it aims for a balanced, low-maintenance ecosystem. What distinguishes the deep substrate method is the deliberate depth: the bed is engineered thick enough that its lower zone functions as a working denitrification bed, not just a rooting medium.
How a Deep Substrate Bed Actually Works
The layered zones
Think of the bed as three working zones stacked vertically:
- Top zone (0–5 cm): oxygen-rich. Fish waste and uneaten food land here; aerobic bacteria process ammonia into nitrite, then nitrate — the classic nitrogen cycle.
- Middle zone (5–10 cm): transitional. Oxygen is scarce; facultative bacteria begin using nitrate instead of oxygen, slowly consuming it.
- Bottom zone (10 cm+): anaerobic. With virtually no free oxygen, specialized bacteria perform denitrification — stripping oxygen from nitrate molecules and releasing nitrogen gas, which harmlessly bubbles out of the bed.
Those three zones develop naturally over the first few months, provided the bed is undisturbed and planted reasonably densely. Plant roots help enormously: they channel tiny amounts of oxygen into the substrate, prevent the bed from becoming a dead, compacted mass, and pump nutrients straight into the foliage.
Why depth matters more than fancy materials
You do not need exotic substrates for this method to function. Depth is the variable that creates the anaerobic zone; below roughly 10 cm, oxygen diffusion from the water column simply cannot keep the lower layers aerated. That said, material choice affects maintenance: a bed of pure fine sand packs down tightly and can form problematic compacted pockets, while a bed with varied grain sizes and a loose nutrient base stays porous enough for water, roots, and gas exchange to move slowly through it.
Setting Up a Deep Substrate Tank: Step by Step
Plan for a one-time build — deep beds are meant to be left alone for years. Do your hardscape layout thinking before you fill.
- Choose the right tank. Deep substrate eats vertical space. A 40-liter (10-gallon) tank with a 12 cm bed loses roughly a third of its water volume, so go one size larger than you think you need. Low, wide tanks (breeders, shallow-style) suit the method better than tall, narrow ones.
- Build the nutrient base (2–4 cm). Options include mineralized topsoil, pond soil, or a commercial aquasoil. If using garden or pond soil, mineralize it first: soak it in a bucket for 1–2 weeks, changing the water every few days, to remove excess organics that would otherwise rot and spike ammonia on day one.
- Add the main bed (6–10 cm). This is the bulk: coarse sand, fine gravel, or a mix. Many hobbyists blend grain sizes so the bed resists compaction. Avoid ultra-fine sand for the entire depth — it packs too tightly.
- Cap it (2–3 cm). A gravel or coarse-sand cap keeps the soil base from clouding the water and gives the surface a finished look. The cap also gives bottom-dwelling fish a safe surface to sift.
- Plant heavily from day one. Fast-growing stem plants and strong root feeders (swords, crypts, vallisneria) are ideal pioneers. Dense planting is your best insurance during the break-in period: roots stabilize the bed and soak up early nutrient surges.
- Fill gently and cycle. Pour water over a plate or plastic sheet to avoid disturbing the layers. Run the tank for 2–4 weeks with regular water testing before adding livestock — soil beds release ammonia early on, and that is normal. Follow a methodical planted tank cycling routine rather than trusting the calendar alone.
Layer Recipes That Work
There is no single canonical recipe — which is the point; the method is about depth, not brands. Three field-tested builds:
| Build | Base layer | Main bed | Cap | Best for |
|---|---|---|---|---|
| Classic soil | 2–3 cm mineralized topsoil | 7–9 cm coarse river sand | 2 cm pea gravel | Root-heavy low-tech community tanks |
| Aquasoil hybrid | 3–4 cm aquasoil | 5–8 cm fine gravel | 2 cm coarse sand | Faster break-in, clearer water early |
| Pond-soil deep bed | 2 cm pond soil + a sprinkle of crushed coral for buffering | 8–10 cm mixed sand and gravel | 3 cm river gravel | Soft-water regions needing stable hardness |
Keep total depth in the 10–15 cm range for most tanks. Beyond 15 cm the biological benefit flattens, the break-in lengthens, and you sacrifice swimming space your fish would rather have.
Stocking and Maintenance for Deep Substrate Tanks
Stocking lightly is the safety margin
Deep substrate tanks reward restraint. Start with a light bioload — a modest school of small fish rather than a full community — and let the bed mature for two to three months before adding more. Heavy waste loads overwhelm the anaerobic zone before it establishes, and they also keep the surface too dirty for the plants to do their share of the work. There is no hard rule for stocking density, but if your nitrates climb week after week despite the deep bed, you have more fish than the system can currently process. A primer on stable planted tank water parameters helps you read what the test kit is telling you.
The golden rule: do not disturb the bed
Once the anaerobic zone is working, treat it like a living filter — because that is what it is. Do not gravel-vacuum the deep bed the way you would a shallow one. Vacuuming tears open the anaerobic layers, releases trapped gases and dissolved waste into the water column, and sets the biological clock back by weeks or months. Surface debris is fine to siphon gently during water changes, and you can hover the siphon just above the cap, but never plunge it into the bed.
This single habit is where most newcomers fail with the method. If you want the look of freshly vacuumed gravel, the deep substrate method is the wrong choice — pick a shallow inert bed and a conventional filter instead.
Water changes and filtration
Many deep substrate tanks run with no filter at all — a no-filter planted tank setup is a natural cousin of this method — but gentle surface circulation helps in most real-world cases. A small sponge filter or a low-flow powerhead prevents dead spots on the surface without excavating the bed. Keep water changes modest and consistent: 20–30% weekly during the first two months, easing to biweekly once parameters are stable and plants are visibly thriving.
Risks, Honestly Addressed
Hydrogen sulfide — the scary gas
Any anaerobic substrate can produce hydrogen sulfide (H₂S), recognizable by its rotten-egg smell. Small amounts form in healthy deep beds and are oxidized harmlessly at the surface. The danger comes from large, sudden releases — exactly what happens when someone jams a gravel vacuum into a mature bed or uproots a huge plant mass all at once. Mitigation is straightforward: plant densely (roots oxygenate the bed), never disturb deep layers, and if you smell rotten eggs during maintenance, stop, do a large water change, and increase surface agitation. This is conservative, start-low thinking applied to maintenance: the bed rewards gentleness.
Nutrient surges and algae in month one
Fresh soil layers leach ammonia, nitrates, and phosphates for the first few weeks. Heavy planting plus regular early water changes handles this. If algae blooms, resist the urge to "fix" the substrate — the bed is not broken; it is young. Reduce light hours slightly, keep up water changes, and let the plants establish.
Not every fish is a match
Heavy diggers — large cichlids, goldfish, big loaches — will excavate a deep bed no matter how well you cap it. Stick to community species that leave the substrate alone, and be cautious with burrowing species: they tunnel through anaerobic layers, which defeats the purpose of leaving the bed undisturbed.
Deep Substrate vs. Other Natural Methods
| Aspect | Deep substrate | Walstad | Thin aquasoil + dosing |
|---|---|---|---|
| Bed depth | 10–20 cm | 3–5 cm | 3–6 cm |
| Denitrification zone | Yes, intentional | Minimal | No |
| Disturbance tolerance | Very low — leave it alone | Low | High — vacuum freely |
| Filtration needed | Optional to minimal | None by design | Yes, conventional |
| Learning curve | Moderate — patience required | Low–moderate | Low |
| Best for | Patient planted-tank hobbyists who want a living ecosystem | Beginners wanting a simple natural tank | High-energy aquascapers chasing fast growth |
Troubleshooting Common Problems
- Cloudy water in week one: Almost always dust from the cap layer or disturbed soil. A fine filter floss run for a few days clears it. Do not tear down and rebuild.
- Ammonia not dropping after three weeks: The soil layer may be richer than expected. Increase water changes to 30–40% twice weekly and hold off on livestock. Test before you trust.
- Plants melting despite good light: Check the transition zone. Emersed-grown plants shed old leaves underwater; what matters is whether new submerged growth is appearing. New growth = patience, not a crisis.
- Bubbles rising from the bed: Occasional small bubbles are normal — nitrogen gas from denitrification and decomposition. Constant, smelly bubbling in one spot means a compacted pocket; gently poke it with a skewer to vent it slowly over days, not all at once.
- Nitrates climbing after months of stability: Usually a stocking or feeding change, not a substrate failure. Reassess food amounts and livestock count before blaming the bed.
Frequently Asked Questions
How deep should substrate be for the deep substrate method?
Aim for 10–15 cm (4–6 inches) total in most aquariums, built from a 2–4 cm nutrient base, a 6–10 cm main bed, and a 2–3 cm cap. That depth is enough for a genuine anaerobic zone to develop below while leaving reasonable swimming space. Depths beyond 15 cm add diminishing returns and consume water volume your fish would rather have.
Does a deep substrate really reduce nitrates?
In a mature, undisturbed bed — yes, measurably. The anaerobic lower zone hosts denitrifying bacteria that convert nitrate into nitrogen gas. Hobbyist measurements commonly show stable single-digit nitrate levels in lightly stocked, heavily planted deep substrate tanks. But it is a slow system: expect two to three months before the effect is significant, and heavy stocking will always outpace it.
Can I use a deep substrate tank with a filter?
Absolutely. The "no filter" reputation is a preference, not a requirement. A gentle sponge filter or low-flow circulation pump complements the bed by keeping surface water oxygenated and preventing dead spots. What matters is not blasting the substrate with current or churning the bed during maintenance.
Do I need to fertilize a deep substrate tank?
Usually very little, at least in the first year. The soil base is a generous nutrient reservoir for root feeders. Water-column feeders may still appreciate occasional light dosing once the bed's initial leaching settles — start low, watch new growth for deficiency signs, and increase only if plants show a genuine need rather than dosing on a fixed schedule.
What happens if I disturb the substrate years later?
Rescape gradually, not all at once. Uprooting one large plant per week and letting the tank recover between moves avoids the sudden gas and waste releases that cause crashes. If you ever need to move the whole tank, treat it like a near-complete rebuild: livestock out, water saved, bed kept as intact as possible, and re-cycle gently.
Is the deep substrate method beginner-friendly?
It is forgiving in the long run but demanding in the short run. The setup is simple and maintenance is minimal, but the break-in period requires patience, regular testing, and the discipline to leave the bed alone. If you are brand new to aquariums, a Walstad-style tank or a conventionally filtered planted tank is a gentler first project; come back to deep substrate for your second tank. For vendor-neutral background reading, Tropica's planted-tank articles and the Aquatic Gardeners Association are solid starting points.
The Verdict: Who Should Try It
The deep substrate method is for the hobbyist who is willing to trade a few months of patience and one ironclad rule — do not disturb the bed — for a planted tank with lush root growth, low nitrate levels, and almost no filter maintenance. It is not magic, it is not a shortcut past cycling, and it will punish impatience in the first eight weeks. But set it up thoughtfully, stock it lightly, and let the invisible ecosystem below the surface do its work: you will own a tank that feels less like a machine you maintain and more like a small landscape you simply keep company.
Tissue-culture plants are the exception — they’re grown in sterile gel and adapt with minimal melting, which is part of what you’re paying for. Plants bought submersed from another hobbyist’s tank also transition with little melt, since they’re already in the right form.
Which Plants Melt Most (and Least)
Heavy melters (expect significant leaf loss)
- Cryptocorynes — infamous for “crypt melt,” sometimes dropping every leaf after any disturbance. They almost always recover from the roots within weeks.
- Stem plants grown emersed — rotala, ludwigia, and hygrophila often shed lower emersed leaves while the growing tips transition.
- Amazon swords — emersed-grown swords typically lose their broad oval aerial leaves and replace them with longer submersed ribbon leaves.
Light melters
- Anubias, java fern, bucephalandra — slow-growing rhizome plants transition gradually; occasional old-leaf melt but rarely dramatic.
- Vallisneria — usually transitions well, though it dislikes the move itself and may sulk for a week.
- Floating plants — minimal melt since their leaves were already at the air-water interface.
The Acclimation Protocol
Step 1: Quarantine or dip first
Before acclimating to your tank’s conditions, make sure you’re not acclimating pests along with the plant. Run new arrivals through our quarantine and dip protocol — it adds days upfront but prevents months of regret.
Step 2: Float to temperature-match (30 minutes)
Float the bag or container in your tank for 20–30 minutes to equalize temperature. Plants are less temperature-sensitive than fish, but a 10°F shock on top of transplant stress is an avoidable insult.
Step 3: Trim before planting
Remove any leaves that are already damaged, yellowing, or heavily algae-covered — they won’t recover and they’ll rot in your tank, feeding algae. For stem plants, trim off the bottom inch and any emersed leaves that look unlikely to adapt; the plant wastes energy maintaining leaves it’s going to shed anyway. Keep the healthy growing tips — that’s where recovery starts.
Step 4: Plant correctly the first time
Follow our planting guide — right depth, crown exposed on rosettes, rhizomes unburied on epiphytes. Every uprooting and replanting restarts the acclimation clock, so get placement right on the first attempt. Decide where each plant goes before it goes in the water.
Step 5: Run a gentle first week
For the first 7 days after planting:
- Moderate light — run your normal photoperiod but consider dropping intensity 20–30% if your light is dimmable. Blast-level light on a melting plant grows algae on the dying leaves, not recovery.
- Stable CO2 — if you inject CO2, keep it consistent. Fluctuating CO2 during acclimation is a melt accelerator. If you’re low-tech, this doesn’t apply — see growing without CO2.
- Half-strength fertilizer — new plants with damaged leaves can’t use full dosing, and the excess feeds algae. Ramp to full strength over 2–3 weeks per our fertilizer schedule.
- No disturbance — don’t move, trim, or “check on” new plants for at least two weeks. Every touch resets root establishment. This is especially critical for crypts.
Step 6: Remove melt, keep the base
As emersed leaves melt, remove the mushy material promptly — decaying leaves release ammonia and grow fungus that can spread to healthy tissue. But never discard the plant while the crown, rhizome, or roots are firm and alive. A crypt that’s lost every leaf but has firm roots is a plant that’s about to recover, not a dead plant. Give it 3–4 weeks before judging.
Telling Normal Melt From Real Problems
Normal transition melt:
- Affects oldest/emersed leaves first, newest growth last
- New submersed leaves emerge even as old ones dissolve
- Roots and crown stay firm and white/green
- Timeline: 1–4 weeks, then obvious new growth
Concerning melt (see our full melting diagnosis guide):
- New growth also melts or emerges deformed
- Rhizome or crown turns mushy and brown — this is rot, not transition
- Entire plant dissolves within days with no new growth after 4+ weeks
- Melting spreads to established plants that weren’t recently moved
Buying Tips to Minimize Melt
- Buy submersed-grown when available — hobbyist-grown cuttings transition with almost no melt.
- Choose tissue culture for sensitive species — crypts and delicate stems establish far more reliably from sterile cups.
- Avoid plants already melting in the store tank — some melt is normal, but a plant that’s mostly mush at purchase has less energy for recovery.
- Transport carefully — keep plants damp and out of direct sun/heat. A plant that dries out or cooks in a hot car melts far worse than one transported properly.
The First-Month Timeline: What to Expect Week by Week
Knowing what’s normal when removes most acclimation anxiety. Here’s the typical timeline for a healthy plant adapting to a new tank:
Week 1: The quiet week
Almost nothing visible happens. The plant is growing roots you can’t see and assessing its new environment. Some species (vallisneria, stem plants) may start shedding their lowest leaves. This is normal. Resist the urge to “help” — no moving, no extra fertilizer, no light changes. The most common beginner mistake is intervening during a week when the correct action is nothing.
Week 2: Melt peaks
This is when emersed leaves give up in earnest. Crypts may drop everything; swords shed their broad aerial leaves; stem plants lose lower foliage. It looks catastrophic and it’s usually fine. Keep removing mushy material, keep conditions stable, and watch the crown and growing tips — if those are firm and green, recovery is already underway.
Week 3: The turn
New submersed-adapted leaves emerge — smaller, thinner, often a slightly different shade of green than the emersed foliage. Stem plant tips start growing visibly; crypts push tiny curled leaves from the crown; swords unfurl narrow ribbon leaves. This is the moment most beginners exhale for the first time.
Week 4+: Established
New growth outpaces melt, and the plant is functionally yours. You can resume full-strength fertilizer, normal trimming, and stop treating it as fragile. Some slow growers (anubias, bucephalandra) take 6–8 weeks to show obvious progress — that’s their normal speed, not a problem.
Acclimating Different Plant Formats
Tissue-culture cups
Sterile, pest-free, and already adapted to high-humidity (not emersed) growth — tissue cultures melt the least of any format. Rinse the agar gel off gently (leftover gel rots and feeds fungus), split the portion into small plantlets, and plant per our planting guide. They establish slowly for the first two weeks, then accelerate. No dip needed, minimal acclimation stress — this is the premium experience you’re paying for.
Potted plants
Remove the pot and strip away the rockwool completely — leftover rockwool traps debris and rots. Tease the root mass apart gently; if it’s a dense mat, splitting it into 2–3 smaller portions actually establishes faster than planting one big clump (more growing points, better water flow around roots). Potted plants are usually emersed-grown, so expect the standard 2–4 week melt cycle.
Bare-root / bunched stems
Typically sold as weighted bunches. Remove any bands, foam, or weights, strip the lower leaves, and plant stems individually or in small groups. Bunched stems from the store are often already transitioning — check for new submersed growth at the tips, which tells you the plant is mid-adaptation and will settle quickly.
Hobbyist cuttings
Already submersed-grown and the fastest to establish — often showing new growth within days. The main acclimation factor is water-parameter difference between the two tanks. Float to temperature-match, plant promptly, and they’ll usually take off with minimal melt. This is why experienced hobbyists prefer trading cuttings over buying potted plants.
Frequently Asked Questions
Should I use a “plant starter” or transplant fertilizer?
Products marketed for transplant shock are mostly B-vitamins and mild hormones. They don’t hurt, but there’s no strong evidence they help aquarium plants specifically. Stable conditions and patience outperform any bottle. Save the money for more plants.
My new plant melted completely — bare crown, no leaves. Is it dead?
Probably not, if the crown or rhizome is firm. Crypts and swords routinely lose 100% of their leaves and regrow from the base within a month. The test is firmness: firm and pale/green means alive; mushy and brown/black means rot. Give firm-but-leafless plants a full 4 weeks before declaring them dead.
Can I speed up acclimation with extra light or CO2?
No — and trying usually backfires. A melting plant can’t use extra light; the excess just grows algae on its dying leaves. Keep light moderate and CO2 stable (not boosted) during acclimation. Growth speed comes from the plant’s own adaptation timeline, which you can’t rush, only avoid delaying.
Should new plants go straight into my main display tank?
After quarantine/dipping, yes — there’s no benefit to a separate “growing-in” tank for most plants. They acclimate to your water fastest in the tank they’ll live in. The exception is very delicate species going into a tank with boisterous fish; give those a few weeks in a calm corner or breeder box first.
The Patience Rule
The single most important acclimation skill is restraint: plant it right, set gentle conditions, remove decay, and then leave it alone for a month. The hobbyists with the best plant growth aren’t doing something clever in week one — they’re simply not interfering in weeks two through four while the plants do what they’ve evolved to do. Melt looks like failure and feels like failure, but in most cases it’s the visible part of a plant successfully becoming yours.