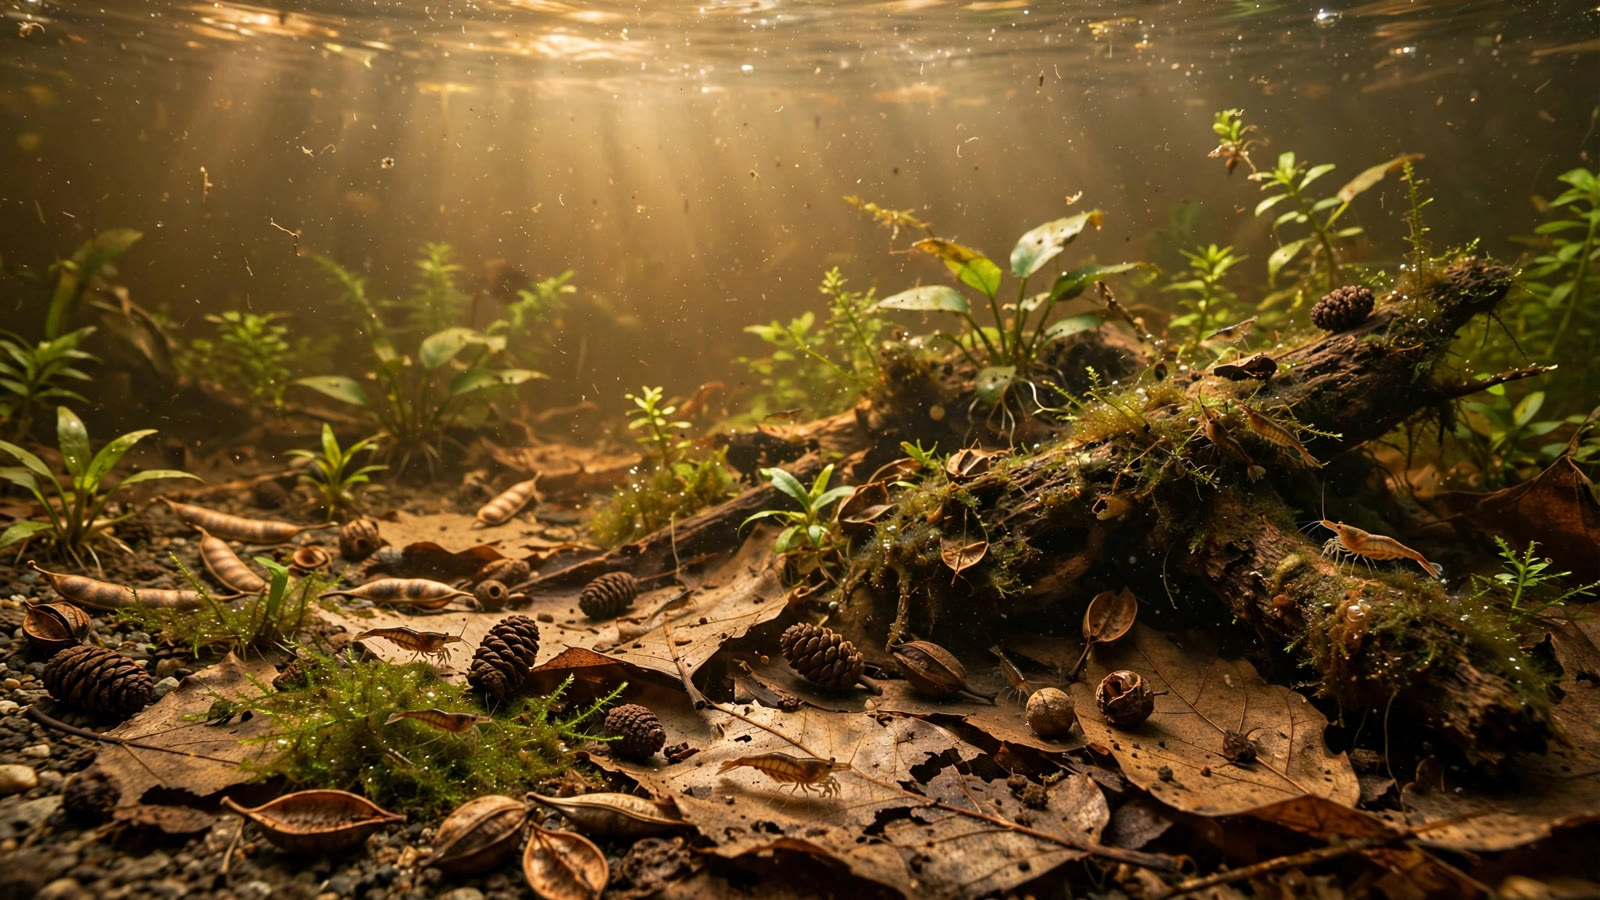
Tuck a few dried catappa leaves into the corner of a planted tank, add a handful of alder cones near the filter outflow, and within days the water takes on a warm amber glow while shrimp and fry start grazing surfaces that weren't there before. Botanicals for planted aquarium setups — leaves, seed pods, cones, bark, and husks prepared for submerged use — are one of the cheapest, most natural upgrades you can make. Used correctly, they add shelter, biofilm, tannins, and a believable wild character to high-tech and low-tech planted tanks alike.
What Aquarium Botanicals Actually Are
Aquarium botanicals are dried plant materials — fallen leaves, seed pods, cones, bark strips, nut husks, and stem sections — collected from species known to be aquarium-safe. They differ from driftwood in two ways: they are smaller, deliberate accents, and most decompose over weeks to months, releasing tannins and organic acids as they break down. Think of them as a slow-release seasoning for your tank rather than permanent hardscape.
The botanicals aquarists actually use fall into a few well-tested families:
- Catappa / Indian almond leaves (Terminalia catappa) — the classic. Large, fast-tannin leaves that tint water amber within a day or two and last two to four weeks submerged.
- Oak, beech, and magnolia leaves — subtler tint, slower breakdown. Magnolia leaves are thick enough to last two months.
- Alder cones (Alnus spp.) — tiny cones with an outsized tannin punch; a dozen can visibly tint a 10-gallon tank and last one to three months.
- Seed pods — lotus pods, sweetgum balls, palm pods, acorn caps. Mostly structural: caves, perches, and grazing surfaces with mild tannin release.
- Coconut husks and halves — nearly permanent hardscape that doubles as a cave or moss anchor.
- Banana stems and bark strips — soft, fast-decomposing materials that grow heavy biofilm quickly; excellent in shrimp breeding tanks.
Reputable sellers label the species and state the material is pesticide-free. Not every dried leaf belongs in a tank — sourcing and preparation matter more with botanicals than with almost any other aquarium product.
What Botanicals Do for a Planted Aquarium
Tannins and humic substances
As botanicals hydrate and break down, they leach tannins and humic acids — the compounds that color rainforest streams. The amber tint is cosmetic, but the chemistry is real: mild antibacterial effects on leaf surfaces and slightly softened water. The pH effect is modest, rarely more than a few tenths of a point in hard water. Peer-reviewed research on leaf litter in freshwater confirms that tannin leaching and water darkening measurably alter aquatic chemistry and suppress phytoplankton, largely through light limitation — which is exactly why dosing matters in a planted tank (study on tree leaves, tannins, and water color). Treat botanicals as a gentle softening of the water's character, not a parameter overhaul.
Biofilm and grazing surfaces
This is the biggest practical benefit. Every new leaf or pod is colonized within days by biofilm — bacteria, fungi, microalgae, and infusoria that shrimp, snails, otocinclus, and fry graze continuously. In breeding setups, a bed of decomposing leaves is a nursery buffet: newborn shrimplets and fry find microscopic food on surfaces before you even notice them.
Shelter and natural aesthetics
Seed pods, lotus pods, and coconut halves create the small caves and overhangs timid species need — a molting shrimp, a berried female, day-old fry. Unlike rock or wood caves, botanical hides are disposable: when a lotus pod collapses, you lift it out and drop in a fresh one. Visually, scattered leaves and pods fill the gap between pristine aquascape and wild habitat, tying hardscape and planting together with a coherent forest-floor story.
Planted Tank Accents vs. True Blackwater
| Factor | Planted tank (accent use) | Blackwater biotope (foundation use) |
|---|---|---|
| Purpose | Shelter, biofilm, subtle tint, aesthetics | Core water chemistry and habitat simulation |
| Dosing | A few leaves or a small handful of pods at a time | Heavy dosing — the leaf bed may cover much of the substrate |
| Light impact | Minimal; use carbon or water changes if plants need maximum PAR | Subdued light is intentional; low-light plants chosen accordingly |
| Maintenance | Replace decomposing pieces individually | Top up the leaf bed continuously as layers compress |
The takeaway: planted-tank keepers borrow blackwater's tools without committing to its look. Tannins absorb blue and green wavelengths first — the spectrum plants use most — so in high-light CO2 tanks keep dosing light enough that the tint doesn't measurably dim your lighting.
Choosing the Right Botanicals
- For shrimp and fry grazing: catappa leaves and banana stems — they soften fast and grow the densest biofilm.
- For gentle tinting without a leaf bed: alder cones — small, precisely dosable, longer-lasting than leaves.
- For shelter and perches: lotus pods, sweetgum balls, coconut halves — long-lived and structurally useful.
- For a long-lasting forest floor: oak and magnolia leaves — thick leaves that hold shape for weeks to months.
- For nano tanks (under 10 gallons): alder cones, acorn caps, and quartered catappa leaves. Scale matters — one whole catappa leaf can dominate a nano tank's chemistry and appearance.
Preparation: Making Botanicals Tank-Safe
Leaves: rinse, boil, soak
- Rinse under running water to remove dust and debris.
- Boil 5–10 minutes to sterilize the surface, break down the waxy cuticle, and pull out the harshest first tannin surge.
- Soak 24–48 hours in dechlorinated water, changing the water once. Leaves that still float can be tucked under hardscape for a day — they'll sink on their own.
Want a stronger tannin effect? Skip the long soak and go straight from boil to tank; the first 48 hours of leaching are the most intense.
Cones, pods, and husks: boil longer, then place
Alder cones and seed pods get a 10–20 minute boil plus a day of soaking; hard pods like sweetgum balls can boil 30 minutes without damage. Coconut halves need repeated boils until the water runs mostly clear, since husk fibers hold a large reservoir of tannins and sugars. Banana stems need only a brief rinse and short boil — they're short-lived biofilm generators, not permanent decor.
One caution: boiling sterilizes and controls tannins, but it isn't a plant quarantine protocol. If you're introducing live plants alongside botanicals, give new plants the full treatment described in guides to bleach dips for aquarium plants or hydrogen peroxide dips for plants — botanicals and living plants enter the tank through different doors, and each needs its own prep routine.
Dosing by Tank Size
For a subtle, planted-tank accent effect, start here:
| Tank size | Catappa leaves (or equivalent) | Alder cones | Pods / caves |
|---|---|---|---|
| 5–10 gallons | 1–2 medium leaves | 3–6 cones | 1–2 small pods |
| 20–30 gallons | 3–5 leaves | 8–15 cones | 2–4 pods or one coconut half |
| 40–60 gallons | 5–8 leaves | 15–25 cones | 3–6 pods |
| 75+ gallons | 8–12 leaves | 25–40 cones | 5–8 pods |
Start low, wait a week, then judge the tint and breakdown pace before adding more. Botanicals lose mass as they decompose — a dose is a subscription, not a permanent addition. Replace pieces individually as they finish so water chemistry stays stable.
Decomposition Timeline and Maintenance
- Catappa and banana stems: 2–4 weeks. Remove when they disintegrate on touch.
- Oak and beech leaves: 4–8 weeks; they hold shape, then go soft and patchy.
- Magnolia leaves: 6–10 weeks; the midrib often outlasts the blade.
- Alder cones: 1–3 months, then they crumble into the substrate surface.
- Lotus pods and sweetgum balls: 2–6 months; replace when spongy.
- Coconut halves: 1–3 years with periodic scrubbing.
Once a week during regular maintenance, lift out anything that crumbles when pinched and add fresh prepared pieces — but never remove all botanicals at once, so grazing livestock never lose their buffet. Do the swap after any stem plant propagation work so disturbed substrate settles first. And remember decomposing botanicals add to the bioload: in a healthy tank that's trivial, but if you're already fighting chronic cloudiness or a slide toward old tank syndrome in planted setups, fix the underlying water-quality problem before adding more organics to decompose.
Botanicals and Fertilizer Programs
At planted-tank dosing levels, tannins don't meaningfully interfere with fertilizers — hobbyists running EI dosing for beginners or weighing liquid fertilizers versus root tabs report no nutrient lockout from a few leaves and cones. What actually matters is light: even a modest tea tint trims the blue-green PAR demanding carpets and red stems depend on. If clarity is non-negotiable, run activated carbon or keep dosing minimal.
Botanicals to Avoid
- Pesticide-treated material — the top risk. Leaves near agriculture, golf courses, roadsides, or manicured gardens may carry insecticides that survive boiling. Can't verify the site is chemical-free? Don't use it.
- Walnut-family trees (walnut, pecan, hickory) — they produce juglone, toxic to many plants and aquatic life. Never in any aquarium.
- Resinous conifers (pine, cedar, fir) — resins and terpenes harm fish and invertebrates. Alder cones yes; pine cones no.
- Unidentified seed pods — unknown seeds, saps, or coatings. If you can't confirm the species, don't submerge it.
- Craft-store potpourri and dyed decor — often scented, dyed, or preserved with chemicals. Buy aquarium-sold botanicals, not home-decor ones.
- Fresh (green) leaves and bark — only use fully dried, naturally fallen material. Green tissue rots fast and clouds water.
Sourcing Responsibly
Buy from suppliers who identify species and harvest sustainably — reputable vendors will say where their catappa leaves come from and that they're collected after natural fall. Avoid vaguely labeled "mixed natural leaves." If you collect locally, take only what trees have already dropped, never from protected areas, and never near roads or sprayed landscapes. And never release aquarium water or leftover botanicals into local waterways — that's how invasive species and pathogens spread, no matter how natural the material looks.
Frequently Asked Questions
Do botanicals lower pH enough to matter for plants?
Only modestly. In soft, low-KH water a generous botanical load can drop pH a few tenths of a point over days; in hard, buffered water you'll barely measure a change. Plants respond far more to CO2 and nutrients than to botanical tannins. Use botanicals for biofilm, shelter, and aesthetics — and manage pH separately.
Will tannins stain silicone or hardscape permanently?
Prolonged heavy exposure can amber-tint light silicone, pale rocks, and white sand, but the staining is cosmetic and fades over weeks once the source is removed. With light planted-tank dosing, staining is rarely an issue. Running a dark blackwater-style load in a tank with pale silicone? Expect some seam tinting over time.
Can I use botanicals with active buffering soil?
Yes. Aquasoils buffer pH down through ion exchange while botanicals add mild organic acids; the two don't fight, and the combined effect simply suits most tropical plants and livestock. Just note that heavy botanical dosing plus fresh aquasoil can push pH lower than intended in the first weeks, so test more often during that window.
How do I stop leaves from floating around the tank?
Proper boiling plus a 24–48 hour soak makes most leaves sink on their own. For stubborn floaters, tuck them under rocks or driftwood for a day — once waterlogged, they stay put. Alder cones and seed pods sink within hours of boiling. Avoid gluing botanicals down; you'll want to remove and replace them as they decompose.
Are botanicals safe with shrimp and snails?
Yes — they're among the best additions for shrimp and snail tanks. The biofilm they grow is prime grazing, and tannins' mild antibacterial properties don't harm established invertebrate colonies at normal doses. The one caution: add botanicals gradually, since a large simultaneous addition decomposing at once can briefly depress oxygen, which shrimp and snails tolerate poorly.
Should I remove botanicals before medicating the tank?
Usually not for the botanicals' sake, but tannins and dissolved organics can reduce some medications' effectiveness by binding to them. For serious illness, treating in a quarantine tank is simpler than medicating the display. If you must treat the display, remove heavily decomposing botanicals first and run fresh activated carbon afterward to help the medication work as intended.
Botanicals are one of those rare aquarium additions that cost almost nothing, ask almost nothing of you, and quietly make the tank better every week they sit in it. Start small — a few prepared leaves, a pinch of alder cones — and let the forest-floor layer build at its own pace. For surface-shade pairing ideas, see our guide to managing floating plants, and keep exploring the plant-care library.
Tissue-culture plants are the exception — they’re grown in sterile gel and adapt with minimal melting, which is part of what you’re paying for. Plants bought submersed from another hobbyist’s tank also transition with little melt, since they’re already in the right form.
Which Plants Melt Most (and Least)
Heavy melters (expect significant leaf loss)
- Cryptocorynes — infamous for “crypt melt,” sometimes dropping every leaf after any disturbance. They almost always recover from the roots within weeks.
- Stem plants grown emersed — rotala, ludwigia, and hygrophila often shed lower emersed leaves while the growing tips transition.
- Amazon swords — emersed-grown swords typically lose their broad oval aerial leaves and replace them with longer submersed ribbon leaves.
Light melters
- Anubias, java fern, bucephalandra — slow-growing rhizome plants transition gradually; occasional old-leaf melt but rarely dramatic.
- Vallisneria — usually transitions well, though it dislikes the move itself and may sulk for a week.
- Floating plants — minimal melt since their leaves were already at the air-water interface.
The Acclimation Protocol
Step 1: Quarantine or dip first
Before acclimating to your tank’s conditions, make sure you’re not acclimating pests along with the plant. Run new arrivals through our quarantine and dip protocol — it adds days upfront but prevents months of regret.
Step 2: Float to temperature-match (30 minutes)
Float the bag or container in your tank for 20–30 minutes to equalize temperature. Plants are less temperature-sensitive than fish, but a 10°F shock on top of transplant stress is an avoidable insult.
Step 3: Trim before planting
Remove any leaves that are already damaged, yellowing, or heavily algae-covered — they won’t recover and they’ll rot in your tank, feeding algae. For stem plants, trim off the bottom inch and any emersed leaves that look unlikely to adapt; the plant wastes energy maintaining leaves it’s going to shed anyway. Keep the healthy growing tips — that’s where recovery starts.
Step 4: Plant correctly the first time
Follow our planting guide — right depth, crown exposed on rosettes, rhizomes unburied on epiphytes. Every uprooting and replanting restarts the acclimation clock, so get placement right on the first attempt. Decide where each plant goes before it goes in the water.
Step 5: Run a gentle first week
For the first 7 days after planting:
- Moderate light — run your normal photoperiod but consider dropping intensity 20–30% if your light is dimmable. Blast-level light on a melting plant grows algae on the dying leaves, not recovery.
- Stable CO2 — if you inject CO2, keep it consistent. Fluctuating CO2 during acclimation is a melt accelerator. If you’re low-tech, this doesn’t apply — see growing without CO2.
- Half-strength fertilizer — new plants with damaged leaves can’t use full dosing, and the excess feeds algae. Ramp to full strength over 2–3 weeks per our fertilizer schedule.
- No disturbance — don’t move, trim, or “check on” new plants for at least two weeks. Every touch resets root establishment. This is especially critical for crypts.
Step 6: Remove melt, keep the base
As emersed leaves melt, remove the mushy material promptly — decaying leaves release ammonia and grow fungus that can spread to healthy tissue. But never discard the plant while the crown, rhizome, or roots are firm and alive. A crypt that’s lost every leaf but has firm roots is a plant that’s about to recover, not a dead plant. Give it 3–4 weeks before judging.
Telling Normal Melt From Real Problems
Normal transition melt:
- Affects oldest/emersed leaves first, newest growth last
- New submersed leaves emerge even as old ones dissolve
- Roots and crown stay firm and white/green
- Timeline: 1–4 weeks, then obvious new growth
Concerning melt (see our full melting diagnosis guide):
- New growth also melts or emerges deformed
- Rhizome or crown turns mushy and brown — this is rot, not transition
- Entire plant dissolves within days with no new growth after 4+ weeks
- Melting spreads to established plants that weren’t recently moved
Buying Tips to Minimize Melt
- Buy submersed-grown when available — hobbyist-grown cuttings transition with almost no melt.
- Choose tissue culture for sensitive species — crypts and delicate stems establish far more reliably from sterile cups.
- Avoid plants already melting in the store tank — some melt is normal, but a plant that’s mostly mush at purchase has less energy for recovery.
- Transport carefully — keep plants damp and out of direct sun/heat. A plant that dries out or cooks in a hot car melts far worse than one transported properly.
The First-Month Timeline: What to Expect Week by Week
Knowing what’s normal when removes most acclimation anxiety. Here’s the typical timeline for a healthy plant adapting to a new tank:
Week 1: The quiet week
Almost nothing visible happens. The plant is growing roots you can’t see and assessing its new environment. Some species (vallisneria, stem plants) may start shedding their lowest leaves. This is normal. Resist the urge to “help” — no moving, no extra fertilizer, no light changes. The most common beginner mistake is intervening during a week when the correct action is nothing.
Week 2: Melt peaks
This is when emersed leaves give up in earnest. Crypts may drop everything; swords shed their broad aerial leaves; stem plants lose lower foliage. It looks catastrophic and it’s usually fine. Keep removing mushy material, keep conditions stable, and watch the crown and growing tips — if those are firm and green, recovery is already underway.
Week 3: The turn
New submersed-adapted leaves emerge — smaller, thinner, often a slightly different shade of green than the emersed foliage. Stem plant tips start growing visibly; crypts push tiny curled leaves from the crown; swords unfurl narrow ribbon leaves. This is the moment most beginners exhale for the first time.
Week 4+: Established
New growth outpaces melt, and the plant is functionally yours. You can resume full-strength fertilizer, normal trimming, and stop treating it as fragile. Some slow growers (anubias, bucephalandra) take 6–8 weeks to show obvious progress — that’s their normal speed, not a problem.
Acclimating Different Plant Formats
Tissue-culture cups
Sterile, pest-free, and already adapted to high-humidity (not emersed) growth — tissue cultures melt the least of any format. Rinse the agar gel off gently (leftover gel rots and feeds fungus), split the portion into small plantlets, and plant per our planting guide. They establish slowly for the first two weeks, then accelerate. No dip needed, minimal acclimation stress — this is the premium experience you’re paying for.
Potted plants
Remove the pot and strip away the rockwool completely — leftover rockwool traps debris and rots. Tease the root mass apart gently; if it’s a dense mat, splitting it into 2–3 smaller portions actually establishes faster than planting one big clump (more growing points, better water flow around roots). Potted plants are usually emersed-grown, so expect the standard 2–4 week melt cycle.
Bare-root / bunched stems
Typically sold as weighted bunches. Remove any bands, foam, or weights, strip the lower leaves, and plant stems individually or in small groups. Bunched stems from the store are often already transitioning — check for new submersed growth at the tips, which tells you the plant is mid-adaptation and will settle quickly.
Hobbyist cuttings
Already submersed-grown and the fastest to establish — often showing new growth within days. The main acclimation factor is water-parameter difference between the two tanks. Float to temperature-match, plant promptly, and they’ll usually take off with minimal melt. This is why experienced hobbyists prefer trading cuttings over buying potted plants.
Frequently Asked Questions
Should I use a “plant starter” or transplant fertilizer?
Products marketed for transplant shock are mostly B-vitamins and mild hormones. They don’t hurt, but there’s no strong evidence they help aquarium plants specifically. Stable conditions and patience outperform any bottle. Save the money for more plants.
My new plant melted completely — bare crown, no leaves. Is it dead?
Probably not, if the crown or rhizome is firm. Crypts and swords routinely lose 100% of their leaves and regrow from the base within a month. The test is firmness: firm and pale/green means alive; mushy and brown/black means rot. Give firm-but-leafless plants a full 4 weeks before declaring them dead.
Can I speed up acclimation with extra light or CO2?
No — and trying usually backfires. A melting plant can’t use extra light; the excess just grows algae on its dying leaves. Keep light moderate and CO2 stable (not boosted) during acclimation. Growth speed comes from the plant’s own adaptation timeline, which you can’t rush, only avoid delaying.
Should new plants go straight into my main display tank?
After quarantine/dipping, yes — there’s no benefit to a separate “growing-in” tank for most plants. They acclimate to your water fastest in the tank they’ll live in. The exception is very delicate species going into a tank with boisterous fish; give those a few weeks in a calm corner or breeder box first.
The Patience Rule
The single most important acclimation skill is restraint: plant it right, set gentle conditions, remove decay, and then leave it alone for a month. The hobbyists with the best plant growth aren’t doing something clever in week one — they’re simply not interfering in weeks two through four while the plants do what they’ve evolved to do. Melt looks like failure and feels like failure, but in most cases it’s the visible part of a plant successfully becoming yours.