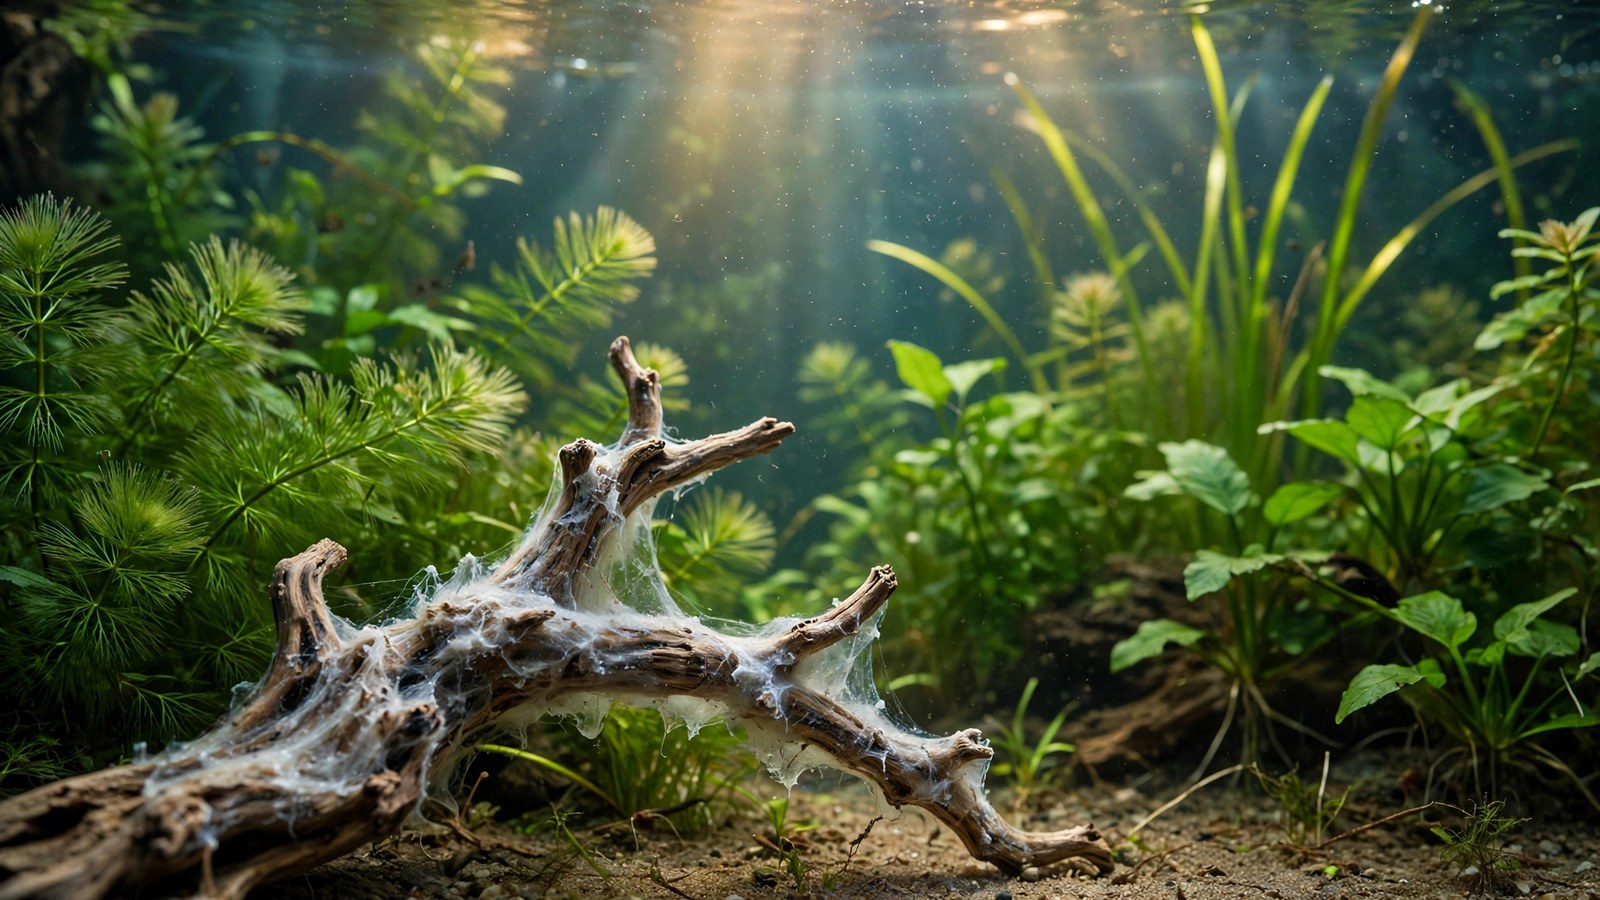
You have just finished placing the perfect piece of driftwood in your new scape, filled the tank, and stepped back to admire it — only to discover, two days later, that the wood is wrapped in a translucent white slime. Your heart sinks. Is this white fungus on driftwood dangerous? Did you buy contaminated wood? Should you rip it out? Take a breath: this cloudy coating is one of the most common and least harmful surprises in planted aquariums, and understanding why it appears will turn a moment of panic into quiet confidence.
What That White Coating Actually Is
The white, cottony or jelly-like film that blooms on freshly submerged driftwood is not a disease, a parasite, or a sign of rot in your aquarium. It is biofilm — a living community of bacteria and aquatic fungi feeding on the sugars, starches, and other soluble organic compounds locked inside the wood's outer layers. The moment dry driftwood hits water, these compounds begin leaching out, and the microorganisms naturally present in every aquarium sense the buffet and multiply.
Think of it like bread molding in a damp cupboard, only reversed: instead of spoiling the wood, the microbes are digesting the loose nutrients on its surface. Under a microscope, the film is a dense mat of bacterial colonies and fungal hyphae. To your eyes, it looks like white fuzz, gray mucus, or a soft translucent glaze — the texture varies with the wood species and how much food is available. Different driftwood species release different amounts of surface sugars, which is why two pieces in the same tank can grow very different amounts of film.
Why new wood blooms and old wood does not
The bloom happens almost exclusively on wood that has not been submerged before — whether it is brand-new from a shop or wood you dried out after a previous tank. Once the surface sugars are consumed and the biofilm's food source runs out, the colonies starve and detach, usually within two to six weeks. Wood that has already lived underwater for a couple of months rarely grows the film again, because its surface nutrients are long gone. This self-limiting cycle is exactly why experienced aquarists greet white fungus with a shrug rather than alarm.
Which woods grow the most biofilm?
| Wood type | Typical biofilm level | Why |
|---|---|---|
| Mopani | Heavy | Dense, two-toned hardwood with lots of leachable sugars and tannins |
| Spider wood / red moorwood | Moderate to heavy | Thin branches with a large surface-to-volume ratio give microbes plenty of feeding area |
| Manzanita | Light to moderate | Hard, sandblasted branches with fewer soft surface fibers |
| Malaysian driftwood | Moderate | Dense and heavy, but its smoother surface holds less loose organic matter |
| Cholla wood | Moderate | Porous skeleton structure gives microbes many micro-habitats |
These are tendencies, not guarantees — an individual piece can surprise you either way. If you want a refresher on how each type behaves underwater, this comparison of fast-sinking driftwood types is a useful companion read. And for a deeper look at how the two most popular branching woods differ, see spider wood vs. manzanita.
Is White Fungus Dangerous to Fish, Shrimp, or Plants?
Short answer: no. Biofilm on driftwood is harmless to fish, shrimp, snails, and aquatic plants. It does not produce toxins, does not attack living tissue, and does not signal a water-quality disaster. In fact, biofilm is a natural and beneficial part of every healthy aquarium — your filter media, glass, and plant leaves are all coated in invisible microbial films right now. The white fuzz on driftwood is simply the visible version of something that is everywhere in your tank anyway.
There is even good news for invertebrate keepers: shrimp and many snails actively graze on biofilm and will clear a modest bloom faster than it would disappear on its own. Otocinclus, nerite snails, cherry shrimp, and Amano shrimp treat a biofilmed branch like a buffet table. This is one of the reasons cholla wood is a favorite in shrimp-focused planted tanks — its porous structure supports grazing invertebrates well. The expert view agrees: WetWebMedia's expert FAQ on aquarium rock and wood treatment describes white slime on driftwood as harmless to livestock, fading once the wood's organics are exhausted.
What about oxygen and water parameters?
A heavy biofilm bloom consumes a small amount of dissolved oxygen as bacteria metabolize the sugars, but in a normally filtered and planted tank this effect is negligible. What can shift your water chemistry is not the fungus itself but the decaying wood sugars — newly submerged wood often releases tannins alongside the film, which may tint the water brown and gently lower pH. That process is harmless and is covered in detail in our guide to driftwood tannins. Test your water as you normally would, keep up routine water changes, and watch your livestock's behavior; if everyone is active and eating, the bloom is a cosmetic phase, not an emergency.
How to Reduce Biofilm Before the Wood Goes In
You cannot completely prevent biofilm on genuinely new wood — if there are sugars in the surface, microbes will find them. But proper preparation dramatically shortens the bloom, which is why preparation is worth the effort for any new piece of hardscape.
Step 1: Scrub the wood
Start with a stiff brush under running water and scrub every crevice. You are removing loose bark, dust, and the soft outermost fibers — exactly the material that fuels the heaviest early bloom. Skip the soap and detergents entirely; residues are far more dangerous to aquarium life than any biofilm. For a full walkthrough of every preparation method, see how to prepare driftwood for your aquarium.
Step 2: Boil it if the size allows
Boiling for one to three hours kills surface organisms and draws out a large share of soluble sugars and tannins in advance — essentially letting the biofilm's first meal happen in a pot instead of your tank. Very large pieces that do not fit in a pot can be poured over with boiling water in a bathtub or bin, rotated periodically. Let the wood cool naturally before handling.
Step 3: Soak it
Submerge the wood in a bucket of dechlorinated water for one to three weeks, changing the water every few days. You will often see the white film bloom and fade right there in the bucket — which is exactly the point. By the time the wood enters your tank, the heaviest phase is already over. Soaking also helps dense pieces like mopani wood become waterlogged so they sink reliably.
Quick-reference checklist
- Scrub with a stiff brush under running water — no soap, ever
- Boil 1–3 hours where possible, or pour boiling water over large pieces
- Soak 1–3 weeks with regular water changes until the film in the bucket peaks and fades
- Inspect for remaining soft bark or loose fibers and scrub again
- Place in the tank and expect only a light, brief bloom if any
What to Do When the Film Appears in Your Tank
If you skipped preparation or the bloom is happening anyway, you have four good options. All of them are valid; pick the one that fits your setup and temperament.
Option 1: Do nothing
This is the approach most experienced aquarists recommend. Leave the wood alone, keep your normal water-change schedule, and let the biofilm run its course. In most tanks the film peaks around week one or two and fades to nothing by week four to six. The main requirement is patience — and the discipline not to keep pulling the wood out "to check on it," which just resets the clock.
Option 2: Brush it off during water changes
If the fuzz bothers you aesthetically, scrub it gently with a soft toothbrush while siphoning during your regular water change so the dislodged film is removed with the old water. Avoid aggressive scrubbing that tears up the wood's surface; you only want to knock back the excess. One gentle pass per week is plenty.
Option 3: Let the cleanup crew work
Shrimp, snails, and otocinclus will graze biofilm enthusiastically. Adding a small crew of Amano shrimp or nerite snails to a newly scaped tank is one of the most pleasant solutions — you get active livestock and a self-cleaning piece of wood at the same time. Just make sure your tank is cycled and the animals' basic needs are met first; never add livestock purely as a janitorial service before the tank is ready for them.
Option 4: Temporary removal for stubborn pieces
If a particular piece is producing an exceptionally heavy bloom that keeps regenerating, pull it out, boil or hot-soak it for a few more days, and put it back. This is rarely necessary, but it works when a piece is unusually sugary. Do not resort to chemical treatments, hydrogen peroxide baths, or bleach — the cure is worse than the harmless film.
When It Is NOT Biofilm: Warning Signs to Watch For
Genuine driftwood biofilm is white, gray, or translucent, slimy or fuzzy to the touch, confined to the wood's surface, and appears within the first days to weeks of submerging new wood. The following signs suggest something else is going on and deserve a closer look:
- Green, blue-green, or black coatings — these point to algae or cyanobacteria growing on the wood, a light/nutrient balance issue rather than harmless biofilm.
- Film appearing months later on long-established wood — could indicate excess organic waste in the tank feeding a bacterial bloom; check feeding habits and filter maintenance.
- Foul, rotten-egg odor around the wood — the wood itself may be soft-rotting (common with non-aquarium-safe softwoods or pieces collected outdoors); remove and replace the piece.
- Livestock gasping, lethargy, or deaths coinciding with the bloom — the film itself does not kill fish, so look for the real cause: test ammonia, nitrite, and oxygen immediately rather than blaming the wood.
- Thick white strands spreading onto substrate and glass — a systemic bacterial bloom, often after a crash or overfeeding, needs water testing and water changes, not wood scrubbing.
The honest rule: biofilm stays on the wood, appears early, smells like nothing much, and fades on its own. Anything that breaks that pattern earns investigation.
Prevention Tips for Future Pieces
Every new piece of driftwood you buy will go through some version of this phase, but you can make each one easier than the last:
- Buy from aquarium sources. Reputable aquarium shops sell wood that is typically cleaner and better suited to submersion than random pieces from a garden center or beach. Choosing the right driftwood for aquascaping covers which types suit which goals.
- Always prepare before placement. The scrub–boil–soak routine above is the single biggest factor in how dramatic the bloom will be.
- Cycle first, scape in parallel. A mature, cycled tank with an established cleanup crew handles a biofilm bloom far better than a brand-new setup — plan your hardscape timing around your cycle.
- Resist chemical shortcuts. Algaecides and antibacterial products marketed against "white slime" risk your livestock and your beneficial bacteria for a problem that resolves itself for free.
- Photograph the bloom. Seriously — six months later you will enjoy comparing the slimy branch to the beautifully seasoned, algae-patinaed hardscape it became. It also helps you reassure the next beginner you meet.
Frequently Asked Questions
How long does white fungus on driftwood last?
Most blooms peak within the first one to two weeks and disappear entirely in two to six weeks, depending on the wood species, how much surface sugar it contained, and whether shrimp or snails are grazing it. Heavily prepared wood may show almost no film at all, while a raw piece of mopani can look alarming for a month before clearing. If it persists beyond eight weeks, the wood may still be leaching — remove it for another boil-and-soak round.
Can white fungus on driftwood kill my fish?
No — the biofilm itself is not toxic and does not attack fish. However, never dismiss livestock distress by blaming the film: if fish are gasping or dying while the wood is blooming, test ammonia, nitrite, and dissolved oxygen immediately. The cause will be a water-quality problem that happened to coincide with the new wood, such as an uncycled tank, and that is what needs fixing. Observe your livestock daily during the bloom as good practice.
Should I take the driftwood out of the tank to clean it?
Usually not. Removing the wood restarts the colonization clock and disturbs your scape for no real gain. The better move is a gentle brush-off during your normal water change so dislodged film is siphoned away. Only remove the piece if the bloom is exceptionally heavy and regenerating after weeks, in which case a few extra days of boiling and soaking outside the tank will finish the job faster.
Will shrimp and snails eat the white fungus?
Yes — biofilm is a natural food source, and cherry shrimp, Amano shrimp, nerite snails, and otocinclus graze it readily. Many aquarists intentionally let a new piece bloom in a shrimp tank as free first food. Do not add livestock before the tank is cycled and stable just to clean the wood, though; the film is harmless, but an uncycled tank is not. Let the bloom be a bonus, not the reason for stocking.
Is boiling driftwood enough to prevent the white film?
Boiling reduces the bloom significantly but rarely eliminates it entirely, because it cannot extract every soluble compound from deep in the wood. The most reliable prevention is the full routine — scrub, boil, then soak for one to three weeks with water changes until any film in the bucket peaks and fades. Even then, expect a light, brief bloom in the tank and treat it as a normal part of the wood seasoning process.
How can I tell biofilm apart from mold on driftwood?
Underwater biofilm looks like white or translucent slime, fuzz, or a jelly glaze and appears within days of submerging new wood — this is the harmless version. True mold is a problem mainly on wood kept in damp air, appearing as distinct fuzzy patches in green, black, or blue with a musty smell. In the tank, any green or blue-green growth is more likely algae than mold. When in doubt, biofilm stays on the wood and fades in weeks; anything colorful, foul-smelling, or spreading deserves closer attention.
The Slime Is a Phase, Not a Problem
Every seasoned aquarist has stared at a slimy branch and felt that same flicker of worry — and every one of them has watched it vanish on its own a few weeks later, leaving behind beautifully seasoned hardscape. Prepare your wood well, keep your water changes steady, let your shrimp do their part, and give the microbes time to finish their meal. The white fungus on driftwood is not your tank failing; it is your tank's biology working exactly as nature intended, one invisible colony at a time.
Tissue-culture plants are the exception — they’re grown in sterile gel and adapt with minimal melting, which is part of what you’re paying for. Plants bought submersed from another hobbyist’s tank also transition with little melt, since they’re already in the right form.
Which Plants Melt Most (and Least)
Heavy melters (expect significant leaf loss)
- Cryptocorynes — infamous for “crypt melt,” sometimes dropping every leaf after any disturbance. They almost always recover from the roots within weeks.
- Stem plants grown emersed — rotala, ludwigia, and hygrophila often shed lower emersed leaves while the growing tips transition.
- Amazon swords — emersed-grown swords typically lose their broad oval aerial leaves and replace them with longer submersed ribbon leaves.
Light melters
- Anubias, java fern, bucephalandra — slow-growing rhizome plants transition gradually; occasional old-leaf melt but rarely dramatic.
- Vallisneria — usually transitions well, though it dislikes the move itself and may sulk for a week.
- Floating plants — minimal melt since their leaves were already at the air-water interface.
The Acclimation Protocol
Step 1: Quarantine or dip first
Before acclimating to your tank’s conditions, make sure you’re not acclimating pests along with the plant. Run new arrivals through our quarantine and dip protocol — it adds days upfront but prevents months of regret.
Step 2: Float to temperature-match (30 minutes)
Float the bag or container in your tank for 20–30 minutes to equalize temperature. Plants are less temperature-sensitive than fish, but a 10°F shock on top of transplant stress is an avoidable insult.
Step 3: Trim before planting
Remove any leaves that are already damaged, yellowing, or heavily algae-covered — they won’t recover and they’ll rot in your tank, feeding algae. For stem plants, trim off the bottom inch and any emersed leaves that look unlikely to adapt; the plant wastes energy maintaining leaves it’s going to shed anyway. Keep the healthy growing tips — that’s where recovery starts.
Step 4: Plant correctly the first time
Follow our planting guide — right depth, crown exposed on rosettes, rhizomes unburied on epiphytes. Every uprooting and replanting restarts the acclimation clock, so get placement right on the first attempt. Decide where each plant goes before it goes in the water.
Step 5: Run a gentle first week
For the first 7 days after planting:
- Moderate light — run your normal photoperiod but consider dropping intensity 20–30% if your light is dimmable. Blast-level light on a melting plant grows algae on the dying leaves, not recovery.
- Stable CO2 — if you inject CO2, keep it consistent. Fluctuating CO2 during acclimation is a melt accelerator. If you’re low-tech, this doesn’t apply — see growing without CO2.
- Half-strength fertilizer — new plants with damaged leaves can’t use full dosing, and the excess feeds algae. Ramp to full strength over 2–3 weeks per our fertilizer schedule.
- No disturbance — don’t move, trim, or “check on” new plants for at least two weeks. Every touch resets root establishment. This is especially critical for crypts.
Step 6: Remove melt, keep the base
As emersed leaves melt, remove the mushy material promptly — decaying leaves release ammonia and grow fungus that can spread to healthy tissue. But never discard the plant while the crown, rhizome, or roots are firm and alive. A crypt that’s lost every leaf but has firm roots is a plant that’s about to recover, not a dead plant. Give it 3–4 weeks before judging.
Telling Normal Melt From Real Problems
Normal transition melt:
- Affects oldest/emersed leaves first, newest growth last
- New submersed leaves emerge even as old ones dissolve
- Roots and crown stay firm and white/green
- Timeline: 1–4 weeks, then obvious new growth
Concerning melt (see our full melting diagnosis guide):
- New growth also melts or emerges deformed
- Rhizome or crown turns mushy and brown — this is rot, not transition
- Entire plant dissolves within days with no new growth after 4+ weeks
- Melting spreads to established plants that weren’t recently moved
Buying Tips to Minimize Melt
- Buy submersed-grown when available — hobbyist-grown cuttings transition with almost no melt.
- Choose tissue culture for sensitive species — crypts and delicate stems establish far more reliably from sterile cups.
- Avoid plants already melting in the store tank — some melt is normal, but a plant that’s mostly mush at purchase has less energy for recovery.
- Transport carefully — keep plants damp and out of direct sun/heat. A plant that dries out or cooks in a hot car melts far worse than one transported properly.
The First-Month Timeline: What to Expect Week by Week
Knowing what’s normal when removes most acclimation anxiety. Here’s the typical timeline for a healthy plant adapting to a new tank:
Week 1: The quiet week
Almost nothing visible happens. The plant is growing roots you can’t see and assessing its new environment. Some species (vallisneria, stem plants) may start shedding their lowest leaves. This is normal. Resist the urge to “help” — no moving, no extra fertilizer, no light changes. The most common beginner mistake is intervening during a week when the correct action is nothing.
Week 2: Melt peaks
This is when emersed leaves give up in earnest. Crypts may drop everything; swords shed their broad aerial leaves; stem plants lose lower foliage. It looks catastrophic and it’s usually fine. Keep removing mushy material, keep conditions stable, and watch the crown and growing tips — if those are firm and green, recovery is already underway.
Week 3: The turn
New submersed-adapted leaves emerge — smaller, thinner, often a slightly different shade of green than the emersed foliage. Stem plant tips start growing visibly; crypts push tiny curled leaves from the crown; swords unfurl narrow ribbon leaves. This is the moment most beginners exhale for the first time.
Week 4+: Established
New growth outpaces melt, and the plant is functionally yours. You can resume full-strength fertilizer, normal trimming, and stop treating it as fragile. Some slow growers (anubias, bucephalandra) take 6–8 weeks to show obvious progress — that’s their normal speed, not a problem.
Acclimating Different Plant Formats
Tissue-culture cups
Sterile, pest-free, and already adapted to high-humidity (not emersed) growth — tissue cultures melt the least of any format. Rinse the agar gel off gently (leftover gel rots and feeds fungus), split the portion into small plantlets, and plant per our planting guide. They establish slowly for the first two weeks, then accelerate. No dip needed, minimal acclimation stress — this is the premium experience you’re paying for.
Potted plants
Remove the pot and strip away the rockwool completely — leftover rockwool traps debris and rots. Tease the root mass apart gently; if it’s a dense mat, splitting it into 2–3 smaller portions actually establishes faster than planting one big clump (more growing points, better water flow around roots). Potted plants are usually emersed-grown, so expect the standard 2–4 week melt cycle.
Bare-root / bunched stems
Typically sold as weighted bunches. Remove any bands, foam, or weights, strip the lower leaves, and plant stems individually or in small groups. Bunched stems from the store are often already transitioning — check for new submersed growth at the tips, which tells you the plant is mid-adaptation and will settle quickly.
Hobbyist cuttings
Already submersed-grown and the fastest to establish — often showing new growth within days. The main acclimation factor is water-parameter difference between the two tanks. Float to temperature-match, plant promptly, and they’ll usually take off with minimal melt. This is why experienced hobbyists prefer trading cuttings over buying potted plants.
Frequently Asked Questions
Should I use a “plant starter” or transplant fertilizer?
Products marketed for transplant shock are mostly B-vitamins and mild hormones. They don’t hurt, but there’s no strong evidence they help aquarium plants specifically. Stable conditions and patience outperform any bottle. Save the money for more plants.
My new plant melted completely — bare crown, no leaves. Is it dead?
Probably not, if the crown or rhizome is firm. Crypts and swords routinely lose 100% of their leaves and regrow from the base within a month. The test is firmness: firm and pale/green means alive; mushy and brown/black means rot. Give firm-but-leafless plants a full 4 weeks before declaring them dead.
Can I speed up acclimation with extra light or CO2?
No — and trying usually backfires. A melting plant can’t use extra light; the excess just grows algae on its dying leaves. Keep light moderate and CO2 stable (not boosted) during acclimation. Growth speed comes from the plant’s own adaptation timeline, which you can’t rush, only avoid delaying.
Should new plants go straight into my main display tank?
After quarantine/dipping, yes — there’s no benefit to a separate “growing-in” tank for most plants. They acclimate to your water fastest in the tank they’ll live in. The exception is very delicate species going into a tank with boisterous fish; give those a few weeks in a calm corner or breeder box first.
The Patience Rule
The single most important acclimation skill is restraint: plant it right, set gentle conditions, remove decay, and then leave it alone for a month. The hobbyists with the best plant growth aren’t doing something clever in week one — they’re simply not interfering in weeks two through four while the plants do what they’ve evolved to do. Melt looks like failure and feels like failure, but in most cases it’s the visible part of a plant successfully becoming yours.