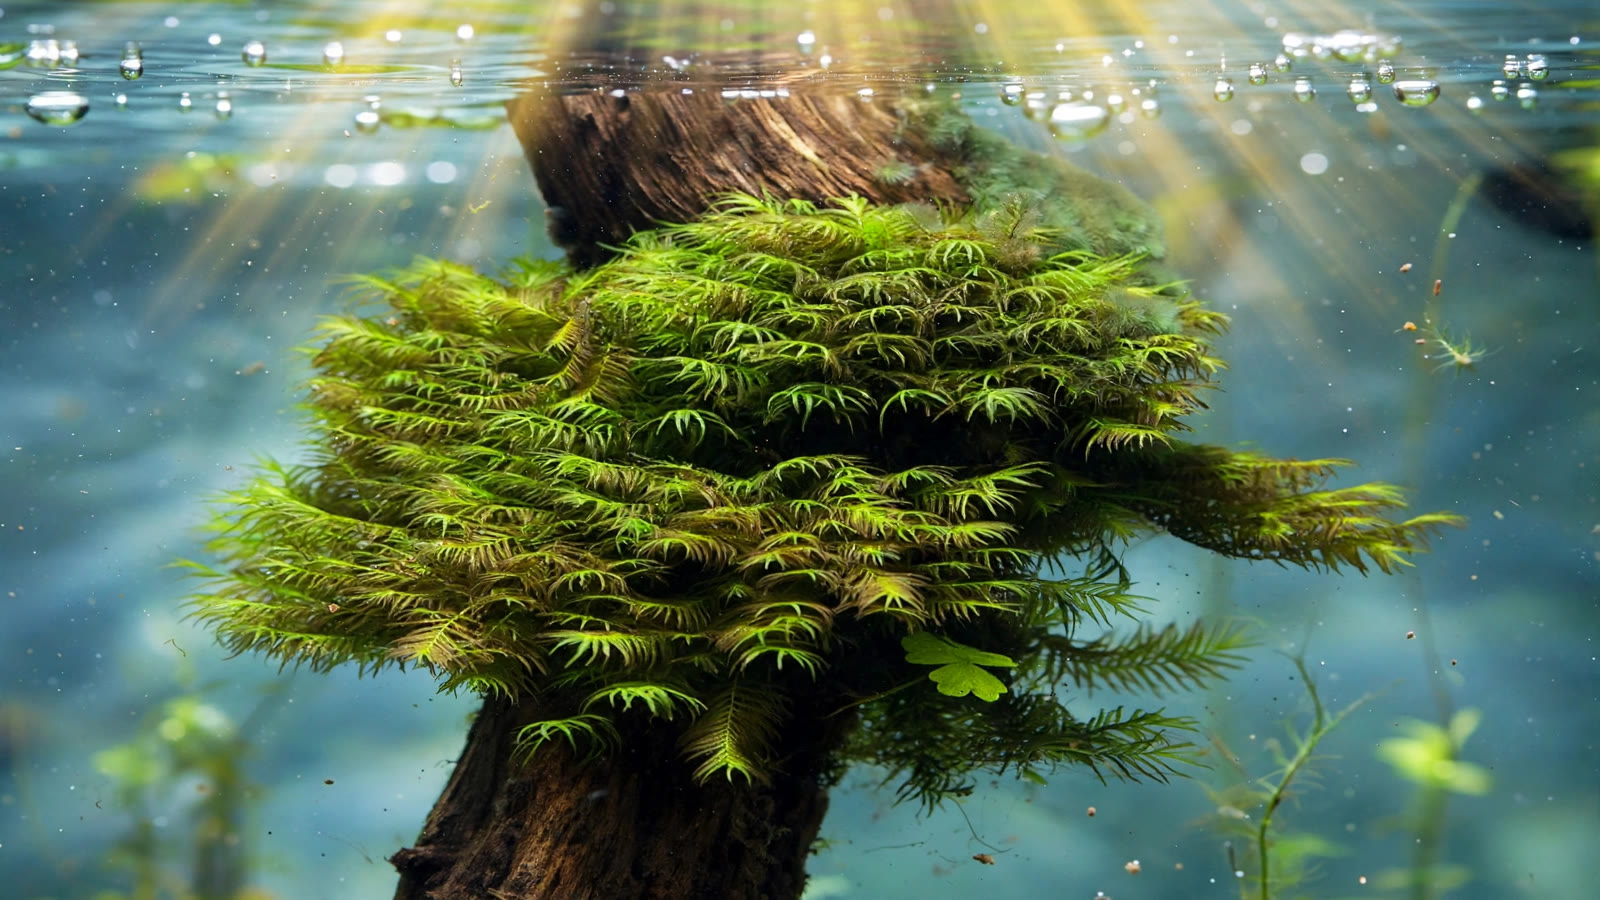
Most aquarium mosses reward your patience and then immediately embarrass you: one untrimmed corner of java moss becomes a tumbleweed that drifts across the tank and colonizes the filter intake. Proper fissidens fontanus care sidesteps that frustration entirely. Known in the hobby as phoenix moss or US fissidens, this North American native grows in dense, feather-like rosettes that anchor tightly to wood and rock and simply stay where you put them. It is one of the slowest-growing mosses in the trade, which means it never turns into an unmanageable mat — but it also means you need to plant it with intention and let it do its unhurried work.
This profile covers everything phoenix moss needs: care parameters, attachment methods, propagation, aquascape placement, and how it compares to the better-known mosses.
What Is Fissidens Fontanus?
Fissidens fontanus — phoenix moss — is an aquatic moss in the Fissidentaceae family, native to streams and rivers in North America. Each stem carries small, lance-shaped leaves arranged in two opposite rows, which gives the fronds their unmistakable feather or palm-frond appearance when viewed up close. Viewed from a normal distance, an established patch reads as a plush, deep-green cushion with a finely stippled texture.
The "phoenix" name is thought to come from the way new fronds appear to rise in tufts from the patch, like small flames — and once established, the moss has a reputation for persisting in tanks long after other delicate plants have given up. It is sold loose, on mesh pads, on driftwood, or as tissue-culture cups, and tissue-culture stock is increasingly common as Fissidens fontanus gains popularity in planted-tank retail.
Why It "Stays Put"
The practical superpower of phoenix moss is its anchoring behavior. Unlike java moss, which produces loose, stringy growth that breaks off and drifts, fissidens fontanus grows in short, compact fronds that weave themselves into a tight mat. Once the mat has gripped a piece of driftwood or rock — a process that takes a few weeks — it holds on firmly. You can trim it without a snowstorm of fragments, reposition the hardscape without shedding, and lean it against the filter outflow without finding pieces of it in your mechanical filtration a month later.
This matters enormously in shrimp tanks and nano aquariums, where loose moss debris clogs pre-filters and detracts from the clean look small tanks depend on. If your main complaint about mosses has always been the mess, phoenix moss is the moss that finally behaves.
Fissidens Fontanus Care Parameters
Phoenix moss is forgiving about chemistry and lighting but picky about temperature. The table below summarizes its accepted range; the notes underneath explain the details that actually affect your results.
| Parameter | Range | Notes |
|---|---|---|
| Temperature | 18–26 °C (64–79 °F) | Prefers the cooler end; growth stalls above ~26 °C |
| pH | 5.5–7.5 | Adapts across soft and moderately hard water |
| General hardness | Soft to moderate (1–10 dGH) | No strict requirement |
| Lighting | Low to medium | High light speeds growth slightly but invites algae |
| CO₂ | Not required | Beneficial; noticeably faster, denser growth with injection |
| Flow | Gentle to moderate | Circulates nutrients through the mat and deters detritus |
| Growth rate | Very slow | Expect weeks before new attachment is firm; months for a full mat |
Temperature is the lever that matters most. Phoenix moss does its best work in cool, clean water — the classic conditions of a caridina shrimp tank or an unheated indoor aquarium. In warmer tanks (above about 26 °C / 79 °F) it survives but grows sluggishly and the fronds can thin out, which is why some keepers in hot climates list it as fussy. If your tank runs warm, place the moss in the coolest corner and give it slightly more flow.
Lighting and CO₂ are negotiable. Low-to-medium light is the sweet spot: enough to keep the moss deep green, not so much that thread algae colonizes the dense mat. Added CO₂ is genuinely useful here — it is one of the few interventions that visibly changes how fast fissidens grows — but the moss will establish perfectly well in a low-tech tank as long as you are patient. Liquid carbon supplements are a partial alternative, though keep them away from shrimp tanks unless dosed conservatively.
How to Attach and Plant Phoenix Moss
Phoenix moss will not anchor itself reliably if you just drop it in the tank. It needs to be held against a surface for the first few weeks while its rhizoids grip. These are the three methods that work.
Tying to Driftwood or Rock
- Rinse the moss and spread a thin, even layer over the target area. Thin layers attach faster and grow denser than thick clumps.
- Wrap dark cotton thread, fishing line, or fine mesh around the hardscape to hold the layer in place. Cotton thread rots away in a few months, by which point the moss has attached; fishing line stays put and can be removed later.
- Place the piece in the tank in gentle-to-moderate flow. Resist the urge to check daily — disturb it as little as possible for the first three weeks.
On driftwood, phoenix moss eventually carpets the wood's contours and produces that ancient, forest-floor look that photographers love. On rock — especially seiryu or dragon stone — it softens hard edges and tucks into crevices.
Cyanoacrylate (Super Glue) Method
For instant attachment, dab a small amount of gel cyanoacrylate on a dry spot of the hardscape, press a pinch of moss onto it, hold for a few seconds, and return the piece to the tank. Gel glue cures in water within seconds and is fish- and shrimp-safe once cured. This is the fastest way to start vertical accents — moss glued to the side of a vertical rock face or the trunk of a driftwood "tree" — because there is no thread to shift. Use it sparingly; a few well-placed anchor points beat one big glued blob, which can suffocate the moss underneath.
Moss Walls, Carpets, and Mesh Sandwiches
Sandwich a thin layer of phoenix moss between two sheets of plastic or stainless-steel mesh, cable-tie the edges, and lean or suction-cup the panel against the back glass. Within a couple of months the fronds push through both sides and you get a living wall with the moss's signature feathered texture. The same technique laid flat on the substrate makes a slow but elegant moss carpet — slower than monte carlo, but far lower maintenance once established.
Growth Rate and Maintenance
Be honest with yourself before you buy: phoenix moss grows slowly enough that impatience is the number one killer of good results. A patch might double in size over two to three months under good conditions. Plan your layout around the moss you plant, not the moss you imagine in six months — buy enough to cover the area you want covered from day one.
Trimming
Unlike fast mosses, phoenix moss rarely needs trimming. When a mat gets too thick or starts to look shaggy, lift the section gently and trim with fine aquascaping scissors, removing the cut fronds from the tank rather than letting them settle. Because the mat is compact, trimmings stay in one place instead of scattering — the "stays put" advantage again. One or two trims a year is typical in low-tech setups.
Algae and Debris Management
The dense mat that makes phoenix moss attractive also traps detritus and offers algae a sheltered surface. Prevention beats cure here:
- Start clean. Plant in an established, stable tank rather than a brand-new cycling one, and quarantine new moss the way you would any new plant.
- Keep flow moving through the patch. A gentle current carries waste out of the mat before it rots in place.
- Don't over-fertilize. In a low-tech tank, lean dosing is plenty for a slow moss; excess nutrients feed hair algae, which is miserable to remove from a feathered mat.
- Use a soft toothbrush for spot cleaning. Gently brush the surface to lift settled detritus during water changes, then siphon it out.
If hair algae does colonize the mat, a brief blackout or a conservative liquid-carbon spot treatment usually resolves it — but remove as much manually first, since chemicals work far better on thinned-out algae than on a dense infestation.
Where Phoenix Moss Shines in Aquascapes
Phoenix moss is a texture plant, and texture plants earn their place by contrast. A few placement ideas that play to its strengths:
- Shrimp tanks: the dense, cool-water mat is an ideal grazing and hiding surface for cherry and crystal shrimp, and shrimplets shelter in the fronds. The moss's cool-water preference overlaps perfectly with caridina parameters.
- Nano tanks: its tiny leaf scale keeps it in proportion in 5–10 gallon layouts where bolder mosses look coarse.
- Wood and stone accents: tuck it into hardscape junctions — where a branch meets the trunk, where two rocks touch — to soften transitions and suggest age.
- Iwagumi and minimalist scapes: a single moss-softened stone can carry an entire minimalist composition; pair it with one anubias or bucephalandra for the second texture.
One caution: because it grows so slowly, phoenix moss is a poor choice for outcompeting algae during a new tank's ugly phase. In fresh setups, faster plants — stem plants, floaters, or a quicker moss like java moss — do the heavy lifting first; add phoenix moss once the tank is stable and nutrient-cycling is mature.
Propagation
Propagation is simple division — there are no runners, rhizomes, or seeds to manage in the aquarium. Once a patch is established (firmly attached and several millimeters of new growth), pull or cut a clump off, divide it into smaller pieces, and attach the divisions to new surfaces with thread or glue.
The key insight: more, smaller divisions colonize faster than one large clump. Ten pea-sized pieces spread across a driftwood branch will merge into a continuous mat sooner than one large chunk, because each piece puts out new fronds in all directions. Tissue-culture cups are the most cost-effective starting stock for large projects — a single cup can be teased into twenty or more planting pieces.
Troubleshooting Phoenix Moss
| Symptom | Likely cause | Fix |
|---|---|---|
| Browning or yellowing fronds | Too warm, ammonia spike, or dried out in transit | Move to cooler water; confirm cycle is stable; trim dead sections — healthy tissue regrows from the base |
| Moss won't attach after a month | Too thick a layer, or disturbed too often | Thin to a single layer, re-tie firmly, and leave it alone |
| Hair algae threading through the mat | Excess light/nutrients, low flow | Reduce light period, lean out dosing, increase flow, remove manually before spot-treating |
| Growth stalled, fronds sparse | Temperature above ~26 °C, or very lean water with no CO₂ | Cool the tank if possible; add CO₂ or modest all-in-one fertilizer |
| Melting after purchase | Transit stress or emersed-to-submersed transition | Remove mushy portions, keep the firm green core; give it 2–3 weeks in stable conditions |
Phoenix Moss vs. Other Aquarium Mosses
How does fissidens fontanus stack up against the mosses most keepers already know? This comparison makes the trade-offs concrete:
| Trait | Phoenix moss | Java moss | Christmas moss | Flame moss |
|---|---|---|---|---|
| Growth rate | Very slow | Fast | Medium | Slow |
| Stays put | Excellent | Poor — sheds constantly | Good | Good |
| Texture | Feathery, palm-like | Stringy | Triangular fronds | Twisted upward spirals |
| Temperature | Cool preference | Wide tolerance | Wide tolerance | Wide tolerance |
| Difficulty | Easy (needs patience) | Very easy | Easy | Easy |
| Best for | Nano tanks, shrimp tanks, detail work | Beginners, fry cover, fast coverage | Structured tree/branch shapes | Accent clumps, foreground mounds |
None of these is strictly better — they solve different problems. Our java moss care guide and christmas moss care guide cover the fast-coverage options, flame moss fills the accent niche, and our best aquarium mosses roundup tours the whole category.
Frequently Asked Questions
Is phoenix moss good for beginners?
Yes — its water-parameter tolerance is wide and it forgives low light and no CO₂. The real beginner test is patience: it grows slowly enough that new keepers sometimes assume it is dead. If you can leave it undisturbed for a month and keep the tank stable, it is one of the most trouble-free plants you can own.
Does fissidens fontanus need CO₂?
No, it does not need CO₂ injection. It establishes fine in low-tech tanks with modest light and lean fertilization. That said, added CO₂ is the single most effective growth accelerator for this moss — expect noticeably faster spread and denser fronds. Treat CO₂ as a performance upgrade rather than a requirement.
How do I attach phoenix moss to driftwood?
Spread a thin layer over the wood and hold it with dark cotton thread, fishing line, or a mesh wrap for three to four weeks while it anchors. For instant results, press small pinches onto gel cyanoacrylate (super glue gel) — it cures underwater in seconds and is shrimp-safe once cured. Thin layers attach faster than thick clumps, and avoid disturbing the piece during the first weeks.
Why is my phoenix moss turning brown?
Browning usually traces to one of three causes: temperatures above ~26 °C (79 °F), an unstable or ammonia-spiked new tank, or tissue that dried out during shipping. Trim away the dead brown fronds, move the moss to cooler, stable water, and give the green core two to three weeks — healthy phoenix moss typically regrows from the base rather than dying outright.
How fast does phoenix moss grow?
Very slowly. Under good conditions a patch may double in size every two to three months; in cool low-tech water, growth can be barely visible month to month. This is a feature, not a flaw — the moss never overruns the scape. Plan layouts with enough starting material to cover your target area from day one instead of waiting for it to fill in.
Can phoenix moss grow on the substrate as a carpet?
Yes, using the mesh-sandwich technique: a thin layer of moss pressed between two sheets of plastic or stainless-steel mesh and laid flat on the substrate. Fronds grow through both sides and knit into a low, textured carpet within a few months. It is far slower than dedicated carpet plants but needs almost no maintenance once established.
The Verdict: A Moss for Keepers Who Plan Ahead
Fissidens fontanus is not the moss you buy for instant gratification. It is the moss you buy when you are tired of mosses that misbehave — when you want a feathered, deep-green cushion on your driftwood that stays exactly where you put it, holds its texture for years, and never buries your filter intake in shed fragments. Its demands are modest: cool, clean, stable water and a few weeks of undisturbed anchoring. Its reward is a plant that looks more deliberate and crafted than anything fast-growing can manage. Pair it with the quick growers for coverage, let the phoenix moss handle the detail work, and your aquascape gets the best of both worlds. For placement inspiration, browse our marimo moss ball care guide and java fern care guide — both share phoenix moss's love of low-light, low-maintenance setups.
Tissue-culture plants are the exception — they’re grown in sterile gel and adapt with minimal melting, which is part of what you’re paying for. Plants bought submersed from another hobbyist’s tank also transition with little melt, since they’re already in the right form.
Which Plants Melt Most (and Least)
Heavy melters (expect significant leaf loss)
- Cryptocorynes — infamous for “crypt melt,” sometimes dropping every leaf after any disturbance. They almost always recover from the roots within weeks.
- Stem plants grown emersed — rotala, ludwigia, and hygrophila often shed lower emersed leaves while the growing tips transition.
- Amazon swords — emersed-grown swords typically lose their broad oval aerial leaves and replace them with longer submersed ribbon leaves.
Light melters
- Anubias, java fern, bucephalandra — slow-growing rhizome plants transition gradually; occasional old-leaf melt but rarely dramatic.
- Vallisneria — usually transitions well, though it dislikes the move itself and may sulk for a week.
- Floating plants — minimal melt since their leaves were already at the air-water interface.
The Acclimation Protocol
Step 1: Quarantine or dip first
Before acclimating to your tank’s conditions, make sure you’re not acclimating pests along with the plant. Run new arrivals through our quarantine and dip protocol — it adds days upfront but prevents months of regret.
Step 2: Float to temperature-match (30 minutes)
Float the bag or container in your tank for 20–30 minutes to equalize temperature. Plants are less temperature-sensitive than fish, but a 10°F shock on top of transplant stress is an avoidable insult.
Step 3: Trim before planting
Remove any leaves that are already damaged, yellowing, or heavily algae-covered — they won’t recover and they’ll rot in your tank, feeding algae. For stem plants, trim off the bottom inch and any emersed leaves that look unlikely to adapt; the plant wastes energy maintaining leaves it’s going to shed anyway. Keep the healthy growing tips — that’s where recovery starts.
Step 4: Plant correctly the first time
Follow our planting guide — right depth, crown exposed on rosettes, rhizomes unburied on epiphytes. Every uprooting and replanting restarts the acclimation clock, so get placement right on the first attempt. Decide where each plant goes before it goes in the water.
Step 5: Run a gentle first week
For the first 7 days after planting:
- Moderate light — run your normal photoperiod but consider dropping intensity 20–30% if your light is dimmable. Blast-level light on a melting plant grows algae on the dying leaves, not recovery.
- Stable CO2 — if you inject CO2, keep it consistent. Fluctuating CO2 during acclimation is a melt accelerator. If you’re low-tech, this doesn’t apply — see growing without CO2.
- Half-strength fertilizer — new plants with damaged leaves can’t use full dosing, and the excess feeds algae. Ramp to full strength over 2–3 weeks per our fertilizer schedule.
- No disturbance — don’t move, trim, or “check on” new plants for at least two weeks. Every touch resets root establishment. This is especially critical for crypts.
Step 6: Remove melt, keep the base
As emersed leaves melt, remove the mushy material promptly — decaying leaves release ammonia and grow fungus that can spread to healthy tissue. But never discard the plant while the crown, rhizome, or roots are firm and alive. A crypt that’s lost every leaf but has firm roots is a plant that’s about to recover, not a dead plant. Give it 3–4 weeks before judging.
Telling Normal Melt From Real Problems
Normal transition melt:
- Affects oldest/emersed leaves first, newest growth last
- New submersed leaves emerge even as old ones dissolve
- Roots and crown stay firm and white/green
- Timeline: 1–4 weeks, then obvious new growth
Concerning melt (see our full melting diagnosis guide):
- New growth also melts or emerges deformed
- Rhizome or crown turns mushy and brown — this is rot, not transition
- Entire plant dissolves within days with no new growth after 4+ weeks
- Melting spreads to established plants that weren’t recently moved
Buying Tips to Minimize Melt
- Buy submersed-grown when available — hobbyist-grown cuttings transition with almost no melt.
- Choose tissue culture for sensitive species — crypts and delicate stems establish far more reliably from sterile cups.
- Avoid plants already melting in the store tank — some melt is normal, but a plant that’s mostly mush at purchase has less energy for recovery.
- Transport carefully — keep plants damp and out of direct sun/heat. A plant that dries out or cooks in a hot car melts far worse than one transported properly.
The First-Month Timeline: What to Expect Week by Week
Knowing what’s normal when removes most acclimation anxiety. Here’s the typical timeline for a healthy plant adapting to a new tank:
Week 1: The quiet week
Almost nothing visible happens. The plant is growing roots you can’t see and assessing its new environment. Some species (vallisneria, stem plants) may start shedding their lowest leaves. This is normal. Resist the urge to “help” — no moving, no extra fertilizer, no light changes. The most common beginner mistake is intervening during a week when the correct action is nothing.
Week 2: Melt peaks
This is when emersed leaves give up in earnest. Crypts may drop everything; swords shed their broad aerial leaves; stem plants lose lower foliage. It looks catastrophic and it’s usually fine. Keep removing mushy material, keep conditions stable, and watch the crown and growing tips — if those are firm and green, recovery is already underway.
Week 3: The turn
New submersed-adapted leaves emerge — smaller, thinner, often a slightly different shade of green than the emersed foliage. Stem plant tips start growing visibly; crypts push tiny curled leaves from the crown; swords unfurl narrow ribbon leaves. This is the moment most beginners exhale for the first time.
Week 4+: Established
New growth outpaces melt, and the plant is functionally yours. You can resume full-strength fertilizer, normal trimming, and stop treating it as fragile. Some slow growers (anubias, bucephalandra) take 6–8 weeks to show obvious progress — that’s their normal speed, not a problem.
Acclimating Different Plant Formats
Tissue-culture cups
Sterile, pest-free, and already adapted to high-humidity (not emersed) growth — tissue cultures melt the least of any format. Rinse the agar gel off gently (leftover gel rots and feeds fungus), split the portion into small plantlets, and plant per our planting guide. They establish slowly for the first two weeks, then accelerate. No dip needed, minimal acclimation stress — this is the premium experience you’re paying for.
Potted plants
Remove the pot and strip away the rockwool completely — leftover rockwool traps debris and rots. Tease the root mass apart gently; if it’s a dense mat, splitting it into 2–3 smaller portions actually establishes faster than planting one big clump (more growing points, better water flow around roots). Potted plants are usually emersed-grown, so expect the standard 2–4 week melt cycle.
Bare-root / bunched stems
Typically sold as weighted bunches. Remove any bands, foam, or weights, strip the lower leaves, and plant stems individually or in small groups. Bunched stems from the store are often already transitioning — check for new submersed growth at the tips, which tells you the plant is mid-adaptation and will settle quickly.
Hobbyist cuttings
Already submersed-grown and the fastest to establish — often showing new growth within days. The main acclimation factor is water-parameter difference between the two tanks. Float to temperature-match, plant promptly, and they’ll usually take off with minimal melt. This is why experienced hobbyists prefer trading cuttings over buying potted plants.
Frequently Asked Questions
Should I use a “plant starter” or transplant fertilizer?
Products marketed for transplant shock are mostly B-vitamins and mild hormones. They don’t hurt, but there’s no strong evidence they help aquarium plants specifically. Stable conditions and patience outperform any bottle. Save the money for more plants.
My new plant melted completely — bare crown, no leaves. Is it dead?
Probably not, if the crown or rhizome is firm. Crypts and swords routinely lose 100% of their leaves and regrow from the base within a month. The test is firmness: firm and pale/green means alive; mushy and brown/black means rot. Give firm-but-leafless plants a full 4 weeks before declaring them dead.
Can I speed up acclimation with extra light or CO2?
No — and trying usually backfires. A melting plant can’t use extra light; the excess just grows algae on its dying leaves. Keep light moderate and CO2 stable (not boosted) during acclimation. Growth speed comes from the plant’s own adaptation timeline, which you can’t rush, only avoid delaying.
Should new plants go straight into my main display tank?
After quarantine/dipping, yes — there’s no benefit to a separate “growing-in” tank for most plants. They acclimate to your water fastest in the tank they’ll live in. The exception is very delicate species going into a tank with boisterous fish; give those a few weeks in a calm corner or breeder box first.
The Patience Rule
The single most important acclimation skill is restraint: plant it right, set gentle conditions, remove decay, and then leave it alone for a month. The hobbyists with the best plant growth aren’t doing something clever in week one — they’re simply not interfering in weeks two through four while the plants do what they’ve evolved to do. Melt looks like failure and feels like failure, but in most cases it’s the visible part of a plant successfully becoming yours.