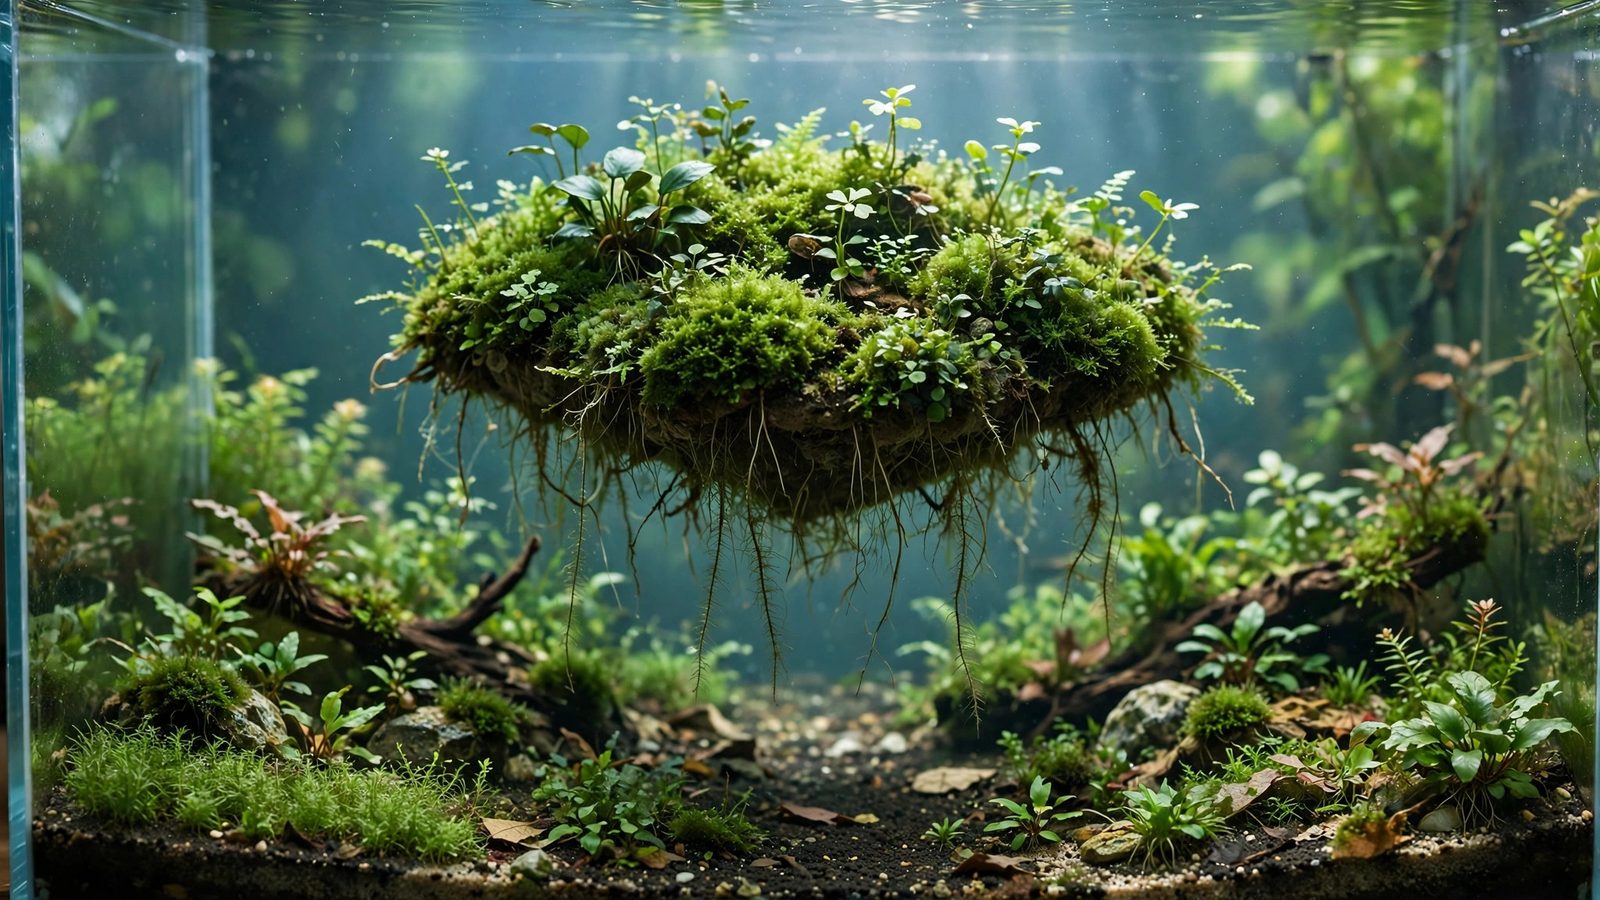
Most "floating island" aquascapes fail the same quiet way: the island reads as a regular hill on an obvious rock pile, or it slides forward and crushes the carpet underneath. A true floating island aquascape — rock, soil, and plants hovering over a ring of bare sand — is 80% engineering and 20% planting. This guide covers both, so yours floats on purpose, not by accident.
What Makes an Island "Float"
Your eye doesn't judge whether the island touches the substrate — it judges shadows and negative space. The island-style aquascape tradition showed that a lone mass surrounded by open sand draws the eye; the floating variant lifts that mass on hidden supports so the gap itself becomes part of the composition.
Three things create the illusion: a physical gap of 5–10 cm between the island's bottom edge and the substrate — tall enough to read as open water, short enough that supports stay rigid; darkness underneath, where trailing plants shadow the gap against bright surrounding sand; and distance — nothing may touch the island. One rock bridge, driftwood leg, or plant runner, and the brain files it under "hill" instead of "floating."
Pick your illusion type before building. A low hover (3–5 cm gap) suits nano tanks. A deep hover (8–12 cm) in a tank at least 45 cm tall is dramatic — fish visibly swim underneath. Deeper than ~12 cm, supports get hard to hide and the design reads as a mistake.
Three Support Methods, Compared Honestly
Every floating island needs something holding it up that the viewer can't see. Three approaches work, each with a real trade-off.
| Method | How it works | Capacity | Best for | Downside |
|---|---|---|---|---|
| Acrylic risers | 6–10 mm acrylic rods or plates under a rock/soil platform | 10–15 kg | Tanks 60 cm+ | Must be cut to exact height; algae coats them if neglected |
| Rock pillars | Stone columns hidden inside the island footprint | 20+ kg | Heavy stone islands | Peek out at wide gaps; hard to adjust |
| Suspension | Clear line or stainless wire from a rim brace above | 3–5 kg | Nano tanks; moss-only islands | Any sway looks wrong |
For a first build, use acrylic risers — cast, not extruded, which crazes underwater over time. Cut rods 2 cm longer than your target gap: three make a tripod for islands up to 30 cm wide, a fourth for anything wider; use plate risers when the island is taller than wide. Bond with aquarium-safe silicone, 24–48 hours cure — super glue goes brittle underwater and shears on structural joints.
Sizing the Island to Your Tank
Proportion errors sink more floating islands than anything else. Use the rules below as starting points, then sketch the layout on the front glass with a dry-erase marker before adding water — the hardscape-first method exists so you can fix proportion mistakes while everything is still dry.
| Tank length | Island footprint | Hover gap | Island height | Max wet weight |
|---|---|---|---|---|
| 30–45 cm (nano) | ≤ 20 × 15 cm | 3–5 cm | 8–12 cm | ~4 kg |
| 60 cm (standard) | ≤ 35 × 22 cm | 5–8 cm | 12–18 cm | ~8 kg |
| 90–120 cm | ≤ 55 × 30 cm | 8–12 cm | 18–28 cm | ~15 kg |
Two rules govern this table. First, the island's footprint should cover no more than ~60% of the floor in its longest dimension, and the open ring should never narrow below 5 cm — the minimum for the shadow band to read as water. Second, budget for wet weight: saturated aquasoil weighs 1.4–1.6 kg per liter, so a 6-liter soil cap is already ~9 kg before rocks. Keep total weight 30% under your supports' rating, and don't crowd the hover gap — creating real depth starts with keeping that layer open.
Choosing Rock and Soil That Won't Collapse
Build the island as a platform first, planting second. The platform is one or two large, flat-topped stones (seiryu, dragon stone, or slate) forming a tray 2–3 cm deep. Everything else — soil, plants, detail rocks — sits inside it, so the island reads as one geological mass rather than a loose pile.
Pick tray stone flat enough to stack without wobble and rough enough for silicone to grip: press each edge and rock it dry. If a stone pivots on a single contact point now, it will pivot underwater too — with plants and current adding leverage. Shim wobbles with stone wedges, then silicone them.
Soil choice matters more here than in a normal planted tank. Island soil sits on a sloped tray with a sheer drop at every edge, and loose granules migrate downhill with each water change. Use a high-CEC aquasoil capped with 1–2 cm of fine gravel or crushed lava rock — the cap pins the soil and its angular grains lock on slopes up to ~35 degrees. Steeper than that, terrace the island: stack two or three 5–7 cm mini-trays like wedding-cake layers. The same principle behind sloping substrate for depth applies at height — un-terraced steep soil on an island is a landslide waiting to happen.
The high-CEC aquasoil the soil section specifies: a high-CEC aquasoil like Fluval Stratum.
Building Your Floating Island Aquascape, Step by Step
Work dry — silicone joints need 24–48 hours of cure, and you can't test stability through water.
- Mark the footprint. With the tank empty, outline the island's footprint on the glass with masking tape, keeping 5 cm clear of every wall.
- Set the risers. Press your acrylic risers into position inside the footprint — flat faces of plate risers toward the viewing glass.
- Build the tray. Silicone the base stones into a platform tray on a table, cure fully, then set it on the risers and silicone the riser-to-tray joints. Full cure again.
- Load-test. Pile books or bottles totaling 130% of your estimated wet weight on the tray for 24 hours. If anything shifts, you found the failure on your counter, not under 60 liters of water.
- Add soil and cap. Fill the tray with moist aquasoil, press firm, add the gravel cap — keeping soil 3 cm below the tray rim so the first water change doesn't wash granules over the edge.
- Plant before flooding. Plant heavily and dry-start 2–3 weeks so root mats bind the soil before water and current work on it.
- Flood slowly. Run water over a plate or plastic bag, never directly onto the island.
Planting the Island for the Hover Effect
Plant in three layers: a skirt, a mass, and a crown. The skirt does the most work and gets forgotten most — plants trailing over the island's edge to shadow the gap: weeping moss, Anubias nana 'Petite', or Bucephalandra 'Wavy Green' in tray-wall crevices. Tie them to the tray edge with thread (attaching plants to rocks covers the technique) — never plant them in rim soil, or they'll creep outward and bridge the gap. Let the skirt hang 3–6 cm down, hiding the risers behind a dark curtain.
The mass is the island's body: dense rooters that make it look substantial — Cryptocoryne parva, Staurogyne repens, dwarf hairgrass. Avoid fast runners like Vallisneria or Sagittaria subulata; one runner reaching the floor bridges the gap and kills the illusion within a month.
The crown is 2–4 accent stems at the island's center, directly over the risers where weight is supported: Rotala rotundifolia, Ludwigia repens, or a small Echinodorus. Trim crowns to ≤15 cm above the soil in a 60 cm tank — taller crowns break the visual ceiling and catch current like sails.
Skirt plants get tied or glued to the tray edge: a dab of aquarium-safe plant glue like Seachem Flourish Glue.
Lighting, CO2, and Flow Around the Island
A floating island splits your tank into two light zones. The crown gets full light (30–50 PAR), while the substrate ring under the island sits in partial shadow — fine, since that ring should be bare sand or low-light carpet needing only 10–20 PAR. Blast the ring with 40 PAR and nothing growing there, and algae will colonize it.
Position your light slightly toward the back so the island's shadow falls on the rear substrate, invisible to the viewer — the front ring stays bright and the hover reads clearly. Light from dead center and the shadow pools under the island like a dark pit.
CO2 must reach the skirt and underside, where flow is weakest. Angle your diffuser outlet or lily pipe 20–30 degrees downward on the side opposite the island so current sweeps under it, and put a drop checker in the gap itself — if the gap reads blue while open water reads green, island plants are CO2-starved.
Fish and Shrimp Safety
The gap under the island is prime real estate for small fish — until a curious one wedges into a space it can't back out of. Keep every crevice in the support structure at least 4 cm wide, or seal it with silicone — the same entrapment logic behind safe shrimp tank aquascaping, applied vertically.
Stock livestock that sells the illusion: small schooling fish (ember tetras, chili rasboras, celestial pearl danios) swimming through the hover gap prove the island floats — 10–15 in a 60 cm tank. Corydoras forage the shadow ring safely; avoid large diggers (loaches, big cichlids) that can undermine riser footings. Cherry or Amano shrimp are ideal — they graze the skirt moss without disturbing structure.
One real hazard: during water changes, an exposed tray can shift if bumped by a siphon. Drain to no lower than the island's underside, and keep siphons 10 cm clear of supports.
Maintaining the Hover
A floating island degrades in three predictable ways. Skirt overgrowth is most common: moss and Anubias reach toward the light and eventually bridge the gap. Trim the skirt every 1–2 weeks back to 3–4 cm — the same discipline as regular aquascape trimming, applied to the zone most people ignore.
Algae on the risers is second: biofilm under bright light grows green dust algae, outlining your supports in neon. Wipe risers with a soft sponge during every weekly water change (25–30%).
Substrate creep is the slow one: soil washes over the tray rim and narrows the ring ~1 cm a month. Siphon the ring monthly, top up the gravel cap twice a year, and vacuum out any buildup over 2 cm when you rescape. Once the island matures, check focal point placement — it should sit at roughly one-third of the tank's length from either end, not dead center.
Frequently Asked Questions
Will the acrylic supports be visible through the water?
Not if you frost them and shadow the gap. Frosted cast acrylic has nearly the same refractive index as water, so it disappears at viewing distance — what gives supports away is light flashing off polished surfaces or algae coating them green. Frost with 400-grit sandpaper, trail skirt plants over the gap, and wipe the risers weekly.
How heavy can my floating island safely be?
Stay under 70% of your supports' rated capacity after estimating wet weight. Saturated aquasoil runs 1.4–1.6 kg per liter, wet rock roughly 2.5 kg per liter of volume. A typical 60 cm island — 5 liters of soil, 3 kg of rock, plants — lands around 10–12 kg wet, well within four acrylic plate risers rated at 15 kg. Load-test dry at 130% of your estimate for 24 hours.
Can I build one with a hang-on-back filter?
Yes, but keep the island away from the outflow. HOB output creates a strong downward current that pushes tall island plants sideways and washes soil off the tray's downstream edge. Keep at least 15 cm between the outflow and the island's edge, and baffle the flow if needed. Canister filters with lily pipes suit this style better.
Do I need CO2 for a floating island aquascape?
Not strictly, but it changes what you can plant. A low-tech island with Anubias, Bucephalandra, mosses, and Cryptocoryne parva thrives without injected CO2. For dense carpets or fast stem crowns, CO2 becomes nearly mandatory — the elevated position puts those plants in the highest-light, highest-demand zone. Liquid carbon won't reach the skirt in useful concentrations.
What causes a floating island to collapse?
Almost always one of three things: silicone joints flooded before full cure, top-heavy planting that catches current and levers the tray forward, or soil slumping off un-terraced slopes until the center of gravity shifts. Fix it in the build: 48-hour cures, tall plants over the risers, terraced trays on slopes above 35 degrees. A 5-degree tilt on your monthly level check is the early warning.
How do I clean under the island without disturbing it?
Use a narrow siphon or turkey baster in the hover gap during water changes, staying 10 cm clear of the risers. Detritus collects in the shadow ring because flow is weakest there, so it needs more attention than open substrate. Never jam tools into the gap — wipe with a soft sponge on a thin handle. Anything that rocks the island repeatedly works the silicone joints loose over months.
Build It Like It Has to Last
Build the platform like furniture, plant it like a garden, and maintain the gap like it's the whole point — because it is. Get the engineering right and the island floats a year from now; get it wrong and you'll own a very expensive hill.