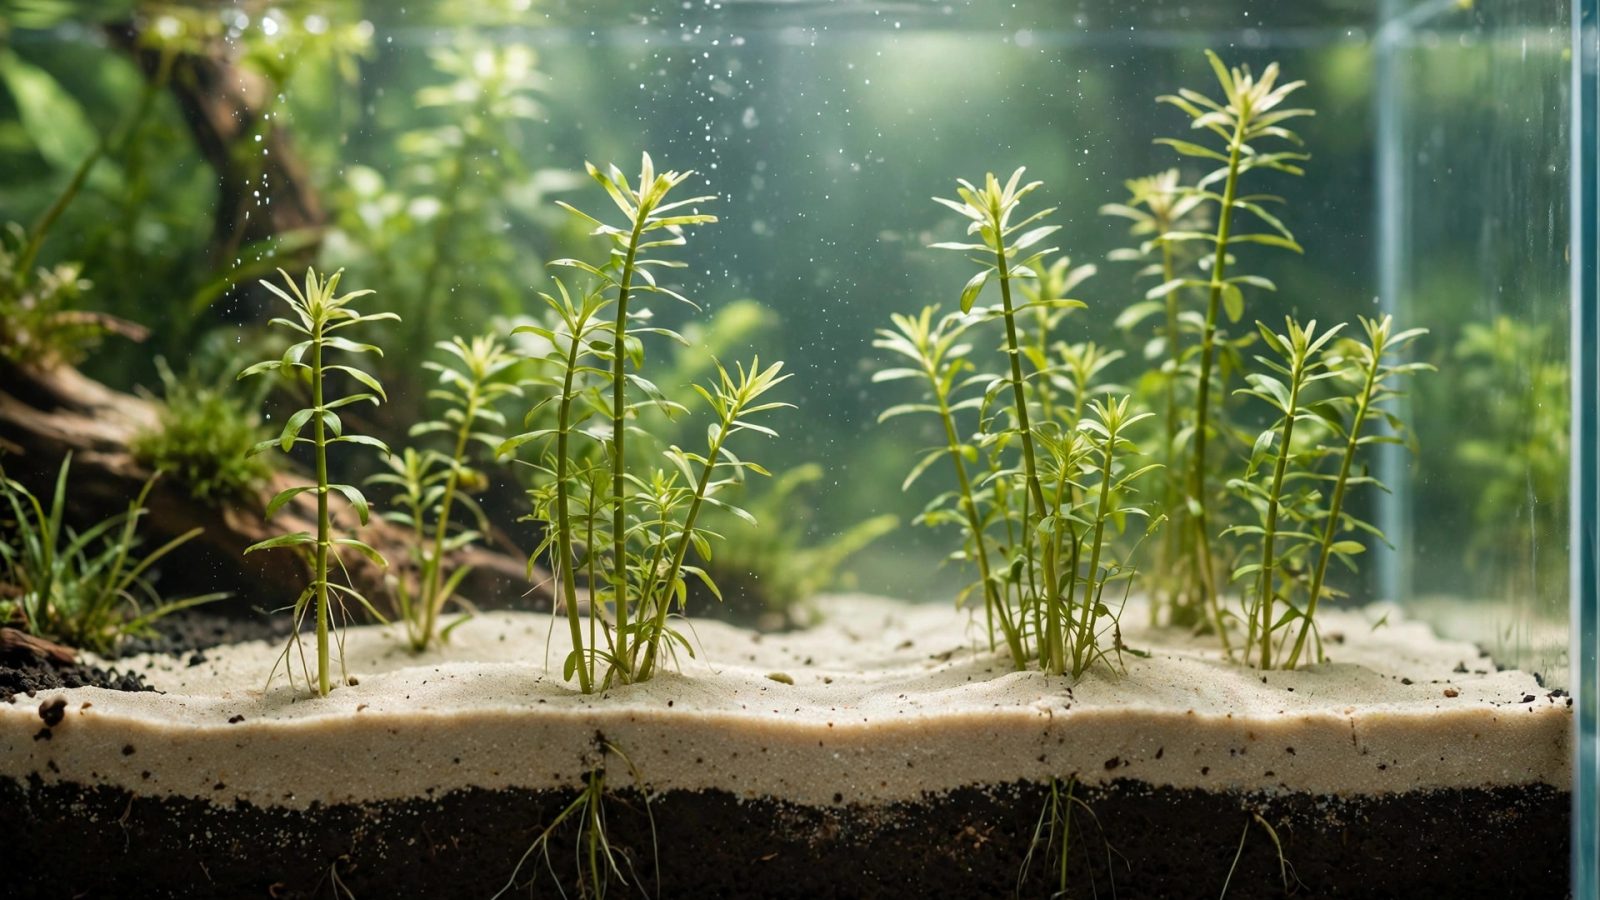
The cap is what makes a dirted tank work. Capping aquarium soil with sand seals the nutrient-rich dirt layer beneath a clean, stable barrier — preventing mud plumes, holding plants in place, and presenting a natural-looking surface. Get the cap right and your dirted tank is clean and trouble-free. Get it wrong — too thin, too coarse, wrong technique — and soil migrates upward, turning your water into chocolate milk every time you plant.
Here’s exactly how to cap soil with sand so the layers stay separate for years.
Why Capping Is Non-Negotiable
Uncapped soil in an aquarium is a disaster: the lightest disturbance sends mud into the water column, the surface grows algae on exposed nutrients, and burrowing snails turn the bed into soup. The cap serves four functions:
- Physical barrier: Holds soil down against water movement, planting disturbance, and livestock activity.
- Clean surface: Presents sand — siphonable, attractive, natural-looking — instead of mud.
- Nutrient throttle: Slows (doesn’t stop) nutrient diffusion from soil to water, reducing algae pressure while letting roots access fertility below.
- Planting medium: Stems and small plants anchor in the cap’s top layer; roots grow down into the soil below.
Choosing Your Cap Material
Pool filter sand (0.5–1mm) is the gold standard: dense enough to seal well, coarse enough to resist compaction, cheap, and natural-looking. Fine gravel (2–3mm) also works and allows slightly better water exchange, but seals less tightly — better for experienced dirted-tank keepers. Blasting sand (medium grit) gives a dark cap option.
Avoid: ultra-fine play sand (compacts into a seal so tight it can trap gases), coarse pea gravel (gaps let soil through), and any coated/colored sand of unknown composition. Full sand selection guidance is in our best sands guide.
Cap Depth: The Critical Number
3–4cm of cap over 2–3cm of soil. This ratio matters:
- Too thin (<2cm): Soil breaches during planting — every stem you push through drags mud up. Snails and corydoras dig through easily. The #1 capping failure.
- Just right (3–4cm): Planting goes through cleanly, the barrier holds against normal disturbance, roots reach soil within days.
- Too thick (>5cm): Roots take longer to reach the soil, and you waste the soil’s benefit in the upper zone. Also deeper total bed = more anaerobic risk.
The soil layer itself must stay at 2–3cm — thicker dirt goes anaerobic and releases excess nutrients regardless of cap quality. If you mineralized your soil properly (see the mineralization guide), this thin layer is plenty fertile.
The Capping Technique: Step by Step
1. Prepare the soil base
Spread mineralized, dry soil evenly at 2–3cm. Mist it lightly and press gently flat — a damp, firm soil surface caps more cleanly than loose dry powder. Don’t saturate it into mud.
2. Pre-wet the sand
Rinse your cap sand thoroughly, then keep it damp. Dry sand poured onto soil creates dust clouds and mixes at the boundary; damp sand settles cleanly.
3. Cap gently, in sections
Using a cup, sprinkle damp sand over the soil starting from one end, working across. Don’t dump — pouring creates craters that mix layers. Aim for even coverage; check depth with a ruler in several spots. The first centimeter is the most important — get full coverage before building depth.
4. Mist and settle
Lightly mist the capped surface. The water helps the sand settle into a tight, even layer. Inspect for thin spots or soil showing through; touch up as needed.
5. Fill with extreme care
Place a plate, plastic bag, or saucer on the cap and pour water onto it — never directly onto the substrate. Fill slowly. The first fill is when most capping failures reveal themselves; patience here saves hours of cleanup.
Planting Through the Cap
Use long tweezers: push stems through the cap into the soil layer in one smooth motion, then pinch the tweezers slightly while withdrawing — this collapses the sand back around the stem, sealing the hole. The technique takes practice; your first ten plantings will each puff a little soil, and that’s fine — siphon it during the next water change.
For heavy root feeders (swords, crypts), dig a small pocket with your finger, place the roots spread into the soil layer, and backfill with sand. For carpeting plants, plant shallow — their roots will find the soil; burying them deep just rots the crowns.
Key rule: Every planting disturbs the cap slightly. Work efficiently, replant decisively (don’t fiddle), and siphon any soil plume immediately before it settles across the sand surface.
Maintaining the Boundary Long-Term
- Replanting: Pull old plants slowly, at an angle — yanking straight up cores soil through the cap. Twist gently while withdrawing.
- Vacuuming: Hover above the sand surface only. Deep vacuuming breaches the cap. Our substrate cleaning guide covers the technique.
- Snails: Malaysian trumpet snails are beneficial (aerate the bed) but their burrowing does slowly mix layers at the boundary — acceptable and unavoidable. Large burrowing species (some loaches) can breach thin caps; keep caps at 4cm+ if housing diggers.
- Top-ups: The cap compacts and thins over months. Add fresh sand annually to maintain 3–4cm — pour gently over a plate during a water change.
- Rescape discipline: Plan layouts carefully. Every major rescape in a dirted tank is a mud-management operation. The cap forgives small changes gracefully and punishes wholesale rearrangement.
Troubleshooting Cap Failures
Soil plume when planting
Normal in small amounts. Siphon immediately. If every planting causes a major plume, your cap is too thin — add another centimeter.
Sand sinking into soil / soil rising through sand
The layers are mixing, usually from: cap too thin, sand too coarse (gaps), or excessive disturbance. Top up with finer sand and reduce disturbance. In severe cases, the boundary is lost and the bed becomes a soil-sand blend — which still grows plants fine, honestly, just looks less clean.
Persistent cloudiness
Fine soil particles suspended in the water column. Run fine filter floss, do large water changes, and stop disturbing the bed. It settles within days if left alone.
Anaerobic patches (rotten egg smell when disturbed)
The soil layer is too thick or the cap is sealing too tightly (ultra-fine sand). Poke gently with a skewer to release gas, consider thinning the soil in that zone, and ensure trumpet snails are present.
Cap Alternatives: When Sand Isn’t Ideal
Fine gravel caps suit tanks with diggers (cichlids, loaches) — the heavier grains resist excavation better than sand. Aquasoil as a cap over dirt is the competition-aquascaper’s trick: dirt’s long-term fertility below, aquasoil’s clean planting and appearance above. Expensive but effective. No cap (raw Walstad) works only with very thin soil, heavy planting, and acceptance of an earthy aesthetic — not recommended for beginners.
FAQ
Can I cap with aquasoil instead of sand?
Yes — it’s an excellent (if pricey) cap. The aquasoil’s granules seal well and plant beautifully. You get dirt’s deep fertility plus aquasoil’s surface performance.
How long does the cap last?
Indefinitely with maintenance top-ups. Sand doesn’t decompose. The boundary slowly blurs over years from snail and root activity, but a well-built cap functions for the life of the tank.
Can I add a cap to an existing dirted tank?
Yes — during a water change with the water level low, gently sprinkle pre-rinsed damp sand over thin areas. The existing biofilm helps it settle quickly.
Cap Depth Variations by Tank Type
- Standard community dirted tank: 3–4cm sand over 2–3cm soil. The classic ratio.
- Shrimp dirted tank: 2–3cm cap is enough — shrimp don’t disturb substrate, and a thinner cap lets biofilm colonize closer to the soil’s nutrient zone. Keep soil at 2cm.
- Digging fish (loaches, cichlids): 4–5cm cap, and consider fine gravel instead of sand for excavation resistance. Honestly, dirted tanks and dedicated diggers are a poor combination — think carefully.
- High-energy aquascape on dirt: 3cm sand cap + aquasoil top layer in planting zones. The dirt provides deep fertility, the aquasoil provides the planting experience and appearance.
The First Month: Cap-Specific Care
New caps need a settling-in period. For the first 2–3 weeks: avoid rearranging hardscape (every move breaches the cap), plant decisively in single sessions rather than daily fiddling, siphon gently and shallowly, and run filter floss to catch the fine particles that escape despite your best technique. The cap “sets” as biofilm colonizes sand grains and binds them lightly — after a month, the bed is noticeably more stable than on day one.
Water changes in month one should be large (50% twice weekly) — same as any nutrient-rich substrate startup. You’re exporting the initial nutrient pulse from the soil faster than algae can use it. This discipline in the first month determines whether months 2–12 are glorious or an algae battle.
Long-Term Cap Evolution
Over 1–2 years, the sharp soil/sand boundary softens: roots penetrate and die back, snails burrow, mulm works downward. The bed becomes a gradient rather than distinct layers — and this is fine. A mature blended bed retains the soil’s CEC and nutrient memory while the sand fraction keeps it workable. Many veteran dirted-tank keepers report years 2–5 as the best period: fully mature, incredibly stable, plants thriving on the accumulated fertility.
What doesn’t happen: the cap doesn’t “wear out.” Sand is permanent. Top up thin spots annually, don’t deep-disturb the bed, and the cap serves for the tank’s lifetime. The soil below slowly depletes its initial charge but retains CEC indefinitely — supplement with root tabs for heavy feeders from year two, and the system hums along.
Common Beginner Mistakes
- Capping dry soil with dry sand: Dust everywhere, poor settling. Dampen both.
- Soil too thick: The temptation to add “extra fertility” with 5cm of dirt. Don’t — 2–3cm is the safe maximum.
- Cap too thin: 1–2cm looks sufficient until the first planting session. 3cm minimum.
- Filling too fast: A strong pour craters through the cap into the soil. Plate, slow pour, patience.
- Planting before the cap settles: Give the capped bed 24 hours after filling before major planting. The sand needs to settle into place.
- Using unmineralized soil: The cap can’t fix raw soil’s ammonia and organics — it only contains the physical mess. Mineralize first (see the guide).
Master the cap and the dirted tank becomes what it promises: the cheapest high-performance substrate in the hobby, clean and stable for years.