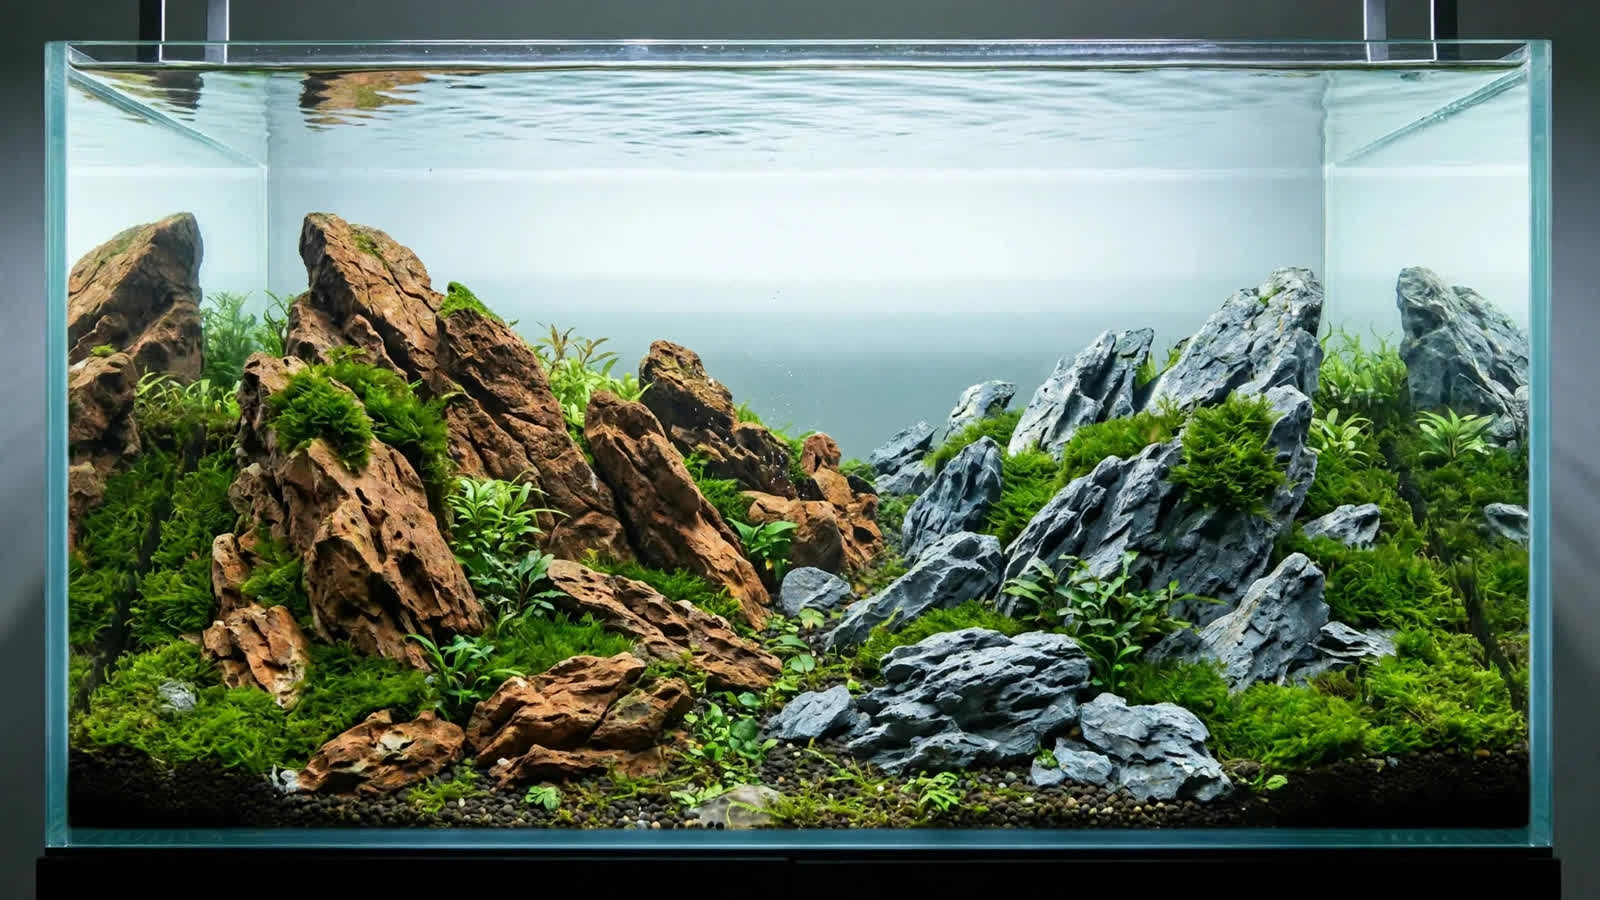
Ask a group of aquascapers which rock belongs in a planted tank and you will start an argument faster than debating CO2 brands. In the dragon stone vs seiryu stone debate, these two heavyweight hardscape stones dominate the conversation — one a warm, pitted classic covered in dragon-scale texture, the other a sharp blue-grey limestone with dramatic white veins. Both can anchor a breathtaking aquascape, but they differ in ways that genuinely matter: water chemistry, weight, price, and the scaping styles they suit. This guide compares them honestly across every dimension that should inform your purchase.
Quick Verdict: Which Stone Should You Buy?
Dragon stone (Ohko stone) is the safer all-rounder: chemically inert, easy to work with, full of natural planting pockets, and forgiving for beginners. Seiryu stone is the specialist's choice: sharper, more dramatic, and unmatched for Iwagumi layouts — but it can raise your pH and hardness, which matters enormously for soft-water setups, shrimp, and sensitive plants. Read on for the full breakdown.
The Two Stones, Side by Side
Before comparing, it helps to know exactly what each rock is.
Dragon Stone (Ohko Stone)
Dragon stone — sold most often as Ohko stone — is a clay-based sedimentary rock with a surface that looks like overlapping dragon scales. It is warm brown to ochre, heavily pitted with crevices that catch light and shadow beautifully once submerged. Those pits form natural planting pockets where you can wedge anubias, bucephalandra, or moss directly into the rock with no glue. Crucially, dragon stone is essentially inert — it does not meaningfully change your water chemistry. For the deeper dive on this stone alone, see our complete dragon stone aquascaping guide.
Seiryu Stone
Seiryu (sometimes called "mini landscape rock") is a limestone-based rock from Japan, known for its striking blue-grey color, sharp jagged edges, and white calcite veins running across its faces like lightning. It is the definitive rock of the Iwagumi style — those minimalist, three-or-five-stone layouts with a single carpet plant. It is denser, heavier, and harder than dragon stone, with a flatter, more architectural character. Its defining quirk: as a limestone, it can raise pH, GH, and KH in your tank water. Our standalone seiryu stone guide covers it in depth.
Head-to-Head: Every Dimension That Matters
Here is the full comparison in one place, followed by deeper explanation of each point.
| Feature | Dragon Stone (Ohko) | Seiryu Stone |
|---|---|---|
| Color and texture | Warm brown-ochre, heavily pitted "dragon scale" surface | Cool blue-grey with white veins, sharp jagged faces |
| Water chemistry | Inert — no meaningful effect on pH, GH, or KH | Can raise pH, GH, and KH (limestone) |
| Weight | Relatively light for its size; porous structure | Noticeably heavier; dense and hard |
| Typical price | Mid-range; often cheaper per piece | Premium; typically costs more per pound |
| Planting pockets | Excellent — pits and holes hold epiphytes and moss naturally | Fewer — crevices exist but are shallower |
| Ease of shaping | Easier to break into smaller pieces | Very hard; difficult to fracture cleanly |
| Signature style | Nature style, jungle, biotope | Iwagumi, minimalist, stone-focused |
| Beginner friendliness | High — forgiving in every way | Moderate — chemistry and weight need respect |
Look and Texture: Warm Dragon Scales vs Cold Mountain Crags
This is where personal taste rules, but the visual difference is stark enough to describe objectively.
Dragon stone reads warm. Under aquarium lighting its browns deepen to rich ochre and umber, and the pitted surface creates constant micro-shadows that give the rock visual depth even before plants fill in. It looks like something pulled from a tropical riverbank — organic and aged. In a nature-style scape it holds structure while letting the plants be the stars.
Seiryu stone reads cold and architectural. The blue-grey base with white vein striations looks like a fragment of mountain cliff, and its sharp edges catch light in dramatic slashes. Against a bright green carpet, the contrast between cool stone and living green is electric. Seiryu demands to be looked at — it is the protagonist of the scape, not the supporting cast.
If you want the whole hardscape laid out at once, our guide to the best rocks for aquascaping places both stones in the wider context of every common option.
Water Chemistry: The Honest Truth About Seiryu Stone
This is the single most important section of this article, so let us be blunt: seiryu stone can raise the pH, general hardness (GH), and carbonate hardness (KH) of your aquarium water. It is a limestone-family rock, and limestone contains calcium carbonate that slowly dissolves into the water column — especially in softer, more acidic water, where the dissolution runs faster.
How much does it matter? It depends on your livestock and tap water.
- Hard-water community tanks (livebearers, most tetras, barbs): usually no problem. Your water is already hard; a modest bump from seiryu is barely noticeable and your regular water changes buffer it further.
- Discus or soft-water biotopes: seiryu works directly against you — every water change becomes a tug-of-war with the rock.
Dragon stone, by contrast, is inert. It will not shift your parameters in any meaningful way, which is one of the biggest reasons it is the default recommendation for beginners, shrimp keepers, and anyone running sensitive soft-water species. If you are unsure about your tap water, read our breakdown of whether aquarium rocks raise pH before you buy anything.
The Vinegar Fizz Test: How to Test Any Unknown Stone
Whether you bought seiryu, dragon stone, or a mystery rock from a landscaping yard, you can test whether it will affect your water with nothing but household vinegar and five minutes. Here is the reliable method:
- Clean the rock — scrub it under running water with a stiff brush to remove dust and loose sediment. Pat it dry-ish; a slightly damp surface is fine.
- Apply white vinegar directly to a few spots, especially in crevices and on any light-colored veins. You can also pour a small pool of vinegar onto a flat face.
- Watch and listen for 30–60 seconds. Fizzing, bubbling, or a faint hissing sound means the vinegar (an acid) is reacting with calcium carbonate — this stone will influence your water chemistry.
- For a more decisive result, use a stronger acid. Vinegar is weak; a faint or absent reaction can still mean slow dissolution. Hardware-store muriatic acid gives a definitive answer — fizz means carbonate, guaranteed. Wear gloves and work outdoors.
- The 24-hour bucket test (most reliable): submerge the rock in a bucket of your actual tap water, test pH, GH, and KH on day one, then test again after 24 and 72 hours. Any upward drift tells you exactly what the stone will do in your tank.
Note that even genuinely inert dragon stone can produce a tiny bit of surface dust that temporarily clouds the first fill — that is mechanical sediment, not a chemistry problem, and it clears with rinsing and water changes.
Weight, Price, and Practicality
Weight matters more than most buyers expect. Seiryu stone is dense — a fist-sized piece feels surprisingly hefty, and a full Iwagumi arrangement for a 20-gallon tank adds serious load to your stand. Put a foam or egg-crate layer under heavy stones to protect the glass, and always place the largest stones before adding substrate or water.
Dragon stone is noticeably lighter for its visual volume thanks to its porous structure. That porosity also makes it easier to break into smaller pieces — a hammer tap along a natural fracture line usually does the job. Seiryu resists this; it is very hard, and breaking it cleanly takes deliberate effort and safety glasses. Many scapers buy seiryu pre-selected in graded boxes for exactly this reason.
On price, seiryu typically costs more per pound or per box. Dragon stone sits in the mid-range — affordable enough that you can buy a generous pile, dry-scape with it, and rehome the pieces you do not use. If budget decides, our lava rock guide covers the cheapest credible alternative, and safe river rocks explains how to source stone for free.
Style Fit: Which Scape Does Each Stone Belong In?
Seiryu stone: the Iwagumi king
If your goal is a classic Iwagumi — three to five stones arranged around one dominant "master stone," with a single carpet plant — seiryu is the canonical choice and has been since the style's birth. Its sharp edges and dramatic veining give an Iwagumi its mountains-in-miniature feel, and the sparse planting means the stone carries the entire composition.
Dragon stone: the nature-style workhorse
For nature-style, jungle, and biotope scapes — the densely planted layouts most hobbyists build — dragon stone is the better partner. Its organic texture blends with wood and plants rather than competing with them, and the natural planting pockets let you establish anubias, buce, and moss directly on the rock, creating the "grown-in" look that glued setups take months to achieve.
The Decision Table: Pick Your Winner by Tank Type
| Your tank | Winner | Why |
|---|---|---|
| Beginner planted community tank | Dragon stone | Inert, light, forgiving, easy to rescape |
| Classic Iwagumi carpet tank | Seiryu | The canonical stone; sharp lines suit minimalism |
| Shrimp tank (Neocaridina) | Dragon stone | Parameter stability matters more than drama |
| Shrimp tank (Caridina, soft water) | Dragon stone | Seiryu actively fights soft-water parameters |
| Dense nature-style scape | Dragon stone | Planting pockets and warm tones blend with foliage |
| Discus or South American biotope | Dragon stone | Keeps soft, acidic water undisturbed |
| Hard-water cichlid or livebearer tank | Either | Water already hard; choose on looks alone |
| Tight budget | Dragon stone | Cheaper per piece and easier to trim to fit |
Preparing New Rock: Scrub, Soak, and a New Inoculation Option
Whichever stone you choose, new rock needs preparation before it goes into a stocked tank. Start with a stiff brush and a thorough rinse to remove quarry dust and loose grit — dragon stone's pits hide surprising amounts of sediment. A 24- to 48-hour soak in a bucket lets you check for parameter drift (as in the bucket test above) and float out trapped air. Skip the boiling-water myth for large stones: thermal shock can crack dense seiryu, and boiling does nothing to chemistry anyway.
There is also a genuinely new development worth knowing about: at the Interzoo trade show in Nuremberg on September 27, 2026, Tropic Marin launched Eco-Start Freshwater, a bacterial inoculation product specifically designed for "marinating" new hardscape — submerging fresh rock in treated water for about a day to seed it with beneficial microbes before it enters the tank, as covered in Reef Builders' Interzoo 2026 launch report. It is aimed squarely at the awkward new-rock phase, when bare stone is a blank canvas for algae. Whether it becomes a standard step remains to be seen, but the concept — pre-colonizing rock the way we cycle filters — is sound.
Common Mistakes to Avoid
- Buying seiryu for a soft-water shrimp tank without testing first. Run the bucket test; three days of data is cheaper than a colony crash.
- Placing heavy seiryu directly on bare glass. Use egg crate or foam underneath, and set large stones before substrate and water go in.
- Skipping the dry layout. Arrange your stones outside the tank, photograph them, and wet the layout before committing — dragon stone darkens dramatically when wet, and seiryu's veins sharpen.
- Glueing everything. Dragon stone's whole advantage is its natural planting pockets — wedge plants and moss into them and let roots do the work before reaching for cyanoacrylate.
Frequently Asked Questions
Is dragon stone or seiryu stone better for beginners?
Dragon stone, by a comfortable margin. It is chemically inert so it cannot sabotage your water parameters, it is lighter and easier to arrange and rescape, and its pitted surface holds epiphytes and moss without glue. Seiryu is harder to work with, heavier, more expensive, and its effect on pH and hardness adds a variable beginners do not need. Choose seiryu once you have a scape concept that specifically demands it.
Will seiryu stone raise my pH permanently?
Not permanently, but for a very long time. The calcium carbonate in seiryu dissolves slowly, so the pH-raising effect is strongest in the first months and tapers as exposed surfaces get coated with biofilm and mineral deposits. Regular water changes also dilute the effect. In hard-water tanks the drift is negligible; in soft-water or low-KH tanks it can be a persistent, measurable upward pull that you manage with testing and water changes — or avoid entirely by choosing dragon stone.
Can I mix dragon stone and seiryu stone in one scape?
Technically yes, aesthetically almost always no. Their colors and textures clash — warm pitted brown against cold jagged grey-blue reads as two different landscapes colliding. The one exception is using a small piece of the secondary stone deliberately as a contrasting accent, but this is an advanced move that usually looks accidental unless the composition is exceptional. If you want variety within one scape, use different sizes of a single stone type.
How do I know if my rock is really inert?
Run the tests in order of reliability: the vinegar fizz test for a quick screen, a stronger acid test for confirmation, and the 24- to 72-hour bucket test with your own tap water for the definitive answer. If pH, GH, and KH stay flat across three days with the rock submerged, you are dealing with an inert stone and can scape with confidence regardless of what the label claimed.
Which stone is better for attaching moss and epiphytes?
Dragon stone wins clearly. Its deep pits and holes create natural pockets where you can press in anubias rhizomes, bucephalandra, java fern, or clumps of moss, and the rough texture gives roots and rhizoids plenty to grip. Seiryu's smoother, harder faces offer fewer footholds, so epiphytes on seiryu usually need to be tied or glued. That said, moss will eventually colonize any rock given time and good conditions.
Does dragon stone really not affect water at all?
Correct — genuine dragon stone is chemically inert and will not raise pH, GH, or KH. The only "effect" new dragon stone has is mechanical: fine quarry dust and sediment hiding in the pits can cloud your first fill, which some beginners mistake for a chemistry problem. A good scrub and rinse solves it completely. If a stone sold as dragon stone fizzes in the vinegar test, it was mislabeled — run the bucket test and treat it as a carbonate rock.
The Bottom Line
The dragon stone vs seiryu stone question resolves the moment you know what your tank needs. Choose dragon stone when parameter stability, planting versatility, and forgiveness matter — most planted community tanks, shrimp tanks, and nature-style scapes. Choose seiryu stone when the scape itself is the statement — a true Iwagumi or stone-focused minimalist layout in a tank whose water can absorb the chemistry without complaint. Run the fizz test, dry-scape the stones wet, and photograph the layout before a single drop of tank water goes in.
Tissue-culture plants are the exception — they’re grown in sterile gel and adapt with minimal melting, which is part of what you’re paying for. Plants bought submersed from another hobbyist’s tank also transition with little melt, since they’re already in the right form.
Which Plants Melt Most (and Least)
Heavy melters (expect significant leaf loss)
- Cryptocorynes — infamous for “crypt melt,” sometimes dropping every leaf after any disturbance. They almost always recover from the roots within weeks.
- Stem plants grown emersed — rotala, ludwigia, and hygrophila often shed lower emersed leaves while the growing tips transition.
- Amazon swords — emersed-grown swords typically lose their broad oval aerial leaves and replace them with longer submersed ribbon leaves.
Light melters
- Anubias, java fern, bucephalandra — slow-growing rhizome plants transition gradually; occasional old-leaf melt but rarely dramatic.
- Vallisneria — usually transitions well, though it dislikes the move itself and may sulk for a week.
- Floating plants — minimal melt since their leaves were already at the air-water interface.
The Acclimation Protocol
Step 1: Quarantine or dip first
Before acclimating to your tank’s conditions, make sure you’re not acclimating pests along with the plant. Run new arrivals through our quarantine and dip protocol — it adds days upfront but prevents months of regret.
Step 2: Float to temperature-match (30 minutes)
Float the bag or container in your tank for 20–30 minutes to equalize temperature. Plants are less temperature-sensitive than fish, but a 10°F shock on top of transplant stress is an avoidable insult.
Step 3: Trim before planting
Remove any leaves that are already damaged, yellowing, or heavily algae-covered — they won’t recover and they’ll rot in your tank, feeding algae. For stem plants, trim off the bottom inch and any emersed leaves that look unlikely to adapt; the plant wastes energy maintaining leaves it’s going to shed anyway. Keep the healthy growing tips — that’s where recovery starts.
Step 4: Plant correctly the first time
Follow our planting guide — right depth, crown exposed on rosettes, rhizomes unburied on epiphytes. Every uprooting and replanting restarts the acclimation clock, so get placement right on the first attempt. Decide where each plant goes before it goes in the water.
Step 5: Run a gentle first week
For the first 7 days after planting:
- Moderate light — run your normal photoperiod but consider dropping intensity 20–30% if your light is dimmable. Blast-level light on a melting plant grows algae on the dying leaves, not recovery.
- Stable CO2 — if you inject CO2, keep it consistent. Fluctuating CO2 during acclimation is a melt accelerator. If you’re low-tech, this doesn’t apply — see growing without CO2.
- Half-strength fertilizer — new plants with damaged leaves can’t use full dosing, and the excess feeds algae. Ramp to full strength over 2–3 weeks per our fertilizer schedule.
- No disturbance — don’t move, trim, or “check on” new plants for at least two weeks. Every touch resets root establishment. This is especially critical for crypts.
Step 6: Remove melt, keep the base
As emersed leaves melt, remove the mushy material promptly — decaying leaves release ammonia and grow fungus that can spread to healthy tissue. But never discard the plant while the crown, rhizome, or roots are firm and alive. A crypt that’s lost every leaf but has firm roots is a plant that’s about to recover, not a dead plant. Give it 3–4 weeks before judging.
Telling Normal Melt From Real Problems
Normal transition melt:
- Affects oldest/emersed leaves first, newest growth last
- New submersed leaves emerge even as old ones dissolve
- Roots and crown stay firm and white/green
- Timeline: 1–4 weeks, then obvious new growth
Concerning melt (see our full melting diagnosis guide):
- New growth also melts or emerges deformed
- Rhizome or crown turns mushy and brown — this is rot, not transition
- Entire plant dissolves within days with no new growth after 4+ weeks
- Melting spreads to established plants that weren’t recently moved
Buying Tips to Minimize Melt
- Buy submersed-grown when available — hobbyist-grown cuttings transition with almost no melt.
- Choose tissue culture for sensitive species — crypts and delicate stems establish far more reliably from sterile cups.
- Avoid plants already melting in the store tank — some melt is normal, but a plant that’s mostly mush at purchase has less energy for recovery.
- Transport carefully — keep plants damp and out of direct sun/heat. A plant that dries out or cooks in a hot car melts far worse than one transported properly.
The First-Month Timeline: What to Expect Week by Week
Knowing what’s normal when removes most acclimation anxiety. Here’s the typical timeline for a healthy plant adapting to a new tank:
Week 1: The quiet week
Almost nothing visible happens. The plant is growing roots you can’t see and assessing its new environment. Some species (vallisneria, stem plants) may start shedding their lowest leaves. This is normal. Resist the urge to “help” — no moving, no extra fertilizer, no light changes. The most common beginner mistake is intervening during a week when the correct action is nothing.
Week 2: Melt peaks
This is when emersed leaves give up in earnest. Crypts may drop everything; swords shed their broad aerial leaves; stem plants lose lower foliage. It looks catastrophic and it’s usually fine. Keep removing mushy material, keep conditions stable, and watch the crown and growing tips — if those are firm and green, recovery is already underway.
Week 3: The turn
New submersed-adapted leaves emerge — smaller, thinner, often a slightly different shade of green than the emersed foliage. Stem plant tips start growing visibly; crypts push tiny curled leaves from the crown; swords unfurl narrow ribbon leaves. This is the moment most beginners exhale for the first time.
Week 4+: Established
New growth outpaces melt, and the plant is functionally yours. You can resume full-strength fertilizer, normal trimming, and stop treating it as fragile. Some slow growers (anubias, bucephalandra) take 6–8 weeks to show obvious progress — that’s their normal speed, not a problem.
Acclimating Different Plant Formats
Tissue-culture cups
Sterile, pest-free, and already adapted to high-humidity (not emersed) growth — tissue cultures melt the least of any format. Rinse the agar gel off gently (leftover gel rots and feeds fungus), split the portion into small plantlets, and plant per our planting guide. They establish slowly for the first two weeks, then accelerate. No dip needed, minimal acclimation stress — this is the premium experience you’re paying for.
Potted plants
Remove the pot and strip away the rockwool completely — leftover rockwool traps debris and rots. Tease the root mass apart gently; if it’s a dense mat, splitting it into 2–3 smaller portions actually establishes faster than planting one big clump (more growing points, better water flow around roots). Potted plants are usually emersed-grown, so expect the standard 2–4 week melt cycle.
Bare-root / bunched stems
Typically sold as weighted bunches. Remove any bands, foam, or weights, strip the lower leaves, and plant stems individually or in small groups. Bunched stems from the store are often already transitioning — check for new submersed growth at the tips, which tells you the plant is mid-adaptation and will settle quickly.
Hobbyist cuttings
Already submersed-grown and the fastest to establish — often showing new growth within days. The main acclimation factor is water-parameter difference between the two tanks. Float to temperature-match, plant promptly, and they’ll usually take off with minimal melt. This is why experienced hobbyists prefer trading cuttings over buying potted plants.
Frequently Asked Questions
Should I use a “plant starter” or transplant fertilizer?
Products marketed for transplant shock are mostly B-vitamins and mild hormones. They don’t hurt, but there’s no strong evidence they help aquarium plants specifically. Stable conditions and patience outperform any bottle. Save the money for more plants.
My new plant melted completely — bare crown, no leaves. Is it dead?
Probably not, if the crown or rhizome is firm. Crypts and swords routinely lose 100% of their leaves and regrow from the base within a month. The test is firmness: firm and pale/green means alive; mushy and brown/black means rot. Give firm-but-leafless plants a full 4 weeks before declaring them dead.
Can I speed up acclimation with extra light or CO2?
No — and trying usually backfires. A melting plant can’t use extra light; the excess just grows algae on its dying leaves. Keep light moderate and CO2 stable (not boosted) during acclimation. Growth speed comes from the plant’s own adaptation timeline, which you can’t rush, only avoid delaying.
Should new plants go straight into my main display tank?
After quarantine/dipping, yes — there’s no benefit to a separate “growing-in” tank for most plants. They acclimate to your water fastest in the tank they’ll live in. The exception is very delicate species going into a tank with boisterous fish; give those a few weeks in a calm corner or breeder box first.
The Patience Rule
The single most important acclimation skill is restraint: plant it right, set gentle conditions, remove decay, and then leave it alone for a month. The hobbyists with the best plant growth aren’t doing something clever in week one — they’re simply not interfering in weeks two through four while the plants do what they’ve evolved to do. Melt looks like failure and feels like failure, but in most cases it’s the visible part of a plant successfully becoming yours.