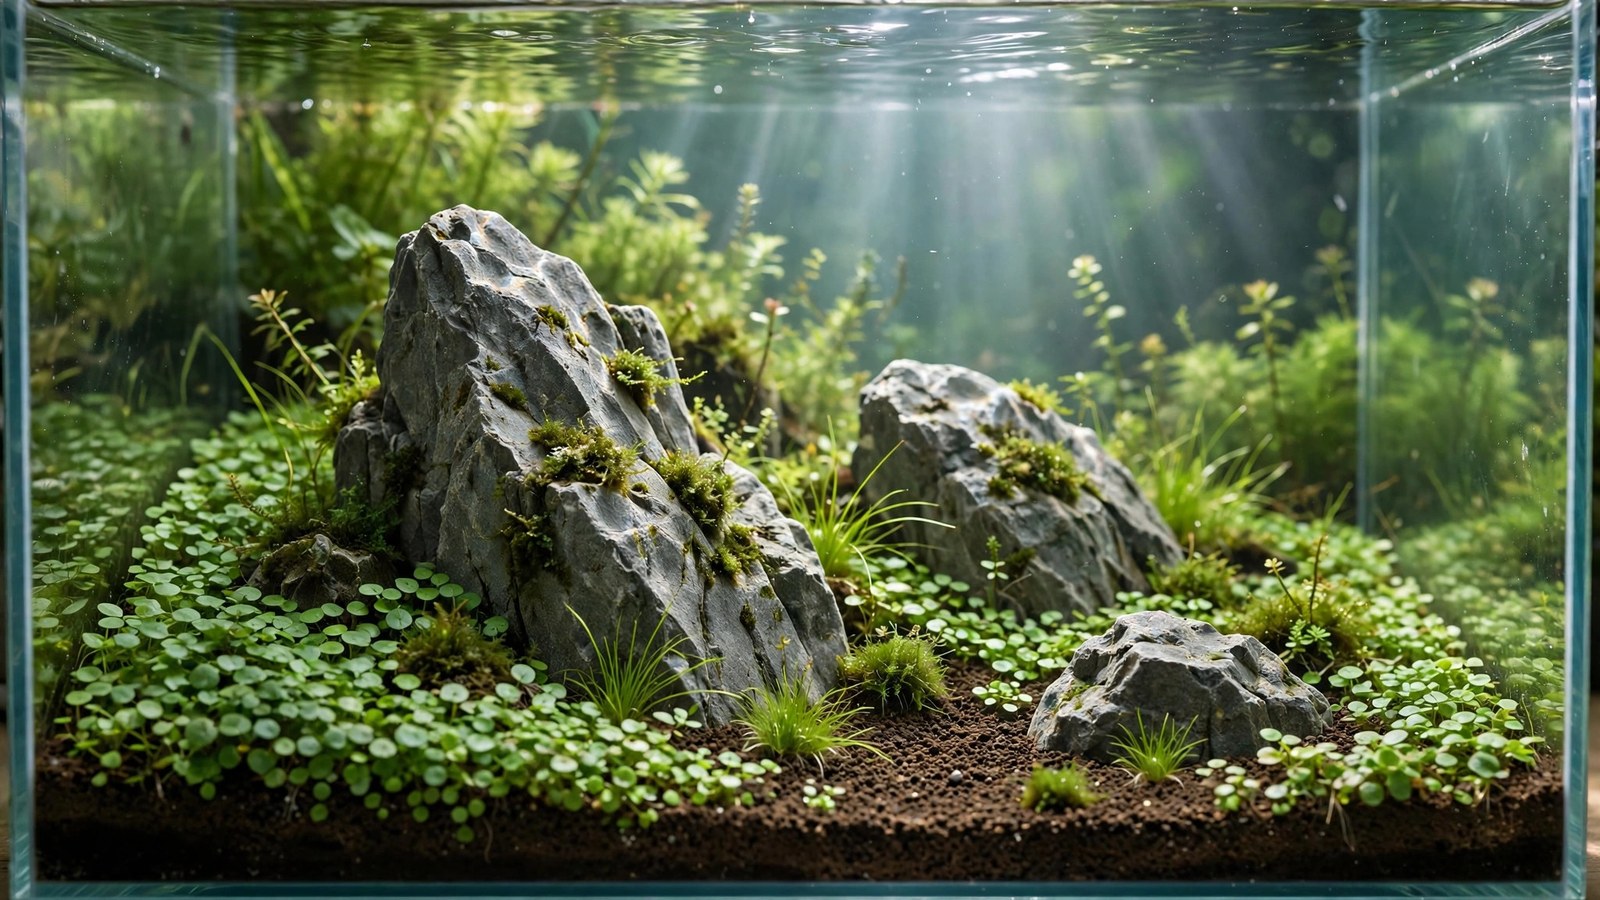
Iwagumi is aquascaping's haiku — a style of radical simplicity where a few carefully chosen stones, a single carpet of plants, and open water create a landscape of profound calm. It looks effortless. It is anything but: with nowhere to hide mistakes, every element must be perfect. This guide walks you through building an iwagumi tank that honors the style's discipline — and actually stays beautiful.
Iwagumi Principles: Less, but Perfect
Developed by Takashi Amano from Japanese rock-garden aesthetics, iwagumi follows strict conventions:
- Odd-numbered stones: traditionally 3 (sanzon) or 5–7 for larger tanks. The primary stone (oyaishi) dominates — roughly two-thirds of the tank's height — supported by smaller attendant stones (fukuishi, soeishi, suteishi).
- One plant species — traditionally a single carpeting plant. Modern iwagumi sometimes adds one background stem, but purists hold the line at one.
- Open water: large areas of unplanted space are deliberate — negative space is a design element, not emptiness.
- Golden-ratio placement: the oyaishi sits at roughly the 1:1.618 focal point, never centered. It leans slightly, with its most characterful face forward.
- Substrate slope: rising toward the back, amplifying depth.
The paradox: the simplest-looking aquascape is the hardest to execute, because every flaw is visible. An iwagumi forgives nothing — which is exactly why succeeding at one teaches more than any other style.
Tank, Stones, and the Oyaishi
Tank: shallow, wide formats show iwagumi best — 60cm (20-gallon long) is the classic competition size; nano iwagumi in 5–10 gallons is popular but harder (less room for stone presence). Rimless tanks suit the minimalist aesthetic. Our 20-gallon planted tank setup covers the hardware baseline.
Stones: use real aquascaping stone — seiryu, ryuoh, dragon stone (ohko), or manten. Buy more than you need (2–3x the stones you'll use) so you can audition arrangements. The stones must share character: same type, same color family, weathered faces. One odd stone ruins the composition.
Choosing the oyaishi: look for a stone with presence — interesting texture, a strong silhouette, roughly two-thirds of your intended scape height. It should look like it belongs, emerging from the substrate as if the visible part is just the tip. Bury stones one-third deep; perched stones look fake.
Equipment: High-Tech Minimalism
Iwagumi's single carpet species must grow flawlessly — which means high-tech equipment despite the simple look:
- Lighting: medium-high LED, 7–8 hours. Carpeting plants need strong light at the substrate.
- CO2 injection: essential. Dwarf baby tears and hairgrass carpet densely only with CO2. See our high-tech planted tank setup for system design.
- Substrate: fine aquasoil (powder type for the top layer), 1.5–2 inches, sloped higher at the back. Powder-type soil lets delicate carpet roots establish.
- Filtration: canister with lily pipes — the glassware suits the aesthetic, and gentle distributed flow feeds the carpet evenly.
- Fertilization: lean but consistent water-column dosing; carpets show deficiencies as patchy growth.
Arranging the Stones: The Sanzon Layout
Work with the tank empty and dry. This is sculpture — take hours, photograph from the front, live with it:
- Place the oyaishi first — at the golden-ratio point (about 60% across from one side), leaning 10–15 degrees toward the composition's "flow" direction. Its tallest point aims slightly off-vertical for dynamism.
- Add the fukuishi (second stone) — smaller, placed to balance the oyaishi, leaning the same direction. The two stones converse.
- Add soeishi and suteishi (third, fourth) — progressively smaller, placed to complete the flow. The smallest (suteishi, the "sacrificial stone") is often barely visible — it exists to balance the composition, traditionally placed to be nearly hidden.
- Check from every angle — front, sides, above. Stones must look naturally embedded, all leaning with the same directional energy, like a mountain range in miniature.
- Photograph in black and white — removing color reveals whether the composition works structurally. If it looks good in grayscale, the layout is sound.
Common failures: stones all the same size (no hierarchy), oyaishi centered (static), stones perched on top of substrate (floating look), mixed stone types (visual noise).
The Carpet: Species and Planting
Choosing the carpet
- Dwarf baby tears (Hemianthus callitrichoides / HC Cuba): the classic iwagumi carpet — tiny leaves, incredibly dense, demanding. Needs high light, CO2, and patience.
- Dwarf hairgrass (Eleocharis parvula / acicularis): grass-like blades, slightly easier than HC, beautiful swaying texture. The forgiving classic.
- Monte Carlo (Micranthemum tweediei): larger leaves than HC, carpets faster, tolerates slightly less light. The modern pragmatic choice.
- Glossostigma: fast, low, demanding — the old-school Amano carpet.
Planting technique
Buy tissue-culture cups — pest-free, dense, and they establish fastest. Divide each cup into 20–30 tiny portions and plant in a grid, 1 inch apart, using tweezers. This is tedious — a 20-gallon takes 2–3 hours — but grid planting carpets months faster than clumps.
Dry-start method (recommended): plant the carpet in damp (not flooded) substrate, cover the tank with cling film, and grow emersed for 4–8 weeks. Carpet plants grow dramatically faster emersed with unlimited CO2, root deeply, and you flood a finished carpet instead of waiting months underwater. Mist daily, ventilate briefly to prevent mold. When the carpet is dense, flood slowly.
Flooding and the First Month
Flood gently — pour over a plate or plastic bag to avoid cratering the substrate and uprooting the carpet. Expect a transition melt as emersed-grown carpet adapts to submerged life (2–3 weeks of ugly). This is normal; the roots are established and new submerged growth follows.
- Week 1–2 post-flood: 50% water changes every 2–3 days; CO2 running; light 6 hours. Remove melting material; don't disturb the carpet.
- Week 3–4: new submerged growth appears; increase light to 7–8 hours; weekly 50% water changes.
- Month 2–3: carpet fills in; first trim when blades/leaves reach 1.5x desired height.
Maintenance: Precision Gardening
- Trim the carpet regularly — every 2–3 weeks once established. Trimming thickens growth; neglected carpets grow leggy, trap debris, and detach from the substrate in mats.
- 50% weekly water change — non-negotiable in high-tech iwagumi; resets nutrients and removes the organics carpets shed.
- Clean stones monthly — algae on the oyaishi ruins the composition; soft brush during water changes.
- Maintain the slope — substrate migrates forward over months; push it back during water changes.
- Weed invaders ruthlessly — one stray stem plant in an iwagumi is a compositional emergency. Remove immediately.
Livestock: Minimal and Purposeful
Iwagumi livestock is restrained — small schools that complement, never dominate:
- Chili rasboras / ember tetras: tiny red fish that contrast green carpets beautifully
- Celestial pearl danios: jewel-like, perfect scale for iwagumi
- Otocinclus: essential algae crew for the stones and glass
- Amano shrimp: the carpet's best friend — they clean without disturbing it
- Cherry shrimp: add living red accents; breed gently in the carpet
Our schooling fish guide and shrimp tank setup cover these species. Stock lightly — an iwagumi is about the landscape; fish are the weather.
Frequently Asked Questions
Can I do iwagumi without CO2?
Low-tech iwagumi is possible with Monte Carlo or dwarf sagittaria and a dry start, but it's slow (6+ months to carpet) and never as dense as CO2 versions. Dwarf baby tears without CO2 is an exercise in frustration. If you want the classic look on a deadline, CO2 is required — our high-tech guide covers it.
Why is my carpet growing upward instead of spreading?
Insufficient light at the substrate — the plant stretches toward the light instead of creeping. Increase light intensity, trim the tall growth hard (it forces lateral spread), and ensure CO2 reaches the substrate (good circulation, diffuser near the filter outflow). Upward growth is the plant telling you conditions at the bottom aren't good enough.
How do I keep the stones algae-free?
Prevention: balanced light/CO2/nutrients so algae never gets a foothold. Cleanup crew (otocinclus, amano shrimp, nerites) grazes stone surfaces constantly. Manual: soft toothbrush during water changes. The oyaishi is the composition's soul — keeping it clean is maintenance priority one.
My carpet keeps detaching in mats. Why?
The classic neglected-carpet failure: lower layers die from light starvation and rot, so the living top layer peels off in sheets. Prevention is trimming — regular trims keep light reaching the base and growth compact. Once detached, replant the healthy portions and trim aggressively going forward.
Can I add a background plant to an iwagumi?
Traditionalists say no — one species, period. Modern practice sometimes allows a single restrained background stem (a fine rotala) for depth. If you do, keep it minimal and behind the stone composition's flow. Know that you're bending the style's core rule; do it deliberately, not accidentally.
How long does an iwagumi last before rescaping?
A well-maintained iwagumi peaks at 6–12 months, then slowly declines as substrate compacts, carpets thicken beyond trimming's help, and stones get buried. Most iwagumi keepers rescape yearly — the style's discipline extends to knowing when to start over. Photograph it at peak; that's the reward.
The Iwagumi Payoff
An iwagumi at peak is meditation in glass — stones rising from a perfect green plain, tiny fish drifting like weather, nothing extraneous, nothing missing. It demands the most precision of any style here and offers the deepest satisfaction. Choose your stones slowly, plant your grid patiently, trim with discipline, and you'll build the haiku of aquascapes.
For the plant science behind carpeting species, see the 2Hr Aquarist aquarium plant care guides.
Tissue-culture plants are the exception — they’re grown in sterile gel and adapt with minimal melting, which is part of what you’re paying for. Plants bought submersed from another hobbyist’s tank also transition with little melt, since they’re already in the right form.
Which Plants Melt Most (and Least)
Heavy melters (expect significant leaf loss)
- Cryptocorynes — infamous for “crypt melt,” sometimes dropping every leaf after any disturbance. They almost always recover from the roots within weeks.
- Stem plants grown emersed — rotala, ludwigia, and hygrophila often shed lower emersed leaves while the growing tips transition.
- Amazon swords — emersed-grown swords typically lose their broad oval aerial leaves and replace them with longer submersed ribbon leaves.
Light melters
- Anubias, java fern, bucephalandra — slow-growing rhizome plants transition gradually; occasional old-leaf melt but rarely dramatic.
- Vallisneria — usually transitions well, though it dislikes the move itself and may sulk for a week.
- Floating plants — minimal melt since their leaves were already at the air-water interface.
The Acclimation Protocol
Step 1: Quarantine or dip first
Before acclimating to your tank’s conditions, make sure you’re not acclimating pests along with the plant. Run new arrivals through our quarantine and dip protocol — it adds days upfront but prevents months of regret.
Step 2: Float to temperature-match (30 minutes)
Float the bag or container in your tank for 20–30 minutes to equalize temperature. Plants are less temperature-sensitive than fish, but a 10°F shock on top of transplant stress is an avoidable insult.
Step 3: Trim before planting
Remove any leaves that are already damaged, yellowing, or heavily algae-covered — they won’t recover and they’ll rot in your tank, feeding algae. For stem plants, trim off the bottom inch and any emersed leaves that look unlikely to adapt; the plant wastes energy maintaining leaves it’s going to shed anyway. Keep the healthy growing tips — that’s where recovery starts.
Step 4: Plant correctly the first time
Follow our planting guide — right depth, crown exposed on rosettes, rhizomes unburied on epiphytes. Every uprooting and replanting restarts the acclimation clock, so get placement right on the first attempt. Decide where each plant goes before it goes in the water.
Step 5: Run a gentle first week
For the first 7 days after planting:
- Moderate light — run your normal photoperiod but consider dropping intensity 20–30% if your light is dimmable. Blast-level light on a melting plant grows algae on the dying leaves, not recovery.
- Stable CO2 — if you inject CO2, keep it consistent. Fluctuating CO2 during acclimation is a melt accelerator. If you’re low-tech, this doesn’t apply — see growing without CO2.
- Half-strength fertilizer — new plants with damaged leaves can’t use full dosing, and the excess feeds algae. Ramp to full strength over 2–3 weeks per our fertilizer schedule.
- No disturbance — don’t move, trim, or “check on” new plants for at least two weeks. Every touch resets root establishment. This is especially critical for crypts.
Step 6: Remove melt, keep the base
As emersed leaves melt, remove the mushy material promptly — decaying leaves release ammonia and grow fungus that can spread to healthy tissue. But never discard the plant while the crown, rhizome, or roots are firm and alive. A crypt that’s lost every leaf but has firm roots is a plant that’s about to recover, not a dead plant. Give it 3–4 weeks before judging.
Telling Normal Melt From Real Problems
Normal transition melt:
- Affects oldest/emersed leaves first, newest growth last
- New submersed leaves emerge even as old ones dissolve
- Roots and crown stay firm and white/green
- Timeline: 1–4 weeks, then obvious new growth
Concerning melt (see our full melting diagnosis guide):
- New growth also melts or emerges deformed
- Rhizome or crown turns mushy and brown — this is rot, not transition
- Entire plant dissolves within days with no new growth after 4+ weeks
- Melting spreads to established plants that weren’t recently moved
Buying Tips to Minimize Melt
- Buy submersed-grown when available — hobbyist-grown cuttings transition with almost no melt.
- Choose tissue culture for sensitive species — crypts and delicate stems establish far more reliably from sterile cups.
- Avoid plants already melting in the store tank — some melt is normal, but a plant that’s mostly mush at purchase has less energy for recovery.
- Transport carefully — keep plants damp and out of direct sun/heat. A plant that dries out or cooks in a hot car melts far worse than one transported properly.
The First-Month Timeline: What to Expect Week by Week
Knowing what’s normal when removes most acclimation anxiety. Here’s the typical timeline for a healthy plant adapting to a new tank:
Week 1: The quiet week
Almost nothing visible happens. The plant is growing roots you can’t see and assessing its new environment. Some species (vallisneria, stem plants) may start shedding their lowest leaves. This is normal. Resist the urge to “help” — no moving, no extra fertilizer, no light changes. The most common beginner mistake is intervening during a week when the correct action is nothing.
Week 2: Melt peaks
This is when emersed leaves give up in earnest. Crypts may drop everything; swords shed their broad aerial leaves; stem plants lose lower foliage. It looks catastrophic and it’s usually fine. Keep removing mushy material, keep conditions stable, and watch the crown and growing tips — if those are firm and green, recovery is already underway.
Week 3: The turn
New submersed-adapted leaves emerge — smaller, thinner, often a slightly different shade of green than the emersed foliage. Stem plant tips start growing visibly; crypts push tiny curled leaves from the crown; swords unfurl narrow ribbon leaves. This is the moment most beginners exhale for the first time.
Week 4+: Established
New growth outpaces melt, and the plant is functionally yours. You can resume full-strength fertilizer, normal trimming, and stop treating it as fragile. Some slow growers (anubias, bucephalandra) take 6–8 weeks to show obvious progress — that’s their normal speed, not a problem.
Acclimating Different Plant Formats
Tissue-culture cups
Sterile, pest-free, and already adapted to high-humidity (not emersed) growth — tissue cultures melt the least of any format. Rinse the agar gel off gently (leftover gel rots and feeds fungus), split the portion into small plantlets, and plant per our planting guide. They establish slowly for the first two weeks, then accelerate. No dip needed, minimal acclimation stress — this is the premium experience you’re paying for.
Potted plants
Remove the pot and strip away the rockwool completely — leftover rockwool traps debris and rots. Tease the root mass apart gently; if it’s a dense mat, splitting it into 2–3 smaller portions actually establishes faster than planting one big clump (more growing points, better water flow around roots). Potted plants are usually emersed-grown, so expect the standard 2–4 week melt cycle.
Bare-root / bunched stems
Typically sold as weighted bunches. Remove any bands, foam, or weights, strip the lower leaves, and plant stems individually or in small groups. Bunched stems from the store are often already transitioning — check for new submersed growth at the tips, which tells you the plant is mid-adaptation and will settle quickly.
Hobbyist cuttings
Already submersed-grown and the fastest to establish — often showing new growth within days. The main acclimation factor is water-parameter difference between the two tanks. Float to temperature-match, plant promptly, and they’ll usually take off with minimal melt. This is why experienced hobbyists prefer trading cuttings over buying potted plants.
Frequently Asked Questions
Should I use a “plant starter” or transplant fertilizer?
Products marketed for transplant shock are mostly B-vitamins and mild hormones. They don’t hurt, but there’s no strong evidence they help aquarium plants specifically. Stable conditions and patience outperform any bottle. Save the money for more plants.
My new plant melted completely — bare crown, no leaves. Is it dead?
Probably not, if the crown or rhizome is firm. Crypts and swords routinely lose 100% of their leaves and regrow from the base within a month. The test is firmness: firm and pale/green means alive; mushy and brown/black means rot. Give firm-but-leafless plants a full 4 weeks before declaring them dead.
Can I speed up acclimation with extra light or CO2?
No — and trying usually backfires. A melting plant can’t use extra light; the excess just grows algae on its dying leaves. Keep light moderate and CO2 stable (not boosted) during acclimation. Growth speed comes from the plant’s own adaptation timeline, which you can’t rush, only avoid delaying.
Should new plants go straight into my main display tank?
After quarantine/dipping, yes — there’s no benefit to a separate “growing-in” tank for most plants. They acclimate to your water fastest in the tank they’ll live in. The exception is very delicate species going into a tank with boisterous fish; give those a few weeks in a calm corner or breeder box first.
The Patience Rule
The single most important acclimation skill is restraint: plant it right, set gentle conditions, remove decay, and then leave it alone for a month. The hobbyists with the best plant growth aren’t doing something clever in week one — they’re simply not interfering in weeks two through four while the plants do what they’ve evolved to do. Melt looks like failure and feels like failure, but in most cases it’s the visible part of a plant successfully becoming yours.