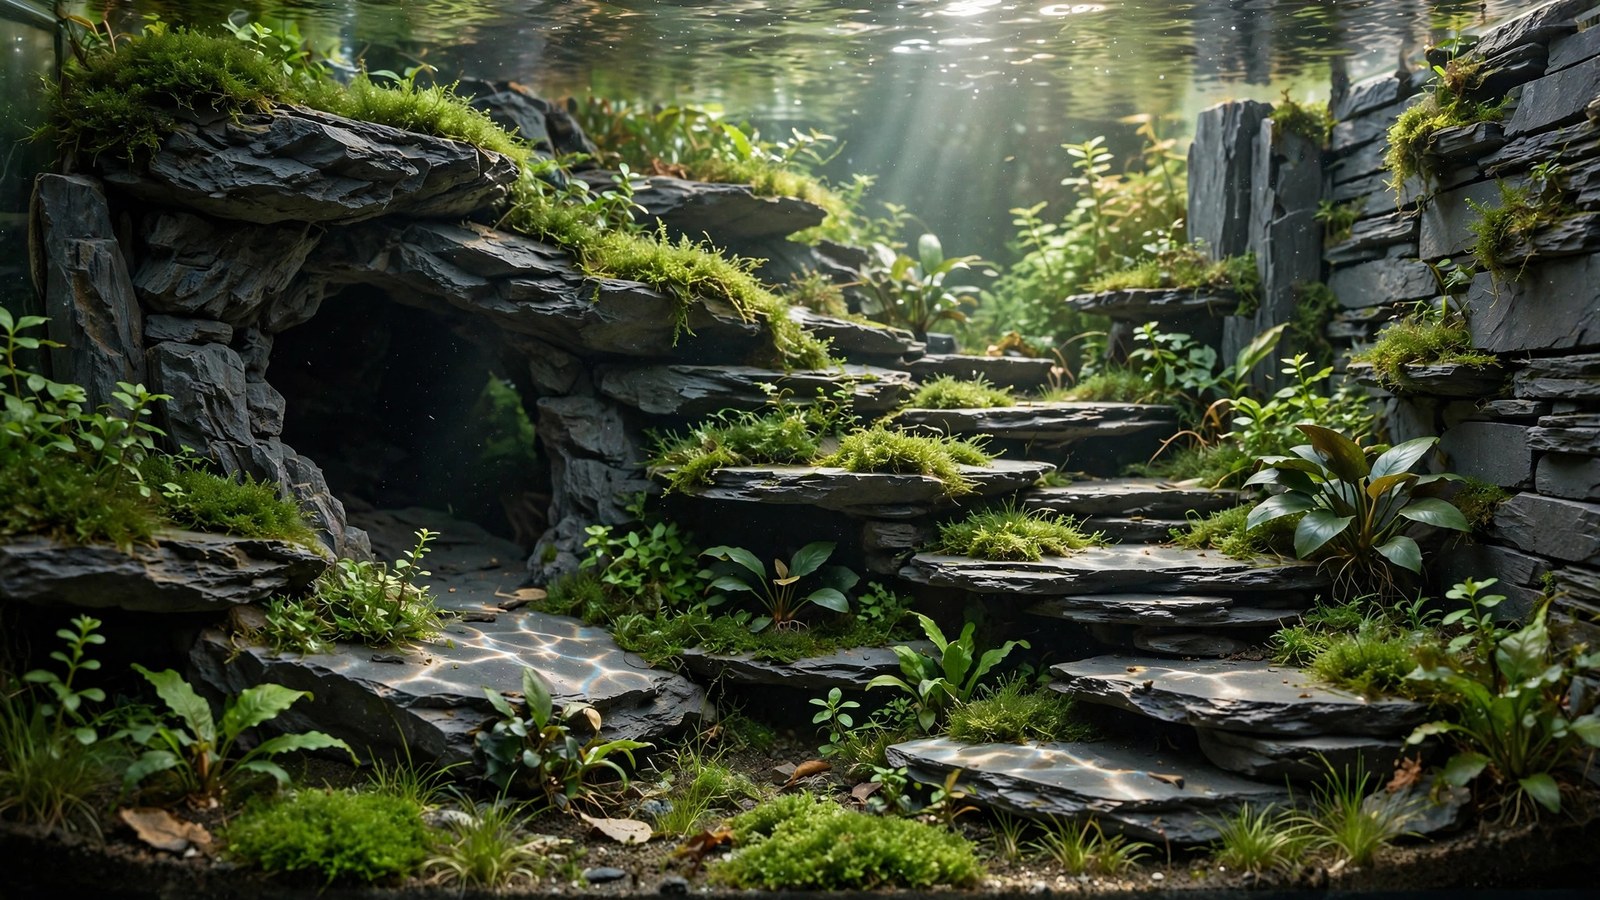
Slate doesn't try to be beautiful — it's flat, gray, and geological. But in the hands of an aquascaper who understands structure, slate becomes caves, terraces, retaining walls, and backgrounds that no other stone builds as cleanly. Its flat layers stack with architectural precision, and it's usually cheap and inert. This guide covers using slate for caves, terraces, walls, and other structural aquascaping.
What Slate Is
Slate is metamorphosed shale — fine-grained rock that splits naturally into flat sheets along its bedding planes. Aquarium slate is typically gray to dark gray, sometimes with subtle blue or green tints. Key properties:
- Usually inert — pure slate doesn't affect pH/KH. (Caveat: some "slate" sold for landscaping contains carbonate layers or pyrite veins — test any new slate with the acid fizz test from our rocks-and-pH guide.)
- Splits into flat sheets — the defining feature. You get clean, stackable slabs from a single rock with a chisel.
- Sharp edges when broken — freshly split slate has knife-like edges. Sand or file any edge fish might contact.
- Heavy and stable — stacked slate stays put; it's the most structurally reliable aquascaping stone.
- Plain looking — let's be honest. Slate's beauty is in what you build with it, not the stone itself.
Project 1: Caves and Hides
Slate's flat sheets make the best DIY caves in the hobby:
- Select 3–5 flat pieces: two "walls," one "roof," optionally a back.
- Lean the walls against each other (A-frame) or stack with the roof spanning across — no glue needed for simple structures; gravity + the flat contact surfaces hold firmly.
- Size the entrance for the intended resident: just bigger than an adult apisto/bristlenose for breeding caves (tight entrances feel safer and get used more); larger for community hides.
- Sand all edges — inside and out. Cave interiors contact fish constantly; a sharp slate edge in a spawning cave is a fin-tear waiting to happen.
- Bury the base slightly in substrate for stability and a natural look.
For breeding: slate caves are the gold standard for bristlenose plecos, apistogramma, and many catfish — better than ceramic caves because you control the dimensions, and the flat roof gives fry a grazing surface. Position caves with entrances visible from the front glass (for your viewing) but in a quiet tank zone (for the fish's comfort).
Project 2: Terraces and Retaining Walls
Slate's flat layers stack into retaining walls with a precision no rounded stone matches:
- Dry-stack walls: overlap pieces like bricks, each layer set back slightly. The weight and flat contact surfaces hold 4–6 inch walls without adhesive — perfect for building terraces.
- Glue for height: for walls over 6 inches or in high-flow areas, bond layers with cyanoacrylate + tissue. The flat surfaces give glue maximum contact area — slate bonds stronger than any other stone.
- Plant the wall: moss and anubias petite wedged between layers colonize slate walls beautifully, softening the architectural lines into "ancient stonework."
- Backfill properly: fill behind the wall with substrate before final positioning of the top layers — trying to pour substrate behind a finished wall washes it out.
Project 3: Backgrounds and Back Walls
Lean large slate sheets against the back glass (substrate piled at the base holds them) for a stone-cliff background — dramatically cheaper than 3D foam backgrounds and completely natural. Tips:
- Overlap sheets like shingles, top sheet overlapping the one below — water flows behind without trapping debris visibly.
- Leave a 1-inch gap from the glass for water circulation (prevents dead zones and makes algae cleanup possible).
- Plant epiphytes in the horizontal seams — the background becomes a vertical garden.
- Dark gray slate against a black background is nearly invisible (all form, no color) — against a light blue background it's dramatic. Choose per your tank's backdrop.
Project 4: Spawning Slabs and Functional Pieces
- Angelfish/disc spawning slabs: a vertical slate sheet (leaned at 70–80°) is the classic spawning surface — easy to remove with eggs attached, easy to clean. Breeders have used slate slabs for decades.
- Weight/anchor bases: glue driftwood to a slate tile and bury the tile — the wood stays put permanently with zero visible hardware. The standard solution for floating wood.
- Stepping stones: flat slate pieces as "path" accents in nature-style scapes — subtle, natural, functional (they protect the substrate in high-traffic zones).
Sourcing and Preparing Slate
Landscaping yards, garden centers, and tile shops sell slate cheaply — offcuts and "slate chippings" bags are perfect. Aquarium-branded slate costs multiples more for the same rock. Preparation:
- Acid-test every batch — drop vinegar or pH-down on a fresh surface; fizzing means carbonates (don't use it, or use it knowingly like Seiryu). Most true slate passes silently.
- Scrub thoroughly — landscaping slate carries quarry dust and sometimes oils. Hot water + stiff brush + a soak.
- Break to size — score with a chisel along the grain and tap. Slate splits obligingly along its planes; across the grain it's stubborn.
- Sand every cut edge — 80-grit then 150-grit. This is the step everyone skips and every fish regrets.
Slate vs Other Structural Stones
| Stone | Stackability | Looks | Inert? | Best structural use |
|---|---|---|---|---|
| Slate | Excellent (flat) | Plain | Usually | Walls, caves, terraces |
| Dragon stone | Good (glue it) | Beautiful | Yes | Visible feature structures |
| Lava rock | Fair (irregular) | Utilitarian | Yes | Hidden structure, media |
| Seiryu | Fair (jagged) | Stunning | No (raises KH) | Feature stone, not structure |
Slate in Paludariums and Open-Top Tanks
Slate's flat, stable character makes it excellent above the waterline too:
- Waterfall weirs: a flat slate sheet angled as a spillway creates clean, sheet-like water flow — far more elegant than plastic weirs. Position a pump outlet behind the top edge; water sheets down the slate face into the tank. The flat surface is key: irregular rock makes chaotic splashing, slate makes glassy flow.
- Planting ledges: horizontal slate shelves above the waterline hold pots of emersed plants, mosses, and ferns — the paludarium's version of terrace gardening. Drill a small drainage notch so pots don't waterlog.
- Basking platforms: for turtle and newt setups, a slate slab half-submerged at the surface is the natural basking spot — the dark stone absorbs heat from the lamp, and the flat surface suits reptile feet.
- Drip walls: vertical slate sheets with water trickling down grow mosses and ferns emersed spectacularly — the constant moisture + flat surface is ideal for wall plantings.
Buying Slate: Cost Reality
Slate pricing is where the landscaping-yard strategy pays off enormously:
- Landscaping slate chippings bag: a few dollars for 20+ lbs of usable pieces — the pieces are random, but for walls and caves random is fine.
- Slate paving slabs: sold individually at garden centers; one large slab yields many cut pieces. A single $10–15 slab can furnish several tanks' worth of caves and walls.
- Aquarium-branded slate: 5–10× the landscaping price for identically-composed rock, sometimes pre-sanded. You're paying for convenience and certainty, not better stone.
- What to ask for: "natural slate" (not "slate-effect"), unsealed, undyed. Roofing slate suppliers also sell offcuts cheaply — ask for "slate offcuts" or "seconds."
For a typical cave + terrace project in a 40-gallon tank, the landscaping-yard total is usually under $15. It's the cheapest structural hardscape in the hobby by a wide margin.
Frequently Asked Questions
Is slate safe for all fish?
Pure slate is inert and safe — with two checks: acid-test for carbonates (some "slate" isn't), and sand every edge (sharp slate cuts fins and hands). With those handled, slate is among the safest hardscape materials, used in breeding tanks for decades.
Will slate affect my pH?
True slate: no. But the landscaping trade sells various layered rocks as "slate," some containing limestone bands or pyrite. The vinegar fizz test takes 10 seconds and settles it — fizz means carbonates (manage like Seiryu); rust-colored veins plus a sulfur smell means pyrite (don't use it).
How do I glue slate pieces together?
Cyanoacrylate (super glue gel) + tissue/paper towel as a bonding matrix — see our glue guide. Slate's flat surfaces are ideal for gluing: maximum contact area, strong bonds. For load-bearing structures, glue + a 24-hour cure outside the tank.
Can I use roofing slate or floor tiles?
Roofing slate: yes, if untreated (no sealants, no asbestos-era composites — modern natural roofing slate is fine after scrubbing). Floor/wall tiles: only if unglazed natural slate — glazed tiles have glass coatings of unknown composition, and some are slate-look ceramic. When in doubt, landscaping slate is cheap and certain.
My slate is growing algae. How do I clean flat surfaces?
Flat slate is the easiest stone to clean — a razor blade or algae scraper glides across it, unlike pitted stones that need toothbrushes. For textured quarried faces, a stiff brush works. Nerite snails maintain it between cleanings.
The Builder's Stone
Slate will never be the stone visitors ask about — it's the stone that makes everything else possible: the cave the apistos spawned in, the terrace holding the hill together, the wall the moss colonized, the slab the angels chose. Buy it by the bag from the landscaping yard, split it with a chisel, sand the edges, and build. It's the most useful unglamorous material in aquascaping.
Tissue-culture plants are the exception — they’re grown in sterile gel and adapt with minimal melting, which is part of what you’re paying for. Plants bought submersed from another hobbyist’s tank also transition with little melt, since they’re already in the right form.
Which Plants Melt Most (and Least)
Heavy melters (expect significant leaf loss)
- Cryptocorynes — infamous for “crypt melt,” sometimes dropping every leaf after any disturbance. They almost always recover from the roots within weeks.
- Stem plants grown emersed — rotala, ludwigia, and hygrophila often shed lower emersed leaves while the growing tips transition.
- Amazon swords — emersed-grown swords typically lose their broad oval aerial leaves and replace them with longer submersed ribbon leaves.
Light melters
- Anubias, java fern, bucephalandra — slow-growing rhizome plants transition gradually; occasional old-leaf melt but rarely dramatic.
- Vallisneria — usually transitions well, though it dislikes the move itself and may sulk for a week.
- Floating plants — minimal melt since their leaves were already at the air-water interface.
The Acclimation Protocol
Step 1: Quarantine or dip first
Before acclimating to your tank’s conditions, make sure you’re not acclimating pests along with the plant. Run new arrivals through our quarantine and dip protocol — it adds days upfront but prevents months of regret.
Step 2: Float to temperature-match (30 minutes)
Float the bag or container in your tank for 20–30 minutes to equalize temperature. Plants are less temperature-sensitive than fish, but a 10°F shock on top of transplant stress is an avoidable insult.
Step 3: Trim before planting
Remove any leaves that are already damaged, yellowing, or heavily algae-covered — they won’t recover and they’ll rot in your tank, feeding algae. For stem plants, trim off the bottom inch and any emersed leaves that look unlikely to adapt; the plant wastes energy maintaining leaves it’s going to shed anyway. Keep the healthy growing tips — that’s where recovery starts.
Step 4: Plant correctly the first time
Follow our planting guide — right depth, crown exposed on rosettes, rhizomes unburied on epiphytes. Every uprooting and replanting restarts the acclimation clock, so get placement right on the first attempt. Decide where each plant goes before it goes in the water.
Step 5: Run a gentle first week
For the first 7 days after planting:
- Moderate light — run your normal photoperiod but consider dropping intensity 20–30% if your light is dimmable. Blast-level light on a melting plant grows algae on the dying leaves, not recovery.
- Stable CO2 — if you inject CO2, keep it consistent. Fluctuating CO2 during acclimation is a melt accelerator. If you’re low-tech, this doesn’t apply — see growing without CO2.
- Half-strength fertilizer — new plants with damaged leaves can’t use full dosing, and the excess feeds algae. Ramp to full strength over 2–3 weeks per our fertilizer schedule.
- No disturbance — don’t move, trim, or “check on” new plants for at least two weeks. Every touch resets root establishment. This is especially critical for crypts.
Step 6: Remove melt, keep the base
As emersed leaves melt, remove the mushy material promptly — decaying leaves release ammonia and grow fungus that can spread to healthy tissue. But never discard the plant while the crown, rhizome, or roots are firm and alive. A crypt that’s lost every leaf but has firm roots is a plant that’s about to recover, not a dead plant. Give it 3–4 weeks before judging.
Telling Normal Melt From Real Problems
Normal transition melt:
- Affects oldest/emersed leaves first, newest growth last
- New submersed leaves emerge even as old ones dissolve
- Roots and crown stay firm and white/green
- Timeline: 1–4 weeks, then obvious new growth
Concerning melt (see our full melting diagnosis guide):
- New growth also melts or emerges deformed
- Rhizome or crown turns mushy and brown — this is rot, not transition
- Entire plant dissolves within days with no new growth after 4+ weeks
- Melting spreads to established plants that weren’t recently moved
Buying Tips to Minimize Melt
- Buy submersed-grown when available — hobbyist-grown cuttings transition with almost no melt.
- Choose tissue culture for sensitive species — crypts and delicate stems establish far more reliably from sterile cups.
- Avoid plants already melting in the store tank — some melt is normal, but a plant that’s mostly mush at purchase has less energy for recovery.
- Transport carefully — keep plants damp and out of direct sun/heat. A plant that dries out or cooks in a hot car melts far worse than one transported properly.
The First-Month Timeline: What to Expect Week by Week
Knowing what’s normal when removes most acclimation anxiety. Here’s the typical timeline for a healthy plant adapting to a new tank:
Week 1: The quiet week
Almost nothing visible happens. The plant is growing roots you can’t see and assessing its new environment. Some species (vallisneria, stem plants) may start shedding their lowest leaves. This is normal. Resist the urge to “help” — no moving, no extra fertilizer, no light changes. The most common beginner mistake is intervening during a week when the correct action is nothing.
Week 2: Melt peaks
This is when emersed leaves give up in earnest. Crypts may drop everything; swords shed their broad aerial leaves; stem plants lose lower foliage. It looks catastrophic and it’s usually fine. Keep removing mushy material, keep conditions stable, and watch the crown and growing tips — if those are firm and green, recovery is already underway.
Week 3: The turn
New submersed-adapted leaves emerge — smaller, thinner, often a slightly different shade of green than the emersed foliage. Stem plant tips start growing visibly; crypts push tiny curled leaves from the crown; swords unfurl narrow ribbon leaves. This is the moment most beginners exhale for the first time.
Week 4+: Established
New growth outpaces melt, and the plant is functionally yours. You can resume full-strength fertilizer, normal trimming, and stop treating it as fragile. Some slow growers (anubias, bucephalandra) take 6–8 weeks to show obvious progress — that’s their normal speed, not a problem.
Acclimating Different Plant Formats
Tissue-culture cups
Sterile, pest-free, and already adapted to high-humidity (not emersed) growth — tissue cultures melt the least of any format. Rinse the agar gel off gently (leftover gel rots and feeds fungus), split the portion into small plantlets, and plant per our planting guide. They establish slowly for the first two weeks, then accelerate. No dip needed, minimal acclimation stress — this is the premium experience you’re paying for.
Potted plants
Remove the pot and strip away the rockwool completely — leftover rockwool traps debris and rots. Tease the root mass apart gently; if it’s a dense mat, splitting it into 2–3 smaller portions actually establishes faster than planting one big clump (more growing points, better water flow around roots). Potted plants are usually emersed-grown, so expect the standard 2–4 week melt cycle.
Bare-root / bunched stems
Typically sold as weighted bunches. Remove any bands, foam, or weights, strip the lower leaves, and plant stems individually or in small groups. Bunched stems from the store are often already transitioning — check for new submersed growth at the tips, which tells you the plant is mid-adaptation and will settle quickly.
Hobbyist cuttings
Already submersed-grown and the fastest to establish — often showing new growth within days. The main acclimation factor is water-parameter difference between the two tanks. Float to temperature-match, plant promptly, and they’ll usually take off with minimal melt. This is why experienced hobbyists prefer trading cuttings over buying potted plants.
Frequently Asked Questions
Should I use a “plant starter” or transplant fertilizer?
Products marketed for transplant shock are mostly B-vitamins and mild hormones. They don’t hurt, but there’s no strong evidence they help aquarium plants specifically. Stable conditions and patience outperform any bottle. Save the money for more plants.
My new plant melted completely — bare crown, no leaves. Is it dead?
Probably not, if the crown or rhizome is firm. Crypts and swords routinely lose 100% of their leaves and regrow from the base within a month. The test is firmness: firm and pale/green means alive; mushy and brown/black means rot. Give firm-but-leafless plants a full 4 weeks before declaring them dead.
Can I speed up acclimation with extra light or CO2?
No — and trying usually backfires. A melting plant can’t use extra light; the excess just grows algae on its dying leaves. Keep light moderate and CO2 stable (not boosted) during acclimation. Growth speed comes from the plant’s own adaptation timeline, which you can’t rush, only avoid delaying.
Should new plants go straight into my main display tank?
After quarantine/dipping, yes — there’s no benefit to a separate “growing-in” tank for most plants. They acclimate to your water fastest in the tank they’ll live in. The exception is very delicate species going into a tank with boisterous fish; give those a few weeks in a calm corner or breeder box first.
The Patience Rule
The single most important acclimation skill is restraint: plant it right, set gentle conditions, remove decay, and then leave it alone for a month. The hobbyists with the best plant growth aren’t doing something clever in week one — they’re simply not interfering in weeks two through four while the plants do what they’ve evolved to do. Melt looks like failure and feels like failure, but in most cases it’s the visible part of a plant successfully becoming yours.