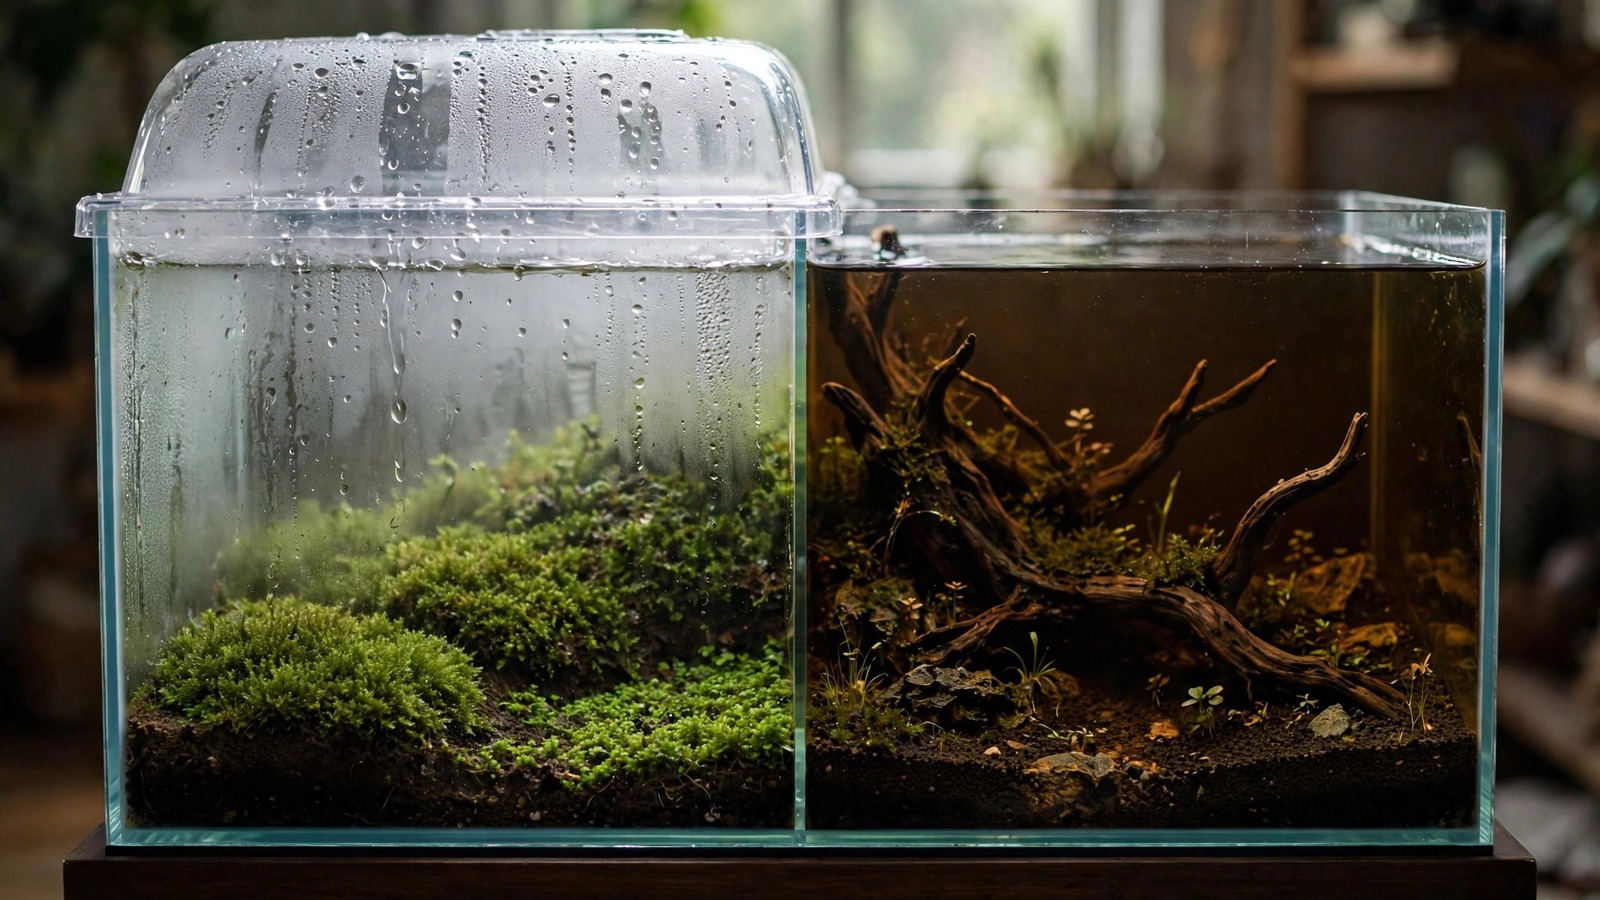
The first month of a new planted tank decides whether your scape becomes the lush carpet you imagined or a green algae experiment. Two patience-first cycling methods promise a better beginning, but they solve opposite problems: the dry start vs dark start aquarium debate isn't really about which one is "better" — it's about matching the method to your plants, your substrate, and how much risk you can stomach. This guide compares both honestly so you pick the right one the first time.
The Short Version: What Each Method Actually Does
Both methods delay planting or stocking to give the tank a head start — but they work in opposite directions. The dry start method grows your carpeting plants emersed (in humid air) before any water goes in. The dark start method fills the tank immediately but runs it without light for weeks, letting the substrate settle and the filter cycle before a single plant is added.
Think of it this way: dry start is a head start for your plants, while dark start is a head start for your water chemistry and biofilter. Understanding that distinction makes the choice obvious in most cases.
How the Dry Start Method Works
In a dry start, you lay down substrate and hardscape, plant your carpet species directly into the damp substrate, then cover the tank with cling film or a glass lid to trap humidity. With no standing water, your plants grow in air, where CO2 is roughly 400 ppm — over ten times what's dissolved in a typical aquarium. Carpet species like dwarf hairgrass and Monte Carlo explode under these conditions, rooting deep and spreading into the dense mat that usually takes months underwater.
What a typical dry start looks like
- Setup: nutrient-rich substrate (usually aquasoil), hardscape placed, plants tucked into moist substrate
- Humidity: tank covered 90–100%; mist daily with dechlorinated or distilled water
- Light: 8–10 hours of light per day, same as a planted tank would get
- Duration: typically 4–8 weeks, until the carpet is dense and rooted
- Flooding: fill the tank slowly, drain and refill once or twice to remove loose organics, then run the filter and cycle as normal
Dry start strengths
The biggest win is the carpet. Emersed growth is fast, roots establish before water current can disturb them, and you skip the fragile early phase where submerged carpet cuttings melt, float up, and get picked apart by hungry algae. It also costs nothing extra — no CO2 system is needed during the dry phase, which makes it popular with aquascapers running high-tech layouts on a budget. For a deeper walkthrough of the technique, see our dry start method guide.
Dry start risks and downsides
The transition is the danger zone. When you flood the tank, emersed-grown leaves must convert to their submerged form, and some melt is normal — sometimes dramatic. If the carpet hasn't rooted firmly enough, whole patches lift off and drift. Mold can also attack during the humid phase, especially if air circulation is poor or you mist too heavily. And crucially, a dry start does not cycle your tank: after flooding, you still need to wait out the nitrogen cycle before adding livestock, because the substrate's ammonia leaching starts in earnest only once water is in.
How the Dark Start Method Works
The dark start takes the opposite route. You set up the complete hardscape and substrate, fill the tank, start the filter — and then keep the lights off entirely for two to six weeks. No plants, no livestock, just dark water, running equipment, and patience.
The logic is biochemical. Fresh aquasoil releases a heavy pulse of ammonia in its first weeks — the same ammonia spike that fuels early algae blooms and makes new tanks dangerous for livestock. By running the tank in darkness, you let beneficial bacteria colonize the filter and substrate to process that ammonia, and you let the initial nutrient surge settle, all while denying algae the light it needs to establish. When you finally plant into a dark-started tank, you're adding plants to stable, cycled water instead of a chemistry rollercoaster.
What a typical dark start looks like
- Setup: substrate and hardscape in place, tank filled, filter running
- Light: completely off (a blackout or even covering the tank helps)
- Maintenance: large weekly water changes — 50% or more — to flush the ammonia the soil releases
- Duration: 2–6 weeks, until ammonia and nitrite test at zero and water changes run clear
- Planting: plant heavily at the end, then begin a normal light schedule
Dark start strengths
Algae control is the headline benefit. Most new-tank algae outbreaks trace back to the combination of excess nutrients and immature biology; the dark start removes light from that equation entirely during the most volatile weeks. It's also a genuinely hands-off method — no daily misting, no mold patrol — and it works brilliantly with epiphyte-heavy scapes (anubias, bucephalandra, mosses) that don't need the carpet head start at all. Our dedicated dark start method guide covers the week-by-week process in detail.
Dark start risks and downsides
The method does nothing for carpet plants — you'll still face the slow, algae-vulnerable establishment phase after planting. It also requires more upfront equipment (the filter runs for weeks before anything living arrives), and beginners sometimes misread a dark, plantless tank as a stalled or dead one and give up too early. Water testing during the dark phase is essential; "no light" doesn't mean "no maintenance."
Dry Start vs Dark Start Aquarium: Head-to-Head Comparison
| Factor | Dry Start Method | Dark Start Method |
|---|---|---|
| What you skip | The fragile early carpet phase | The early algae-and-ammonia phase |
| Water during the method | None — humid air only | Full — tank is filled from day one |
| Lighting | Normal photoperiod (plants need light) | Completely off for the whole period |
| Typical duration | 4–8 weeks | 2–6 weeks |
| Best for | Carpeting plants: HC Cuba, Monte Carlo, dwarf hairgrass | Epiphyte/rock/wood scapes, rich aquasoils, algae-prone setups |
| Cycles the tank? | No — the nitrogen cycle begins at flooding | Yes — filter and substrate colonize during the dark phase |
| Daily effort | Higher: misting, ventilation, mold checks | Lower: weekly water changes, test kit readings |
| Main risk | Melt and carpet lift after flooding | Impatience; planting into an untested tank |
| CO2 needed? | Not during the dry phase (air supplies it) | Not applicable until plants go in |
| Livestock timeline | Only after flooding and a full cycle | Often sooner — the cycle finishes in the dark |
Choosing Based on Your Tank Setup
Pick the dry start if…
Your scape lives or dies on its carpet. Iwagumi layouts, Dutch-style foregrounds, and any tank where a flawless green lawn is the visual centerpiece benefit enormously from emersed growth. Dry start is also the budget-friendly pick for high-tech aspirants: you get CO2-level growth rates for free from the air. If your plan leans on carpeting plants without CO2, a dry start is often what makes that plan realistic.
Pick the dark start if…
Your substrate is doing the heavy lifting. Fresh aquasoil, dirted setups, and any tank loaded with nutrient-rich substrate will leach ammonia aggressively in week one — the dark start tames exactly that. It's also the better choice for hardscape-first scapes dominated by stone, wood, anubias, and mosses, where there's no carpet to grow and algae prevention matters most. Many aquascapers who build their layout around the hardscape-first method find the dark start a natural companion, since the stones and wood are already positioned before water ever enters.
The beginner question: which is more forgiving?
For a first planted tank, the dark start is usually the safer recommendation. It has fewer failure modes (no mold, no flooding-day disasters), it genuinely cycles your tank, and its main demand — patience — costs nothing. The dry start rewards experience: knowing when a carpet is rooted enough to survive flooding is a judgment call that gets easier after you've seen one melt.
Can You Combine Them?
Yes — and experienced aquascapers increasingly do. The sequence matters: run the dry start first to establish your carpet, flood the tank, then immediately begin a short dark start (one to three weeks) to let the substrate's ammonia pulse settle before planting your background stems and turning on full light. You get the carpet head start and the algae-free chemistry window. The trade-off is time: you're stacking two waiting periods, so the total setup stretches to eight to twelve weeks before the tank looks "finished."
Whichever path you take, planning the layout before touching substrate saves the most time of all — our guide to planning an aquascape walks through sketching, hardscape testing, and plant selection in the right order.
Frequently Asked Questions
Can I do a dry start or dark start with fish already in the tank?
No — neither method is compatible with livestock. A dry start has no water at all, and a dark start deliberately creates an uncycled, high-ammonia environment in total darkness, which is stressful and dangerous for fish and invertebrates. Both methods are strictly for the setup phase. Livestock goes in only after the tank is filled, fully cycled, and testing shows zero ammonia and nitrite — the standard livestock-safety rule for any new aquarium.
Does the dark start fully cycle a tank?
It does most of the work. With the filter running and ammonia present from fresh substrate, nitrifying bacteria colonize the media over the two to six weeks, so by planting day the biofilter is usually processing ammonia to nitrate. You should still confirm with a liquid test kit — ammonia and nitrite at zero, nitrate present — before adding any livestock. If the readings aren't clean, keep doing water changes in the dark until they are.
Which method gets me to a finished tank faster?
The dark start is usually quicker to a planted, lit tank (roughly 2–6 weeks), but a dark-started carpet still needs months to fill in underwater. The dry start takes longer upfront (4–8 weeks of emersed growth) but can deliver a finished-looking carpet almost immediately after flooding. Total time to a mature, algae-free scape is comparable; the difference is where in the process the waiting happens.
Will my dry-start carpet melt when I flood the tank?
Some melting is normal and expected — emersed leaves convert to submerged growth over one to three weeks, and species like HC Cuba are notorious for dramatic transitions. Minimize losses by flooding only when the carpet is dense and well-rooted, filling slowly to avoid disturbing the substrate, and planting heavily with fast growers to outcompete algae during the transition. If whole patches lift off, they weren't rooted enough and need more dry time.
Do I need CO2 injection with either method?
Not during the method itself. The dry start gets free CO2 from the air, and the dark start has no plants to feed. But CO2 becomes relevant afterward: a freshly flooded dry-start tank benefits from CO2 injection to power the emersed-to-submerged transition, and dark-started tanks with demanding stem plants will want it from planting day. Low-tech scapes with easy species can succeed with neither, at a slower pace.
The Bottom Line
The dry start vs dark start choice comes down to what your scape needs most: a head start for demanding carpet plants, or a clean, cycled, algae-free foundation for everything else. Carpet-centered layouts almost always justify the dry start's daily effort; soil-heavy, hardscape-driven, or beginner tanks almost always reward the dark start's patience. And if you're feeling ambitious, running them back-to-back gives you both advantages — the lush carpet and the stable water. For inspiration on which carpet species suit your setup, the Tropica plant database lists each plant's growth rate and difficulty, which makes matching a species to your chosen method much easier. Whatever you choose, resist the urge to rush: in aquascaping, the waiting is the work.
Tissue-culture plants are the exception — they’re grown in sterile gel and adapt with minimal melting, which is part of what you’re paying for. Plants bought submersed from another hobbyist’s tank also transition with little melt, since they’re already in the right form.
Which Plants Melt Most (and Least)
Heavy melters (expect significant leaf loss)
- Cryptocorynes — infamous for “crypt melt,” sometimes dropping every leaf after any disturbance. They almost always recover from the roots within weeks.
- Stem plants grown emersed — rotala, ludwigia, and hygrophila often shed lower emersed leaves while the growing tips transition.
- Amazon swords — emersed-grown swords typically lose their broad oval aerial leaves and replace them with longer submersed ribbon leaves.
Light melters
- Anubias, java fern, bucephalandra — slow-growing rhizome plants transition gradually; occasional old-leaf melt but rarely dramatic.
- Vallisneria — usually transitions well, though it dislikes the move itself and may sulk for a week.
- Floating plants — minimal melt since their leaves were already at the air-water interface.
The Acclimation Protocol
Step 1: Quarantine or dip first
Before acclimating to your tank’s conditions, make sure you’re not acclimating pests along with the plant. Run new arrivals through our quarantine and dip protocol — it adds days upfront but prevents months of regret.
Step 2: Float to temperature-match (30 minutes)
Float the bag or container in your tank for 20–30 minutes to equalize temperature. Plants are less temperature-sensitive than fish, but a 10°F shock on top of transplant stress is an avoidable insult.
Step 3: Trim before planting
Remove any leaves that are already damaged, yellowing, or heavily algae-covered — they won’t recover and they’ll rot in your tank, feeding algae. For stem plants, trim off the bottom inch and any emersed leaves that look unlikely to adapt; the plant wastes energy maintaining leaves it’s going to shed anyway. Keep the healthy growing tips — that’s where recovery starts.
Step 4: Plant correctly the first time
Follow our planting guide — right depth, crown exposed on rosettes, rhizomes unburied on epiphytes. Every uprooting and replanting restarts the acclimation clock, so get placement right on the first attempt. Decide where each plant goes before it goes in the water.
Step 5: Run a gentle first week
For the first 7 days after planting:
- Moderate light — run your normal photoperiod but consider dropping intensity 20–30% if your light is dimmable. Blast-level light on a melting plant grows algae on the dying leaves, not recovery.
- Stable CO2 — if you inject CO2, keep it consistent. Fluctuating CO2 during acclimation is a melt accelerator. If you’re low-tech, this doesn’t apply — see growing without CO2.
- Half-strength fertilizer — new plants with damaged leaves can’t use full dosing, and the excess feeds algae. Ramp to full strength over 2–3 weeks per our fertilizer schedule.
- No disturbance — don’t move, trim, or “check on” new plants for at least two weeks. Every touch resets root establishment. This is especially critical for crypts.
Step 6: Remove melt, keep the base
As emersed leaves melt, remove the mushy material promptly — decaying leaves release ammonia and grow fungus that can spread to healthy tissue. But never discard the plant while the crown, rhizome, or roots are firm and alive. A crypt that’s lost every leaf but has firm roots is a plant that’s about to recover, not a dead plant. Give it 3–4 weeks before judging.
Telling Normal Melt From Real Problems
Normal transition melt:
- Affects oldest/emersed leaves first, newest growth last
- New submersed leaves emerge even as old ones dissolve
- Roots and crown stay firm and white/green
- Timeline: 1–4 weeks, then obvious new growth
Concerning melt (see our full melting diagnosis guide):
- New growth also melts or emerges deformed
- Rhizome or crown turns mushy and brown — this is rot, not transition
- Entire plant dissolves within days with no new growth after 4+ weeks
- Melting spreads to established plants that weren’t recently moved
Buying Tips to Minimize Melt
- Buy submersed-grown when available — hobbyist-grown cuttings transition with almost no melt.
- Choose tissue culture for sensitive species — crypts and delicate stems establish far more reliably from sterile cups.
- Avoid plants already melting in the store tank — some melt is normal, but a plant that’s mostly mush at purchase has less energy for recovery.
- Transport carefully — keep plants damp and out of direct sun/heat. A plant that dries out or cooks in a hot car melts far worse than one transported properly.
The First-Month Timeline: What to Expect Week by Week
Knowing what’s normal when removes most acclimation anxiety. Here’s the typical timeline for a healthy plant adapting to a new tank:
Week 1: The quiet week
Almost nothing visible happens. The plant is growing roots you can’t see and assessing its new environment. Some species (vallisneria, stem plants) may start shedding their lowest leaves. This is normal. Resist the urge to “help” — no moving, no extra fertilizer, no light changes. The most common beginner mistake is intervening during a week when the correct action is nothing.
Week 2: Melt peaks
This is when emersed leaves give up in earnest. Crypts may drop everything; swords shed their broad aerial leaves; stem plants lose lower foliage. It looks catastrophic and it’s usually fine. Keep removing mushy material, keep conditions stable, and watch the crown and growing tips — if those are firm and green, recovery is already underway.
Week 3: The turn
New submersed-adapted leaves emerge — smaller, thinner, often a slightly different shade of green than the emersed foliage. Stem plant tips start growing visibly; crypts push tiny curled leaves from the crown; swords unfurl narrow ribbon leaves. This is the moment most beginners exhale for the first time.
Week 4+: Established
New growth outpaces melt, and the plant is functionally yours. You can resume full-strength fertilizer, normal trimming, and stop treating it as fragile. Some slow growers (anubias, bucephalandra) take 6–8 weeks to show obvious progress — that’s their normal speed, not a problem.
Acclimating Different Plant Formats
Tissue-culture cups
Sterile, pest-free, and already adapted to high-humidity (not emersed) growth — tissue cultures melt the least of any format. Rinse the agar gel off gently (leftover gel rots and feeds fungus), split the portion into small plantlets, and plant per our planting guide. They establish slowly for the first two weeks, then accelerate. No dip needed, minimal acclimation stress — this is the premium experience you’re paying for.
Potted plants
Remove the pot and strip away the rockwool completely — leftover rockwool traps debris and rots. Tease the root mass apart gently; if it’s a dense mat, splitting it into 2–3 smaller portions actually establishes faster than planting one big clump (more growing points, better water flow around roots). Potted plants are usually emersed-grown, so expect the standard 2–4 week melt cycle.
Bare-root / bunched stems
Typically sold as weighted bunches. Remove any bands, foam, or weights, strip the lower leaves, and plant stems individually or in small groups. Bunched stems from the store are often already transitioning — check for new submersed growth at the tips, which tells you the plant is mid-adaptation and will settle quickly.
Hobbyist cuttings
Already submersed-grown and the fastest to establish — often showing new growth within days. The main acclimation factor is water-parameter difference between the two tanks. Float to temperature-match, plant promptly, and they’ll usually take off with minimal melt. This is why experienced hobbyists prefer trading cuttings over buying potted plants.
Frequently Asked Questions
Should I use a “plant starter” or transplant fertilizer?
Products marketed for transplant shock are mostly B-vitamins and mild hormones. They don’t hurt, but there’s no strong evidence they help aquarium plants specifically. Stable conditions and patience outperform any bottle. Save the money for more plants.
My new plant melted completely — bare crown, no leaves. Is it dead?
Probably not, if the crown or rhizome is firm. Crypts and swords routinely lose 100% of their leaves and regrow from the base within a month. The test is firmness: firm and pale/green means alive; mushy and brown/black means rot. Give firm-but-leafless plants a full 4 weeks before declaring them dead.
Can I speed up acclimation with extra light or CO2?
No — and trying usually backfires. A melting plant can’t use extra light; the excess just grows algae on its dying leaves. Keep light moderate and CO2 stable (not boosted) during acclimation. Growth speed comes from the plant’s own adaptation timeline, which you can’t rush, only avoid delaying.
Should new plants go straight into my main display tank?
After quarantine/dipping, yes — there’s no benefit to a separate “growing-in” tank for most plants. They acclimate to your water fastest in the tank they’ll live in. The exception is very delicate species going into a tank with boisterous fish; give those a few weeks in a calm corner or breeder box first.
The Patience Rule
The single most important acclimation skill is restraint: plant it right, set gentle conditions, remove decay, and then leave it alone for a month. The hobbyists with the best plant growth aren’t doing something clever in week one — they’re simply not interfering in weeks two through four while the plants do what they’ve evolved to do. Melt looks like failure and feels like failure, but in most cases it’s the visible part of a plant successfully becoming yours.