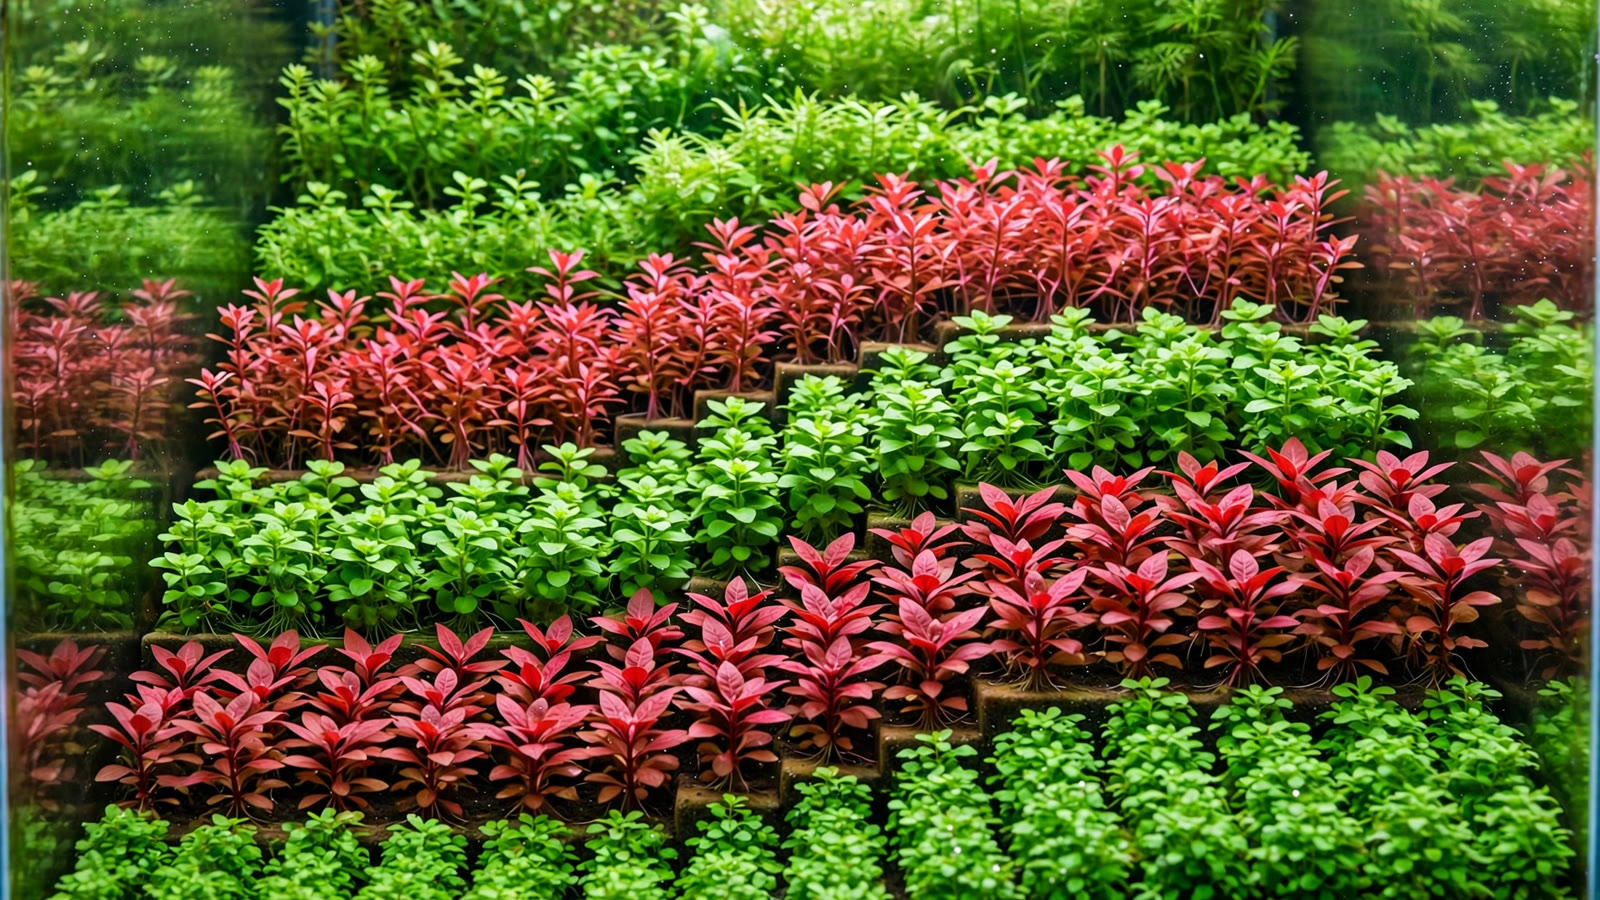
Every competition-winning Dutch tank looks inevitable, as if the plants simply grew into a perfect funnel of color. The truth is the opposite: a classic Dutch layout is a geometry problem solved with living plants. Dutch aquascape street geometry — the angles at which plant streets run, the ratios at which they widen from back to front, and the exact points where they meet the front glass — is what separates a showpiece from a pretty jungle. Once you learn to measure your streets, plant heights and color placement stop being matters of taste and start being arithmetic.
A Street Is a Perspective Instrument, Not a Flowerbed
A Dutch plant street is a band of one species running from the front glass toward the back. It looks decorative, but its real job is optical: it drags the viewer's eye deeper into the tank than the glass box physically allows. Think of the way theater curtains funnel attention toward center stage, or the way a road photographed from ground level seems to rush toward the horizon. The street's edges are leading lines, and its widening shape is forced perspective. Aquascapers who work in other styles already exploit this — diagonal composition and leading lines are the same trick with hardscape — but Dutch style executes it purely with plants, which makes the math stricter: a rock can be nudged half a centimeter, while a street is hundreds of individual stems that must hold a line.
The Mathematics of a Plant Street
Where streets meet the glass: the 1/3 and 2/3 entry points
The most consequential measurement in a Dutch layout happens before a single stem is planted: where each street touches the front glass. The working rule is to drop those entry points on the vertical one-third and two-thirds lines of the tank's width — the same division behind the rule of thirds in aquascaping. On a 120 cm tank, that puts the street openings at roughly 40 cm and 80 cm. Why does it matter? A street that starts dead center splits the layout into mirror halves, and symmetry reads as flat; the viewer's eye has nowhere to travel. Entry points at the thirds create an immediate asymmetry, so the eye enters at an off-center point and travels diagonally across the tank. If two streets share the front glass, give them the two thirds marks and let the remaining third act as breathing room for a foreground accent — crowding all three thirds with street mouths erases the asymmetry you just built.
How wide the funnel opens: street width ratios
Every Dutch street widens toward the viewer — narrow at the back, broad at the front — and the ratio of that taper is the single biggest lever on perceived depth. The practical range is a front-to-back width ratio of about 3:1 to 4:1. A street that is 12 cm wide where it meets the front glass should shrink to 3–4 cm where it vanishes behind the plants at the back. Expressed as an angle, the street's edges diverge at roughly 8 to 15 degrees of total spread: deeper tanks (60 cm front-to-back and beyond) can carry the steeper end, while shallow 30–40 cm tanks need the gentler end or the funnel looks cartoonish. The ratio must also be consistent: if the left street tapers at 3:1 and the right at 6:1, the viewer's brain detects the mismatch instantly, and the illusion of uniform depth breaks.
Terrace sight lines: why the back of a street must stay visible
Width ratios only work if the whole street can actually be seen. On a flat substrate, the trimmed canopy of a front street hides the base of the street behind it, so the taper you so carefully planted is invisible — the viewer sees color bands, not geometry. Terraces solve this as a sight-line problem: each step of substrate lifts the rear street high enough that its base clears the canopy in front of it when viewed straight through the front glass. The related technique of sloping substrate for depth uses the same principle in miniature. As a working figure, terrace risers of 5–8 cm per step on a standard-height tank keep rear street bases visible over a trimmed front canopy, and the steps should run parallel to the front glass so every street climbs at the same rate. A terrace that tilts or steps unevenly shows up immediately as one street's taper looking "wrong" while its neighbors look right.
Street-by-Street Height Geometry
Width is only half the equation; the canopy height of each street is the other half, and the two must move together. The canopy surface of a street should rise along its length, low at the front glass and climbing toward the back, so the eye climbs a visible staircase of color into the tank. The relationship is inverse: a street with a steep divergence angle (wide funnel) can afford a gentle height ramp, because the widening shape is already doing the depth work; a street with a shallow divergence needs a more pronounced height ramp to keep the diagonal readable. In practice this means the tallest plants of a given street sit where the street is narrowest — at the back — and the heights step down as the street widens forward. Where two streets run side by side, their canopies should peak at different depths: if both peak at the same distance from the glass, the peaks fuse into one horizontal band and the street boundary between them disappears. Stagger the peaks and each street keeps its identity.
Color Contrast, Treated as a Science
Complementary pairs: the color wheel underwater
Dutch color discipline rests on a simple physical fact: the strongest visual separation comes from hues opposite each other on the color wheel. Red against green, orange against blue-green, magenta against yellow-green — these pairings vibrate because the eye cannot blend them into a muddy middle. Adjacent streets should therefore be complementary or near-complementary, never neighbors on the wheel: red next to orange reads as one blurry warm mass, while red next to lime green reads as two distinct streets even at a glance. Saturation matters as much as hue: a pale pink stem next to deep forest green fails the contrast test because the pale side reflects too much light to hold its own. Pair saturated with saturated, or use a deliberately pale accent as a bridge between two strong streets — never as a load-bearing contrast on its own. The broader principles are the same ones covered in color theory for aquascapers; Dutch style simply applies them under contest conditions.
The contrast-focal-point rule
Not all contrasts are equal, so the layout's single strongest color pair belongs at its single strongest geometric point. The focal point placement rules put that point at a thirds intersection — the spot where a street's diagonal and the thirds grid coincide. Place your loudest pairing there (the crimson-and-lime example from the catalog below is the classic choice) and flank it with progressively quieter contrasts as you move away. This is why experienced Dutch scapers concentrate their reds instead of scattering them: a red street at the focal point catches the eye exactly where the geometry already directs it, doubling the impact. A red street floating in a corner where no street angle supports it does the opposite — it pulls the eye off the composition's main diagonal and the whole layout feels like it leans. One focal contrast, supported by secondary contrasts, reads as intentional; three equal reds in three places reads as noise.
How NBAT-style judging scores color
This is not just aesthetics — it is scored. Published descriptions of the NBAT A1 planted-tank scorecard, the traditional home of Dutch-style entries, weight chosen plants, development of plants, and general impression with meaningful multipliers, and color harmony and contrast land squarely in all three: plant choice is judged on whether the palette is deliberate, development on whether each street holds a uniform, saturated color, and general impression on whether the whole reads as one composition. A layout with two similar reds side by side or a high-contrast street stranded away from any focal geometry loses points in all three boxes at once. If you ever plan to enter, study NBAT's published judging criteria and how aquascaping contests are judged before you plant — the scorecard is effectively a checklist of the geometry and color rules in this article.
The Color-Pairing Catalog: Species by Species
General palettes are for planning; competitions are won on specific pairings. Each pair below names two species, the contrast mechanism, and why it survives the squint test — browse the Tropica plant database by color and leaf form to confirm how each species colors up under strong light before committing a street to it.
| Pair | Species A (warm) | Species B (cool) | Why the contrast works |
|---|---|---|---|
| 1 | Alternanthera reineckii 'Mini' — crimson | Hemianthus micranthemoides (pearl weed) — lime green | True red/green complementary opposition, plus broad mini leaves against fine pearl-weed foliage, so color and form reinforce each other. The classic focal-point pairing. |
| 2 | Ludwigia palustris 'Super Red' — deep red | Bacopa caroliniana — light green | Saturated deep red against a pale bright green: the lightness gap is as wide as the hue gap. Round Bacopa leaves versus oval Ludwigia leaves keep the boundary crisp. |
| 3 | Rotala macrandra — magenta-red | Mayaca fluviatilis — vivid green | Magenta against neon green is the highest-chroma pairing in the hobby; broad Macrandra leaves versus needle-fine Mayaca makes the street edge unmistakable even in a photograph. |
| 4 | Ammania gracilis — orange-pink | Limnophila aquatica — feathery green | Warm orange-pink against cool feathery green; fine Limnophila texture reads as a backdrop wash, making the Ammania street look denser and more solid. |
| 5 | Rotala rotundifolia 'H'ra' — pink-red tips | Pogostemon helferi — curly lime green | Pink-red needle foliage against a curly lime rosette: opposing hues and opposing leaf architecture. Excellent as the secondary contrast flanking a focal pair. |
| 6 | Nymphaea lotus 'Zenkeri' — dark red round leaves | Vallisneria nana — green ribbons | Dark round red leaves against vertical green ribbons. Use as the single accent at the focal point — the lotus is a soloist, not a street, and the Vallisneria curtain behind it is its green partner. |
| 7 | Hygrophila pinnatifida — bronze-brown | Staurogyne repens — compact bright green | Muted warm tone against bright cool green: contrast carried by saturation difference, not hue opposition. Ideal midground pairing where a full red would overpower the foreground. |
The Front-On Photo Test
Your camera is the most honest judge your layout will ever meet. Set the lens at the vertical center of the front glass, perfectly perpendicular to it — no angle, no tilt. Angled shots are how broken street geometry hides: a street whose edge wanders looks straight from the side, but front-on the wander shows as a kink. Kill the room lights, run only the tank lights, and take the shot on a tripod so you can compare attempts week to week. In the photo, check three things: every street edge runs straight from its thirds entry point to its vanishing point at the back; every street's taper is even on both edges; and the highest-contrast pairing sits on the focal thirds intersection. If a street fails any of the three, replant the offending group before its roots knit the substrate together — geometry is cheapest to fix in the first two weeks. For the full technique, see our guide to photographing your aquascape.
Frequently Asked Questions
At what angle should Dutch plant streets converge?
Aim for a total divergence of roughly 8 to 15 degrees — narrow at the back, wide at the front glass. Deeper tanks (60 cm front-to-back or more) can take the steeper end; shallow 30–40 cm tanks need the gentler end or the funnel looks exaggerated. Measure it practically: mark the front and back widths on the glass with tape and sight along each street edge. Both edges of each street should diverge evenly, and neighboring streets should share roughly the same angle.
How wide should a street be at the front versus the back?
Use a front-to-back width ratio of about 3:1 to 4:1 — for example, 12 cm wide where the street meets the front glass, tapering to 3–4 cm where it disappears behind the plants at the back. Go much narrower at the back and the street vanishes before it can pull the eye in; keep it too wide and the forced-perspective effect dies because the taper is unreadable. Keep the ratio consistent across all streets in the tank.
What is the contrast-focal-point rule?
Your single strongest color pairing goes at your single strongest geometric point — a thirds intersection where a street's diagonal meets the thirds grid. Concentrate the loudest reds there and flank them with progressively quieter contrasts as you move away. A high-contrast street placed where no street angle supports it pulls the eye off the composition's main diagonal. One focal contrast reads as intentional; three equal reds scattered around the tank reads as noise.
Which two colors give the strongest street-to-street contrast?
Saturated red against saturated lime green — true complementary opposites on the color wheel, like Alternanthera reineckii 'Mini' beside pearl weed. The hue opposition is reinforced when the leaf forms also differ (broad versus fine), which is why the classic Dutch focal pairing combines both. Avoid placing two warm colors together (red next to orange) or two similar greens side by side; the eye blends them and the street boundary dissolves.
How do I check my street geometry without entering a contest?
Use the front-on photo test: camera lens centered on the front glass, perfectly perpendicular, room lights off, tank lights only. The photo reveals what the naked eye forgives — wandering street edges, tapers that are uneven on the two sides, entry points that drifted off the thirds marks, and a focal contrast that missed its intersection. Replant any offending group within the first two weeks, before roots knit the substrate and geometry becomes expensive to fix.
Measure Twice, Plant Once
Dutch aquascaping rewards the scaper who treats the front glass as graph paper. Get the entry points on the thirds, hold the 3:1 to 4:1 taper, lift every rear street base into sight with even terraces, stagger the canopy peaks, and anchor your loudest color pair on the focal intersection — and the tank will look deep, deliberate, and calm even before the plants fill in. This article is the precision companion to the general Dutch arrangement rules, which cover the style's broader planting principles. Master the geometry here and the color science there, and you will be laying out streets like a competition judge is already standing in front of your tank — because one day, one might be.
Tissue-culture plants are the exception — they’re grown in sterile gel and adapt with minimal melting, which is part of what you’re paying for. Plants bought submersed from another hobbyist’s tank also transition with little melt, since they’re already in the right form.
Which Plants Melt Most (and Least)
Heavy melters (expect significant leaf loss)
- Cryptocorynes — infamous for “crypt melt,” sometimes dropping every leaf after any disturbance. They almost always recover from the roots within weeks.
- Stem plants grown emersed — rotala, ludwigia, and hygrophila often shed lower emersed leaves while the growing tips transition.
- Amazon swords — emersed-grown swords typically lose their broad oval aerial leaves and replace them with longer submersed ribbon leaves.
Light melters
- Anubias, java fern, bucephalandra — slow-growing rhizome plants transition gradually; occasional old-leaf melt but rarely dramatic.
- Vallisneria — usually transitions well, though it dislikes the move itself and may sulk for a week.
- Floating plants — minimal melt since their leaves were already at the air-water interface.
The Acclimation Protocol
Step 1: Quarantine or dip first
Before acclimating to your tank’s conditions, make sure you’re not acclimating pests along with the plant. Run new arrivals through our quarantine and dip protocol — it adds days upfront but prevents months of regret.
Step 2: Float to temperature-match (30 minutes)
Float the bag or container in your tank for 20–30 minutes to equalize temperature. Plants are less temperature-sensitive than fish, but a 10°F shock on top of transplant stress is an avoidable insult.
Step 3: Trim before planting
Remove any leaves that are already damaged, yellowing, or heavily algae-covered — they won’t recover and they’ll rot in your tank, feeding algae. For stem plants, trim off the bottom inch and any emersed leaves that look unlikely to adapt; the plant wastes energy maintaining leaves it’s going to shed anyway. Keep the healthy growing tips — that’s where recovery starts.
Step 4: Plant correctly the first time
Follow our planting guide — right depth, crown exposed on rosettes, rhizomes unburied on epiphytes. Every uprooting and replanting restarts the acclimation clock, so get placement right on the first attempt. Decide where each plant goes before it goes in the water.
Step 5: Run a gentle first week
For the first 7 days after planting:
- Moderate light — run your normal photoperiod but consider dropping intensity 20–30% if your light is dimmable. Blast-level light on a melting plant grows algae on the dying leaves, not recovery.
- Stable CO2 — if you inject CO2, keep it consistent. Fluctuating CO2 during acclimation is a melt accelerator. If you’re low-tech, this doesn’t apply — see growing without CO2.
- Half-strength fertilizer — new plants with damaged leaves can’t use full dosing, and the excess feeds algae. Ramp to full strength over 2–3 weeks per our fertilizer schedule.
- No disturbance — don’t move, trim, or “check on” new plants for at least two weeks. Every touch resets root establishment. This is especially critical for crypts.
Step 6: Remove melt, keep the base
As emersed leaves melt, remove the mushy material promptly — decaying leaves release ammonia and grow fungus that can spread to healthy tissue. But never discard the plant while the crown, rhizome, or roots are firm and alive. A crypt that’s lost every leaf but has firm roots is a plant that’s about to recover, not a dead plant. Give it 3–4 weeks before judging.
Telling Normal Melt From Real Problems
Normal transition melt:
- Affects oldest/emersed leaves first, newest growth last
- New submersed leaves emerge even as old ones dissolve
- Roots and crown stay firm and white/green
- Timeline: 1–4 weeks, then obvious new growth
Concerning melt (see our full melting diagnosis guide):
- New growth also melts or emerges deformed
- Rhizome or crown turns mushy and brown — this is rot, not transition
- Entire plant dissolves within days with no new growth after 4+ weeks
- Melting spreads to established plants that weren’t recently moved
Buying Tips to Minimize Melt
- Buy submersed-grown when available — hobbyist-grown cuttings transition with almost no melt.
- Choose tissue culture for sensitive species — crypts and delicate stems establish far more reliably from sterile cups.
- Avoid plants already melting in the store tank — some melt is normal, but a plant that’s mostly mush at purchase has less energy for recovery.
- Transport carefully — keep plants damp and out of direct sun/heat. A plant that dries out or cooks in a hot car melts far worse than one transported properly.
The First-Month Timeline: What to Expect Week by Week
Knowing what’s normal when removes most acclimation anxiety. Here’s the typical timeline for a healthy plant adapting to a new tank:
Week 1: The quiet week
Almost nothing visible happens. The plant is growing roots you can’t see and assessing its new environment. Some species (vallisneria, stem plants) may start shedding their lowest leaves. This is normal. Resist the urge to “help” — no moving, no extra fertilizer, no light changes. The most common beginner mistake is intervening during a week when the correct action is nothing.
Week 2: Melt peaks
This is when emersed leaves give up in earnest. Crypts may drop everything; swords shed their broad aerial leaves; stem plants lose lower foliage. It looks catastrophic and it’s usually fine. Keep removing mushy material, keep conditions stable, and watch the crown and growing tips — if those are firm and green, recovery is already underway.
Week 3: The turn
New submersed-adapted leaves emerge — smaller, thinner, often a slightly different shade of green than the emersed foliage. Stem plant tips start growing visibly; crypts push tiny curled leaves from the crown; swords unfurl narrow ribbon leaves. This is the moment most beginners exhale for the first time.
Week 4+: Established
New growth outpaces melt, and the plant is functionally yours. You can resume full-strength fertilizer, normal trimming, and stop treating it as fragile. Some slow growers (anubias, bucephalandra) take 6–8 weeks to show obvious progress — that’s their normal speed, not a problem.
Acclimating Different Plant Formats
Tissue-culture cups
Sterile, pest-free, and already adapted to high-humidity (not emersed) growth — tissue cultures melt the least of any format. Rinse the agar gel off gently (leftover gel rots and feeds fungus), split the portion into small plantlets, and plant per our planting guide. They establish slowly for the first two weeks, then accelerate. No dip needed, minimal acclimation stress — this is the premium experience you’re paying for.
Potted plants
Remove the pot and strip away the rockwool completely — leftover rockwool traps debris and rots. Tease the root mass apart gently; if it’s a dense mat, splitting it into 2–3 smaller portions actually establishes faster than planting one big clump (more growing points, better water flow around roots). Potted plants are usually emersed-grown, so expect the standard 2–4 week melt cycle.
Bare-root / bunched stems
Typically sold as weighted bunches. Remove any bands, foam, or weights, strip the lower leaves, and plant stems individually or in small groups. Bunched stems from the store are often already transitioning — check for new submersed growth at the tips, which tells you the plant is mid-adaptation and will settle quickly.
Hobbyist cuttings
Already submersed-grown and the fastest to establish — often showing new growth within days. The main acclimation factor is water-parameter difference between the two tanks. Float to temperature-match, plant promptly, and they’ll usually take off with minimal melt. This is why experienced hobbyists prefer trading cuttings over buying potted plants.
Frequently Asked Questions
Should I use a “plant starter” or transplant fertilizer?
Products marketed for transplant shock are mostly B-vitamins and mild hormones. They don’t hurt, but there’s no strong evidence they help aquarium plants specifically. Stable conditions and patience outperform any bottle. Save the money for more plants.
My new plant melted completely — bare crown, no leaves. Is it dead?
Probably not, if the crown or rhizome is firm. Crypts and swords routinely lose 100% of their leaves and regrow from the base within a month. The test is firmness: firm and pale/green means alive; mushy and brown/black means rot. Give firm-but-leafless plants a full 4 weeks before declaring them dead.
Can I speed up acclimation with extra light or CO2?
No — and trying usually backfires. A melting plant can’t use extra light; the excess just grows algae on its dying leaves. Keep light moderate and CO2 stable (not boosted) during acclimation. Growth speed comes from the plant’s own adaptation timeline, which you can’t rush, only avoid delaying.
Should new plants go straight into my main display tank?
After quarantine/dipping, yes — there’s no benefit to a separate “growing-in” tank for most plants. They acclimate to your water fastest in the tank they’ll live in. The exception is very delicate species going into a tank with boisterous fish; give those a few weeks in a calm corner or breeder box first.
The Patience Rule
The single most important acclimation skill is restraint: plant it right, set gentle conditions, remove decay, and then leave it alone for a month. The hobbyists with the best plant growth aren’t doing something clever in week one — they’re simply not interfering in weeks two through four while the plants do what they’ve evolved to do. Melt looks like failure and feels like failure, but in most cases it’s the visible part of a plant successfully becoming yours.